
Your front yard is making a first impression whether you’ve thought about it or not. The question is whether that impression is “someone lives here” or “someone made a decision here.”
Black rock landscaping is one of those decisions that sounds easy until you see someone do it badly. Dumped around a shrub with no edging, no contrast, no structure — it just looks like the mulch ran out. Done right, it reads as intentional, modern, and low-maintenance in the best possible sense.
These yards got it right. Here’s how to copy them.
Your Yard Has No Visual Anchor
Most front yards fail before a single plant goes in. They’re flat, they’re undirected, and everything competes equally for attention. Nothing wins. Black rock fixes this — but only if you use it to create a focal point, not just fill space.
The Absent Focal Point Problem
Walk to the street and look at your front yard. Where does your eye go first?
If the answer is “nowhere in particular,” that’s the problem. A good yard has a hierarchy. Something anchors it. Everything else supports that anchor.
Black rock works as a backdrop for exactly this reason. Its darkness recedes visually. It makes whatever you plant in it — a palm, an agave, a clump of ornamental grass — pop forward with real force. Without that backdrop, plants just sit there looking like plants.
Edging That Does Nothing
Loose black rock with no containment is a maintenance nightmare. It migrates. It ends up on the lawn, in the driveway, halfway down the street after a rainstorm.
Steel edging or treated timber borders are non-negotiable. They keep the rock where it belongs and — just as importantly — they create the clean geometric lines that make a black rock bed look intentional rather than accidental.
The border is part of the design. Treat it that way.
Choosing the Wrong Rock Size
River pebbles in the 1–2 inch range are the sweet spot for most residential yards. Smaller than that and the yard reads as gravel. Larger than that and you start approaching boulder territory, which requires a different design language entirely.
For a polished look, go with smooth, rounded Mexican beach pebbles. For something more textural and matte, tumbled black basalt. They behave differently in light — one glints, one absorbs — and that distinction matters when the afternoon sun hits your yard at a low angle.
The Contrast Logic Nobody Explains
Black rock is not a standalone material. It exists to serve contrast. Every yard here that works follows the same underlying logic: dark ground, light or bright elements, clean separation between zones.
Light Against Dark
The most common mistake is planting dark-foliaged plants into black rock. It disappears. The whole point collapses.
Go the other direction. Silver-blue agaves, pale ornamental grasses, white concrete spheres, white river rock — anything that reads light against dark. The contrast is what creates the visual interest. Without it, you just have a very dark yard.
Structure Before Plants
Plants grow, change shape, die. Rock and edging stay. That means the bones of your design — the geometry of the beds, the line of the border, the placement of any hardscape — need to carry the space even when the plants are young and haven’t filled in yet.
Design the rock beds as shapes first. Then decide what goes inside them. Not the other way around.
The Transition Between Materials
Where your black rock meets another surface — lawn, pavement, concrete — that transition line is where the design either holds together or falls apart.
A sharp, consistent edge is worth every dollar of effort. Use a half-moon edger or a spade to cut a clean line into the lawn before you lay the edging. An inch of slop in that border undoes everything else.
Black Rock Landscaping Ideas
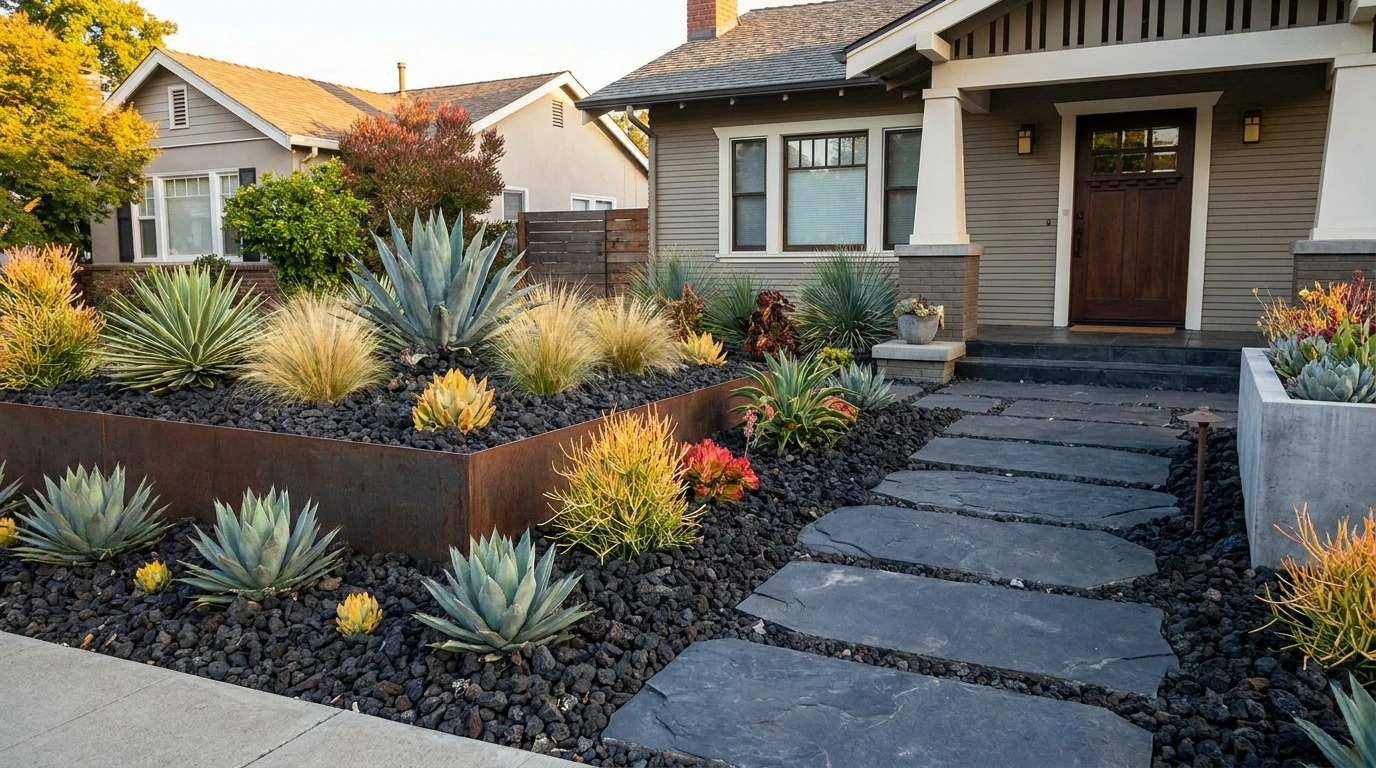
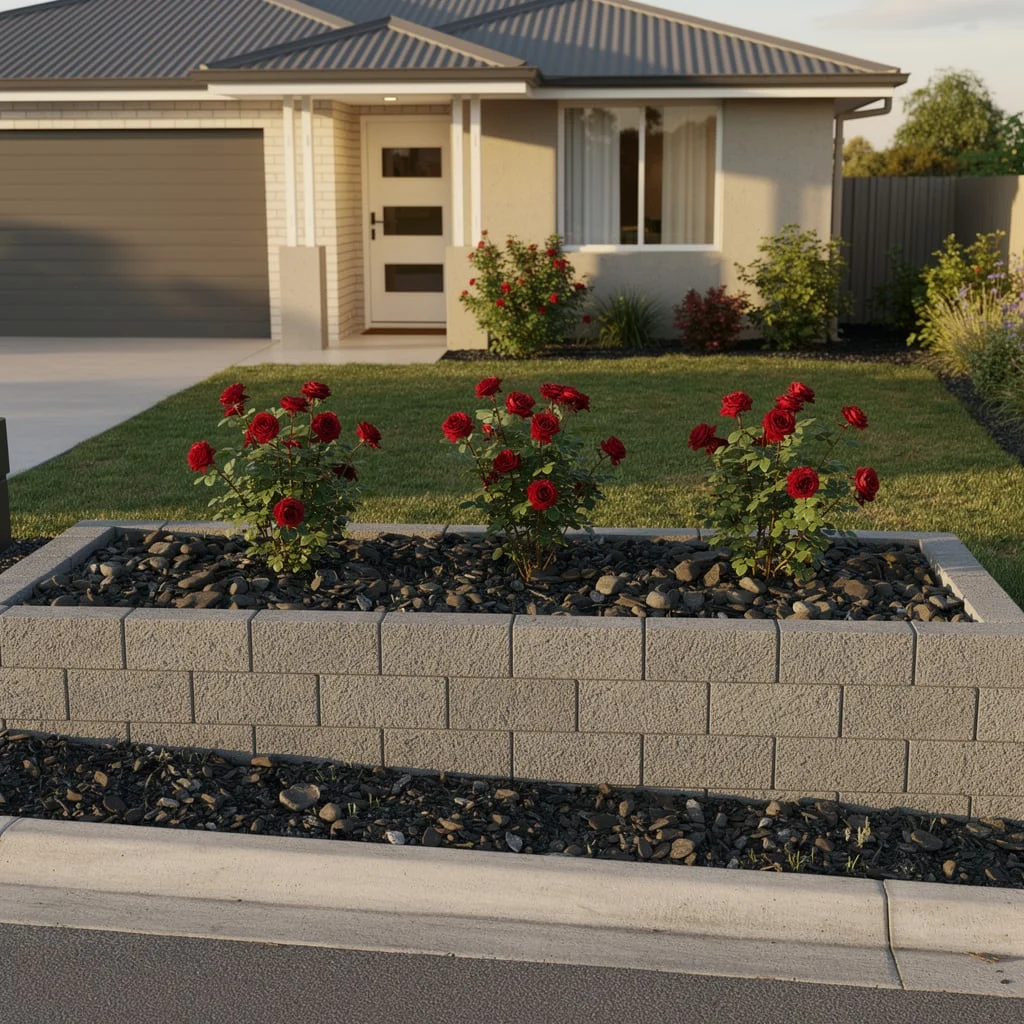
Agave, Palm, White Spheres
Start by building a geometric raised bed using treated timber as the border — square corners, clean edges, consistent height of about 4–6 inches above the surrounding pavement. Lay commercial-grade landscape fabric inside the bed before filling, pinning the edges firmly under the timber. Fill with smooth black Mexican beach pebbles to just below the timber rim, leaving the fabric fully covered.
Position a single blue-grey agave off-center as the primary anchor. Its spiky, architectural form is what the whole bed is designed to frame. Behind it, plant a slim ornamental palm — a Majesty Palm or Areca works well — for vertical contrast and tropical softness against the hard geometry of the edging.
Place two or three white concrete garden spheres in the foreground in a loose triangular grouping — not in a line, not evenly spaced. The size variation matters: one large sphere around 14 inches, two smaller ones at 8–10 inches. Source them from garden centres or cast your own using concrete mix poured into rubber ball moulds from a sporting goods store. Seal them with exterior stone sealer to prevent weathering. The spheres are the detail that elevates this from a rock bed into a composed space.
Corten Steel Terraced Beds
Use corten weathering steel retaining panels — available in pre-cut lengths from landscape suppliers — to create two or three stepped levels in a flat or gently sloped yard. The panels come pre-rusted or develop their characteristic orange patina within the first season. Set each panel into a shallow trench, backfill firmly, and check for level before the concrete sets. The panels will hold their shape without further support up to about 400mm height; anything taller needs internal steel stakes.
Fill the upper platform with fine white angular gravel — not rounded pebbles — as the patio or entertaining surface. The angular gravel compacts underfoot and drains well, making it genuinely usable rather than decorative. Fill the lower planting zones between the corten walls with ornamental grasses: pennisetum or miscanthus planted in tight rows parallel to the steel panels.
The design works because it is three distinct things — rust-orange steel, white gravel, green-gold grass — with no competing elements. Do not add flowers, ornaments, or additional plant species. The restraint is the entire point. Every additional element dilutes the effect.
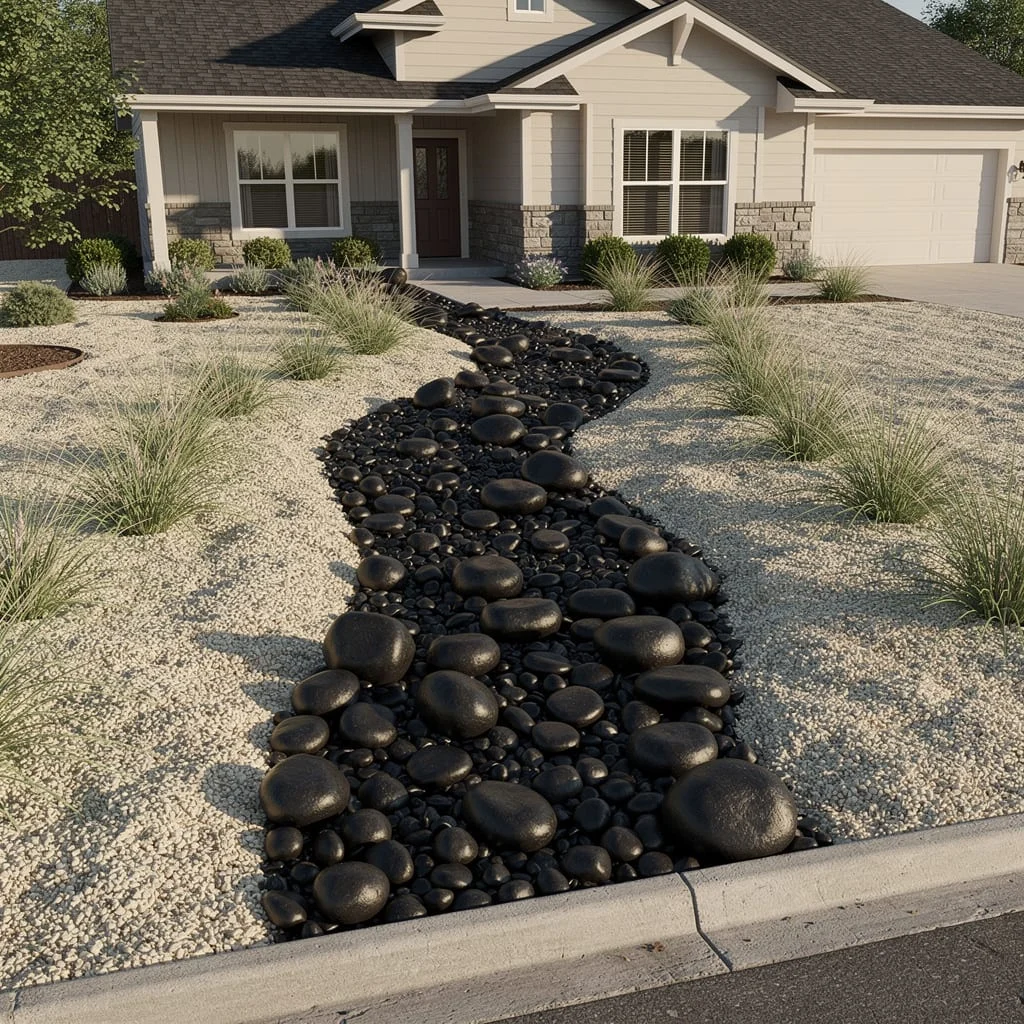
White and Black River Stone Curves
Begin by laying out the shape of your curved bed using a garden hose on the ground. Adjust until the curve is generous and sweeping — not a short wiggle but a full arc that reads from the street. Trace the line, then install your steel edging along it. This outer curve defines the perimeter of the entire composition.
Inside the bed, install a second steel edging strip roughly 12–18 inches inside the first, following the same curve. This inner strip divides the bed into two bands. Fill the outer band with black Mexican beach pebbles. Fill the inner band, closest to the planting zone, with white tumbled river pebbles. The steel strip between them keeps the colours from mixing at the boundary, which is what makes the contrast read as intentional rather than accidental.
Plant the interior planting zone — the area inside the white rock band — with a mix of lush tropical groundcovers and small flowering perennials. Bromeliads, compact Bird of Paradise, or low-growing Agapanthus all work well. The greenery anchors the composition and gives the eye somewhere to land after travelling along the two curved bands of contrasting stone.
Lawn With Dark Mulch Perimeter
Lay fresh sod or overseed to establish a dense, even lawn as the primary surface. Before laying the sod, install steel garden edging around the full perimeter of the lawn zone — this edge is what separates the lawn from the dark mulch borders and it needs to be sharp and consistent. Flare it very slightly outward at the base so it holds against the mulch pressure.
Fill the border zone between the edging and the fence or foundation with a 3–4 inch layer of dark hardwood bark mulch. Go dark — almost black. The colour contrast between the mulch and the lawn is what makes the lawn read as vivid green rather than just green. Plant the border sparsely: a few compact shrubs at generous spacing — 900mm to 1200mm apart — so the dark mulch ground remains visible as a deliberate design element.
When you mow, alternate your mowing direction with each pass to create the two-tone stripe effect visible in this yard. Mow in one direction for the first pass, then in the perpendicular direction on the next pass. The light catches the bent grass blades differently in each direction, creating stripes that look like high effort and cost nothing. It requires only that you are consistent.
Boulder and Silver Groundcover Slope
Select three to five large boulders in sandstone or warm limestone — each at least 500mm across and ideally irregular in shape. The variation between them matters. Avoid boulders that are all the same size or all the same roughly spherical form. Excavate a hole for each boulder approximately one-third of its height and set it in, backfilling and tamping firmly around the base so it sits as if it has always been there rather than placed yesterday.
Plant between and around the boulders with spreading silver-grey groundcovers: woolly thyme, Stachys byzantina, silver carpet, or low-growing Artemisia. These plants spread slowly and hold the slope soil against erosion while their silver-grey tone creates the colour contrast with the warm stone. Space plants at 300–400mm centres and they will cover the bare soil within one season.
Add occasional clusters of pink or magenta flowering plants between the groundcover — dianthus, gaura, or verbena bonariensis all work at this scale. Keep the clusters tight — three plants each — and distribute them irregularly across the slope rather than evenly spaced. Finish the base of the slope with a clean, tightly mowed lawn edge that runs parallel to the footpath or driveway. That sharp transition between the planted slope and the manicured lawn is what gives the whole composition its resolution.
Black Rock Driveway Border
Lay a continuous black pebble bed along the full length of a driveway edge or house foundation. Keep it wide — at least 3 feet — so the rock reads as a substantial zone rather than a thin strip. Install steel garden edging on the lawn side before you lay a single pebble, making sure the edge follows a smooth, slightly curved line rather than a rigid straight one.
Insert solar pathway lights at irregular intervals into the pebble bed. Do not space them evenly — vary the distance between them and angle alternate lights slightly differently so they read as placed rather than installed. The contrast between the glossy black pebbles and the warm glow of the lights at dusk is what makes this work at night as much as during the day.
Plant clusters of bright warm-toned flowers — gaillardia, orange zinnia, or red echinacea — in small groups between the lights. Their colour hits hard against the black. Keep the groupings tight: three plants per cluster, not one plant at a time scattered along the length of the bed.
Silver Shrubs With Dark Mulch Border
Lay fresh sod or overseed to establish a dense, even lawn as the primary surface. Before laying the sod, install steel garden edging around the full perimeter of the lawn zone — this edge is what separates the lawn from the dark mulch borders and it needs to be sharp and consistent. Flare it very slightly outward at the base so it holds against the mulch pressure.
Fill the border zone between the edging and the fence or foundation with a 3–4 inch layer of dark hardwood bark mulch. Go dark — almost black. The colour contrast between the mulch and the lawn is what makes the lawn read as vivid green rather than just green. Plant the border sparsely: a few compact shrubs at generous spacing — 900mm to 1200mm apart — so the dark mulch ground remains visible as a deliberate design element.
When you mow, alternate your mowing direction with each pass to create the two-tone stripe effect visible in this yard. Mow in one direction for the first pass, then in the perpendicular direction on the next pass. The light catches the bent grass blades differently in each direction, creating stripes that look like high effort and cost nothing. It requires only that you are consistent.
Flat Stone Garden Pond
Excavate an oval or kidney shape approximately 8–10 feet at its widest and 18–24 inches deep, with the sides sloping inward slightly toward the base. Smooth the excavated surface and remove any sharp stones that could puncture the liner. Line the entire excavation with a layer of sand, then lay a black EPDM rubber pond liner over it, pressing it firmly into the contours and leaving at least 12 inches of excess at the perimeter.
Lay flat sandstone slabs around the rim of the pond, overlapping the liner edge by 2–3 inches. The slabs disguise the liner and create the finished edge. Bed them in a thin mortar mix on top of the liner flap so they cannot shift. Keep the rim level so the water surface sits uniformly close to the stone edge all the way around.
Plant aquatic irises — purple and yellow flag varieties — in submerged aquatic planting baskets positioned at the pond margins at a depth of 6–8 inches. Add a single submersible fountain pump to create gentle surface movement, which keeps the water oxygenated and prevents stagnation. Keep the surrounding lawn tightly mowed. The contrast between the still dark water and the close-cut grass is the composition this pond depends on.
Cedar Boardwalk Through Groundcover
Build the boardwalk from cedar decking boards laid across 2×4 cedar sleepers set directly on compacted ground or on short concrete piers if the ground is soft. The path needs to be wide enough for two people side by side — 1200mm minimum. Frame each edge with a 2×4 rim joist on both sides, fastened flush with the deck surface. Leave a 4–5mm gap between boards for drainage and natural expansion movement in the timber.
Design the path with one or two gentle bends rather than a straight run. Lay a garden hose on the ground to find the bends before you commit to the framing. The bends are what make the path feel like part of the garden rather than a shortcut through it. Stain the cedar a warm honey tone or leave it untreated to weather naturally to silver — both read well against the surrounding planting.
Surround the entire boardwalk with a low ground-cover planting that is allowed to grow right up to the edge of the timber. Blue star creeper, creeping thyme, or forget-me-nots all work at the scale of a residential boardwalk. The planted ground should feel like it’s claiming the path rather than the path cutting through bare soil. Plant densely at installation — spacing plants at half the recommended distance — and they will knit together within a single growing season.
Sandstone Patio With Stone Retaining Wall
Choose split-faced sandstone or limestone blocks for the retaining wall — the rough-textured split face is the aesthetic, not a compromise. Stack the blocks in a running bond pattern, keeping the top course perfectly level. If the wall will exceed 600mm in height, set a concrete footing below the first course and tie the wall back with geogrid reinforcement every two or three courses. For walls under 600mm on stable ground, a compacted gravel base is sufficient.
Lay the patio surface in large-format sandstone tiles matching the wall material — the visual continuity between the wall and the floor surface is what gives this composition its coherence. Use a running bond layout, keeping grout lines tight at 10mm. Bed the tiles on a 50mm sand and cement screed, checking each tile for level and for a slight fall away from the house for drainage. Let the screed cure fully before grouting.
Plant the lower bed in front of the wall with trailing rosemary or silver prostrate groundcovers — curry plant, Convolvulus cneorum, or prostrate grevillea all work well in warm climates. These plants should eventually cascade down the wall face, softening the hard block edge. Place a small outdoor dining setting centred on the patio: a round table and two or four chairs. That is enough. The restraint of the furnishing is part of what makes the patio read as generous in scale.
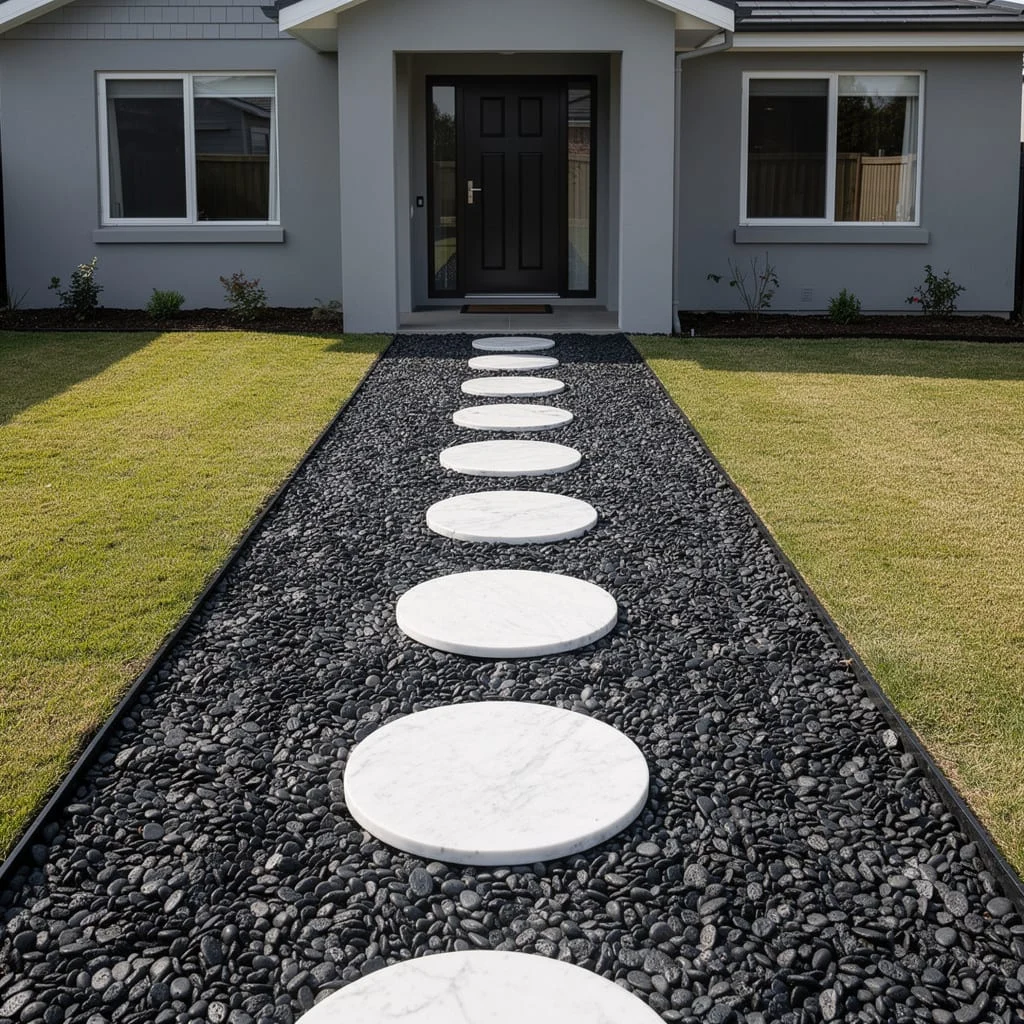
Floating Stone Slab Path
Choose large-format dark grey or black porcelain or bluestone slabs — minimum 24 inches wide and all cut to the same width. This consistency is non-negotiable. Varying widths undermine the whole effect. Lay a base of compacted decomposed granite or crushed rock as the path substrate, levelling it carefully so the finished slabs sit flat with no rocking.
Set the slabs with deliberate gaps between each one — 2 to 3 inches, consistent throughout. Fill those gaps with fine black gravel, raked flush with the slab surface. The fine gravel in the gaps and the larger pebbles in the surrounding bed are two distinct textures, and that distinction is part of the design. Do not use the same rock size throughout.
Edge both sides of the path zone with ornamental grass or low tropical groundcover planted directly into the surrounding black pebble bed. The grass should be close enough to brush the edges of the slabs as it matures. That softness against the hard edge of the stone is what completes the look.
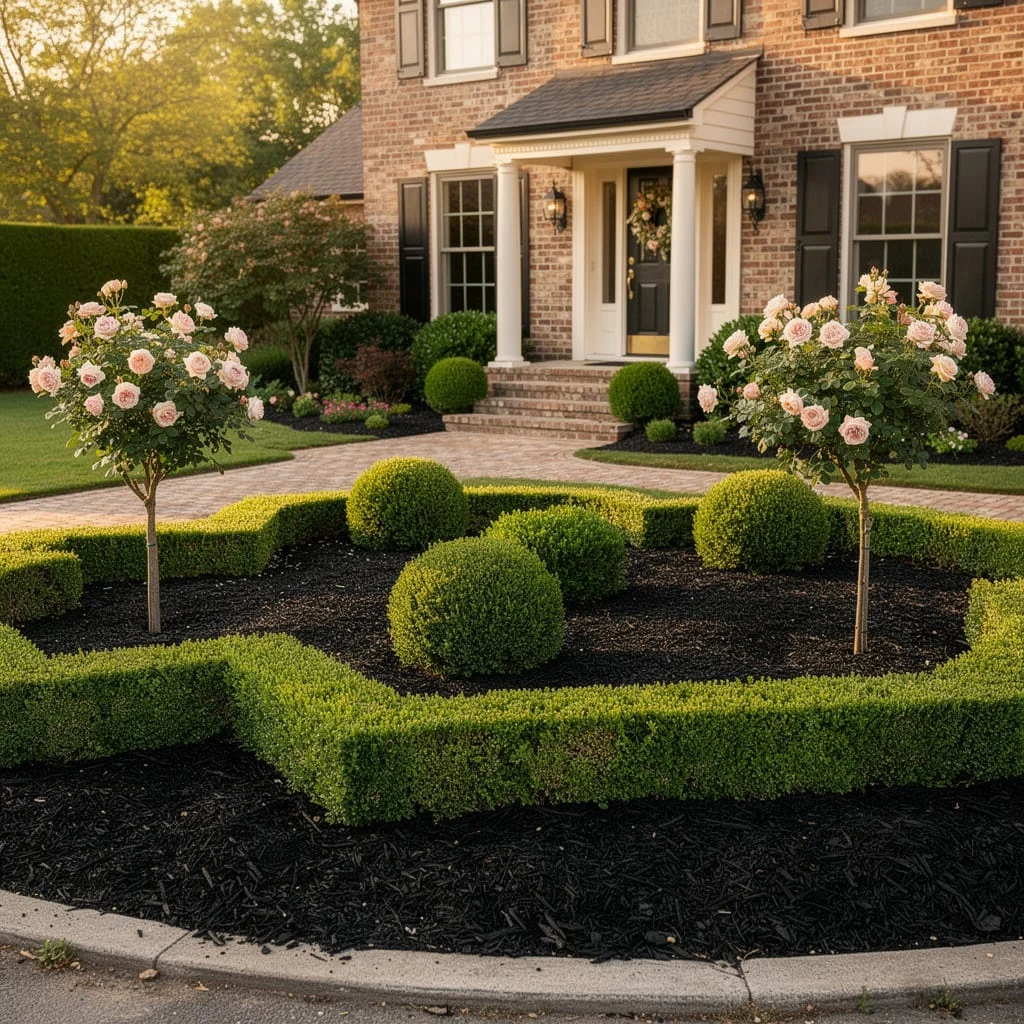
Tiered Stone Wall With Roses and Lavender
Build your retaining wall using rough-cut sandstone or limestone blocks in a dry-stack configuration — no mortar, blocks laid with their longest face horizontal and each course set slightly back from the one below for structural stability. The wall face should have natural texture variation. Machine-cut blocks with uniform faces will not give you the warmth this design depends on.
Plant the lowest terrace with catmint or creeping thyme as a spreading silver-blue ground layer. Space plants 30–40cm apart and they will fill in within one growing season. Add compact shrub roses at the mid-tier — choose varieties that stay under 60cm to avoid overcrowding — and plant them in loose clusters of three rather than single specimens evenly spaced. The clusters read as deliberate; the evenly spaced singles read as nervous.
At the top tier, plant ornamental grasses for soft vertical movement against the brick wall behind. Blue oat grass or Karl Foerster feather reed grass both work well at this scale. Mulch all beds with dark bark mulch to make the stone wall, the plant colours, and the foliage all read with maximum clarity against each other.
Desert Slope With Cacti and Agave
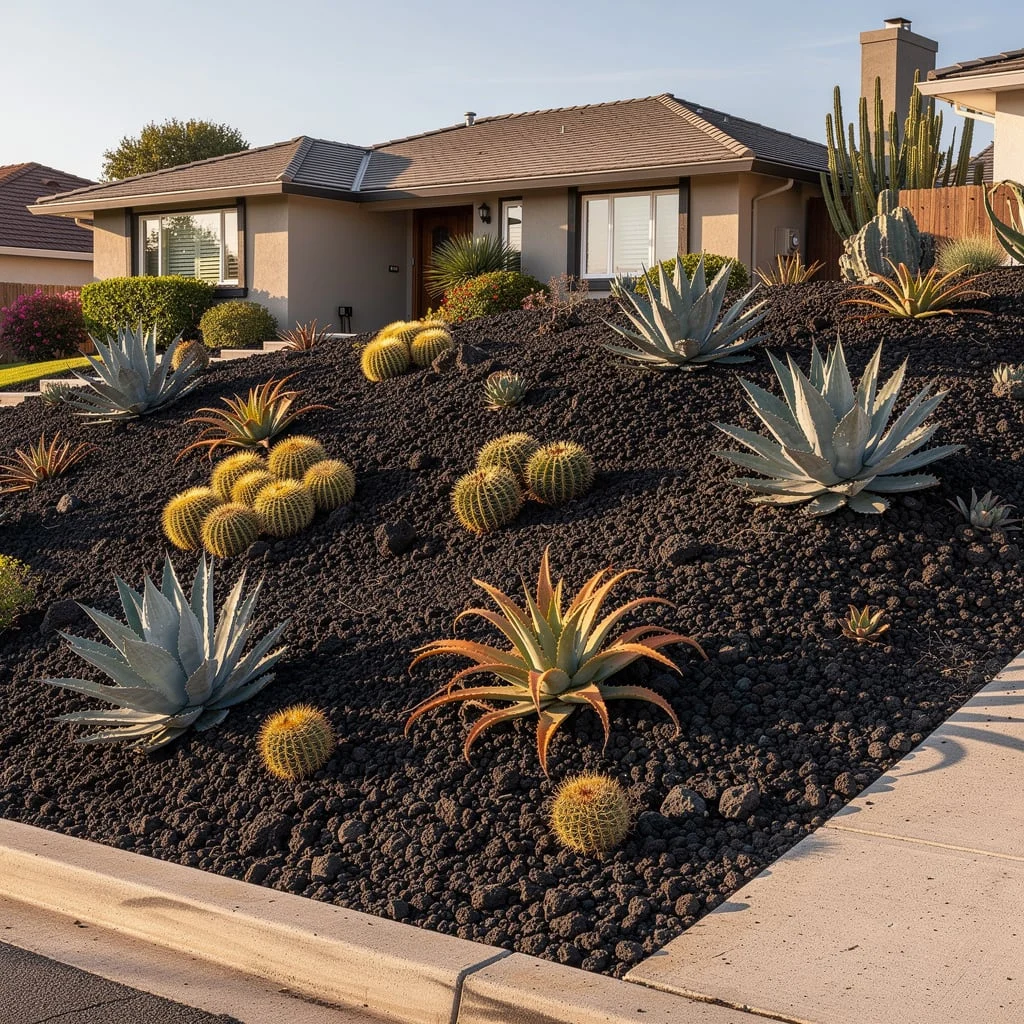
Select three to five large boulders in sandstone or warm limestone — each at least 500mm across and ideally irregular in shape. The variation between them matters. Avoid boulders that are all the same size or all the same roughly spherical form. Excavate a hole for each boulder approximately one-third of its height and set it in, backfilling and tamping firmly around the base so it sits as if it has always been there rather than placed yesterday.
Plant between and around the boulders with spreading silver-grey groundcovers: woolly thyme, Stachys byzantina, silver carpet, or low-growing Artemisia. These plants spread slowly and hold the slope soil against erosion while their silver-grey tone creates the colour contrast with the warm stone. Space plants at 300–400mm centres and they will cover the bare soil within one season.
Add occasional clusters of pink or magenta flowering plants between the groundcover — dianthus, gaura, or verbena bonariensis all work at this scale. Keep the clusters tight — three plants each — and distribute them irregularly across the slope rather than evenly spaced. Finish the base of the slope with a clean, tightly mowed lawn edge that runs parallel to the footpath or driveway. That sharp transition between the planted slope and the manicured lawn is what gives the whole composition its resolution.
Formal Rose Bed With Block Retaining Wall
Build your retaining wall using rough-cut sandstone or limestone blocks in a dry-stack configuration — no mortar, blocks laid with their longest face horizontal and each course set slightly back from the one below for structural stability. The wall face should have natural texture variation. Machine-cut blocks with uniform faces will not give you the warmth this design depends on.
Plant the lowest terrace with catmint or creeping thyme as a spreading silver-blue ground layer. Space plants 30–40cm apart and they will fill in within one growing season. Add compact shrub roses at the mid-tier — choose varieties that stay under 60cm to avoid overcrowding — and plant them in loose clusters of three rather than single specimens evenly spaced. The clusters read as deliberate; the evenly spaced singles read as nervous.
At the top tier, plant ornamental grasses for soft vertical movement against the brick wall behind. Blue oat grass or Karl Foerster feather reed grass both work well at this scale. Mulch all beds with dark bark mulch to make the stone wall, the plant colours, and the foliage all read with maximum clarity against each other.
Circular Mulch Tree Rings
Lay fresh sod or overseed to establish a dense, even lawn as the primary surface. Before laying the sod, install steel garden edging around the full perimeter of the lawn zone — this edge is what separates the lawn from the dark mulch borders and it needs to be sharp and consistent. Flare it very slightly outward at the base so it holds against the mulch pressure.
Fill the border zone between the edging and the fence or foundation with a 3–4 inch layer of dark hardwood bark mulch. Go dark — almost black. The colour contrast between the mulch and the lawn is what makes the lawn read as vivid green rather than just green. Plant the border sparsely: a few compact shrubs at generous spacing — 900mm to 1200mm apart — so the dark mulch ground remains visible as a deliberate design element.
When you mow, alternate your mowing direction with each pass to create the two-tone stripe effect visible in this yard. Mow in one direction for the first pass, then in the perpendicular direction on the next pass. The light catches the bent grass blades differently in each direction, creating stripes that look like high effort and cost nothing. It requires only that you are consistent.
Cedar Raised Vegetable Beds
Build each raised bed from untreated cedar 2×10 or 2×12 boards. Cedar is naturally rot-resistant and does not require chemical treatment — do not use pressure-treated pine for vegetable growing unless it carries an approved food-safe rating. Assemble each bed as a simple rectangle using exterior timber screws driven through corner posts, checking for square before fastening. A diagonal measurement from corner to corner, both ways, should be identical.
Arrange the beds in a tiered layout: one large outer bed forming the base level, a medium inner bed set slightly higher and behind it, and a smaller back bed at the highest point. This graduated height gives you reach into each bed and creates the layered profile visible from the house. Fill each bed with a mix of one-third topsoil, one-third compost, and one-third perlite or coarse sand. The mixture should feel light and friable, not dense. Mound it slightly above the rim of the boards.
Plant the tallest crops — tomatoes, pole beans — at the back of the highest bed with bamboo or hardwood stake supports tied loosely at the top. Plant leafy greens and brassicas in the middle tier. Reserve the front and lowest bed for herbs, salad leaves, and low spreading crops. Insert the stakes before planting, not after, to avoid disturbing roots. The visual logic of tall at the back, low at the front is both practical for light access and compositionally satisfying from the viewing position at the house.
Formal Boxwood and Rose Standard Garden
Lay fresh sod or overseed to establish a dense, even lawn as the primary surface. Before laying the sod, install steel garden edging around the full perimeter of the lawn zone — this edge is what separates the lawn from the dark mulch borders and it needs to be sharp and consistent. Flare it very slightly outward at the base so it holds against the mulch pressure.
Fill the border zone between the edging and the fence or foundation with a 3–4 inch layer of dark hardwood bark mulch. Go dark — almost black. The colour contrast between the mulch and the lawn is what makes the lawn read as vivid green rather than just green. Plant the border sparsely: a few compact shrubs at generous spacing — 900mm to 1200mm apart — so the dark mulch ground remains visible as a deliberate design element.
When you mow, alternate your mowing direction with each pass to create the two-tone stripe effect visible in this yard. Mow in one direction for the first pass, then in the perpendicular direction on the next pass. The light catches the bent grass blades differently in each direction, creating stripes that look like high effort and cost nothing. It requires only that you are consistent.
Driveway Strip With Ornamental Grasses
Use corten weathering steel retaining panels — available in pre-cut lengths from landscape suppliers — to create two or three stepped levels in a flat or gently sloped yard. The panels come pre-rusted or develop their characteristic orange patina within the first season. Set each panel into a shallow trench, backfill firmly, and check for level before the concrete sets. The panels will hold their shape without further support up to about 400mm height; anything taller needs internal steel stakes.
Fill the upper platform with fine white angular gravel — not rounded pebbles — as the patio or entertaining surface. The angular gravel compacts underfoot and drains well, making it genuinely usable rather than decorative. Fill the lower planting zones between the corten walls with ornamental grasses: pennisetum or miscanthus planted in tight rows parallel to the steel panels.
The design works because it is three distinct things — rust-orange steel, white gravel, green-gold grass — with no competing elements. Do not add flowers, ornaments, or additional plant species. The restraint is the entire point. Every additional element dilutes the effect.
Elevated Deck Over Planted Slope

Build the deck platform off the back of the house using 6×6 treated pine or hardwood posts set on concrete footings below the frost line. Space the posts at no more than 1800mm centres and keep them consistently plumb — any lean will be visible and will look like a mistake from the garden below. The posts are not something to hide. They are structural and they are architectural. Keep them cleanly finished and evenly spaced.
Choose western red cedar or treated hardwood for the deck boards rather than pressure-treated pine. Cedar weathers to a warm silver-grey tone that reads as intentional; treated pine weathers to a cold greenish grey that reads as unfinished. Leave a 4–5mm gap between boards for drainage and thermal expansion. Install a simple balustrade with vertical balusters at consistent spacing — no diagonal patterns, no decorative cutouts.
Plant the sloped area beneath and around the deck with shade-tolerant species suited to the climate: ferns, Liriope, hostas, or native groundcovers. Fill between the plants with bark mulch in a dark tone. The planted slope visible through the deck posts from the garden level is the view from below — it should feel like a garden, not like the underside of a structure. Keep the planting varied in height and texture, but restrained in the number of species. Three or four plants repeated in groupings across the slope is more coherent than a dozen different plants competing for attention.
Final Thoughts
Every yard in this list made one committed decision and built everything else around it. Not a dozen small decisions that add up to something. One decision, followed through.
That commitment is harder than it sounds. It means resisting the urge to add one more thing, plant one more species, introduce one more material. The spaces that read as designed are the ones that stopped at the right moment.
Black rock gives you the clarity to stop. Its darkness simplifies. It reduces the visual noise until whatever you’ve placed in it stands out with real authority.
Pick one idea. Do it properly. The front yard will do the rest of the work on its own.