

A flat yard is a blank page. A sloped yard is a yard that already has an idea.
The slope is not the problem. The lack of response to it is the problem.
Most sloped backyards fall into one of two failure modes. The first is ignoring the slope entirely — mowing over it, running grass up and over the grade change, watching it erode every time it rains, maintaining a lawn that nobody actually uses because it tilts at an angle that makes sitting, playing, or entertaining impossible.
The second is the expensive contractor solution that treats the slope like a mistake to be corrected — cut and fill earthworks that produce a flat yard by removing everything interesting about the original terrain.
There is a third way. Work with the slope. Use the grade change to create levels that organise the space, terraces that create enclosed garden rooms, retaining walls that become features rather than infrastructure, and paths that make the grade change part of the journey through the garden rather than an obstacle in it.
Every slope is an opportunity. What follows is a collection of the ways to take it.
Why Sloped Backyards End Up as Neglected Lawn
The path of least resistance on a sloped backyard is to seed it or sod it and mow it. It requires no design decision, no structural investment, no thought.
Mowable Grass on a Steep Slope Is Not a Design Decision, It’s a Deferral
Grass on a slope that exceeds about 15 degrees becomes a maintenance problem. The mower struggles with it. The soil erodes when it rains because the grass root system cannot hold the moisture or the grade. In dry periods the slope browns out before the flat lawn does.
The result is a yard that reads as half-finished — a flat lawn area near the house that works reasonably well, and a sloping section behind it that nobody quite knows what to do with.
Treating the slope as simply more lawn is not neutrality. It is a decision to avoid the design question. And the question is worth asking, because the slope almost always contains the most interesting spatial possibilities in the garden.
Terracing Sounds Expensive Because People Think Structural Retaining Walls First
The word “terracing” conjures engineering permits, concrete formwork, and contractor bills. This is not always what it means.
A modest slope can be terraced with timber sleepers at a cost that competes with laying turf over the same area. A steep slope can be terraced with Corten steel or natural stone at an investment that any quality fence represents.
The issue is not cost. The issue is that terracing requires a spatial decision first — deciding how the levels are organised, how transitions between them are managed, what each level is for — and most people are not comfortable making those decisions without help.
The Slope Has Grade but Most Yards Also Have a View or a Backdrop
A yard that runs uphill from the house has something most flat yards lack: a backdrop. The slope rises and provides a green or planted wall behind the outdoor living area. This is a landscape advantage, not a disadvantage.
A yard that runs downhill from the house has something rarer still: an elevated perspective. The outdoor living area sits above the slope and looks out over whatever lies beyond — garden, trees, borrowed landscape, a view of the neighbourhood at a different scale.
Both conditions are more interesting than flat ground in every direction. The design needs to acknowledge and amplify that interest.
The Structural Decisions That Determine Everything on a Slope
Before any plant goes in the ground on a slope, structural decisions must be made. The sequence matters because structural elements on a slope are permanent, expensive to change, and determine the usable layout of every space.
The Retaining Wall System Determines the Spatial Plan
Every terraced slope requires retaining walls. The question is not whether to build them — it is how many levels, how high each wall, what material, and what happens in the planting beds between them.
A single retaining wall that captures the full grade change in one step creates a bold, dramatic level change that suits a contemporary property with a large garden. Multiple lower walls that step up the grade in smaller increments creates a softer, more layered composition that reads as garden rather than engineering.
The wall material determines the character: dry-stacked natural stone reads as cottage and established; Corten steel reads as contemporary and bold; treated pine sleepers read as informal and approachable; concrete block reads as durable and modern if finished well or industrial if not.
Choose the wall system before choosing the plants. The plants follow from the character of the walls, not the other way around.
The Path System Is the Spine of the Sloped Garden
On flat ground, paths are navigational. On sloped ground, paths are structural — they manage the grade change, create the transitions between levels, and determine how the garden is experienced.
Steps set into a slope become design features. A stone staircase set into a wildflower slope is an invitation. Timber boardwalk sections that zigzag up a gentle grade while flowering groundcover grows between and around them become the primary design element of the space. Flagstone steps with broad treads and low risers that descend a shaded woodland slope toward a view become the journey itself.
Plan the path system before the terracing, because the path positions determine where transitions between levels fall and how the grade is negotiated.
The Top of the Slope and the Bottom of the Slope Are Different Spaces
A sloped backyard has two primary zones: the space near the house (usually the bottom of the slope if the house sits high, or the top of the slope if the land falls away) and the far end of the slope.
These zones have different functions, different light conditions, and different visual relationships to the house. The zone near the house is typically used for outdoor living. The far end of the slope — whatever is at the top or bottom of the grade — is typically the backdrop, the view, or the growing ground.
Design them as different spaces rather than a continuous sloping plane. Give each its own identity. Connect them with a considered path.
Sloped Backyard Landscaping Ideas Worth Replicating
The Lakefront Before and After:
On a lakefront property with a steep slope to the water, the primary design challenge is navigation — creating a path from the house level down to the water that is safe, enjoyable, and integrated with the planted slope rather than imposed on it.
Replace the existing iron staircase with a spiral staircase in black powder-coated steel positioned against the house wall. This frees up the slope for the path and planting rather than consuming width with a straight stair run.
Lay a flagstone path down the slope in irregular natural stone — warm sandstone or limestone in large irregular pieces bedded in compacted gravel. The path should be generous in width — 900mm minimum — with each stone bedded firmly and set at a slight backward slope so water runs off rather than pooling on the surface. Space the stones at a natural walking stride.
Install low-voltage path lights on stakes either side of the flagstone at intervals that provide pool-to-pool lighting without creating glare. These lights transform the path from a daytime feature to an evening experience.
Plant either side of the path with native shade plants appropriate to the local climate and the conditions of a waterfront slope: ferns, Liriope, compact native shrubs, and creeping groundcovers that stabilise the bank between stones.
The principle of this transformation — clear the slope of everything unplanned, create one clear navigational spine, plant around it with intention — applies to any sloped property with a view or destination at the bottom.
The Stacked Cedar Planter Terraces on a Fence-Line Slope
Cedar plank raised beds, stacked in ascending tiers up a slope adjacent to a fence, convert an unusable sloping strip into a productive growing system. This is the most practical and most cost-effective slope solution for a narrow side yard or sloping garden strip.
Build each tier from 150 x 50mm cedar planks joined at the corners with internal timber cleats or galvanised angle brackets. The internal dimensions should be at least 400mm deep to provide adequate root run for vegetables, herbs, and flowering plants.
Step each tier up the slope by one plank height — approximately 150mm. The stagger creates the appearance of a continuous terraced system while each box is structurally independent.
Plant the lower, most accessible tiers with edibles and herbs — tomatoes with bamboo cane support, leafy brassicas, thyme and rosemary at the front edge. Plant the upper tiers with ornamental flowering plants — the height means they are visible from the lower garden and provide a backdrop to the functional planting below.
Lay concrete stepping pads or flat stone slabs as a path between the tiers and the adjacent fence, giving access to each bed for planting and harvesting.
The Full Slope Wildflower Garden with Stone Steps and Bark Mulch Path
This is the most naturalistic and most maintenance-forgiving slope solution available. A full slope converted to a dense wildflower and perennial planting, traversed by a stone step and bark mulch path, reads as a designed meadow rather than a landscaped garden.
Source large-format irregular flagstone or bluestone pieces for the steps. Each step should be a single stone, as large as possible — aim for minimum 600mm depth and 800mm width. Bed each stone with a 150mm compacted gravel base and set the back edge of each stone slightly higher than the front edge so water drains off the tread rather than pooling.
Between the stone steps, spread bark mulch at 100mm depth as the path surface. The mulch provides a naturalistic path that looks intentional against the adjacent planting.
Seed or plant the slope on both sides of the path with a mixed perennial and wildflower scheme suited to the light conditions. In full sun: Rudbeckia, Echinacea, Salvia nemorosa, Achillea, and catmint. In part shade: Astilbe, Geranium, Veronica, and Leucanthemum. The key is density — the plants should be able to compete with each other and with weeds once established, which requires correct spacing at planting.
This scheme is extremely low maintenance once established in years two and three. The first year requires weeding around plants while they establish. After that, the plant canopy covers the soil and the maintenance consists only of cutting back in late winter.
The Timber Hill Fort Backyard:
A sloped backyard with young children in the house is actually a design gift. The slope provides elevation. Elevation provides slides, lookout platforms, and the sense of height that makes outdoor play genuinely exciting for children.
Build a timber play platform at the top of the slope — a level decked area in treated pine at approximately 600 to 800mm above the lower garden level, enclosed with a low railing in the same timber. This platform is the lookout and the start of the slide.
Embed a timber slide into the slope itself — the grade provides the structural base and means the slide needs no independent frame beyond the channel itself. A straight slide with 40 to 50mm solid timber sides and a smooth internal surface is the simplest and safest construction.
Run a decked boardwalk path up the slope on the opposite side to the slide, surfaced in the same timber as the platform. Position timber log rounds along the boardwalk edges as informal stepping elements.
At the base of the slope, excavate a generous sandpit framed in the same timber sleeper material — 100 x 75mm pine minimum, two to three courses high. The sandpit receives the slide.
Plant low, soft groundcover plants at the slope edges — herbs, low ornamental grasses, compact native shrubs — that cushion the slope aesthetically without impeding the play areas.
The Cedar Boardwalk Path Through a Flowering Groundcover Slope
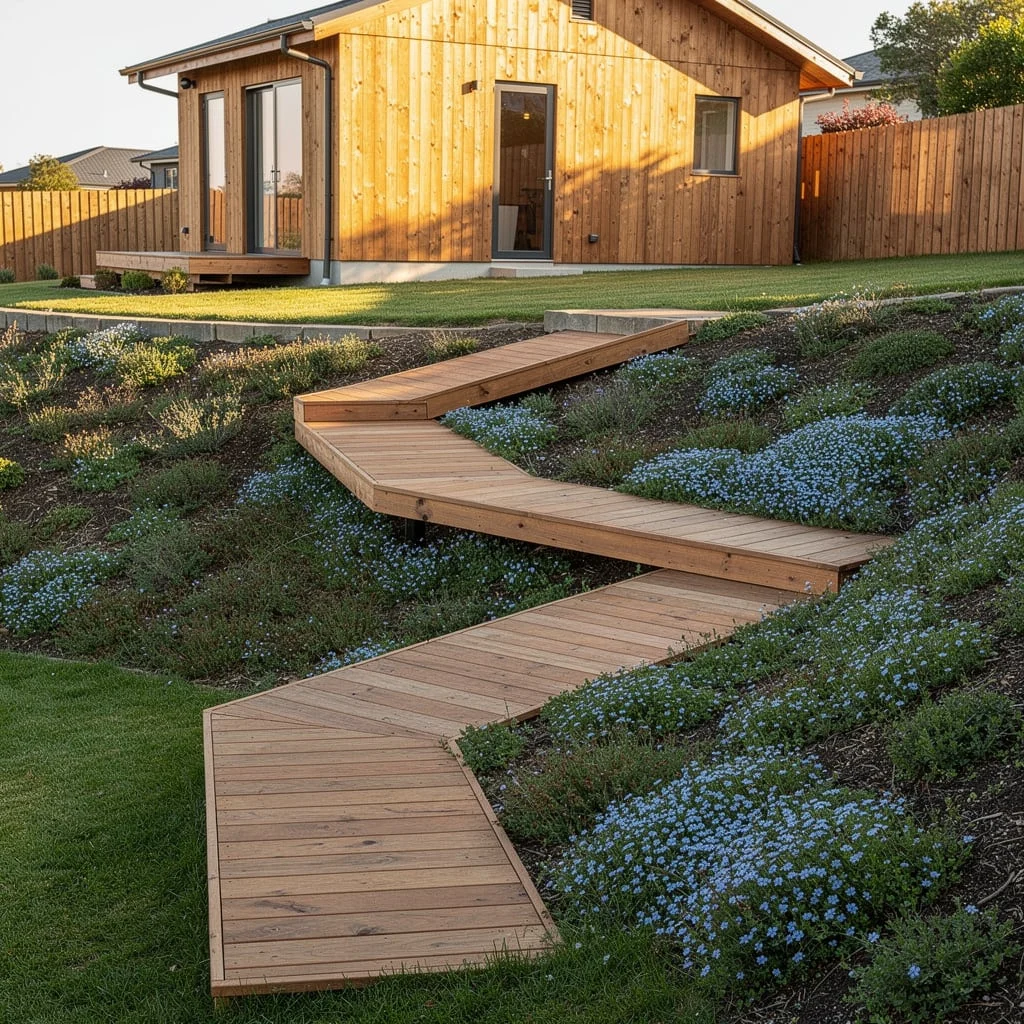
On a gentle slope where grade management is about interest rather than structural engineering, a cedar boardwalk that winds through a dense flowering groundcover planting creates the most beautiful low-budget slope garden available.
Build the boardwalk from 90 x 19mm cedar decking boards laid across 90 x 45mm joists, elevated approximately 100 to 150mm above the slope surface on timber posts. The elevation allows the groundcover to grow beneath and beside the boardwalk without competition.
Make the boardwalk 900mm wide — wide enough for two people to walk side by side. Let it wind gently through the slope with turns that feel natural rather than geometric.
Plant the slope densely on both sides of the boardwalk with Myosotis (forget-me-not) for blue flowering groundcover in spring, alternating with compact lavender and low-growing thyme. These are the flowering species that work: they establish quickly, cover soil, and provide interest through multiple seasons.
The warm honey-brown cedar boardwalk winding through a blue and purple flowering slope, lit by warm evening light, is one of the most photogenic garden compositions available. It also costs less to construct than most people expect — the boards and joists are standard framing timber and the groundcover plants are inexpensive at plug size.
The Three-Level Raised Vegetable Garden on a Slope
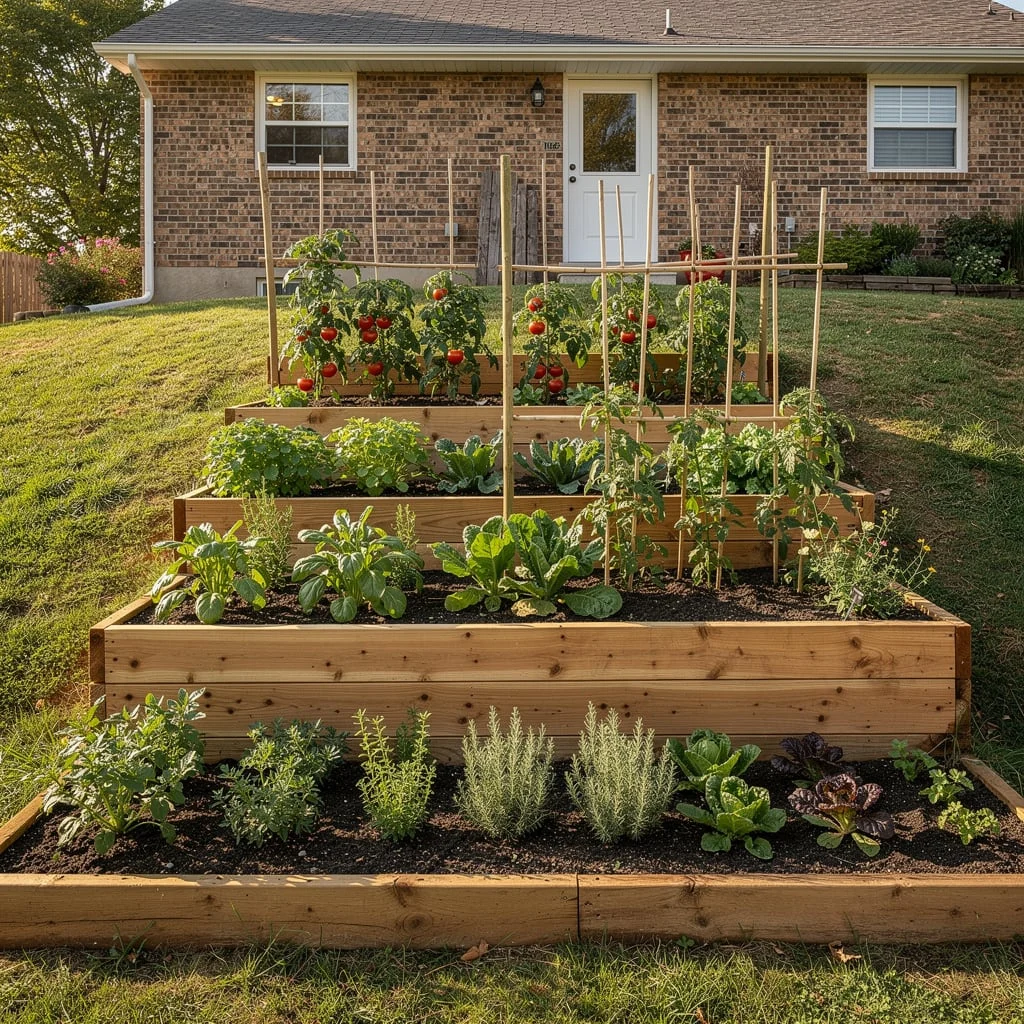
Three interlocking timber raised beds on a gentle slope — each level slightly higher than the one in front — create a compact, highly productive vegetable garden that uses the grade rather than fighting it.
The beds should be built in treated pine or hardwood at a minimum 300mm depth, with the three tiers each sitting approximately one bed-depth higher than the tier in front. The result is a stepped terrace of planting beds that presents all plantings at a similar angle to the viewer.
Use the tiers to organise planting by height at maturity. The lowest tier (closest to the viewing position) gets low-growing crops: herbs, lettuce, radishes, compact flowering plants. The middle tier gets medium-height crops: brassicas, leafy greens, smaller fruiting plants. The upper tier gets the tall crops: staked tomatoes, climbing beans on bamboo frames, corn or tall herbs.
This height zoning ensures all tiers are visible and accessible from the front of the bed arrangement, and that taller crops don’t shade shorter ones.
Lay a compacted gravel or concrete path on both sides of the bed arrangement for maintenance access — all beds should be accessible from the path without having to step into the growing area.
The Rocky Boulder Slope with Silver-Leaf Groundcover and Pink Dianthus
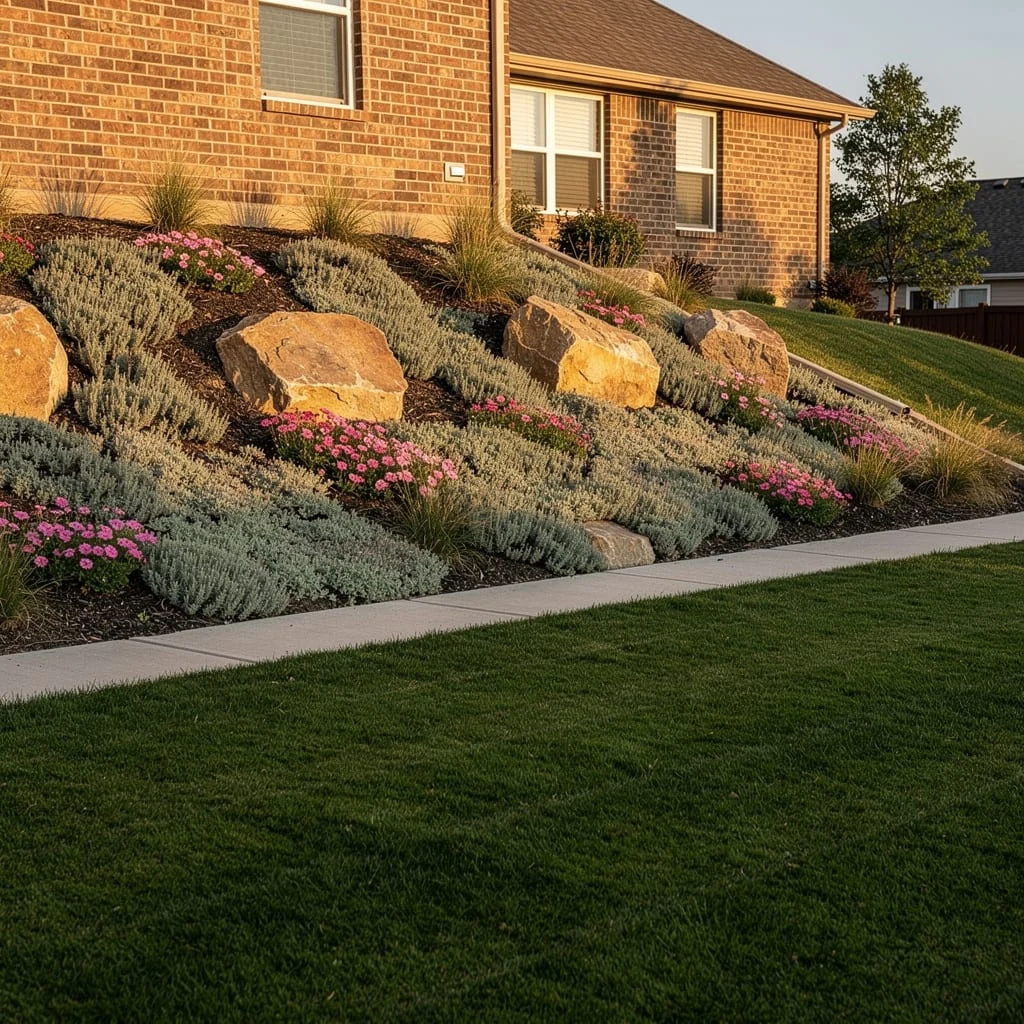
A natural-looking boulder and groundcover slope is the most drought-tolerant and lowest-maintenance approach to a steep, sun-exposed slope. It requires no retaining, no mowing, and virtually no irrigation once established.
Source naturally weathered boulders in a warm golden-ochre or buff sandstone — the warm tone works with the pink Dianthus flowers and silver groundcover foliage. Position the boulders first, before any planting. They should be partially buried — one third below grade — so they read as emergent rock rather than placed stones. Vary their sizes. Group them in natural clusters of two or three rather than placing them individually across the slope.
Plant densely between and around the boulders with Thymus (creeping thyme), Stachys byzantina (lamb’s ear), Russian sage, and Dianthus (pink). These plants have in common: full sun tolerance, excellent drainage requirement, drought tolerance, and low mounding or creeping growth habits.
Dark bark mulch between plants at establishment. After one growing season the planting will cover the mulch and begin to spread. After two seasons it is essentially self-maintaining.
Plant ornamental grasses — Stipa tenuissima or Karl Foerster — at the top of the slope where their movement can be seen against the sky. The vertical grasses at the top, the silver and pink planting on the slope face, and the boulder accents create a three-element composition that reads as intentional and resolved.
The Natural Pond at the Slope Base with Iris and Bog Planting

At the base of a slope that has a natural low point or wet area, a garden pond is not just a design feature — it is a functional drainage solution that turns a problem area into the most interesting element of the garden.
Excavate the pond to a minimum 600mm depth, with shallow shelf zones (200 to 300mm depth) around the perimeter for marginal aquatic plants. Line with a quality EPDM rubber liner — measure the liner carefully as inadequate overlap at the edges is the most common cause of pond failure.
Edge the pond with natural flagstone or sandstone — large irregular pieces set flush with the surrounding lawn or soil surface. The stone edging frames the water and provides a stable edge for sitting or viewing.
Plant the marginal shelves with aquatic iris — Iris pseudacorus for yellow, Iris versicolor for blue-purple — and Typha minima (dwarf reedmace) for vertical accent. Add one or two water lily pads (Nymphaea) for surface coverage that reduces algae growth.
The slope above the pond can be turfed to lawn and the natural grade will drain water toward the pond during rain — effectively turning the pond into a stormwater management feature. Alternatively, plant the slope above the pond with moisture-tolerant species: Astilbe, moisture-loving ferns, and ornamental grasses.
The Curved Sandstone Retaining Wall with Stone Steps and Rosemary Planting
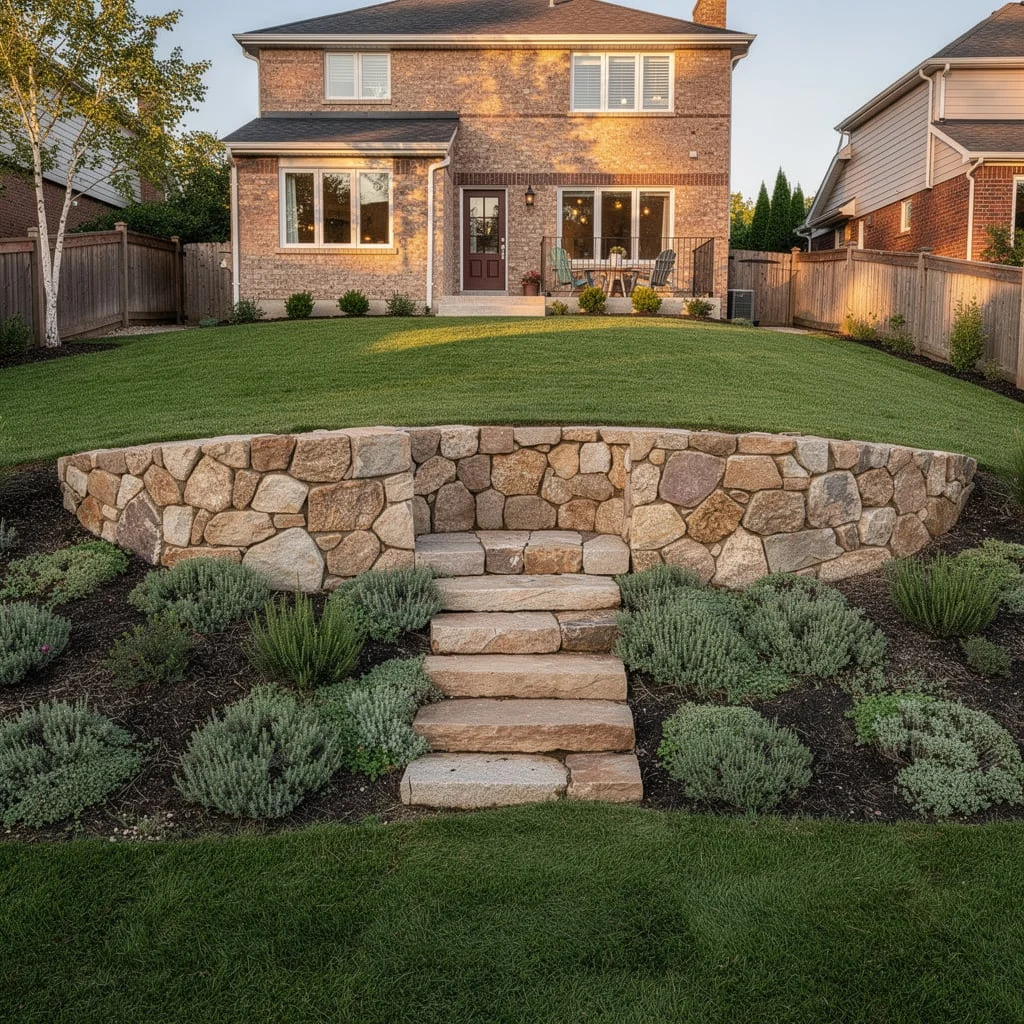
A curved retaining wall is structurally stronger than a straight one for the same height, and vastly more beautiful. In warm golden sandstone dry-stacked to approximately 800mm to 1.2 metres, a curved retaining wall is one of the most satisfying landscape elements available.
Excavate the bank to create the curved face of the wall. Build the wall in two or three courses of natural sandstone or reconstituted masonry with a consistent horizontal joint line. No mortar at the face — point the joints with a sandy mortar if needed for stability but keep the face looking dry-stacked.
Build the steps through the wall as a centred interruption to the curve. Three to four generous steps in matching stone material, with each tread stepping slightly back from the one below, creates a formal entry point through the retaining wall.
Plant the bed above the wall with drought-tolerant flowering perennials that will eventually cascade slightly over the wall face: rosemary, Salvia officinalis, compact lavender. The spilling growth over the top of the stone face is what softens the wall from a hard landscape element to a living one.
The Brick House Backyard with a Turfed Slope and Dark Mulch Perimeter Beds
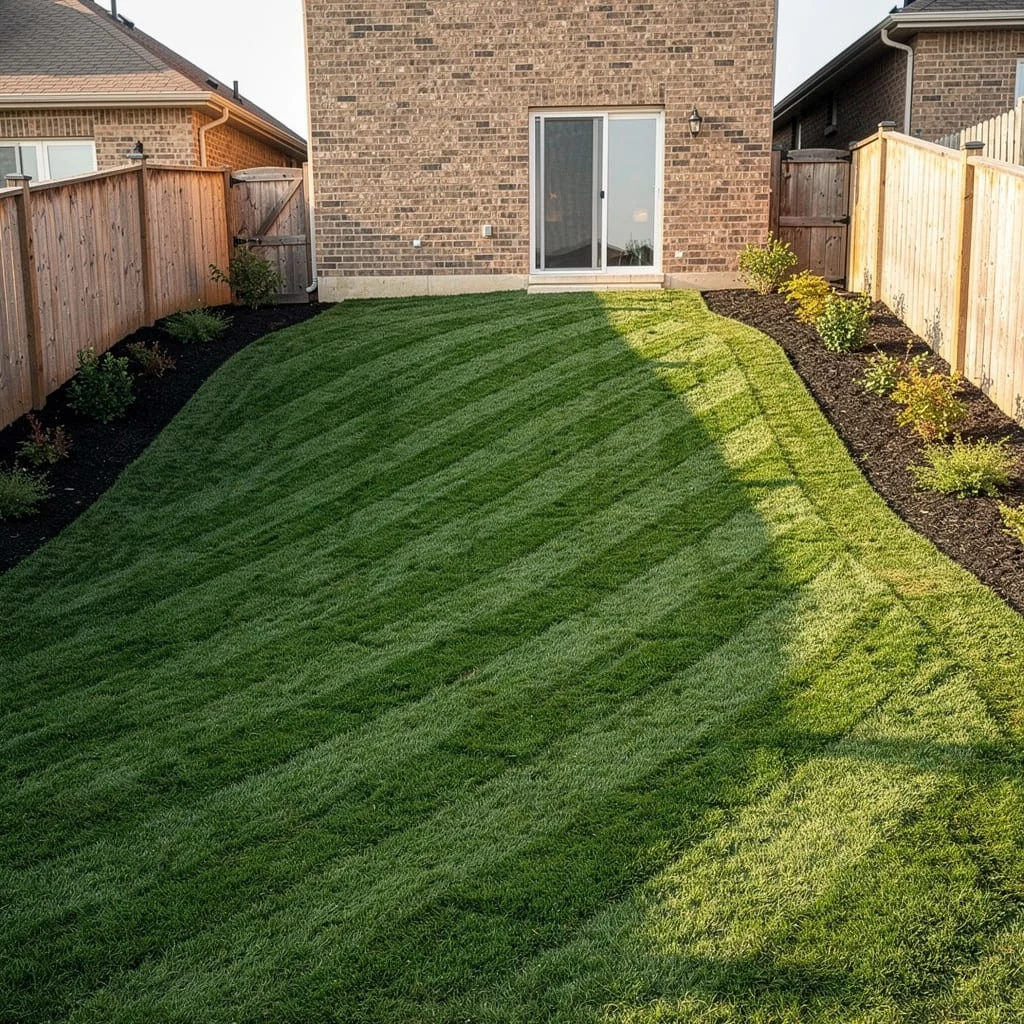
Sometimes the slope itself is not steep enough to require hard terracing, but the yard needs clarity of organisation. New turf over a regraded slope, combined with well-defined perimeter beds in dark mulch, creates the simplest and cleanest backyard resolution available.
Regrade the slope to eliminate any erosion gutters and create a smooth, consistent grade across the lawn area. Install a concrete mowing edge or steel landscape strip between the turfed slope and all planting beds — this single element transforms a scruffy transition into a clean defined edge.
Turf with a quality warm-season or cool-season grass variety appropriate to your climate. The surface preparation — soil improvement, grading, top-dressing — determines how well the turf establishes and how it looks in the long run.
Define two perimeter beds: one along the boundary fence lines using the slope as a natural backstop, one at the house foundation. Apply dark bark mulch to both beds and plant simply — low compact shrubs or groundcovers in the foundation bed, seasonal colour in the boundary beds.
The result reads as professionally maintained rather than professionally designed, which for a simple sloped residential backyard is entirely appropriate.
The Two-Level Corten Steel Terrace with Karl Foerster Grass and White Gravel
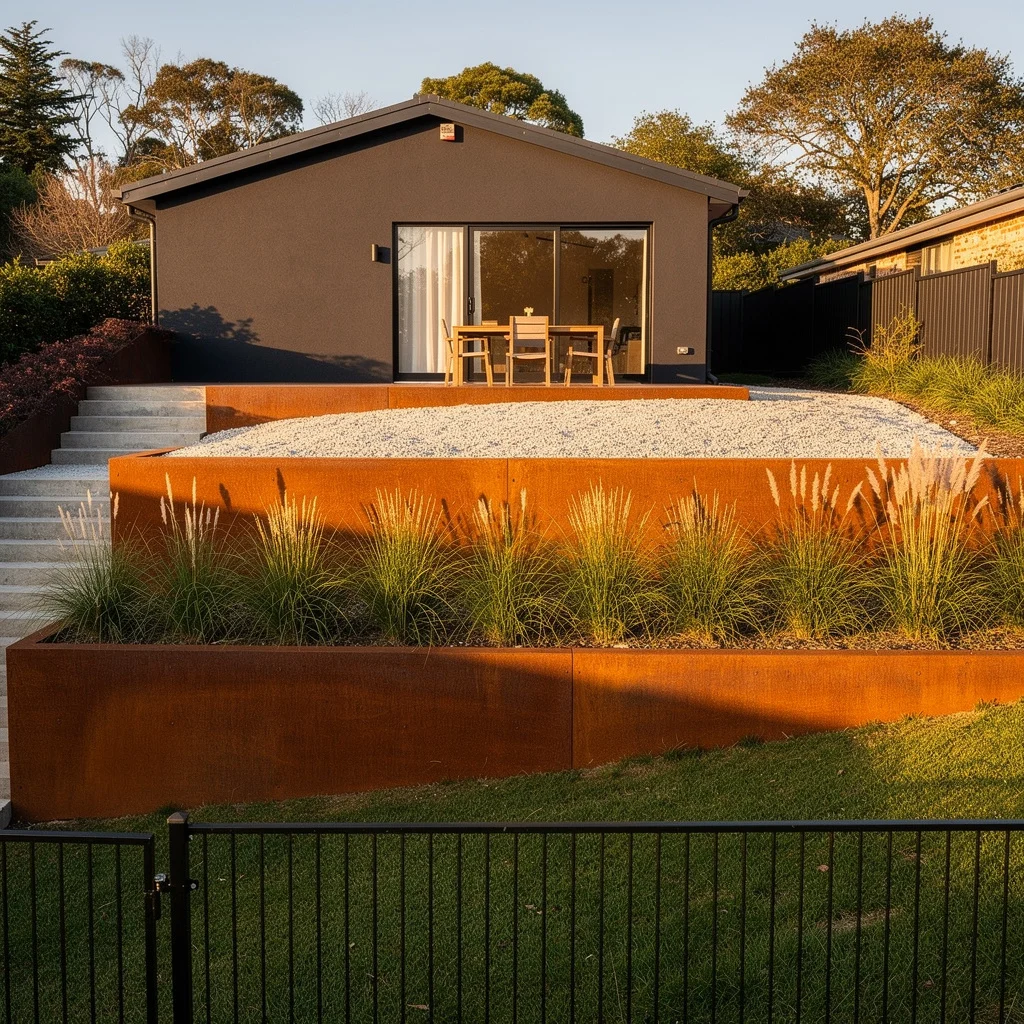
Build the retaining structure in Corten steel — two parallel linear walls, each 600mm high, creating a two-step terrace on a moderate slope. Each wall runs the full width of the garden. The Corten will rust to a deep amber within one season, creating the warm-toned patinated finish that reads as contemporary and permanent.
Fill the level area created between the lower Corten wall and the house paving with white crushed marble or white quartz gravel at 60mm depth. This level becomes the primary use zone — outdoor dining furniture, a low table, a seating arrangement. The white gravel is both the ground surface of the terrace and the material that reflects the amber Corten walls most effectively.
Plant Karl Foerster ornamental grass in the Corten planting zone — the bed between the lower and upper walls. Plant in a dense row at 400mm centres. By late summer the grass will be 1.5 to 1.8 metres and the golden plumes will wave above the Corten wall face in a composition of extraordinary seasonal impact.
On one side of the terrace, install concrete or pale stone steps — flush with the Corten wall faces and using the same grid logic — to provide access from the lower level to the upper garden.
The Natural Sandstone Wall with a Floating Terrace Patio and Lavender Between the Courses
Build two dry-stacked sandstone retaining walls in a slightly battered (backward-leaning) profile — this is both structurally critical for walls above 600mm and aesthetically beautiful. The batter should be approximately 25mm per 300mm of height.
Between the courses of the upper wall, plant lavender — specifically French lavender (Lavisstoechas) or English lavender (Angustifolia) — directly into the joints. Plant small plugs into a prepared pocket of soil mix tucked between individual stone courses. The lavender will spread outward over the wall face within one growing season, creating a living stone wall.
Cap the terrace with large-format sandstone paving in the same tone as the retaining walls. The coping stones should overhang the wall face by 20 to 30mm to create a shadow line.
Place outdoor furniture — a compact dining table and four chairs — centrally on the terrace. The terrace is the room. The stone walls are the walls. The lavender in the joints is the decoration.
The Built-In Rendered Masonry Bench on a Paved Terrace with an Ornamental Grass Slope Behind
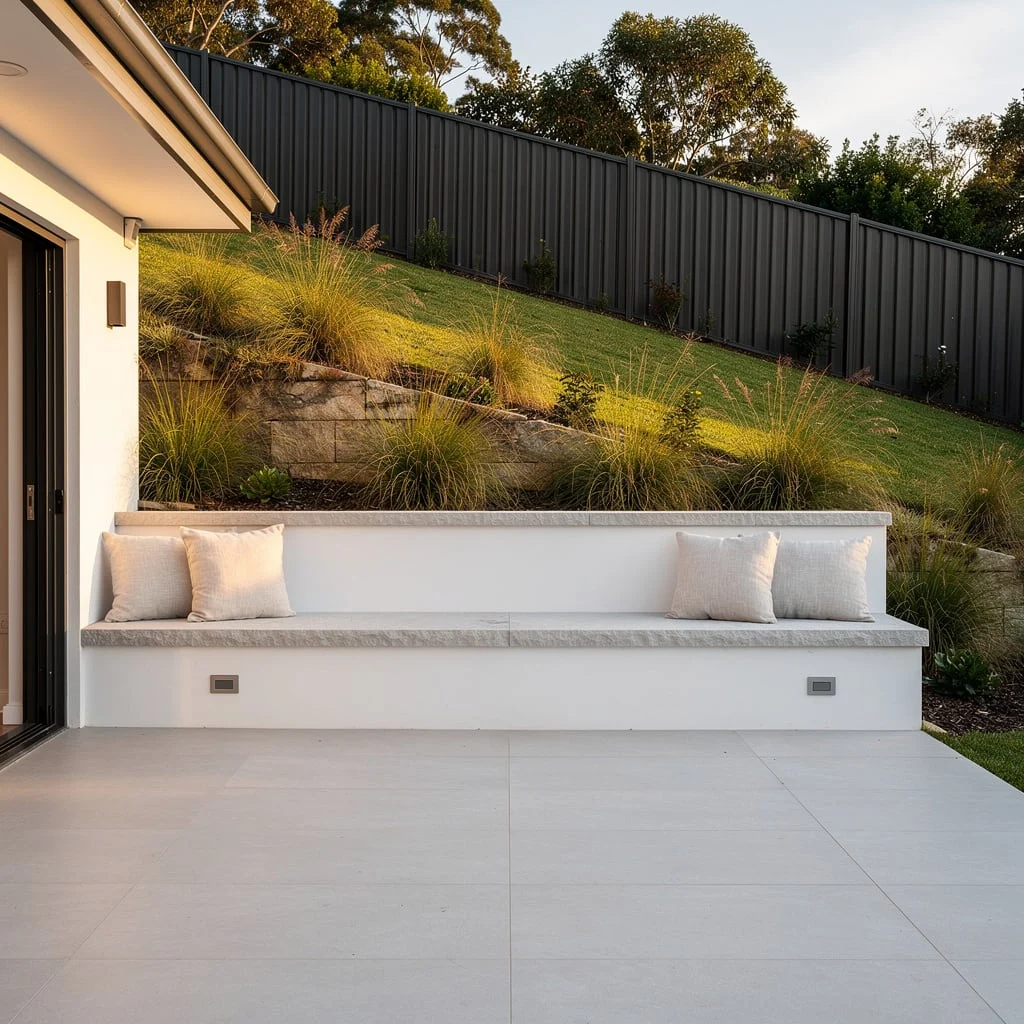
Build the bench as a structural element — a rendered masonry bench, 450mm high and 500mm deep, running the full width of the outdoor paving area. Cap the bench with a bush-hammered or honed natural stone slab in grey or pale buff. The stone cap should be 50mm thick for comfort.
Recess two low-voltage LED strip lights into the masonry bench face — not spotlights, but linear strip lights that throw warm light across the paving surface at ankle height. This is the lighting detail that makes the bench read as architecture rather than garden furniture.
The slope above and behind the bench is the backdrop. Plant it with Pennisetum or Miscanthus ornamental grass in staggered clumps on a groundcover of fine-leaved native plants. Sandstone boulder accents between the grass clumps provide structural interest in winter when the grasses have been cut back.
The white rendered bench, the warm paving, and the golden grass slope behind it are three elements that work at every season because the grass provides the seasonal change the paving and bench cannot.
The Raised Timber Deck on a Sloped Yard with a Shade Planting Bed Below
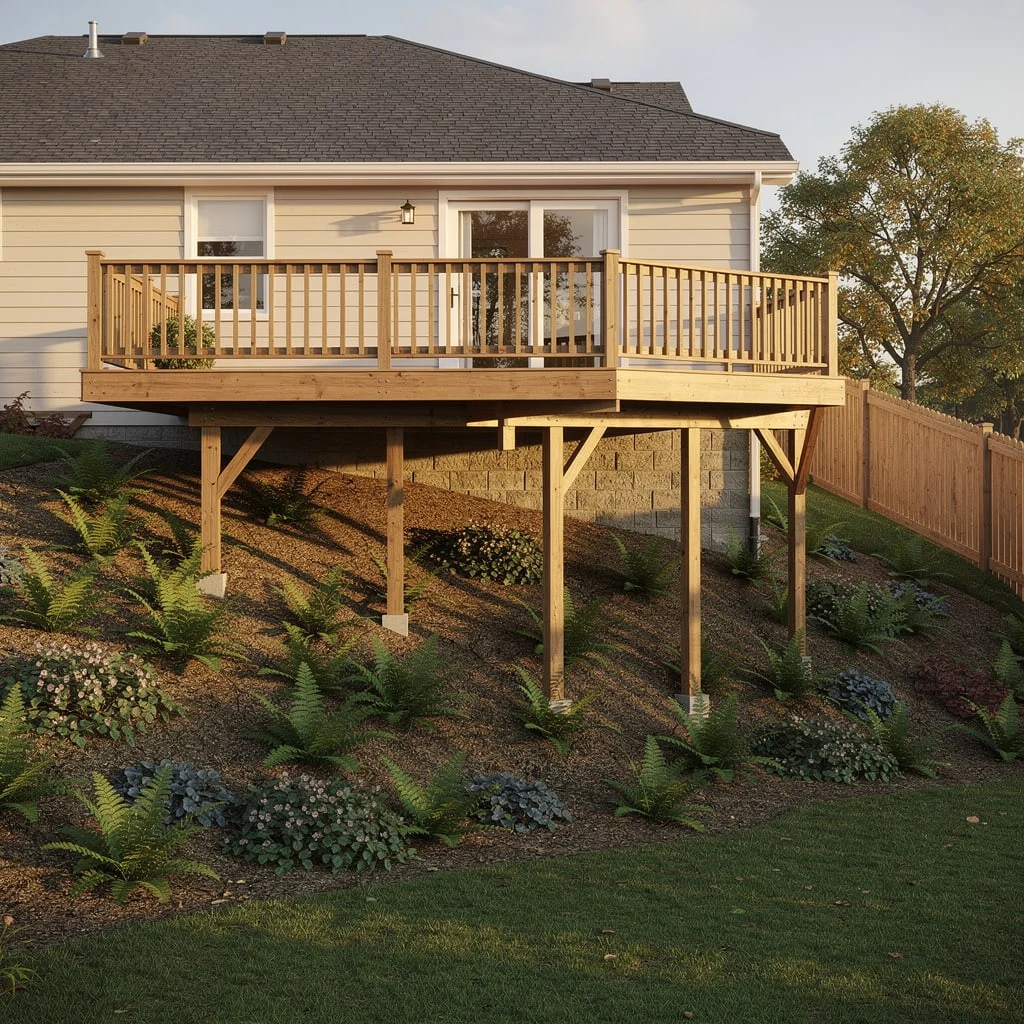
On a slope where the house sits high and the land falls away, a raised deck on posts solves the functional problem — creating a flat outdoor living area adjacent to the house — while the space beneath the deck creates a design opportunity.
The under-deck space is shaded and dry, which immediately rules out most conventional planting. What it provides that nothing else does: a sheltered microclimate with interesting dappled light filtering through deck boards, a structural framework of posts that can anchor the planting composition, and a space below the outdoor living level that creates a layered visual experience.
Plant the slope beneath the deck with genuine shade species: autumn ferns, Liriope muscari, hostas, and hellebores. Apply bark mulch between plants. Keep the planting low enough that it does not compete visually with the deck structure above it.
Install path lights at the base of each post — directing light upward — and recessed step lights in the deck stair risers. At night, with the under-deck planting lit from below, the space reads as a lantern.
The Timber Sleeper Two-Level Terrace with Artificial Turf and a Paved Upper Patio
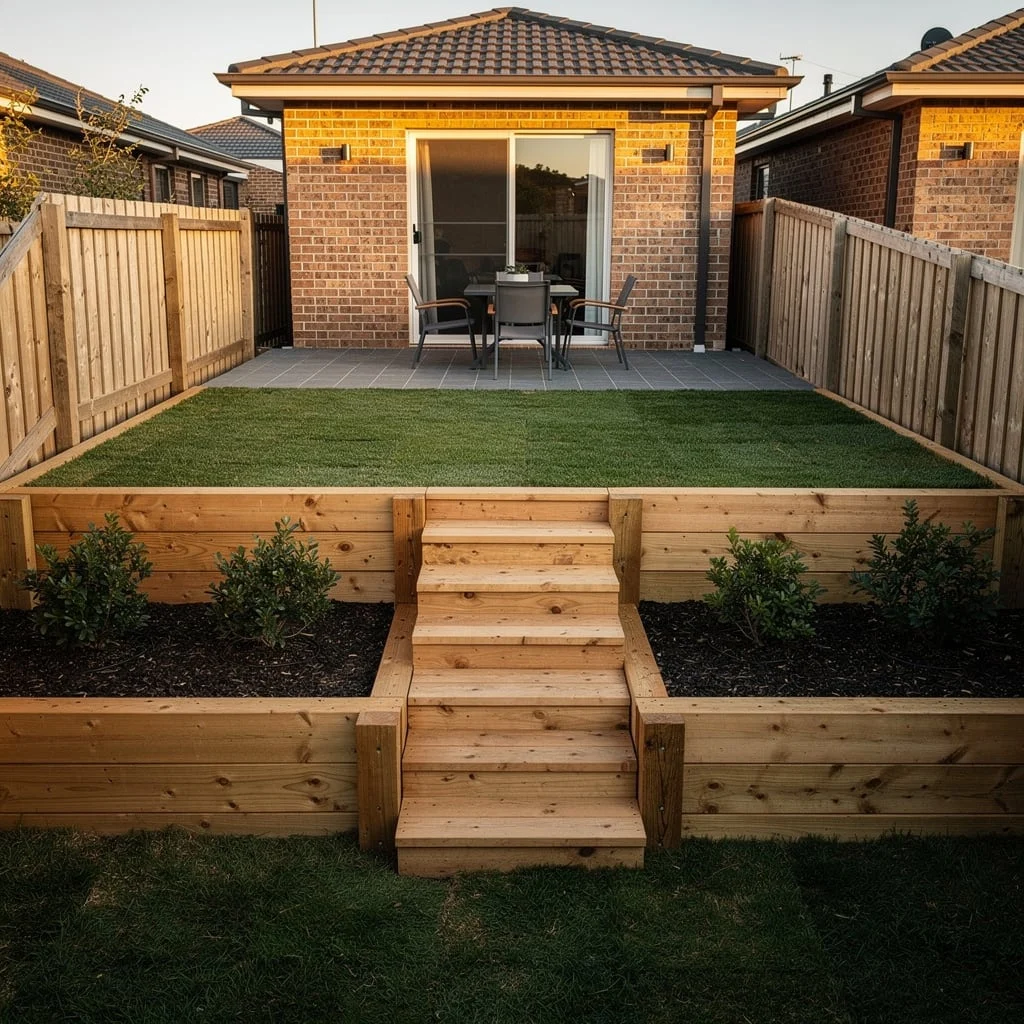
For a backyard that needs maximum usable flat space from a slope, the two-level sleeper terrace is the most practical and most popular solution.
Build a single retaining wall in 200 x 75mm treated pine sleepers — two to three courses depending on the grade change. The sleepers should be pinned to each other and to timber or steel posts driven into the ground behind the wall face. Build integral timber steps through the wall at the centre.
Level and turf the lower zone — this becomes the lawn area for children, pets, or casual use. Level and pave the upper zone adjacent to the house — this becomes the outdoor living and dining area in grey or charcoal porcelain paving.
Plant the perimeter beds of both levels with compact screening shrubs — Lilly Pilly, box, or Photinia — to create privacy from neighbouring properties and to soften the fence line.
The two-level composition — lawn below, paving above — works because each level has a distinct function and a clear physical definition. The timber sleeper wall provides the transition and the steps provide the connection.
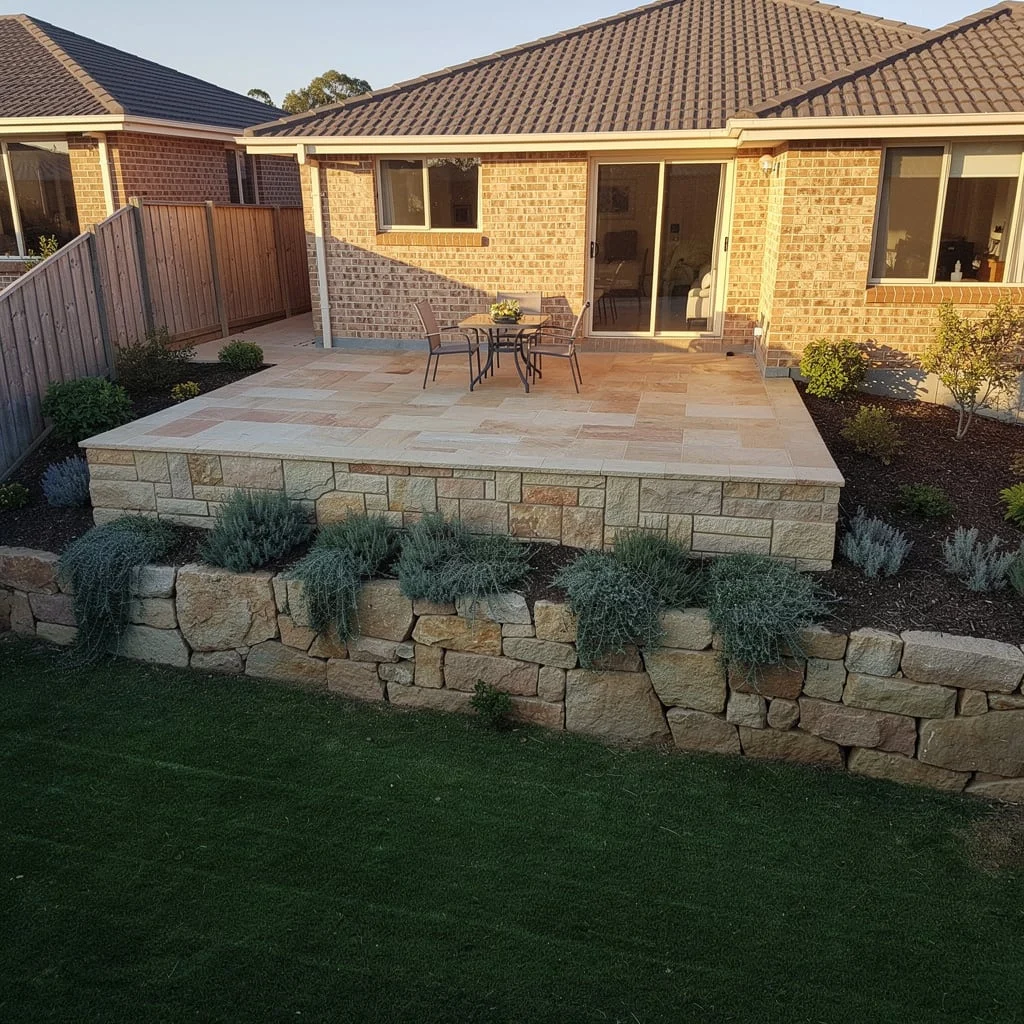
The Multi-Tiered Sandstone Wall with Pink Roses, Lavender, and Ornamental Grasses
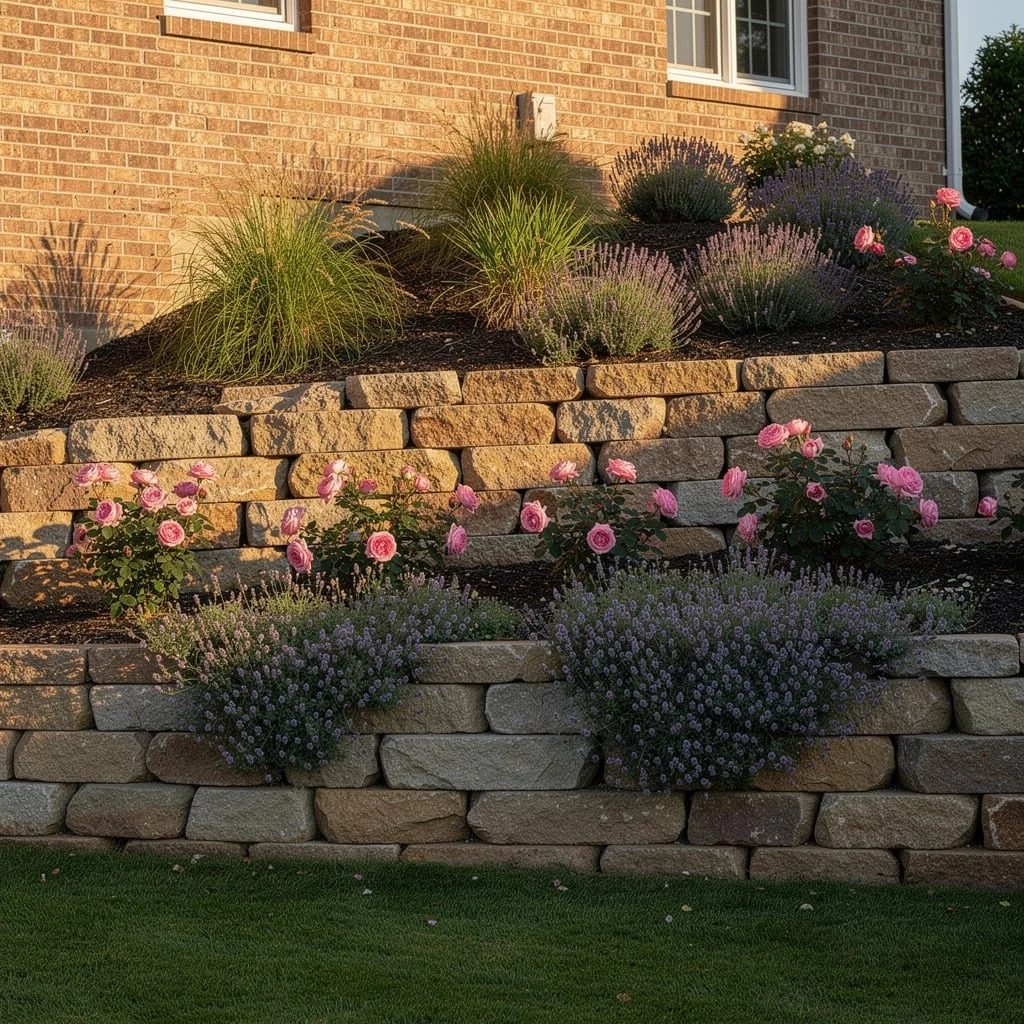
Two or three courses of dry-stacked sandstone at 400mm per course creates a two to three level terraced planting scheme against a house wall. Each level has a distinct planting that reads separately from the level above and below.
The lowest level — closest to the lawn — plants compact lavender species. Their silver foliage and purple flower reads well from a distance, frames the base of the walls, and spills slightly over the lower stone face.
The middle level — the primary viewing height from the lawn — plants pink shrub roses as the key flowering specimens. Space them at 600 to 800mm centres, using a compact variety — ‘The Fairy’, ‘Bonica’, or ‘Carefree Wonder’ — that doesn’t outgrow the terrace width.
The upper level — against the house wall — plants Karl Foerster or Pennisetum ornamental grass for height and movement. The grasses rise above the rose level and provide vertical contrast to the mounding roses and low lavender.
The warm sandstone wall, the pink roses, the purple lavender, and the golden grasses constitute a four-element warm palette composition that photographs well at every season and improves with every year as the plants establish.
The Design Principle That Every Successful Sloped Backyard Gets Right
Every one of these gardens made the slope the subject of the design rather than a problem to be solved or hidden.
The slope was not levelled and turfed into conformity. It was engaged with. The retaining walls were not buried behind planting. They were the dominant architectural element. The paths were not the most direct route up or down. They were the experience of moving through the grade change.
A slope gives a garden something flat ground cannot provide: a vertical dimension. Two spaces at different levels. The possibility of looking down or up. The drama of moving between them.
The gardens that succeed on a slope treat that vertical dimension as what it is — not an inconvenience, but the whole point.