
The foundation bed is the hardest-working piece of landscaping on a property and also the most neglected. Most people put something there because they feel they should — a row of junipers, maybe some mulch, a few annuals from the garden centre — and then wonder why the house still looks unfinished when they pull into the driveway.
The problem is almost never the plants. It is the absence of a design logic that connects the plants to each other, to the house, and to the ground between them. The gardens in this collection all have that logic. Some are formal. Some are wild. Some use almost no plants at all. What they share is the sense that someone thought before they dug.
Here is how to recreate each one.
The Foundation Bed Is Not Optional Decoration
A house without foundation planting looks like it was dropped onto the lot from a great height. The transition between the built structure and the ground is abrupt, and the eye registers the disconnect even if the brain doesn’t identify it immediately. Foundation planting solves this by creating a visual bridge — a layer of living material that mediates between wall and lawn and makes the house look like it belongs to the site.
The Width Problem Nobody Talks About
Foundation beds are almost always too narrow. The standard suburban bed is 60 to 90 centimetres deep, which is wide enough to plant one row of shrubs and not much else. A bed that narrow reads as a strip rather than a garden, and the planting always looks slightly apologetic — as if it knows it is not enough.
Beds that read as designed are a minimum of 120 centimetres deep and ideally 150 to 180 centimetres for any significant wall length. That depth gives you room for three layers of planting: tall at the back against the wall, medium in the middle, low or spreading at the front. Without those three layers, you have decoration. With them, you have a garden.
The Mulch Is Part of the Design
Dark hardwood bark mulch — the nearly black-brown variety — does more design work in a foundation bed than most people realise. It creates a uniform dark ground plane that makes every plant colour read at maximum saturation, suppresses weeds visually as well as practically, and provides the contrast that gives a bed its graphic quality from the street.
Light-coloured mulches — tan, straw, blonde — dilute plant colours and make beds look washed out in photographs and in person. Go dark. Refresh the mulch layer every spring, adding 5 to 7 centimetres of new material over any existing layer that has faded. The darkness is the point.
The Edging Holds Everything Together
An imprecise edge between lawn and bed makes a well-planted garden look neglected. A clean edge makes an ordinary planting look professional. This is the single highest-return action available in residential landscaping and it costs almost nothing beyond time and a sharp tool.
Cut the bed edge with a half-moon edger or a flat spade, removing a 5-centimetre deep strip of turf along the bed boundary. Re-cut this edge four to six times per growing season — once in spring and monthly through summer. For formal or long-term edges, install steel, aluminium, or concrete edging along the perimeter to hold the line between lawn and mulch permanently. The edging material is less important than its consistency. A perfectly straight steel edge that follows a gentle curve looks better than a hand-cut line that wanders.
The Hidden Architecture of a Good Garden Bed
Every garden bed that reads as designed has an underlying structure that would still be recognisable in winter when nothing is flowering. That structure comes from a combination of bed shape, plant placement at a macro level, and the relationship between the plantings and the built elements of the house.
Formal Versus Naturalistic
Formal planting — repeated identical plants at consistent spacing, clipped into regular shapes — works best against formal architecture. White brick or painted stucco with symmetrical windows and shutters is asking for a formal response: standard roses in a row, boxwood spheres at regular intervals, lavender in continuous parallel drifts. The geometry of the plants mirrors and reinforces the geometry of the house.
Naturalistic planting — mixed species, irregular spacing, plants allowed to grow into their natural form — works best against informal or asymmetrical architecture. Dark timber-frame, stone, shingle siding — these surfaces want the softness and variety of a cottage-style border. The informality of the plants contrasts productively with the rough texture of the building material.
Mixing these two approaches on the same property is possible but requires a clear hierarchy. Choose one language as dominant and use the other as an accent.
Using the Wall Itself
A wall is not just a backdrop. It is a planting surface if you give it the right structure. Wrought iron or powder-coated steel obelisk trellises pushed against a wall and planted with climbing roses or clematis add a vertical layer to a foundation bed that no free-standing plant can provide. The dark metal against red or dark brick is particularly effective — the trellis structure reads as a piece of garden architecture rather than a support frame, and the climbing plant eventually makes the wall itself a living surface.
Bed Shape as a Design Move
The shape of the bed boundary — whether it follows the straight line of the house wall or curves outward into the lawn — is a design decision that affects the entire character of the front garden. Straight beds suit formal gardens and modern architecture. Curved beds — sweeping outward from the house in a single gentle arc — suit naturalistic gardens and traditional architecture.
Island beds in the lawn, separate from the house foundation entirely, need to follow a consistent geometric logic: elongated ovals, kidney shapes, or double-oval forms that look deliberate from above. A circular bed in the middle of a lawn works. A vaguely rounded rectangle does not.
Landscaping Around the House Ideas
Standard Roses, Boxwood, and Lavender
The three-species combination here is the entire design: white standard roses on bare stems as the vertical top layer, clipped boxwood spheres as the evergreen mid-layer, and lavender as the spreading silver-purple ground layer. The species alternate along the length of the bed in a strict repeating sequence, planted against white painted brick with dark shutters. The formality of the planting matches the formality of the architecture exactly.
To recreate this, source white standard roses in a consistent stem height — 60 to 80 centimetres is the residential standard — and plant them at 90-centimetre centres against the wall. In the space between each rose, plant a single compact boxwood clipped into a sphere at approximately 30 to 40 centimetres in diameter. In front of the entire row, plant lavender at 30-centimetre centres in a continuous band across the full bed width, choosing a compact variety like Hidcote or Munstead that stays under 40 centimetres in height and spread. Mulch the bed in near-black bark. Cut the lawn edge sharp at the front.
Water the roses at the base rather than overhead — wet foliage is the primary cause of black spot on roses — and deadhead spent blooms weekly through summer to maintain continuous flowering.
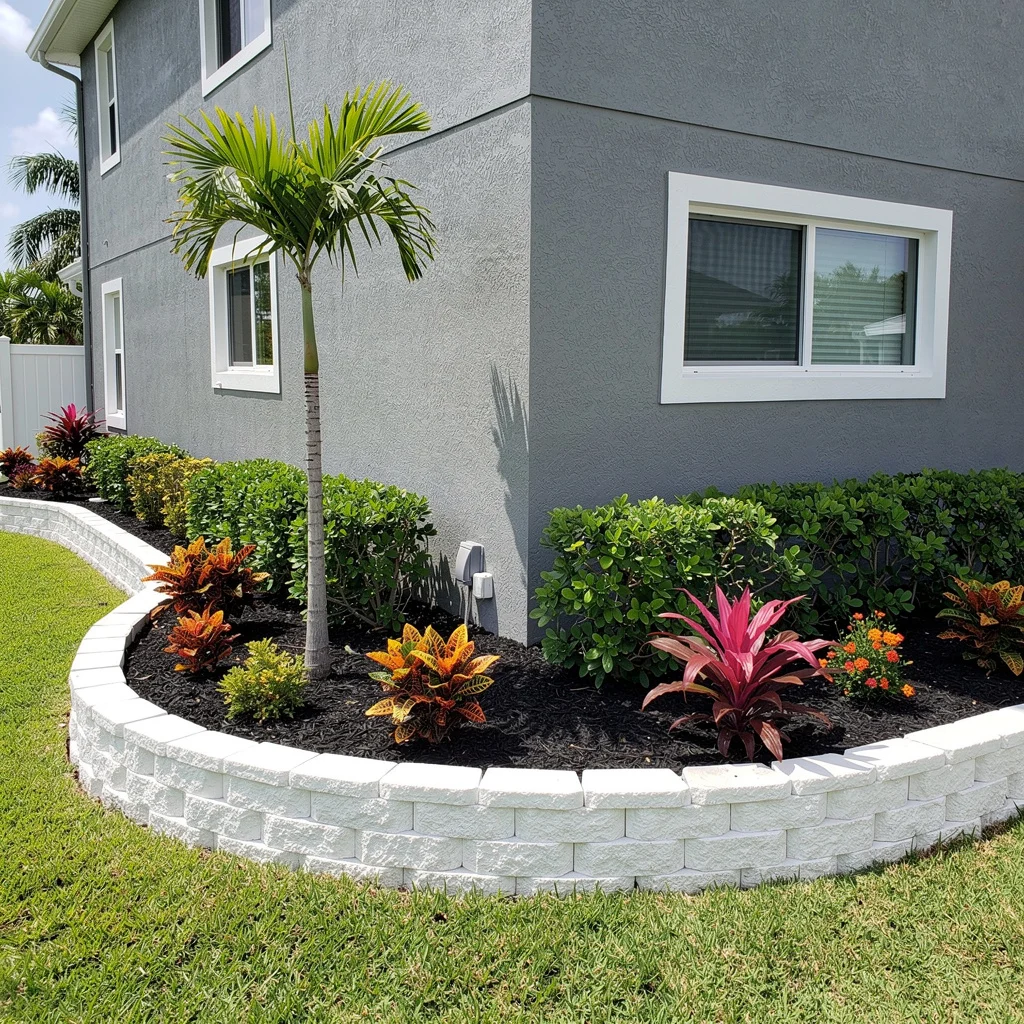
Tropical Corner Bed With White Block Edging
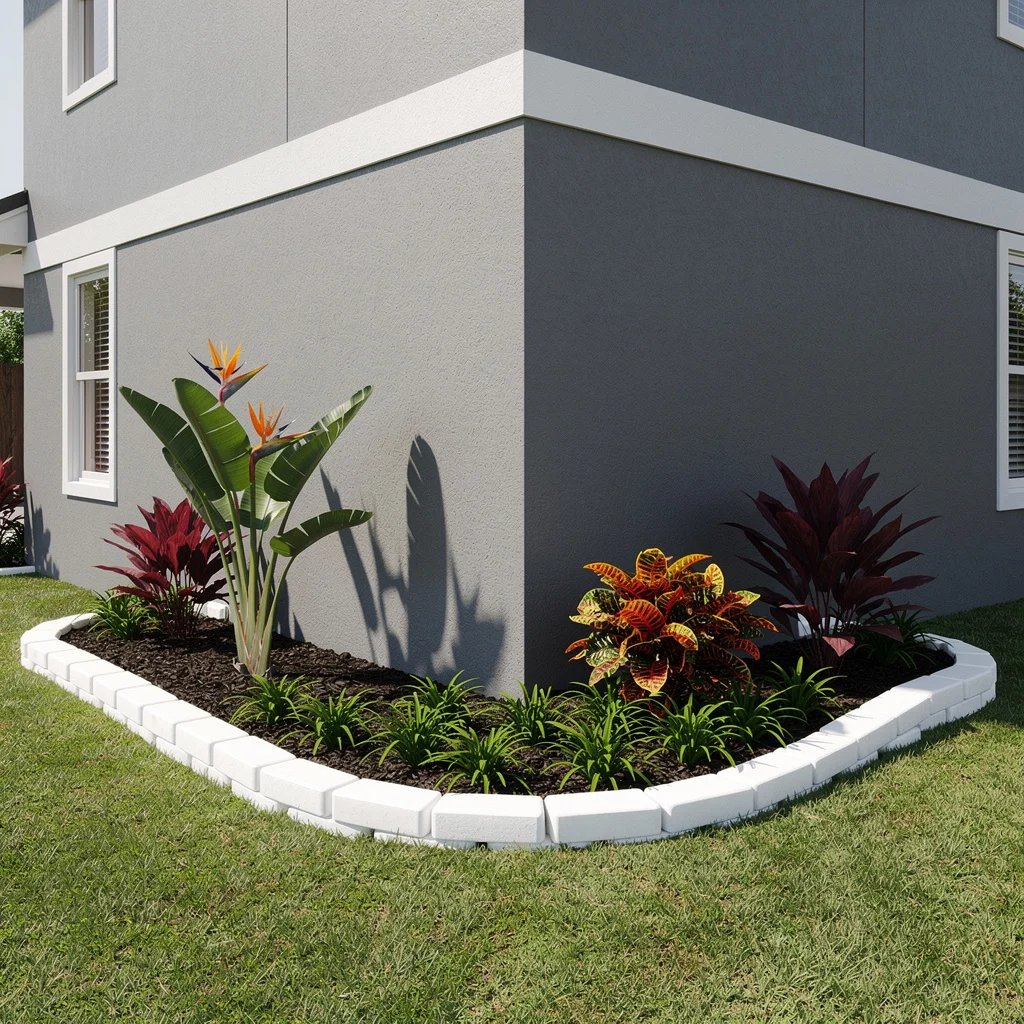
The defining move here is the white painted or rendered masonry block edging — two courses high, following a generous curved line around the corner of the house — that contains a tropical planting of intense colour against a dark grey stucco wall. The white edging and the dark stucco together form a high-contrast frame for the planting. The plants themselves — bird of paradise, croton, red cordyline, liriope — are chosen for foliage colour and tropical drama rather than for flower.
Lay out the bed shape using a garden hose before excavating. The curve should be generous and smooth, sweeping around the corner of the house with a radius of at least 1.5 metres. Construct the white masonry edging from rendered concrete blocks or pre-cast white edging blocks, laying two courses on a concrete footing at the base. Fill the bed with a good quality garden mix amended with compost. Plant a single bird of paradise as the primary tall anchor on the left side. Place red or bronze cordyline behind it for burgundy colour contrast. Position a large croton in the center foreground for the multi-coloured foliage mass, and edge the front of the bed with liriope or mondo grass as the ground-cover layer.
Fill any gaps with dark rubber mulch or very dark bark. The planting works because the foliage colours are warm — orange, red, burgundy — against the cold grey wall, and the white edging keeps the tropical exuberance contained.
S-Curve Bed With Concrete Edging
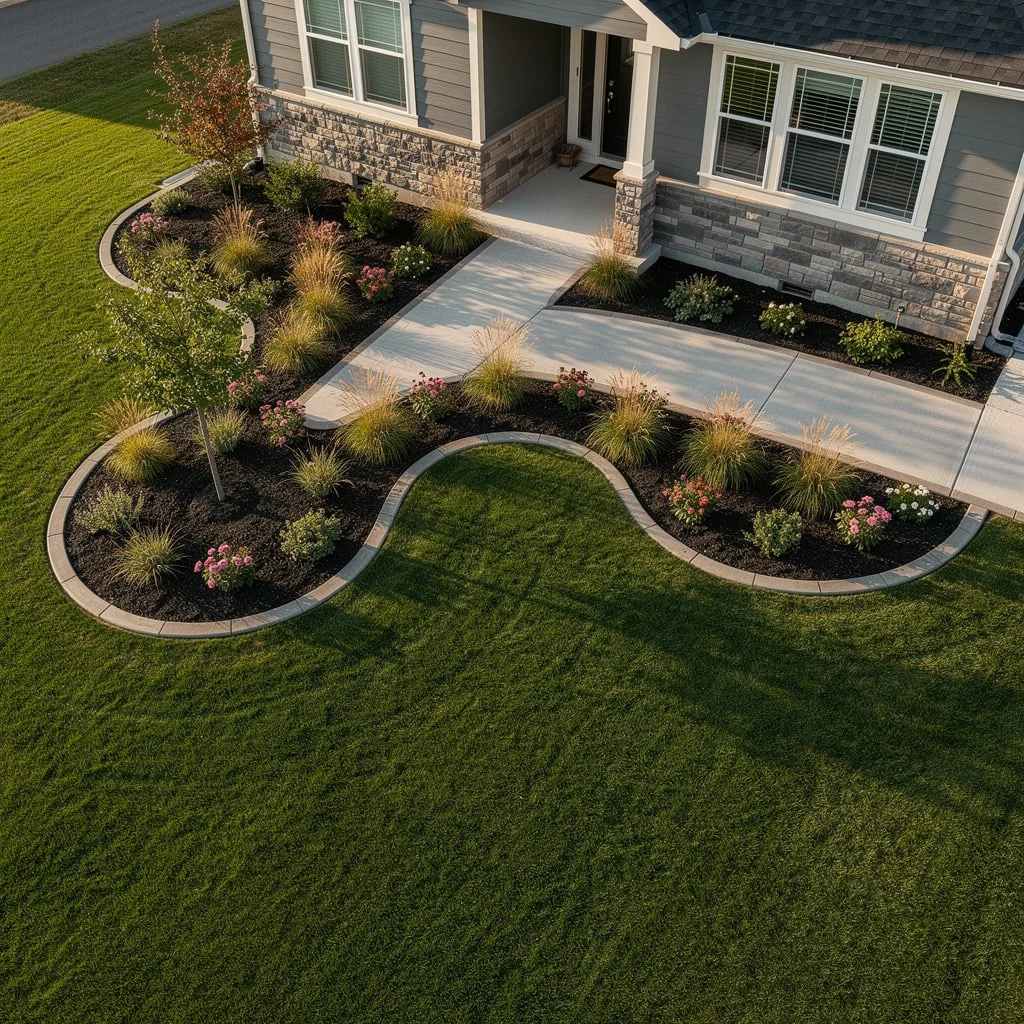
Viewed from above, the s-curve bed shape is one of the most fluid and satisfying forms in residential landscaping. It creates a sense of movement through the front garden that leads the eye from the street toward the house, and the dark mulch interior against the green lawn makes the curved boundary line read as a drawing in the landscape.
Mark the s-curve using spray paint on the turf, adjusting the line until it flows from the street edge toward the house path with equal convex curves on each side. The curve should be wide enough to accommodate at least 1.5 metres of bed width at its broadest point. Install grey or tan concrete block edging along the curved boundary — one course high — pressing each block firmly against the excavated turf edge and backfilling behind it. Plant a single small ornamental tree — a birch or multi-stem serviceberry — at the far point of the s-curve as the focal anchor.
Throughout the bed, repeat clusters of the same two or three plants: ornamental grasses in groups of three, low compact perennials such as coneflowers or dianthus between the grass clusters. Mulch densely in dark bark. The s-curve shape does the design work; the planting reinforces it by staying restrained.
Three-Layer Brick Foundation Bed
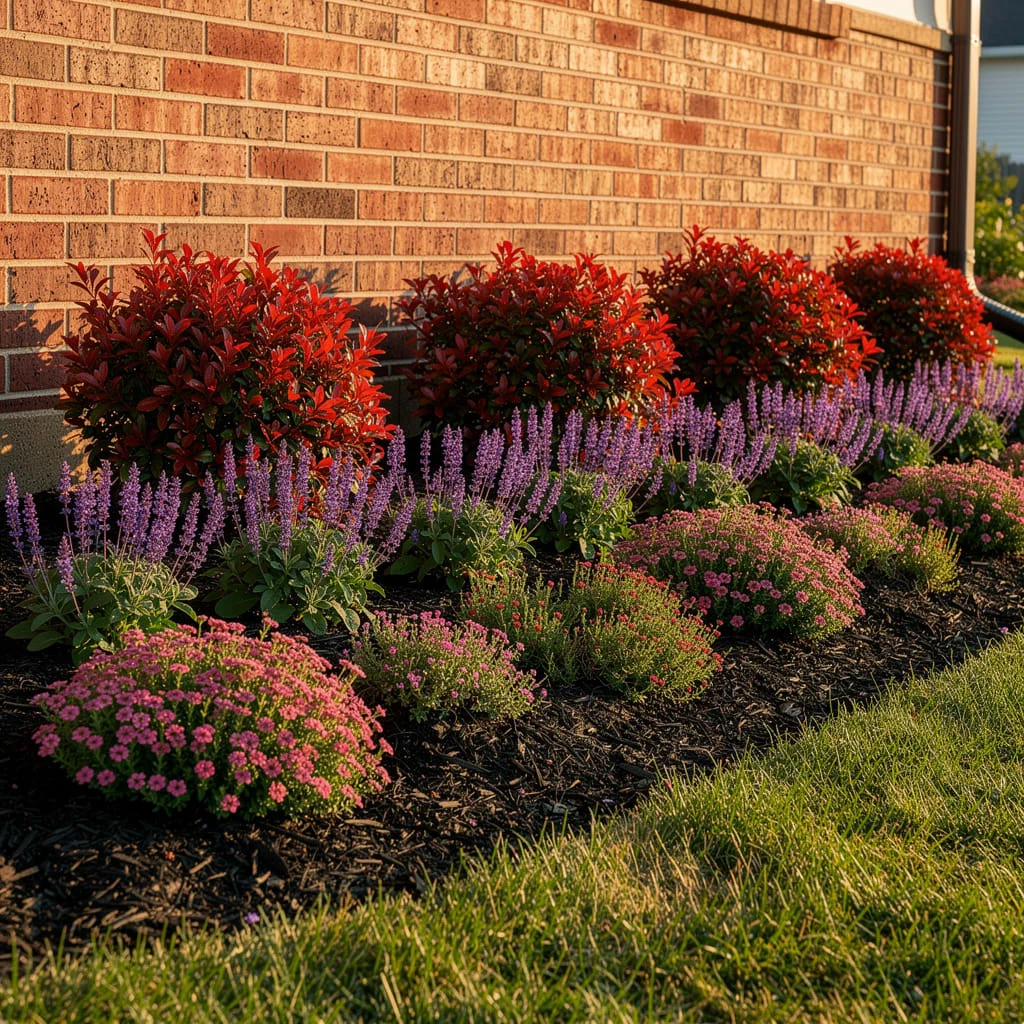
The three-layer structure here is executed with confident clarity: red-leafed photinia or leucothus at the back against warm brick, blue salvia in the middle layer, and pink spreading verbena or thyme at the front edge. Each layer is planted in a continuous mass rather than individual plants, which is what gives the bed its bold, banded appearance from the street.
Prepare the bed to a minimum depth of 150 centimetres from the house wall. Amend with compost and good drainage material if the soil is heavy. Plant the photinia or red-tip leucothus at 60-centimetre centres in a single row tight against the wall, selecting varieties with the most intense red new growth. In front of them, plant blue salvia — May Night or Caradonna are both excellent choices — at 30-centimetre centres in a double staggered row. At the front edge, plant low-growing pink or magenta verbena at 25-centimetre centres to form a continuous spreading mat.
Mulch all exposed soil in dark bark. The warm brick wall behind the three layers amplifies the red of the photinia, which in turn makes the purple-blue of the salvia read with even more intensity. This is a colour relationship — warm brick, dark red foliage, cool purple flower, soft pink ground — that works because of its internal contrasts.
White Pebble River With Black Mulch Bed
The white pebble river is the design element that makes this composition modern and graphic rather than simply a planted bed. It runs between the lawn edge and the black mulch bed, creating a three-zone composition: green lawn, white pebble band, black mulch planting area. The contrast between the three tones is sharp and deliberate, and the curved line of the pebble band connects both zones in a fluid, organic way.
Install black plastic or rubber edging along the outer boundary of the pebble zone — the side closest to the lawn — bending it to follow the desired curve. Install a second edging strip along the inner boundary between the white pebbles and the black mulch bed. Fill the pebble zone with white polished river pebbles to a depth of 5 to 7 centimetres, covering the full zone from edge to edge. Fill the bed area with very dark bark mulch or black rubber mulch to a consistent 7-centimetre depth.
Within the dark bed, plant a combination of large granite boulders — partially buried so they appear to have always been there — with ornamental grasses, hostas, and low shade-tolerant groundcovers filling the spaces between the boulders. Keep the number of plant species to three. The composition reads most powerfully from the street when the white pebble band curves visibly and the dark bed behind it contains clearly spaced, architecturally distinct plants.
Perennial Wildflower Border
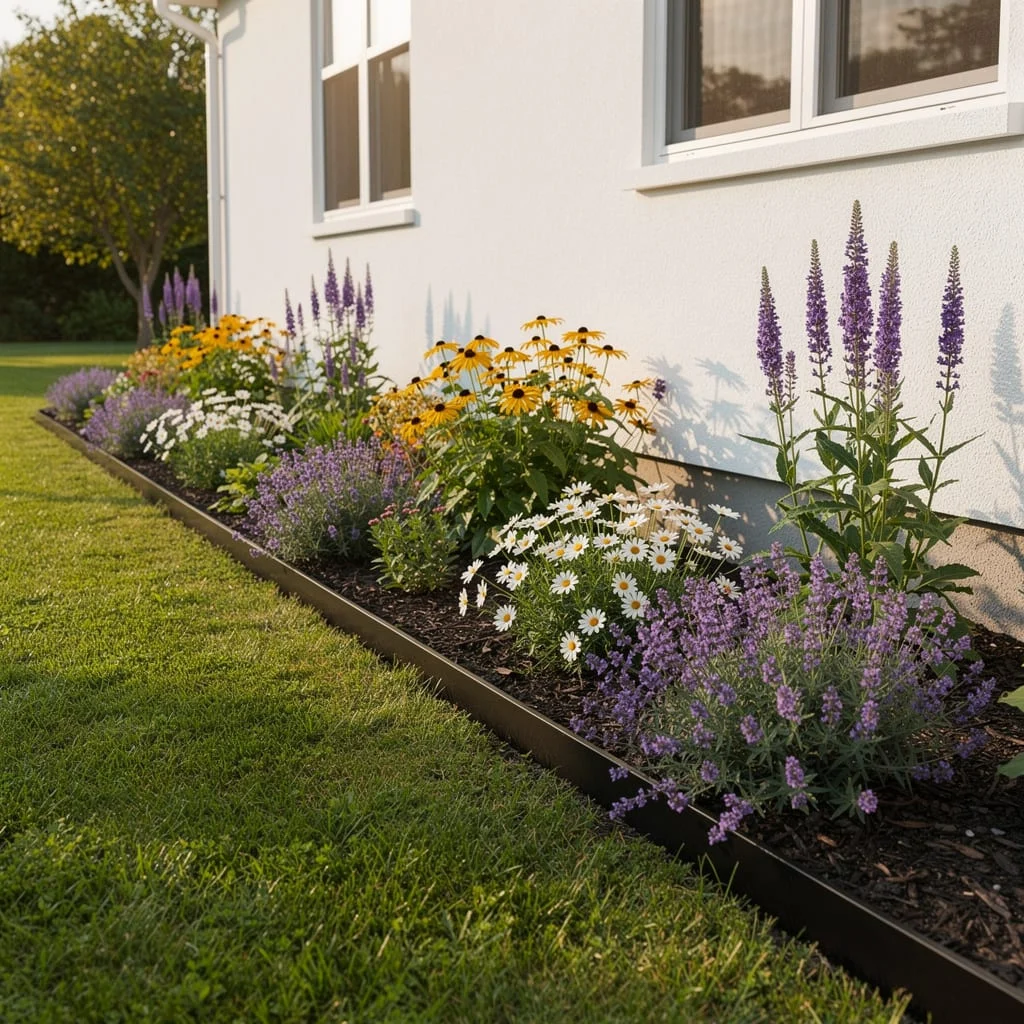
This bed is a perennial border in the traditional English sense — a deep bed planted with a mix of flowering perennials that bloom in succession from late spring through autumn, creating a constantly changing tapestry of colour against a plain white wall. The steel garden edging provides the only formal element in an otherwise naturalistic planting.
Begin the design on paper by choosing five perennial species that bloom at different times of year and at different heights. A workable selection for most temperate climates might be: Veronicastrum virginicum for vertical purple spikes at the back, Rudbeckia hirta for yellow mid-height daisy flowers, Leucanthemum superbum for white daisies at mid height, nepeta or catmint for sprawling silver-blue at the front, and lavender or agastache as a fragrant secondary ground layer. Plant each species in groups of three to five plants rather than individually, distributing the groups throughout the bed so no single colour dominates one end.
Mulch between plants with dark bark and install a steel edging strip along the lawn edge. The bed will look sparse in the first season and begin to look like an intentional garden in the second, as the perennials establish and the groups expand toward each other.
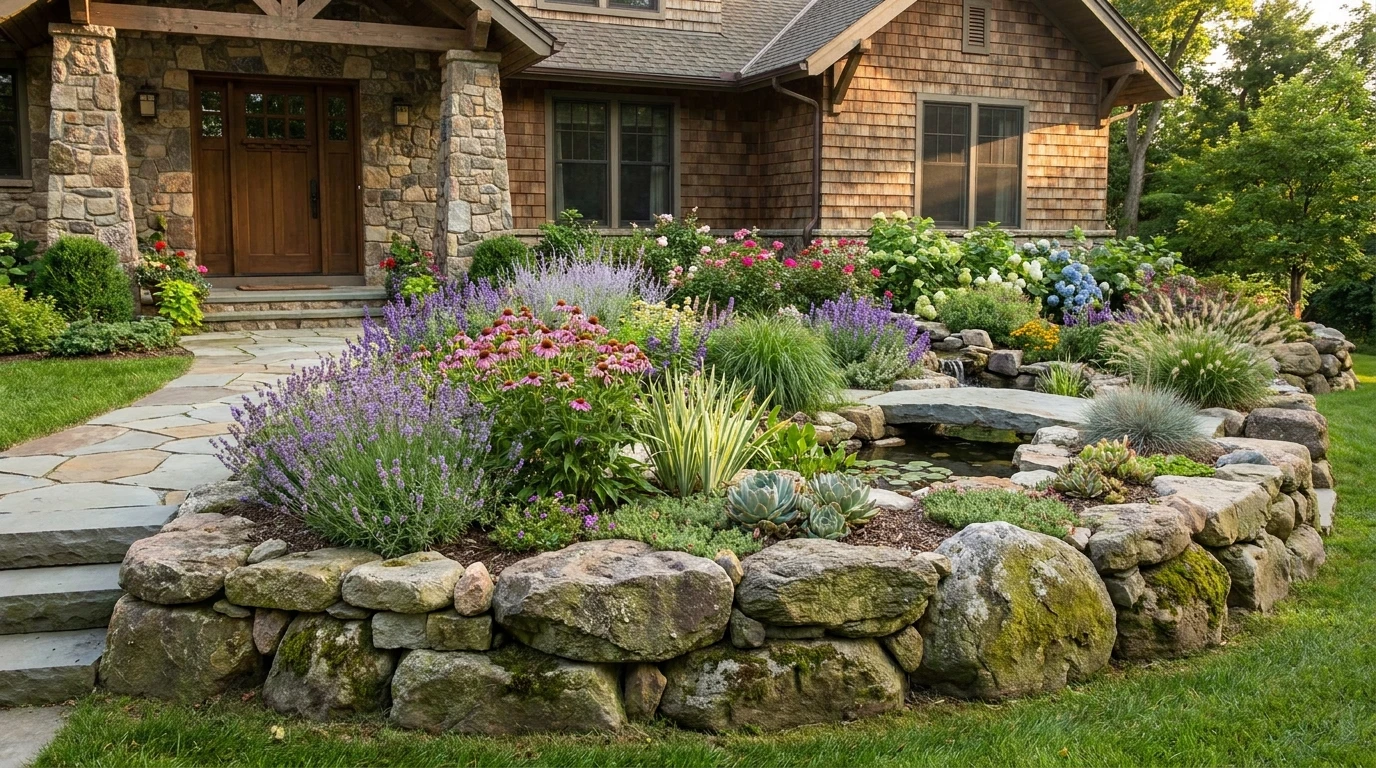
Flagstone Path With Cottage Border
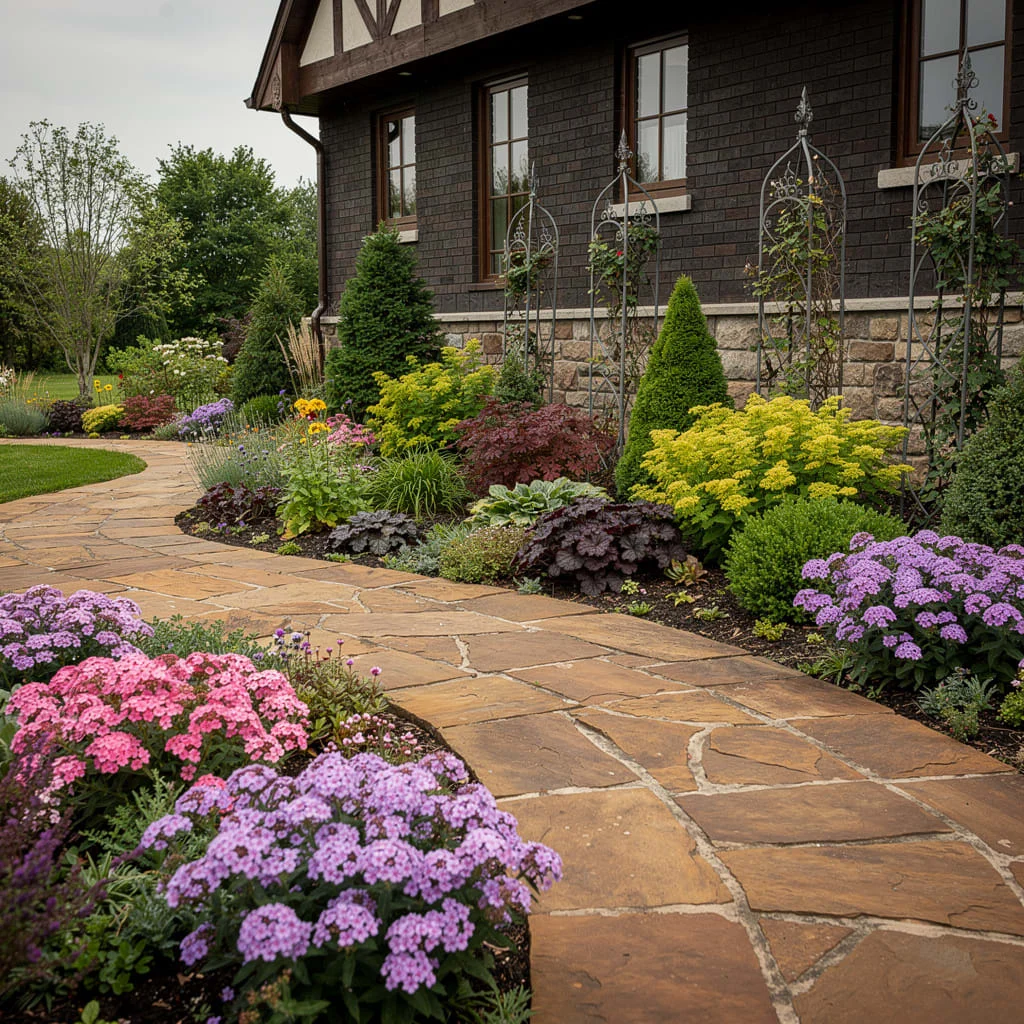
The flagstone path running beside the house creates the second design element that elevates this from a foundation bed to a garden experience. The path invites movement along the bed rather than viewing it only from a distance, and the cottage-style planting spills slightly over the path edge, softening it in the way that makes informal paths feel welcoming rather than awkward.
Lay large-format irregular flagstones — sandstone or limestone in warm tan or rust tones — directly onto a 50-millimetre compacted sand base. Set them tightly with no gaps larger than 20 millimetres, and bed each stone firmly so none rock underfoot. The path should be at least 90 centimetres wide. Behind the path, excavate the bed to 180 centimetres in depth and plant a rich mix of cottage perennials and shrubs. Japanese maples provide the dark burgundy foliage architecture at the back. Dwarf Alberta spruce give vertical conical form. Lady’s mantle, heuchera, and compact ageratum fill the mid-layer. Pink and lavender verbena spread at the front.
Insert three or four black powder-coated iron obelisk trellises against the house wall at even spacing, and train climbing roses or sweet peas up them. The obelisks provide the vertical punctuation that prevents the cottage planting from reading as merely messy.
Tropical Florida Corner With White Edging
The elevated white masonry retaining wall — two or three courses high — is the structural decision that makes this tropical corner planting feel permanent and resolved rather than temporary. It raises the planting surface above the surrounding lawn, which gives the tropical plants more visual presence and also improves drainage, which tropical species with colourful foliage strongly prefer.
Build the raised wall from standard concrete retaining blocks, coating them with exterior white masonry paint after installation. Lay the foundation course on a compacted gravel base to prevent settling and movement over time. Construct the corner to follow the house corner exactly, curving one side toward each wall face. Fill the raised bed with a free-draining tropical mix: equal parts topsoil, coarse perlite, and organic compost. Plant a single slim ornamental palm — Lady Palm or Majesty Palm — close to the wall corner as the anchor. Surround it with compact croton varieties in the foreground for their multicoloured yellow, orange, red, and green foliage.
Place dwarf red or pink bromeliads at the outer corners of the bed and use beach spider lily or mondo grass as a low ground cover. The glossy, highly saturated tropical foliage colours hit their maximum intensity against the dark grey stucco wall and the bright white edging.
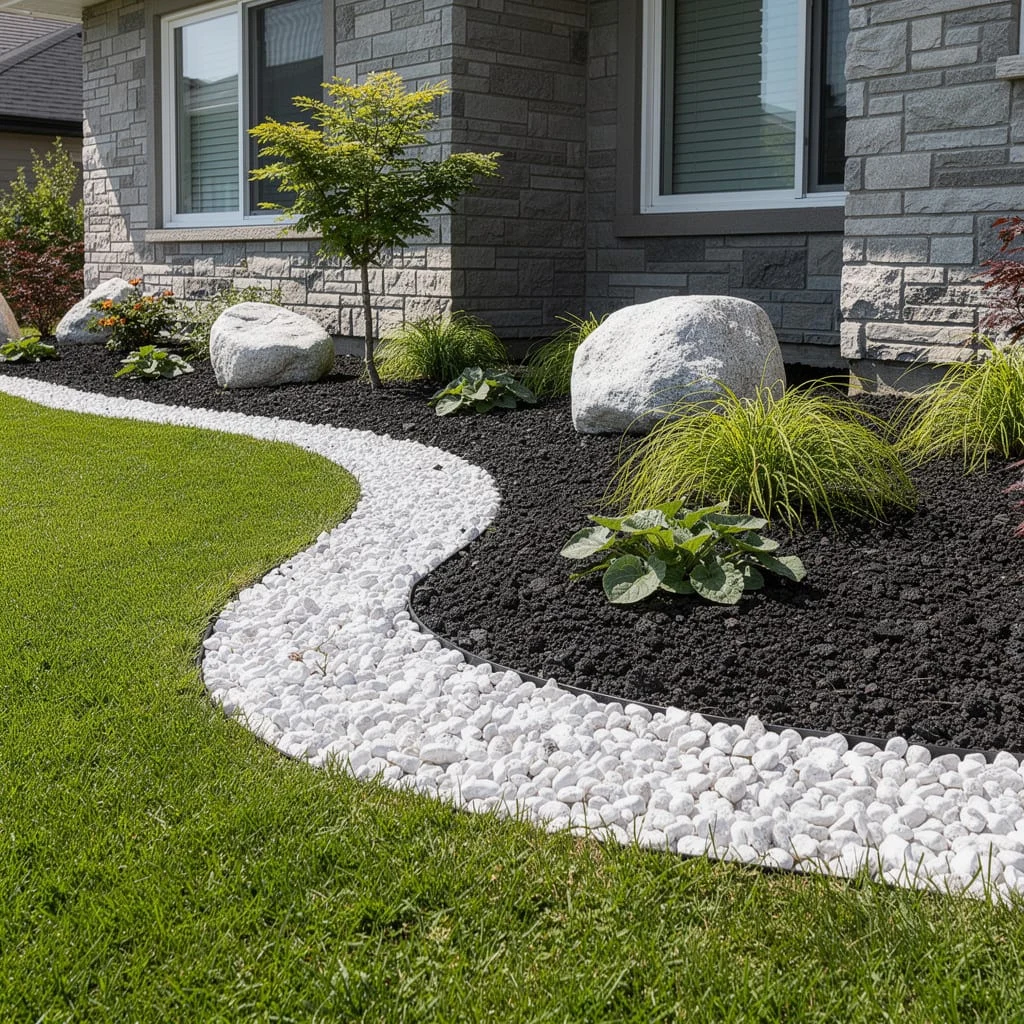
White Pebble River With Boulders and Hostas
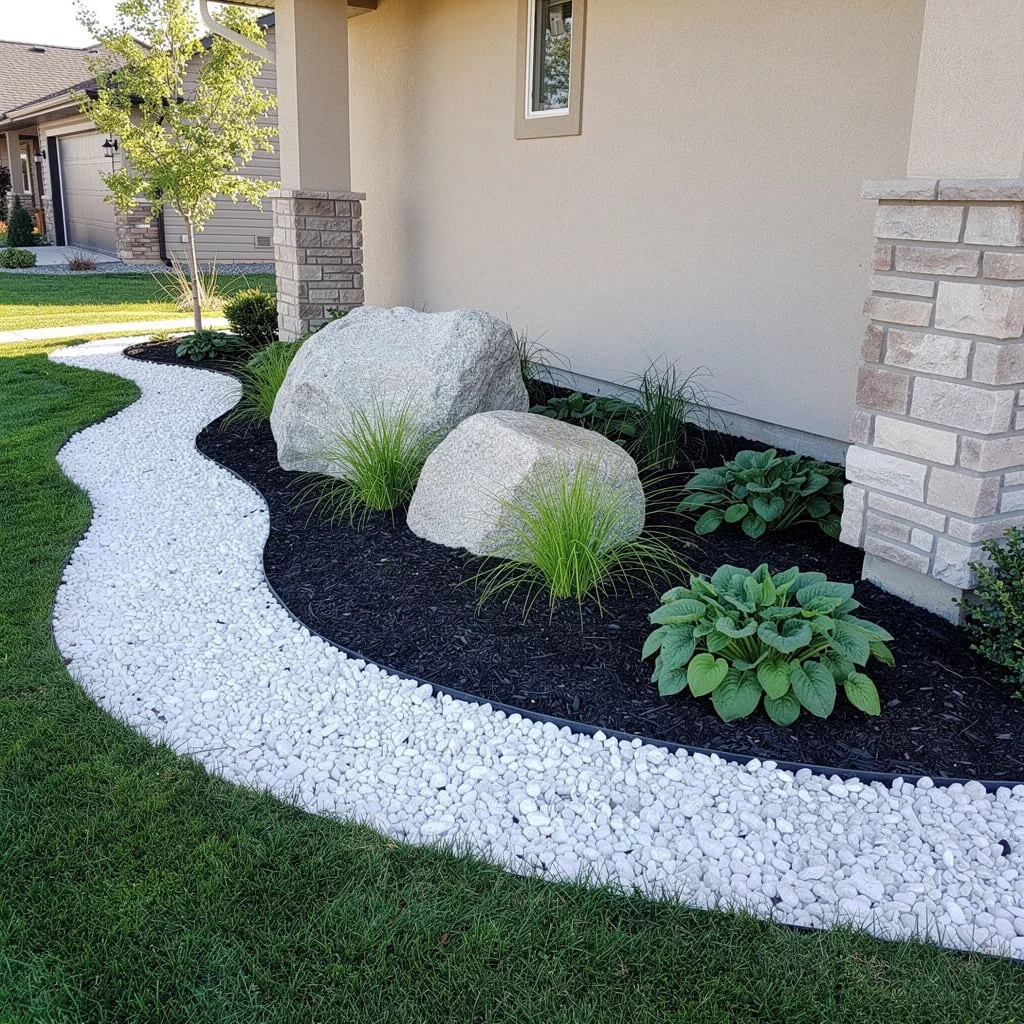
This is a quieter, more monochromatic version of the pebble river idea — using only grey, white, green, and the dark brown of bark mulch, without any flowering plants. The composition depends entirely on the contrast between materials and the placement of the boulders as sculptural objects.
Install the two-zone boundary system: steel edging on the lawn side of the white pebble zone, and a second steel edging strip on the mulch side. Choose white or pale grey polished river pebbles in the 20 to 40-millimetre size range — larger than in a groundcover application, since they will be seen as a material rather than a texture. Fill the pebble zone to 8 centimetres depth. In the dark mulch planting zone behind, position two large granite or limestone boulders — each at least 50 centimetres in diameter — partially buried and placed in a slightly asymmetric arrangement, one closer to the house wall and one further forward.
Plant blue-green ornamental grass — Blue Oat Grass or Elijah Blue fescue — between and around the boulders, filling the gaps. Add three to five hostas in large-leaf varieties along the base of the wall. Mulch all exposed soil in black or near-black bark. No flowers. No colour. Just form, texture, and the graphic line of the white pebble river curving between the green lawn and the dark planted bed.
Warm-Tone Foundation Bed Against Brick

The combination of red-orange brick, purple salvia, and pink or mauve thyme is a warm-temperature palette that reads as rich and slightly Mediterranean in character. The warm brick wall behind the planting enhances every warm note in the plants — the brick and the plants are in the same colour family, so they harmonise rather than contrast.
Keep the plant selection to exactly three species. Plant compact red barberry or red-tip photinia in a single row against the wall at 60-centimetre centres for the dark red foliage backdrop. In front of it, plant May Night salvia — which produces deep purple-blue flower spikes — at 30-centimetre centres in a continuous band running the full length of the bed. At the front edge, plant compact pink or magenta thyme or dianthus in a spreading mass.
Mulch with a warm brown bark rather than near-black — the warmer mulch tone complements the brick background rather than creating a cold contrast with it. This is one of the few beds where brown rather than black mulch is the better choice, precisely because of the dominant warm tone of the wall material.
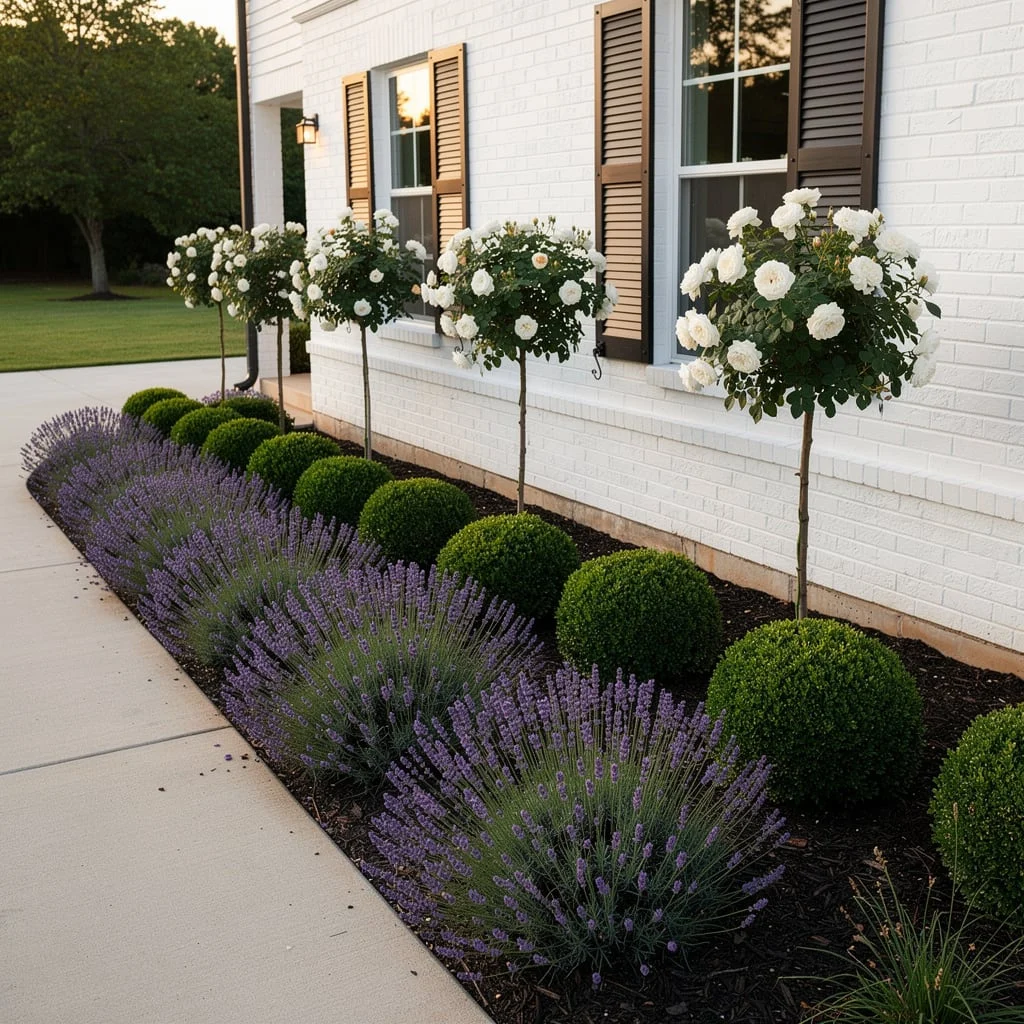
Farmhouse Three-Species Foundation
The three-plant combination at work here — boxwood spheres, lavender, and tall ornamental grasses — produces a layered composition that reads as simultaneously structured and naturalistic. The spheres provide the evergreen geometric form, the lavender provides the purple-silver spreading ground layer, and the grasses provide the vertical movement and seasonal texture. None of the three species flower in a conventional sense except the lavender, which means the bed holds its structure and interest across all four seasons.
Plant the ornamental grasses at 80-centimetre centres against the wall — Calamagrostis Karl Foerster for upright form, or Pennisetum for the arching weeping effect visible in this image. Between each grass, position a single boxwood clipped into a sphere at 35 to 40 centimetres diameter — the alternating grass and sphere rhythm is what gives the bed its visual metre. In front of all the back-row plants, install lavender at 30-centimetre centres in a single continuous band across the bed width.
Choose a mid-height variety such as Munstead or Hidcote that will not overwhelm the boxwood spheres in front of it. Mulch the entire bed in very dark black-brown bark. The dark shutters on the white barn-style siding above the bed are part of what makes this work so well — the dark shutters, dark grass seed heads, and dark mulch form a tonal connection that runs through the composition vertically.
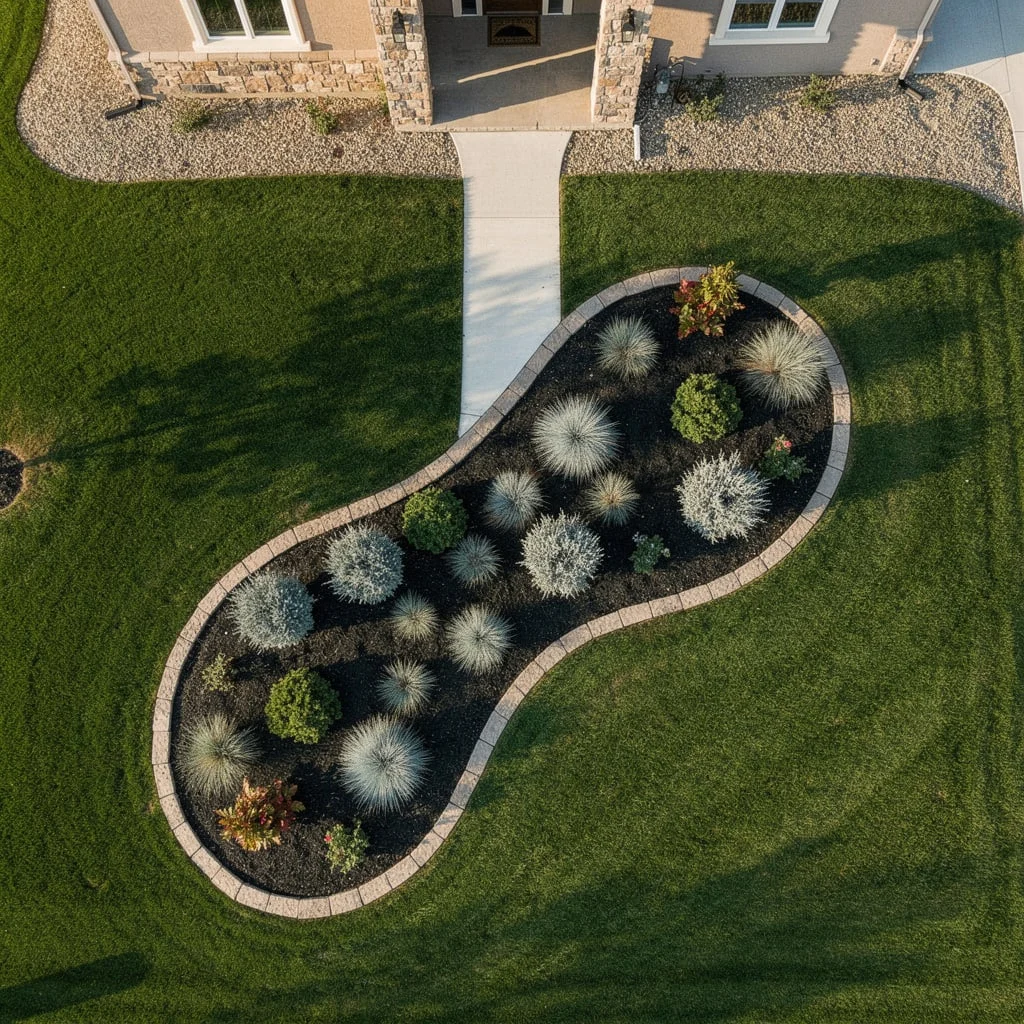
Blue Fescue Island Bed
This aerial-perspective composition reveals a design principle that only becomes fully visible from above: a double-oval island bed — like a peanut shape — planted almost entirely with a single silver-blue ornamental grass, creating a repeated bubble pattern across the dark mulch surface that reads as both graphic and botanical.
The plant is Blue Fescue or Festuca glauca, a compact clumping grass that forms perfect hemispheres of silver-blue foliage 20 to 30 centimetres in diameter. Plant them at 40-centimetre centres across the full interior of the island bed — leaving some gaps for compact shrubs and a few red-leafed accent plants like Heuchera — so the bed surface reads as a field of silver spheres when viewed from above. Edge the entire bed perimeter with grey-tan concrete edging blocks, following the double-oval shape. The edging should be consistent in height — one block — around the full perimeter.
Fill all exposed soil between the fescue plants with near-black dark bark. A few larger green boxwood clumps at the wider end of the oval provide scale contrast. Keep the surrounding lawn in perfect condition and mow it in alternating directions to maintain the stripe effect visible in the photograph.
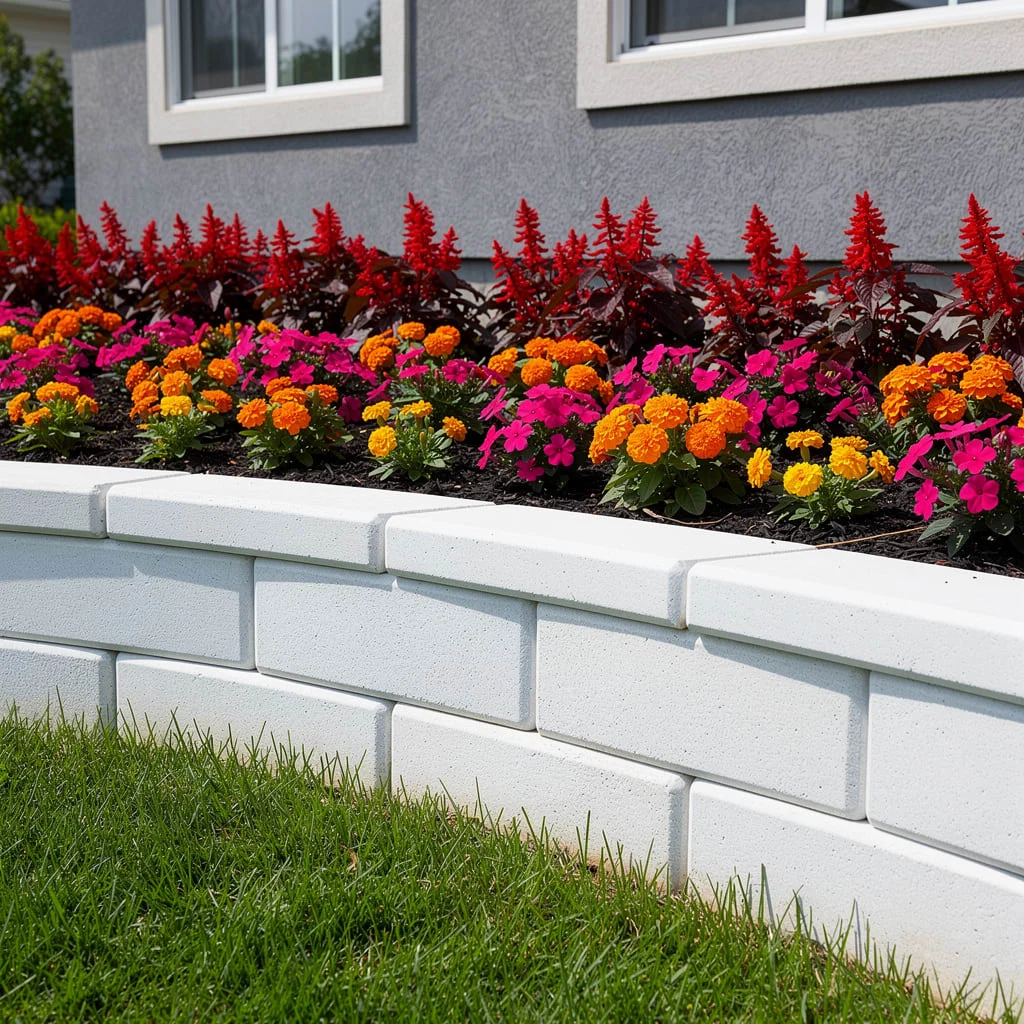
Hot Colour Annual Bed With White Wall
The white painted or rendered masonry retaining wall — three courses high — is the frame that makes this intensely coloured annual planting work as design rather than spectacle. The white wall compresses the height of the bed above it, elevating the planting and providing a neutral surface against which the hot orange, pink, and red annual colours read at full intensity.
Build the retaining wall from smooth-face rendered concrete blocks painted in exterior white masonry paint, setting them on a concrete footing at three courses high. Fill the raised bed with excellent free-draining annual growing mix. Plant in three layers: red cockscomb or red salvia at the back for vertical height and the deepest colour, orange French marigolds across the middle for the warm mid-tone, and hot pink impatiens or vinca at the front for the spreading ground colour.
Plant each species in a full continuous band across the bed width — not in clusters, not alternating. The banding is the design: three solid horizontal stripes of increasingly warm colour from back to front. Replace the annuals completely at the end of each growing season, choosing the same or a closely related colour combination to maintain the intended palette.
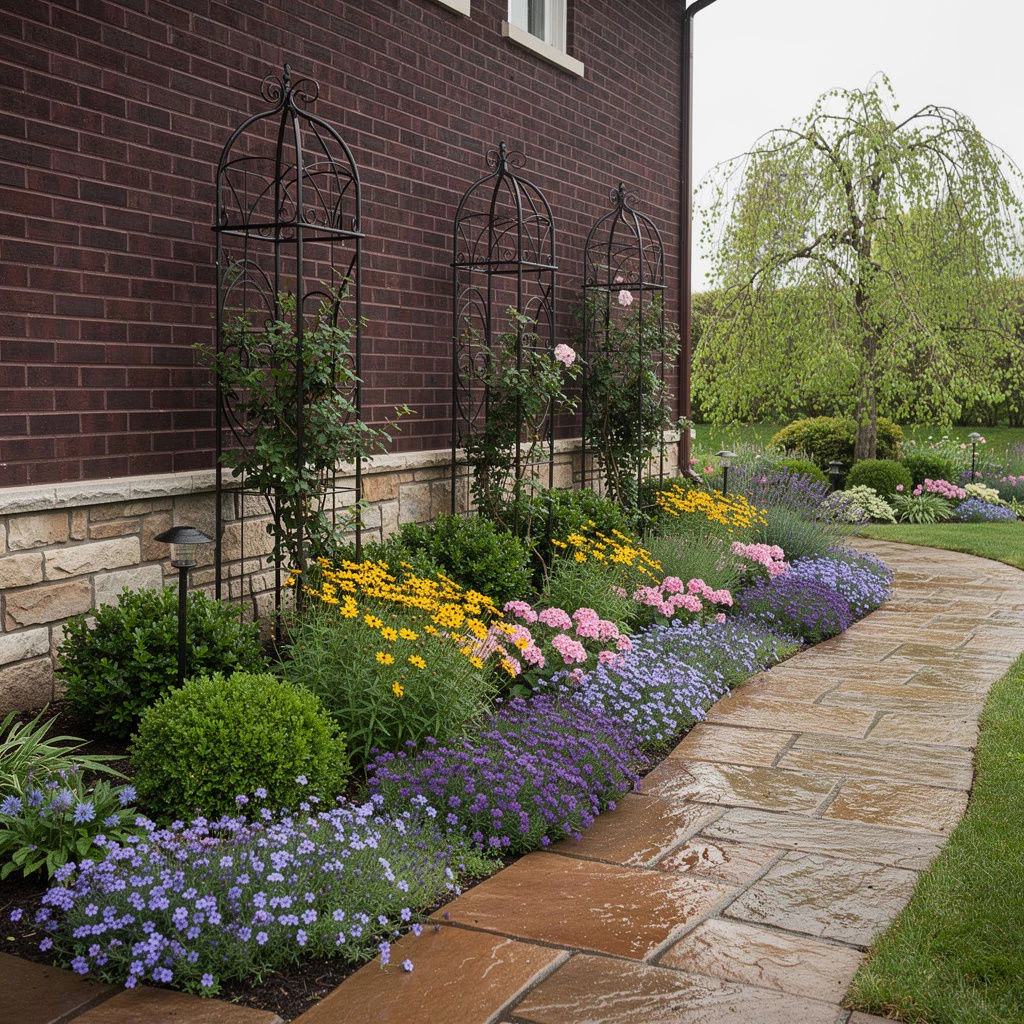
Iron Obelisk Border With Perennials
Three identically sized and equally spaced black iron obelisk trellises mounted against the dark brick wall are the architectural spine around which this entire border is organised. They provide the vertical element that no plant in the perennial border can provide as consistently, and their height and dark colour anchor the composition against the very tall brick wall above.
Purchase or commission matching iron obelisk trellises at a minimum of 180 centimetres in height, in a consistent gothic arch or cathedral style. Mount them directly against the wall using masonry anchors and standoff brackets that hold the trellis 5 to 8 centimetres clear of the wall surface, allowing climbing plants to grow behind the structure. Plant a single climbing rose at the base of each obelisk — choose a repeat-blooming variety in pale pink or soft white. In front of the obelisks, build a perennial border in three layers: tall Rudbeckia or yellow coreopsis in the mid-ground, compact pink phlox or pink echinacea behind the path edge, and low blue lobularia or blue geranium as the spreading front layer.
Add compact boxwood spheres at the entry point of the border as the permanent structural anchor. Install low-voltage path lights at intervals along the bed boundary. The lights illuminate the obelisks and the wall behind them at dusk, making the trellis structure visible as garden architecture rather than just a support frame.
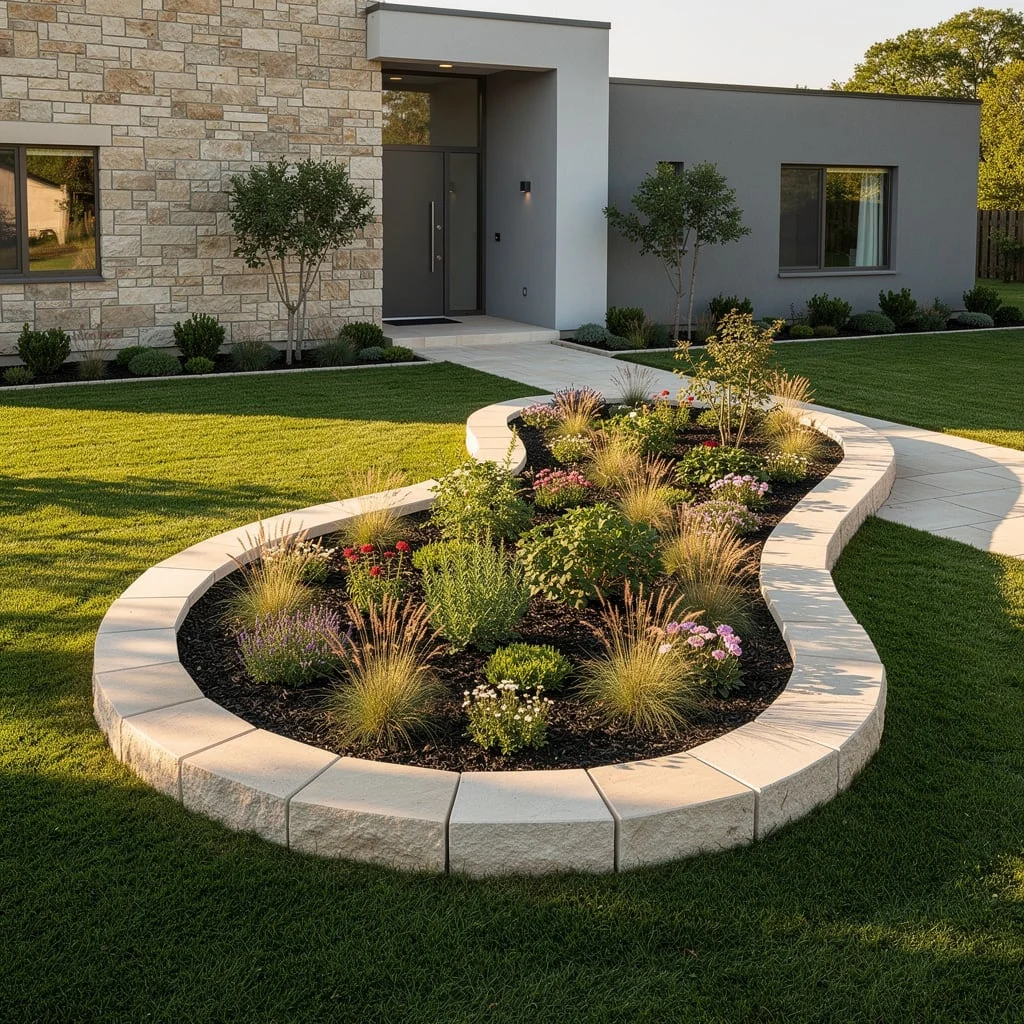
Curved Limestone Block Island Bed
The stone or concrete block edging here is in a warm cream or limestone tone — not white, not grey — which places it in a naturalistic rather than a formal register. The colour of the edging relates to the stone cladding on the house facade and to the warm tones of the ornamental grasses inside the bed, creating a material coherence that runs from the building out through the landscape.
Lay out the bed shape in a generous kidney or s-curve, with no dimension narrower than 120 centimetres. Install the limestone-coloured split-face concrete blocks as a single-course edging, following the curved boundary and cutting the blocks at their ends to follow the arc without leaving gaps. This requires a masonry saw — hire one if you don’t own one, because the curved edging is the thing that elevates this design above a standard landscape block border. Fill the bed with dark mulch and plant a mix of ornamental grasses — feather reed grass, blue oat grass, and blue fescue in varying sizes — with flowering perennials tucked between the grass clusters: red dianthus, pink geranium, white alyssum.
Plant a slim ornamental tree — olive, Italian cypress, or multi-stem birch — at the curved apex of the bed as the vertical focal point. The olive trees visible in the background of this image reinforce the Mediterranean character suggested by the warm limestone edging.
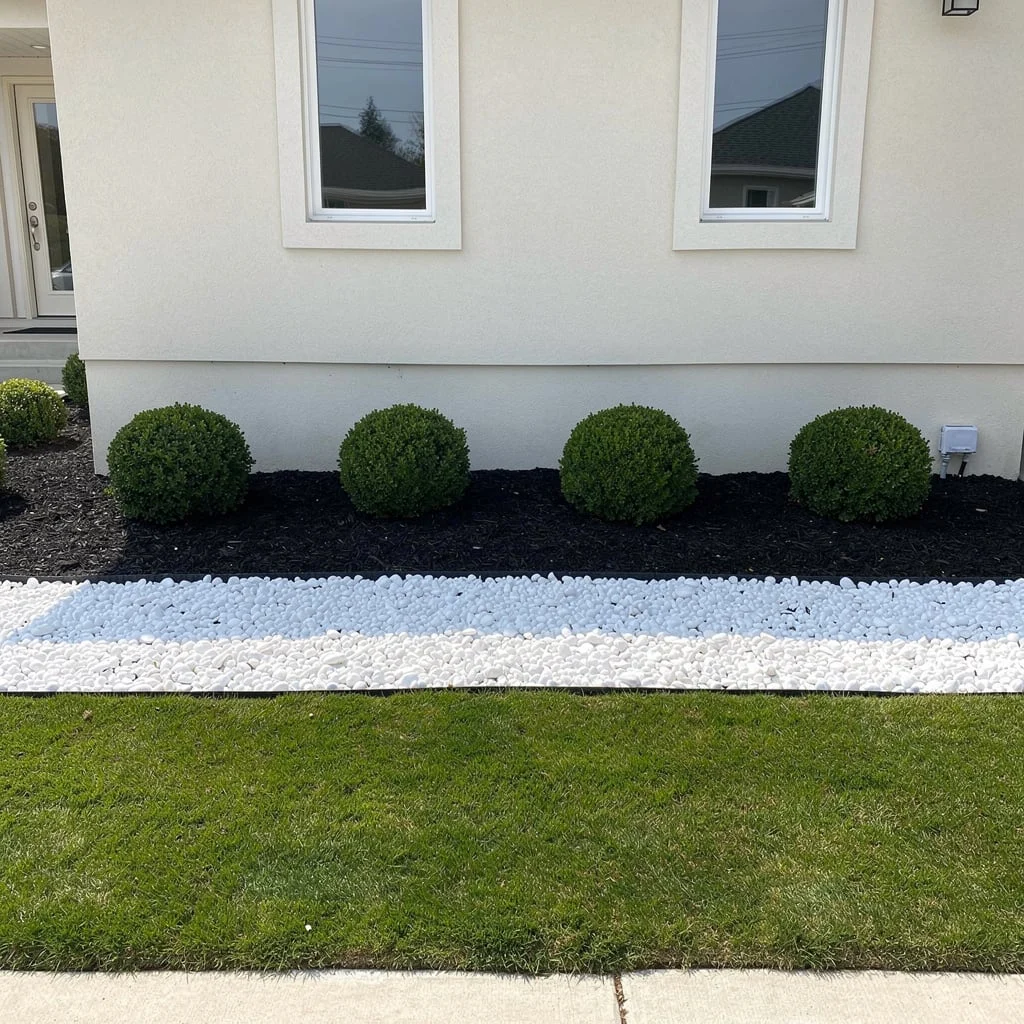
Black Mulch With White Pebbles and Boxwood Spheres
The simplest and arguably the most resolved composition in this collection: four equally spaced boxwood spheres planted in a single row against a cream stucco wall, with a deep white pebble zone in front of the mulch bed, a clean steel edging strip between the pebble zone and the lawn, and no other plants. Nothing else.
The installation sequence matters. Install the steel edging first, bent to follow the straight line of the foundation bed boundary. Behind the edging, lay a 7-centimetre deep layer of white polished river pebbles — not a narrow band but a generous 40 to 50-centimetre wide zone. Behind the pebble zone, a second steel edging strip separates the white pebble zone from the dark mulch bed. Fill the dark mulch bed with near-black bark mulch to 7 centimetres.
Plant the boxwood spheres at equal centres — measure precisely — against the wall in a consistent size, clipping any variation in plant form before installation so all four spheres appear identical. No other plants. No decoration. The composition is complete.
Final Thoughts
Every bed in this collection made one decision and committed to it completely. Not twelve decisions. One.
The s-curve bed committed to its line. The standard rose bed committed to its repetition. The tropical corner committed to its colour. The white pebble and black mulch composition committed to its restraint. That clarity of intention is what makes each of them work, and it is also what makes each of them feel effortless to look at — as if the garden arrived naturally rather than being installed.
Before you buy a single plant or lay a single stone, decide what your one decision is. Then make it, and make it fully.
Everything else follows from there.