
Garden edging is the detail that separates a yard that looks maintained from one that looks designed, and the gap between those two things is larger than most homeowners realize until they see a properly edged bed for the first time and can’t unsee the difference. It’s the kind of upgrade that costs relatively little, requires no major installation, and yet communicates — instantly and unmistakably — that whoever tends this garden actually cares about it.
The thing about edging is that it’s less about the material itself and more about what the material does to the relationship between the planting bed and everything around it. A clean, defined border between lawn and garden bed makes the lawn look better, makes the planting look more intentional, and makes the whole yard read as a composed space rather than a collection of things that happen to share the same property. It is, in the most literal sense, where the design lives.
Why Most Garden Edges Are Doing the Bare Minimum
A distressing number of garden beds are separated from their surrounding lawn by nothing more than optimism and the occasional bout of hand-edging that lasts about three weeks before the grass reclaims its territory. This is not a strategy — it’s an absence of one.
Edges Define What a Garden Bed Is – Without a clear edge, a planting bed is just an area where the grass has been removed. A defined edge transforms it into a deliberate space with boundaries that communicate intention. The plant material inside can be identical, but the presence or absence of a considered edge changes everything about how it reads.
The Right Material Amplifies the Planting – Edging doesn’t just contain a bed — it frames it. Dark metal edging makes every green tone inside the bed pop more intensely. River pebble edging creates a naturalistic transition that makes informal plantings feel cohesive. Timber railway sleepers give a raised bed the visual weight it needs to hold its own against a strong architectural backdrop. The material choice is a design decision, not an administrative one.
Maintenance Becomes Dramatically Easier – A properly installed physical edge barrier between lawn and bed keeps grass from colonizing the planting zone in a way that hand-edging never consistently achieves. That alone justifies almost any edging investment purely on labor-saving grounds, before the aesthetic improvement is even considered.
The Edging Decisions Worth Getting Right
Most edging failures come from treating the installation as a quick job rather than a considered one, which produces results that look provisional and require constant remediation.
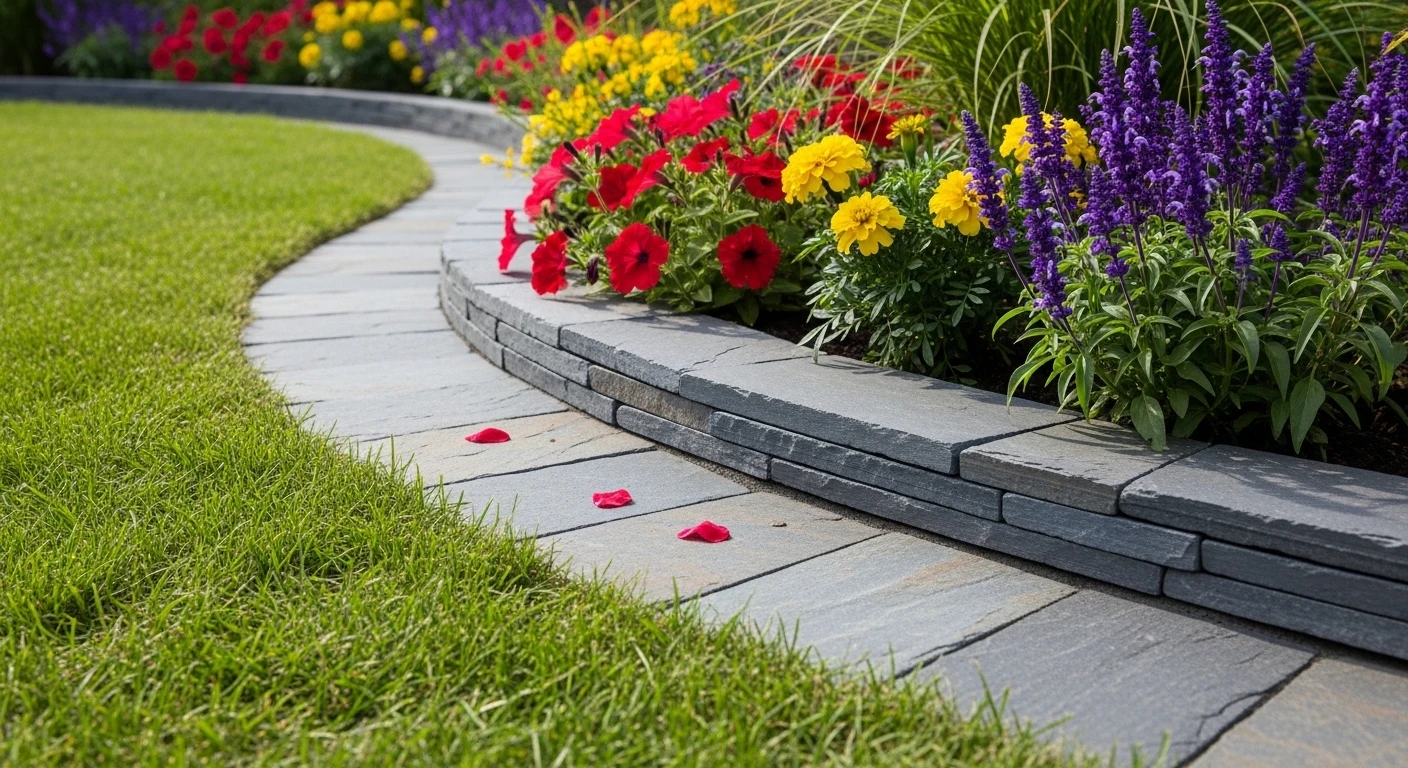
Depth Matters as Much as Visibility – The portion of any edging material that sits above ground is the part people see. The portion that sits below ground is the part that actually works. Edging installed without adequate depth gets pushed out of position by frost heave, root pressure, and lawn mower contact, usually within one season. Install it properly once and it holds indefinitely.
Curves Require Commitment – A gentle, sweeping curve in an edging line looks elegant and intentional. A wobbly, uncertain curve that can’t decide what it’s doing looks like a mistake. Before installing any flexible edging material in a curved configuration, mark the line with a garden hose first and live with it for a day before committing. The difference between a confident curve and an accidental one is the entire difference between designed and approximate.
The Edge and the Mulch Work Together – Garden edging and the ground cover material inside the bed are a system, not independent elements. The right mulch or ground cover material, applied at the right depth, contained by the right edge, creates the complete picture. Getting the edging right and filling the bed with thin, pale, old mulch produces a result that’s still only halfway there.
What Every Garden That Looks Properly Finished Has in Common
Every yard that prompts unsolicited compliments from neighbors shares one quality across the board — the transitions between different surfaces are clean, defined, and clearly maintained. The line between lawn and bed, between path and planting, between gravel and grass — these junctions are where a garden either looks resolved or looks like a work in progress. Edging is the single most efficient investment in making every one of those junctions look resolved, and it pays visual dividends every day of the year regardless of what’s flowering or not.
Garden Edging Ideas
Timber Log Roll Edging:
Completely redid my garden. Added new flowers and edging. Really happy the way it came out 😁 😤
by u/Few_Lobster7961 in gardening
Log roll edging — sections of pointed timber logs wired together in a continuous roll — is one of those materials that ages into its environment rather than resisting it, which gives it a particular charm that harder-edged options can’t replicate. Here it runs the full length of a foundation bed, containing dark rich soil and a loose, abundant mix of tulips, salvia, alyssum, and mixed perennials that presses right up to the timber edge with the casual generosity of a well-tended cottage garden. The warm brown tones of the treated timber against the dark soil and the white lattice fence backdrop create a composition that feels warm and intentional without trying too hard. The logs are doing the practical job of keeping soil in the bed while the pointed tops are providing just enough visual interest at ground level to make the edge itself worth noticing.
Grey Paver Brick Edging With White Gravel and Globe Lights:
A single row of grey paver bricks laid flat creates the crispest possible transition between a lawn edge and a white gravel planting bed, and this installation uses that simplicity as the foundation for a garden border that’s considerably more polished than its straightforward construction would suggest. The white gravel bed behind the brick edge contains white limelight hydrangeas at mid-height, pleached standard trees providing an elevated canopy layer, and two glowing pink-orange sphere lights placed at irregular intervals that turn the whole border into something atmospheric after dark. The dark horizontal slatted fence behind everything anchors the composition and makes the pale hydrangea blooms read with the kind of crisp contrast that makes them look twice as impressive as they would against a lighter backdrop.
Oak Railway Sleeper Raised Bed With White and Purple Planting:
A railway sleeper raised border along a garden fence line is one of the most transformative single investments a new-build garden can make, and this one demonstrates why with complete conviction. A single course of chunky, honey-toned fresh oak sleepers runs the full length of a timber fence, raising the planting bed just enough to give it visual presence without creating an imposing barrier. Behind the sleeper edge, white candytuft and purple-flowered catmint tumble forward in a soft, generous mix that contrasts beautifully with both the warm timber and the pale porcelain paving alongside it. Young multi-stem trees underplanted with the same perennial mix extend the design into the vertical plane, suggesting that this border was planned as a complete scheme from ground level to canopy height rather than assembled piece by piece.
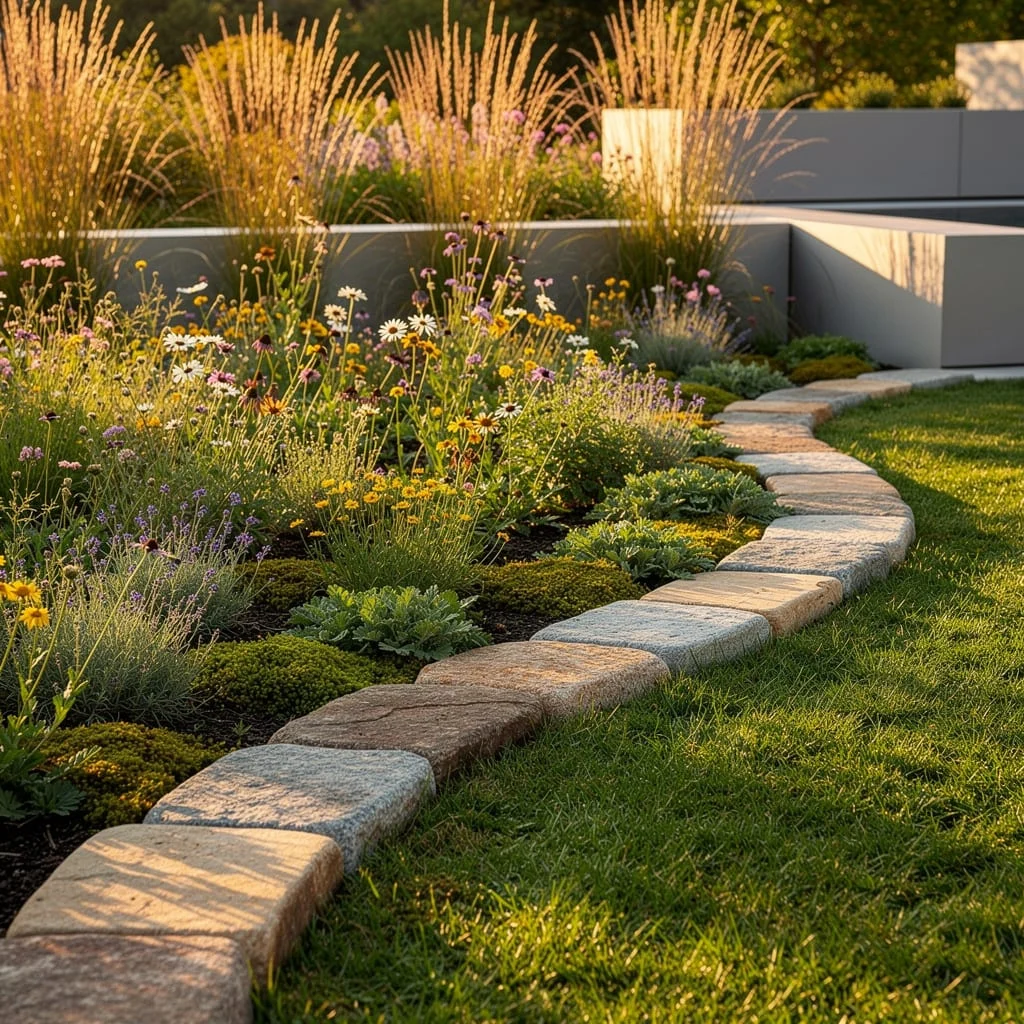
River Stone Edging Along a Curved Front Bed:
Using smooth river stones as a continuous edging strip between a lawn and a planting bed is one of those ideas that sounds straightforward and looks extraordinary in practice — and this front yard installation demonstrates the full potential of the approach. A generous band of mixed-tone river pebbles runs in a generous, confident curve along the lawn edge, creating a naturalistic transition zone that makes the bed look like it evolved rather than was installed. The planting behind the stone edge is precisely the right complement — large-leaf hostas, blue spruce, mounding shrubs, and white flowering alyssum creating a shade-garden palette that reads as quietly sophisticated against the dark mulch ground plane. The combination of natural stone edging, varied foliage textures, and boulder accents within the bed creates a front garden composition that looks significantly more expensive than the materials cost.
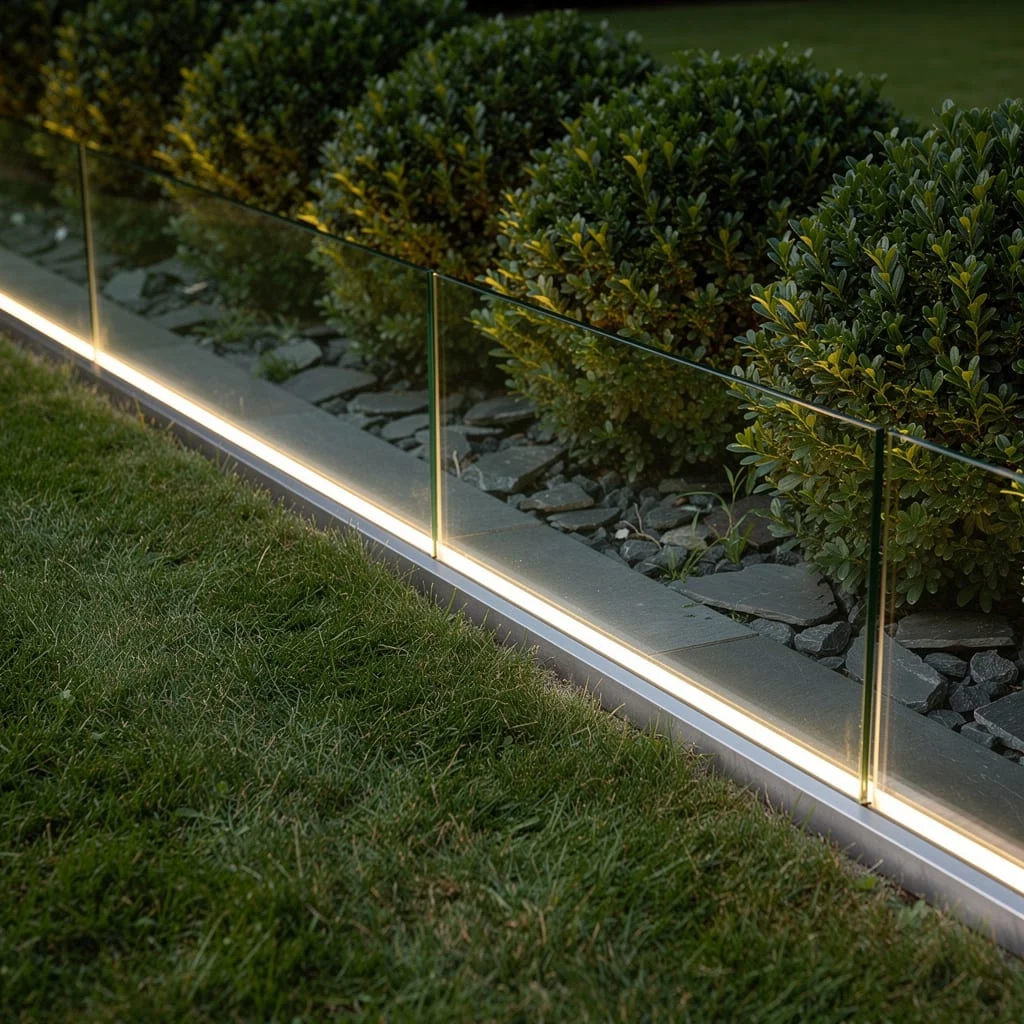
Black Metal Edging With White Stepping Stones and Planted Border:
Black metal garden edging — steel or aluminium powder-coated in matte black — has become the default choice of professional landscape contractors for good reason: it disappears visually while doing its structural job better than almost anything else available. Here it defines the clean division between a mulch planting bed and a black gravel pathway zone, containing a border of mixed mid-height perennials and ground-level plantings beneath a row of standard-trained trees that create a green canopy corridor along the fence line. White rectangular stepping stone pavers cross the dark gravel at regular intervals, and the graphic contrast of white stone against near-black gravel is made possible entirely by the precision of the metal edging keeping both materials cleanly contained on their respective sides of the boundary. The result is tight, sophisticated, and clearly the work of someone who knows what they’re doing.
River Pebble Drainage Strip Between Lawn and Bed:
A continuous river pebble strip running along the edge of a garden bed, contained on the lawn side by a flexible black plastic edge barrier set at ground level, solves multiple problems simultaneously — it creates a clear visual boundary, provides a drainage buffer that prevents lawn water from sitting against plant stems, and removes the strip of ground most vulnerable to weed colonization from the edging equation entirely. The warm mixed-tone pebbles here — cream, grey, rust, and taupe — create a natural, organic-looking edge against the green lawn that reads as considerably more considered than the simple plastic barrier doing the actual containment work below the surface. The planting behind the pebble strip keeps things deliberately informal with hostas, creeping ground cover, and a few larger accent stones, creating an easy, naturalistic garden border that will look better every year it’s maintained.
Channel Modern Royalty with Black Granite and LED Drama
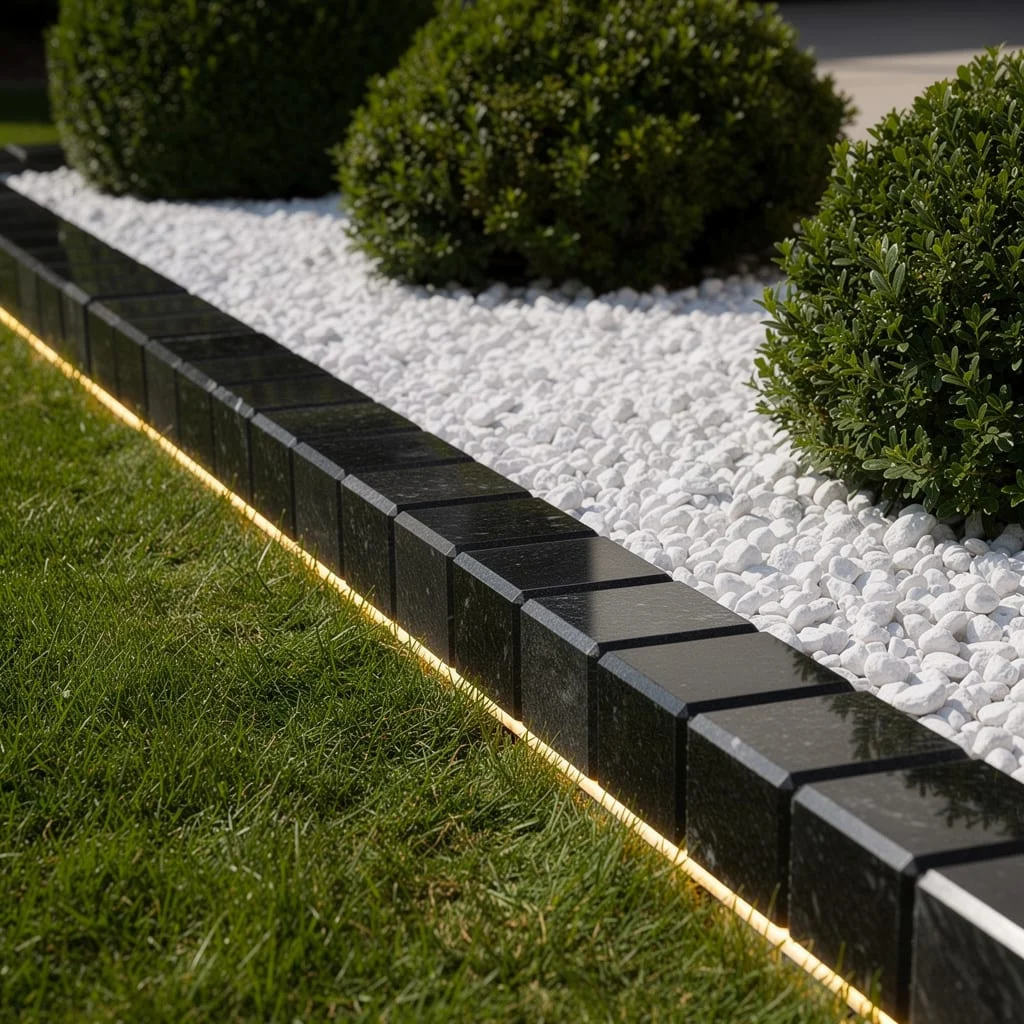
Want your yard to look as punctual and put-together as your most type-A friend? Go full executive mode with hand-polished black granite blocks for a razor-sharp edge between your lush grass and pristine white pebble beds. Lay each granite block with hawk-eyed precision—no sloppiness allowed—and go for those chamfered edges because, let’s keep it boujee, shadow lines are a flex. Add a low-profile LED strip along the base to get that twilight runway look, and make your shrubs earn their keep: trim them into geometric shapes so everything feels deliberate, not wild. Pro tip: never skimp on aligning your blocks—crooked stones are banned. If you’re going luxe, go all-in or not at all.
Rust Never Looked So Chic—Do Corten Steel for ‘Designer’ Vibes
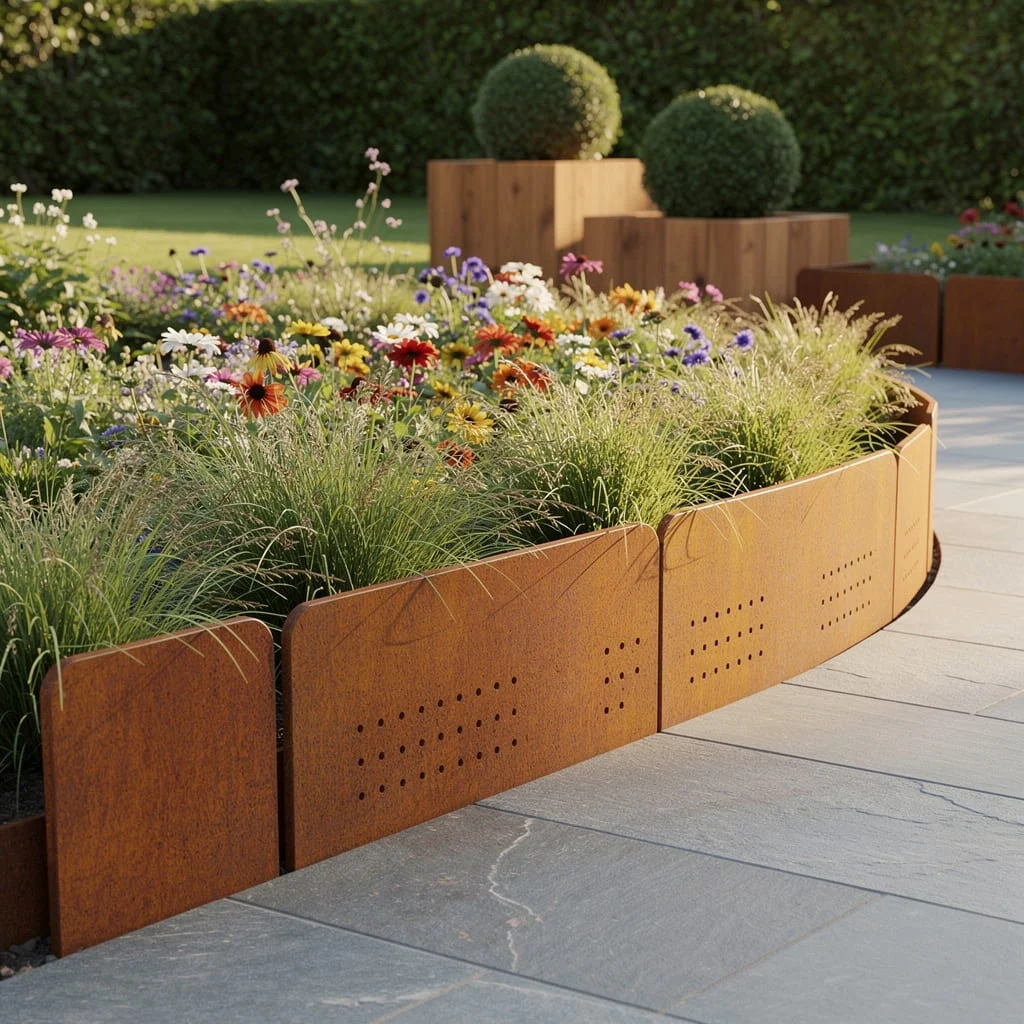
Ready to ditch the ‘I bought this at the mega-mart’ look? Bend corten steel panels around your flower beds for an edge that says, ‘Yeah, I have taste—fight me.’ Let that rusty patina do all the talking and make sure your panels hover just above the grasses, not looming like a fence. Put in those drainage holes—trust that water damage isn’t sexy—then run bluestone pavers nearby to underscore this modern take. Tip: Soften the look with ornamental grasses that spill slightly over, because the only thing more embarrassing than a sterile garden is a cluttered, overstuffed mess. Aim for crisp edges and let materials shine.
Match Belgian Bluestone with Brass Inserts—Because You Deserve Main Character Energy
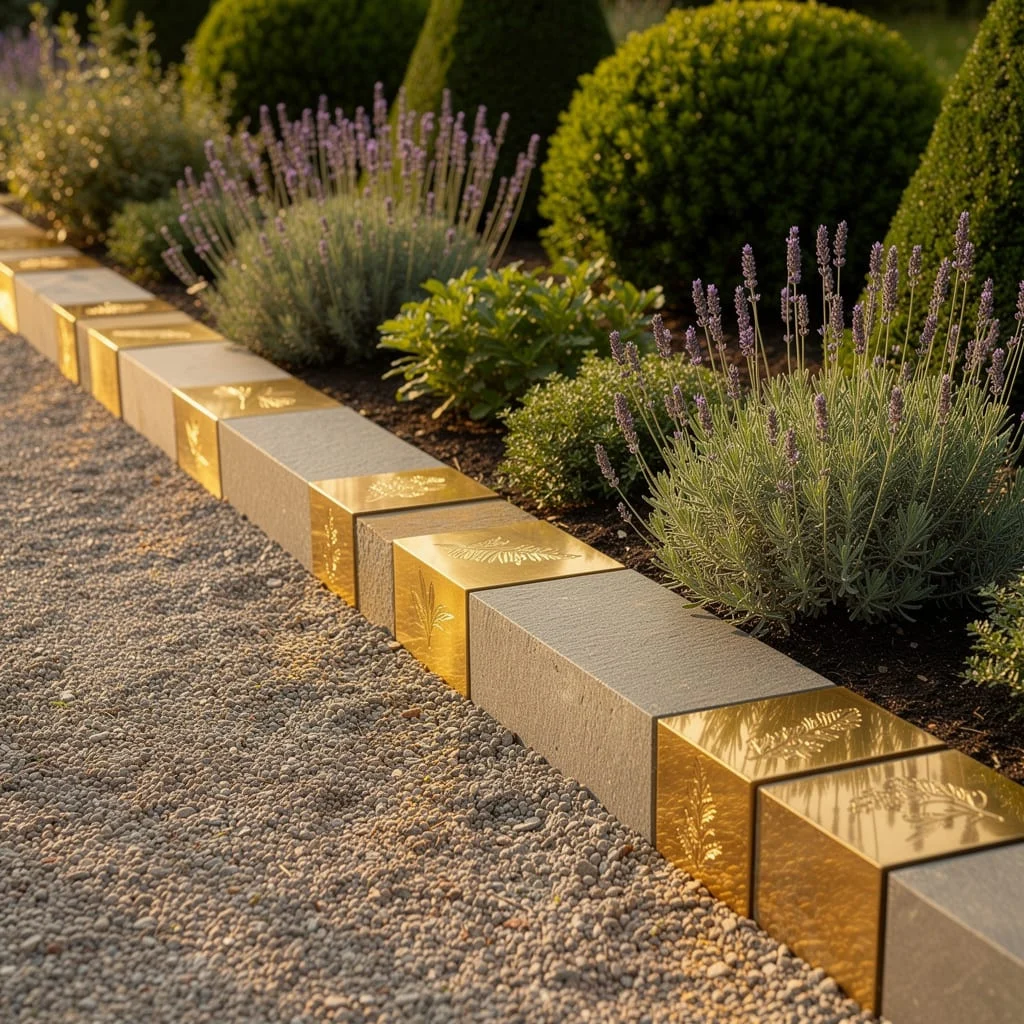
Stop blending in and set the plot twist with a garden edging of alternating Belgian bluestone slabs and polished brass inserts, literally making your pathways sparkle. Lay your bluestone in a linear pattern, drop in those etched brass separators (yeah, the ones with little botanical motifs), and laugh at boring borders. Hedge your bets with surrounding lavender and manicured evergreens for context, but keep the drama at your feet. Pro move: always stagger your slabs and inserts for maximal impact—anyone can lay a straight line, but only the bold make patterns the star.
Go Invisibly Luxe—Lay Glass Panels for a ‘Wait, Where’s the Border?’ Effect
If subtle flexing is your game, drop in ultra-clear, tempered glass panels flush with the ground to mark your edges. The trick is letting the transparency create a sense of separation without shouting about it. Light things up with hidden LEDs beneath the glass for that designer after-hours mood, and flank the whole runway with manicured boxwoods. Slate mulch works like the perfect supporting actor, framing the scene without stealing focus. Here’s the real hack: Always keep your glass smudge-free—dirty panels aren’t minimalist, they’re just gross.
Handle Your Edges Like Art—Mosaic-Tile Borders for the Win
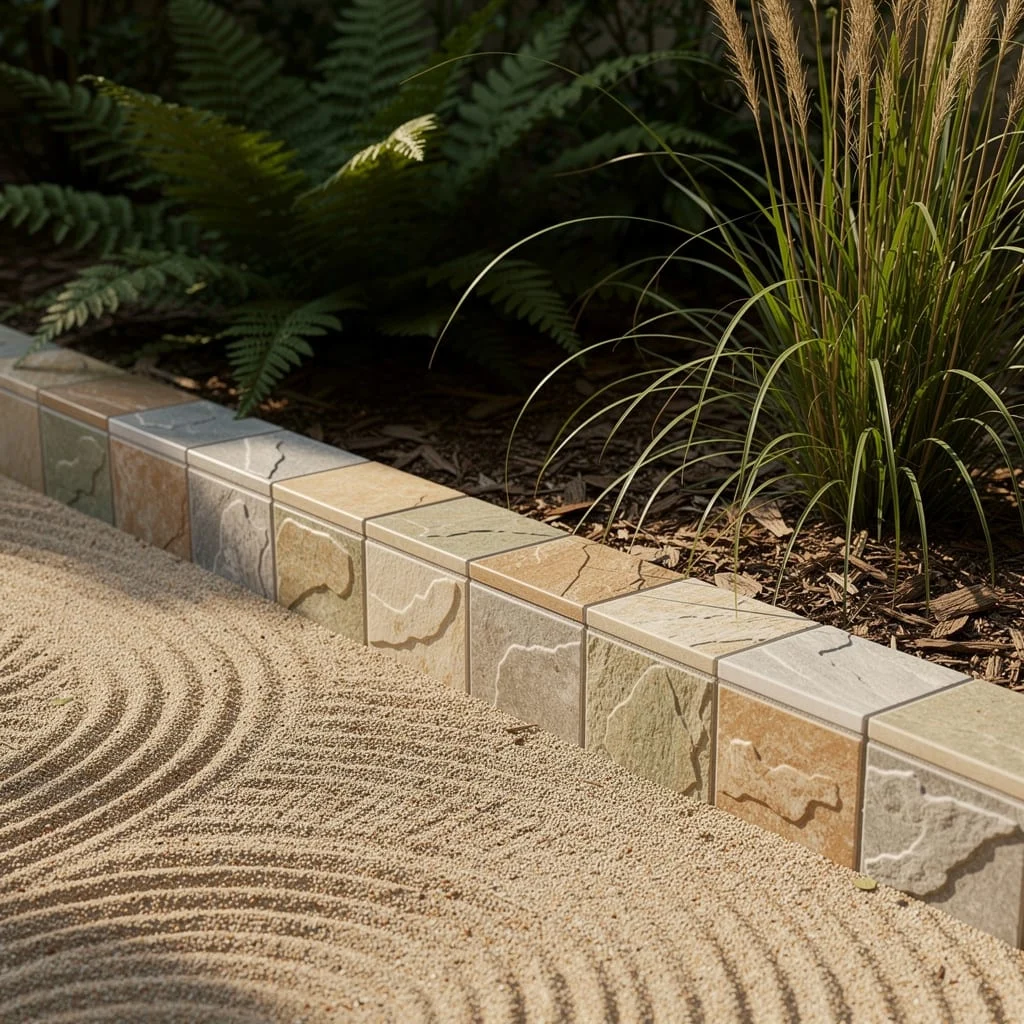
Missing personality? Get artsy and set a garden edge with custom ceramic mosaic tiles in muted natural tones. Fit each tile snugly along your raised bed lines (raise those beds, it looks more expensive) and let relief patterns do the talking. Stop using boring sand as your mulch—finely rake it so those patterned shadows know their spotlight. Tile grout: match it to your base color to avoid eye-melting transitions. Top off with dense ferns and ornamental grasses—yes, drama and calm can coexist. Rule: Never use loud colored tiles unless you want your garden to scream, not sing.
Flex That Tree-Hugger Energy—Stack Reclaimed Oak Beams (Sustainably)
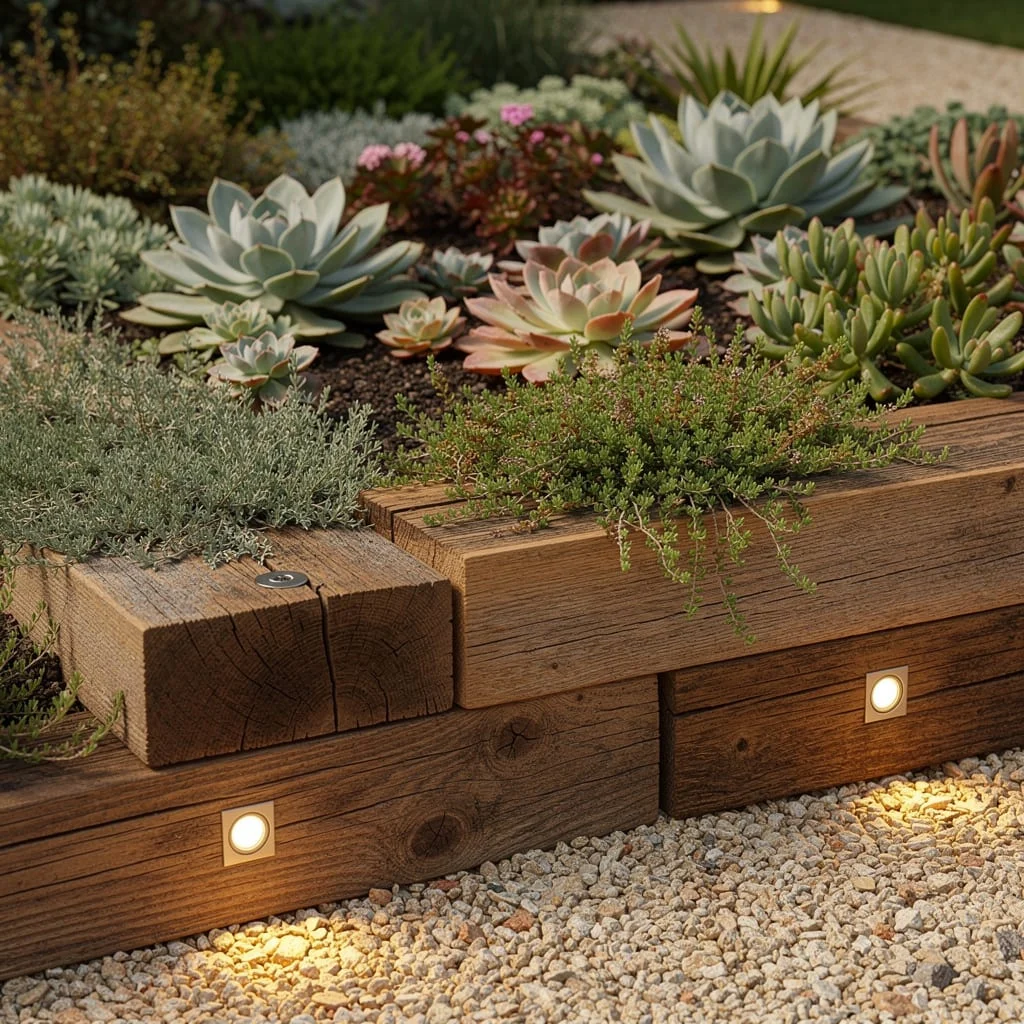
No one’s getting a medal for ugly garden rails. Use reclaimed oak beams, stacked and staggered for visual depth—basically, the natural wall you didn’t know you needed. Spotlight them with sleek, recessed mini-lights, then let thyme and sedum spill casually over the edges (no straight lines in nature, honey). Layer gravel and lush groundcovers for maximum ‘intentional wilderness’ vibes. Real talk: Don’t just throw logs in a pile—keep the edges neat, and make sure each beam is cleaned and sealed so your garden says ‘designer living,’ not ‘decaying barnyard.’
Get Your Luxe On—Vertical Marble Strips Are the Ultimate Power Move
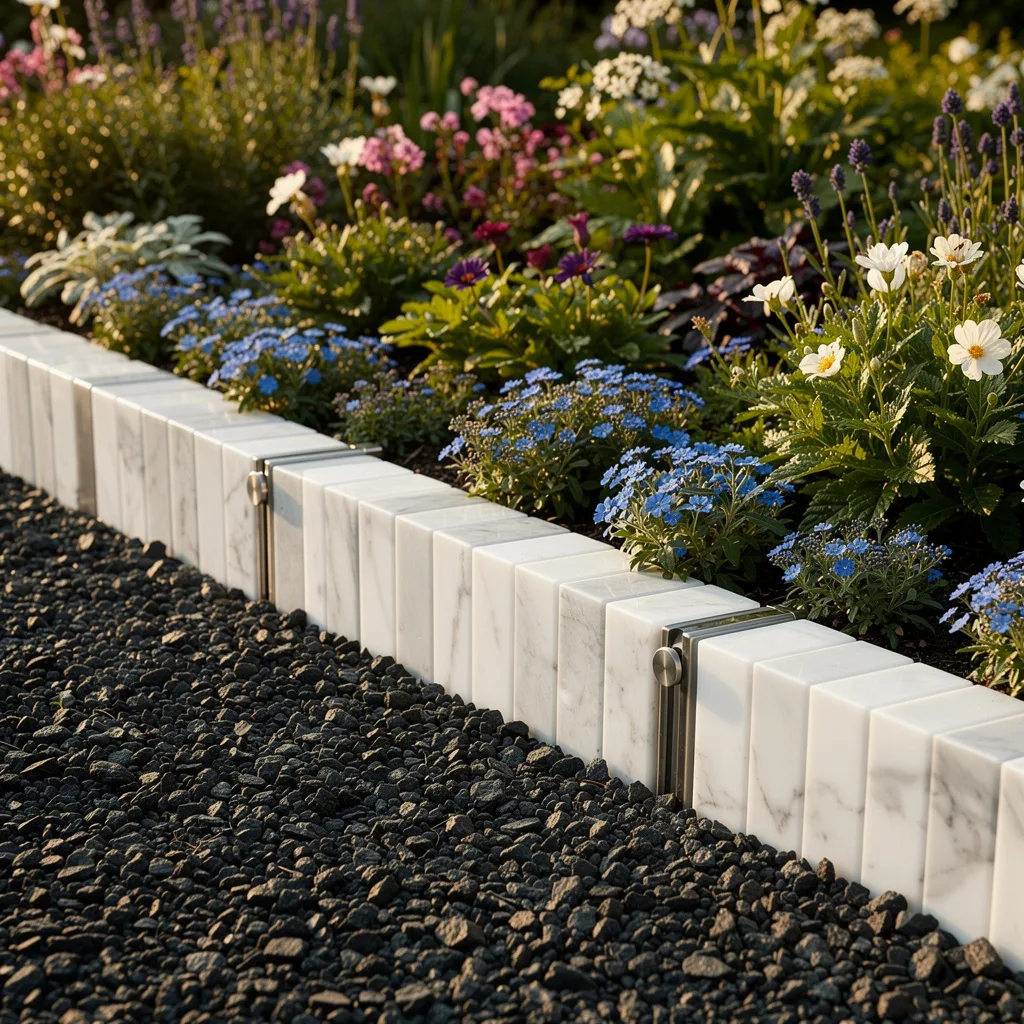
Still using plastic edging? Please stop. Cut and install narrow marble strips vertically to create a luminous garden ribbon that screams old-money elegance. Align each strip precisely—no wonky lines allowed—and pop in stainless connectors for a grid-worthy look. Work blue flowering groundcovers between strips to break up the white and cue the garden version of jewelry styling. Keep basalt gravel on both sides for that brutal contrast. The only rule: Polish those marble faces and pressure wash regularly—dirty marble is NOT a look.
Coil Copper Tubing and Watch Your Neighbors Lose Their Minds (Jealousy Guaranteed)

Want to be talked about at block parties? Everything’s better when you bend copper tubing into swirly geometric borders—think expensive jewelry for your garden, but make it purpose-driven. Patina is a badge of honor, don’t scrub it off. Hide solar-powered uplights inside those loops so the art cranks to 11 after sunset. Lay river pebbles at the base and let groundcovers cascade like a garden curtain. Brass ring: Don’t get lazy with your pattern—sketch it out first or risk a tangled mess on aisle five.
Go Concrete and Glass (No Seriously, the Ultimate Flex)

Still dragging around railroad ties? Step it up. Lay out thick concrete pavers, leaving slim channels in between—then drop midnight blue glass chips to catch every drop of sunlight and moonlight. Brush and seal your pavers to keep those shadows sharp. Border this masterpiece with moss carpets and liriope, and prioritize hydrangea for that strategic splash of softness. Styling rule: Space those pavers just right—too far apart screams ‘trip hazard,’ too close reads ‘cheap sidewalk.’ Test your channel spacing before locking it in forever.
Embrace the Slate Life—Height-Staggered Slate for Rock-Solid Drama
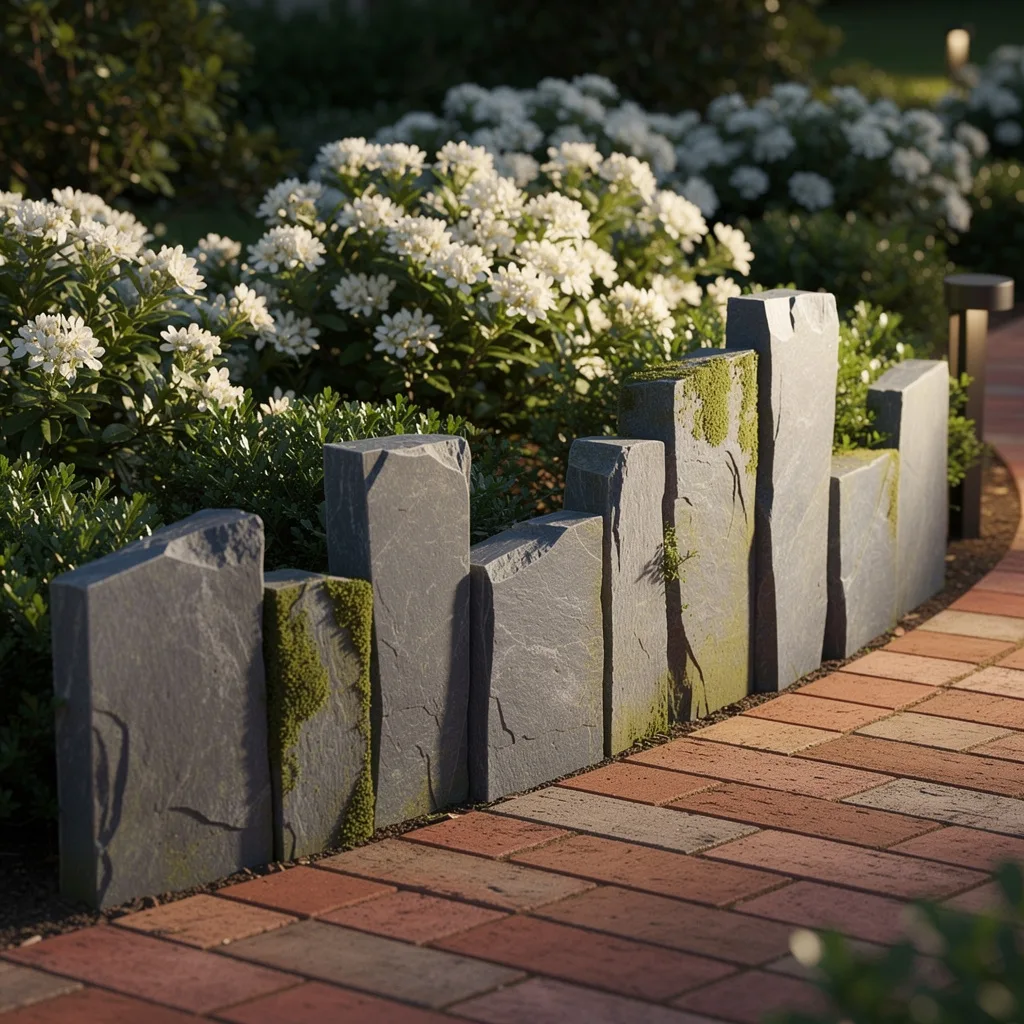
If your garden is reading ‘meh,’ swap plastic for real slate slabs cut in bold, alternating heights. Plant these slabs deep so they stand proud, with moss packed tightly in the gaps for a green punch. Use a backdrop of white flowers and at least one killer brick path for contrast—none of that scruffy stuff you see at big box stores. Accent with low path lights, because nighttime is prime flex time. Pro tip: Mix heights, but keep spacing tight; too much chaos and you’re in ‘construction site’ territory.
Go Industrial Luxe—Matte Charcoal Aluminum for a Next-Level Divide
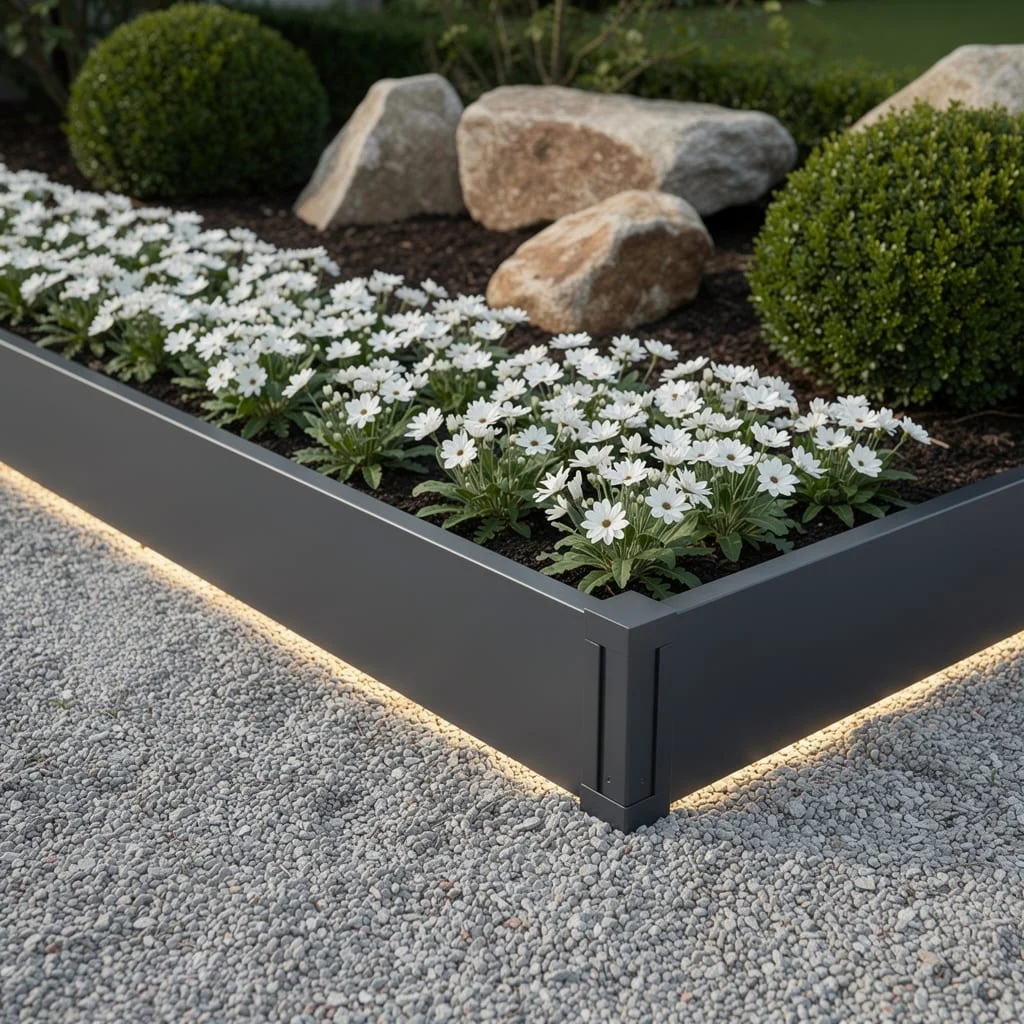
Want a border that means business? Snap in precision-engineered aluminum edging, powder-coated in matte charcoal for the cleanest, coldest finish. Lay them in perfect lines (seamless joints only) next to rows of white-flowering perennials and gravel mulch—no mulch volcanoes, please. Light them up from below for that boss-level, underglow look, and stack mini hedges and stones just behind for depth. Rule: Never let the aluminum bow or buckle—secure those sections like you’re building a spaceship, not a backyard.
Keep It Classic—River Stone and Moss for a ‘Main Character at a Spa’ Vibe
If you think perfect edges have to look forced, get schooled with hand-chosen river stones set in a slow, gentle curve. Fit each stone so its color and texture pop, then polish them lightly for next-level shimmer. Plant moss and micro groundcovers in every gap—it’s literally a living border. Place this along a wildflower bed with sculptural grasses for the high-key ‘natural but moneyed’ look. The pro move: Don’t throw mismatched rocks in random spots—preview your curve, then set each stone with intention.
Final Thoughts
Garden edging is one of those investments that skeptics dismiss as unnecessary detail and converts describe as transformational — and the converts are right. A garden bed with a considered edge and a garden bed without one can contain identical planting and receive identical care, and they will look like completely different levels of gardening ambition.
The material you choose — timber, stone, metal, or pebble — matters less than the commitment to installing it properly, maintaining it consistently, and treating the edge as an active part of the design rather than a chore to be managed. Get that relationship right and every bed in your garden will look like it belongs there. Which, it turns out, is the whole point.