
Here is a number that should bother you: the average bunch of fresh herbs at a grocery store costs between $2 and $4. You use half of it. The rest goes yellow in the fridge by Thursday.
Do that twice a week for a year and you’ve spent $200 to $400 on herbs — a significant portion of which ended up in the bin. Meanwhile, a single herb plant costs $3 to $5, produces continuously for months, and takes up about as much space as a coffee mug.
The math is not subtle. But knowing the math and actually building a herb garden are different things. Most people stall at the second part because they assume it requires a yard, a budget, and some kind of horticultural knowledge they don’t have.
None of those things are true. What it requires is a container, some potting mix, sunlight, and about forty minutes of actual effort. The ideas below prove it — every single one built from salvage, repurposed objects, or materials that cost almost nothing.
Why Repurposed Containers Work Better Than You’d Think
The best DIY herb containers aren’t the ones you buy. They’re the ones you already have, or the ones that would otherwise go to landfill.
The Drainage Problem — and How to Solve It
Any container can become a planter with one condition: it needs to drain. Waterlogged soil kills herbs faster than anything. Roots sitting in standing water rot within days.
For metal containers — tins, buckets, troughs — use a hammer and a thick nail to punch holes through the base. Space them about 5–8cm apart across the entire bottom. The holes don’t need to be large, just numerous.
For ceramic or porcelain containers — old sinks, teacups, decorative pots — a standard masonry or tile drill bit does the job. Go slowly, keep the bit cool with a little water while drilling, and don’t apply pressure. Let the drill do the work. One large hole or several smaller ones works equally well.
For plastic bottles, use a heated metal skewer or a small drill. The heat-method melts cleanly without cracking.
If you genuinely cannot drill drainage into a container — a glazed teacup with no drill bit available, for example — layer the base with 3–4cm of perlite or coarse gravel, then add a layer of potting mix above. Water less frequently and monitor closely. It works as a temporary measure but isn’t a long-term substitute for proper drainage.
Soil and Volume
Small containers dry out fast. This is the main practical challenge with creative DIY planters. A tin can holds maybe 500ml of soil — in summer sun, that’s bone dry by afternoon.
Counter this with the right mix. Use a potting compost that contains a moisture-retaining component — coir fibre, vermiculite, or a pre-blended moisture-control mix. Add a small amount of perlite for drainage balance. Do not use garden soil in containers; it compacts, drains poorly, and brings in weed seeds.
Water small containers daily in warm weather. A cheap moisture meter probe takes the guesswork out entirely — push it into the soil and check before watering rather than watering on a schedule.
Where to Hang and How to Hang Safely
A hanging planter filled with wet soil is heavier than it looks. A terracotta pot in a jute sling, fully watered, can weigh 2–3kg. Several of them on a shared beam multiply that load fast.
For fence hooks: use cup hooks or screw-in hooks rated for at least 5kg, screwed into solid timber rather than just fence boards. If in doubt, use two hooks per planter rather than one.
For overhead hanging from beams or tree branches: use proper S-hooks with a closed loop, and test the anchor point first with a firm pull. Natural jute and sisal rope look beautiful but degrade outdoors within a season. Replace them annually or switch to coated wire with a rope wrap for longevity.
Reading Your Space Before You Build
A DIY herb garden built in the wrong spot fails no matter how good the materials are.
Sun Hours Matter More Than Size
Six hours of direct sunlight is the minimum for most culinary herbs. Basil, rosemary, thyme, sage, and oregano all need full sun. Give them fewer than four hours and they’ll survive but produce sparse, weak-flavoured leaves.
Before deciding where to put your garden, spend one full day noting where the sun falls at different times. A south-facing fence gets sun all day. A north-facing wall gets none. A spot under a tree might get dappled light — enough for parsley and mint, not enough for basil.
If your best available space is in shade, don’t fight it with the wrong plants. Mint, chervil, lemon balm, Vietnamese coriander, and sorrel all genuinely tolerate low light. Build your garden around what actually grows well there.
Matching the Idea to the Space
A teacup hanging display belongs on a sheltered porch or courtyard, not in an exposed windy garden where it’ll swing, dry out, and eventually crack. Fence-rail tins suit a long, south-facing fence. A vintage suitcase planter works best on a covered terrace where it won’t get rained on every week.
Think about access too. You will need to water these plants almost daily in summer. If your container garden is three flights of stairs away from your kitchen tap, it will be watered exactly twice before you give up on it.
DIY Herb Garden Ideas
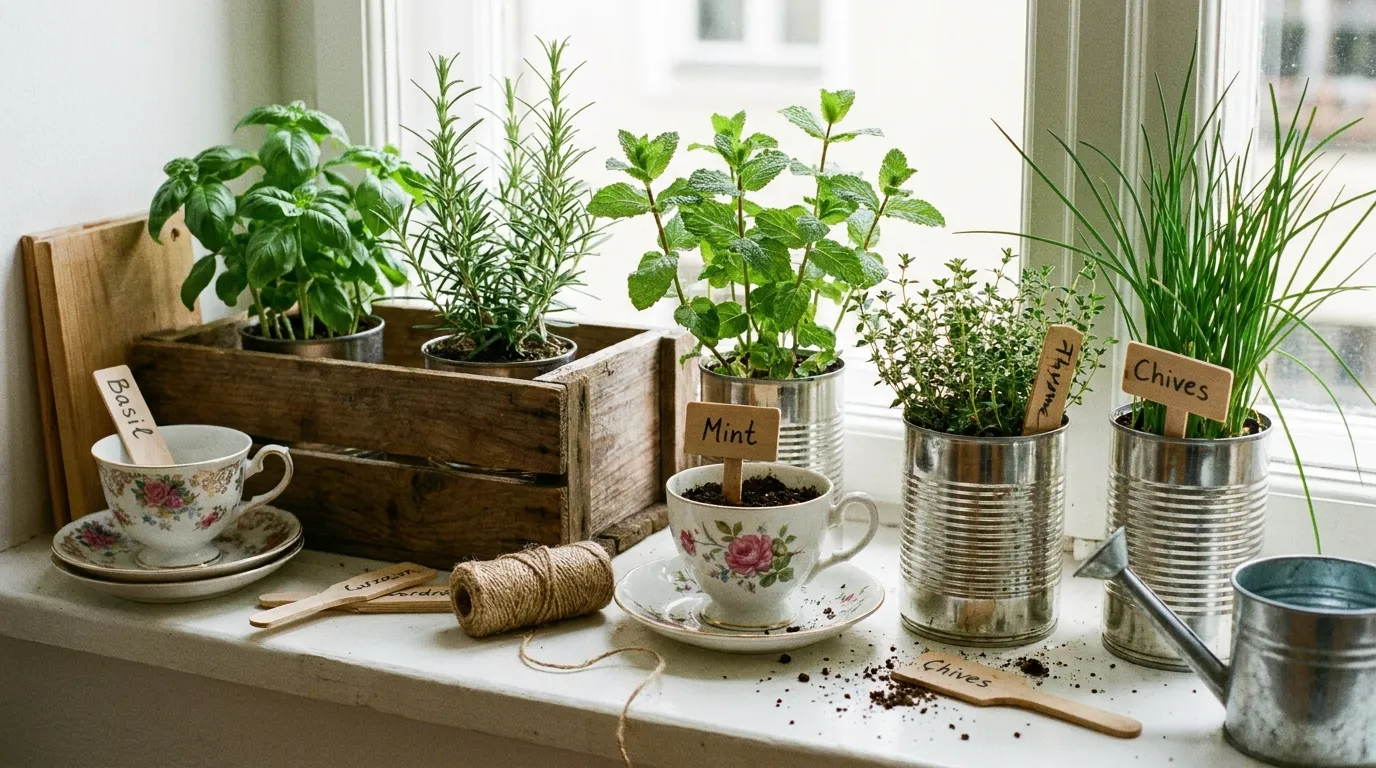
Teacups on a Rustic Beam
Find four to six mismatched teacups or small mugs — charity shops, car boot sales, or the back of a kitchen cupboard. They don’t need to match. The more varied the glaze colours, the better. Drill a small drainage hole in the base of each one using a ceramic drill bit.
Source a length of salvaged timber — a reclaimed fence rail, an old wooden plank, anything with weathering and character. Fix it horizontally to a wall or fence using two large screws into solid anchors. Into the underside of the timber, screw three to five sturdy cup hooks, spaced evenly. Cut lengths of natural jute twine — about 60cm per cup — and thread them through the cup handle, knotting securely. Hang each cup from a hook.
Plant one herb per cup. Basil, oregano, and mint are the obvious choices for volume; they fill out quickly and look full within a couple of weeks. Water each cup daily in warm weather. The whole display dries out faster than a standard pot, so check it every morning.
The visual result — mismatched pastel ceramic, weathered timber, trailing green herbs — achieves something that no bought garden kit ever manages: it looks genuinely personal.
Old Sink Herb Planter
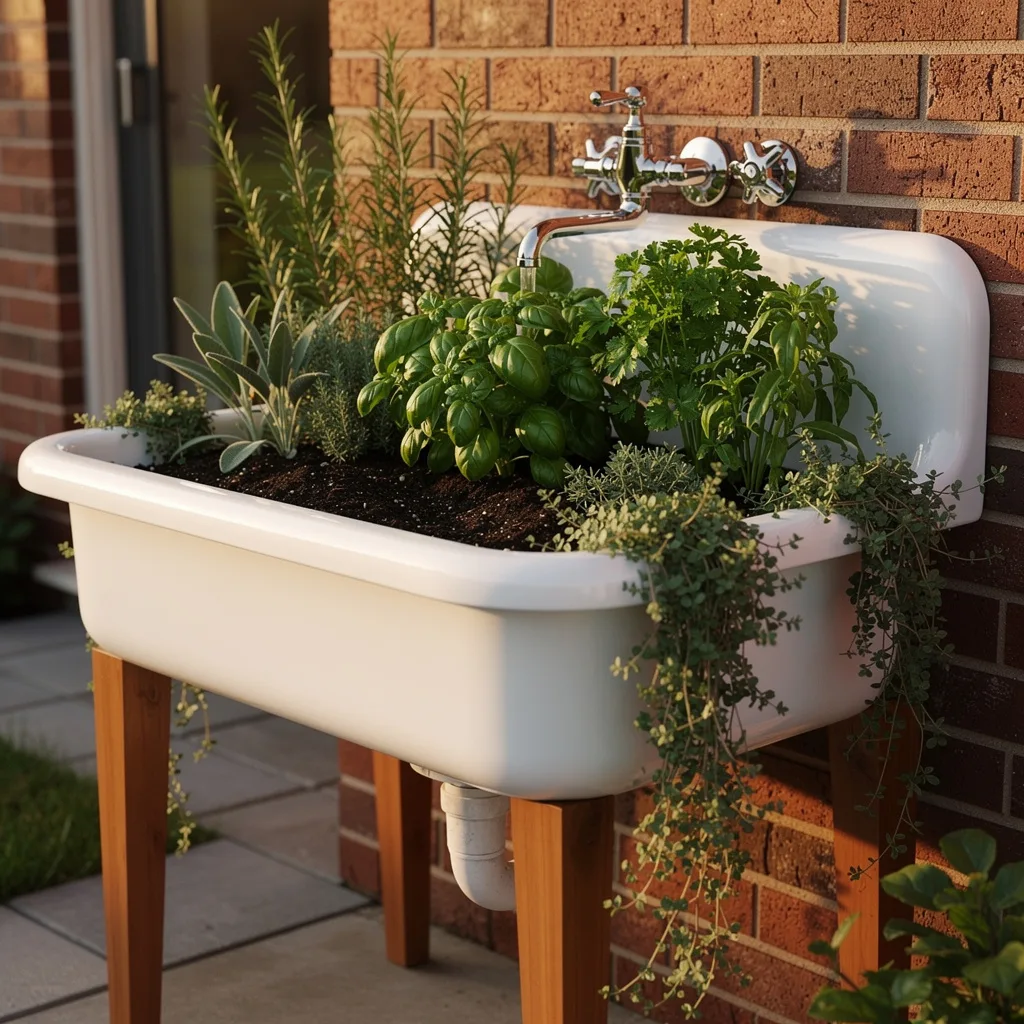
Source a vintage Belfast or butler’s sink — the deep, white porcelain farmhouse style with rounded corners. Salvage yards and architectural reclaim shops stock these regularly, and they’re usually inexpensive because they’re heavy and awkward to transport. Build or buy a simple timber frame to elevate it to a comfortable working height: four legs and two cross-supports, assembled with timber screws. The sink sits on the frame.
The existing drain hole is your drainage solution — no drilling required. Place a piece of fine mesh or a pot shard over the hole to prevent soil loss, then fill the sink with a well-draining potting mix. The depth of a Belfast sink — typically 20–25cm — is excellent for herbs, giving roots real room to establish.
Plant generously. The scale of the sink allows for a proper mixed planting: rosemary at the back as the architectural anchor, basil and parsley in the centre, trailing thyme and oregano at the front edges, sage to one side. Let the trailing herbs spill over the porcelain edge — the contrast of soft green against white ceramic is the whole visual argument for this container.
Leave the chrome taps in place. That detail makes it unmistakably what it is.
Painted Tin Cans on a Fence
Collect tins in multiple sizes — everything from small tomato tins to large catering-size cans. Remove labels, wash thoroughly, and punch drainage holes through the base of each one. Sand any sharp edges on the rim.
Paint each tin in a single bold colour using outdoor enamel spray paint or exterior acrylic. Not the same colour — vary them across the spectrum. Seal with an outdoor varnish to prevent the paint flaking in rain. Once dry, hand-paint a simple motif on each one if you like: a single flower, a leaf, a stripe. Or leave them plain and let the block colours do the work.
Fix a row of brass screw-in cup hooks along the top rail of a fence, spaced 15–20cm apart. Thread a loop of sturdy cord through each tin’s drainage holes or wrap cord around the tin body and knot it tightly. Hang each tin from a hook. Plant one herb per tin — mint in one, basil in another, thyme, oregano, and lemon balm in the rest.
The tin sizes will vary slightly, which means the hanging heights vary too. That variation is the point. A perfectly uniform row of identical tins is furniture-store display. An energetic mix of sizes and colours is a garden with a personality.
Cinder Block Herb Wall
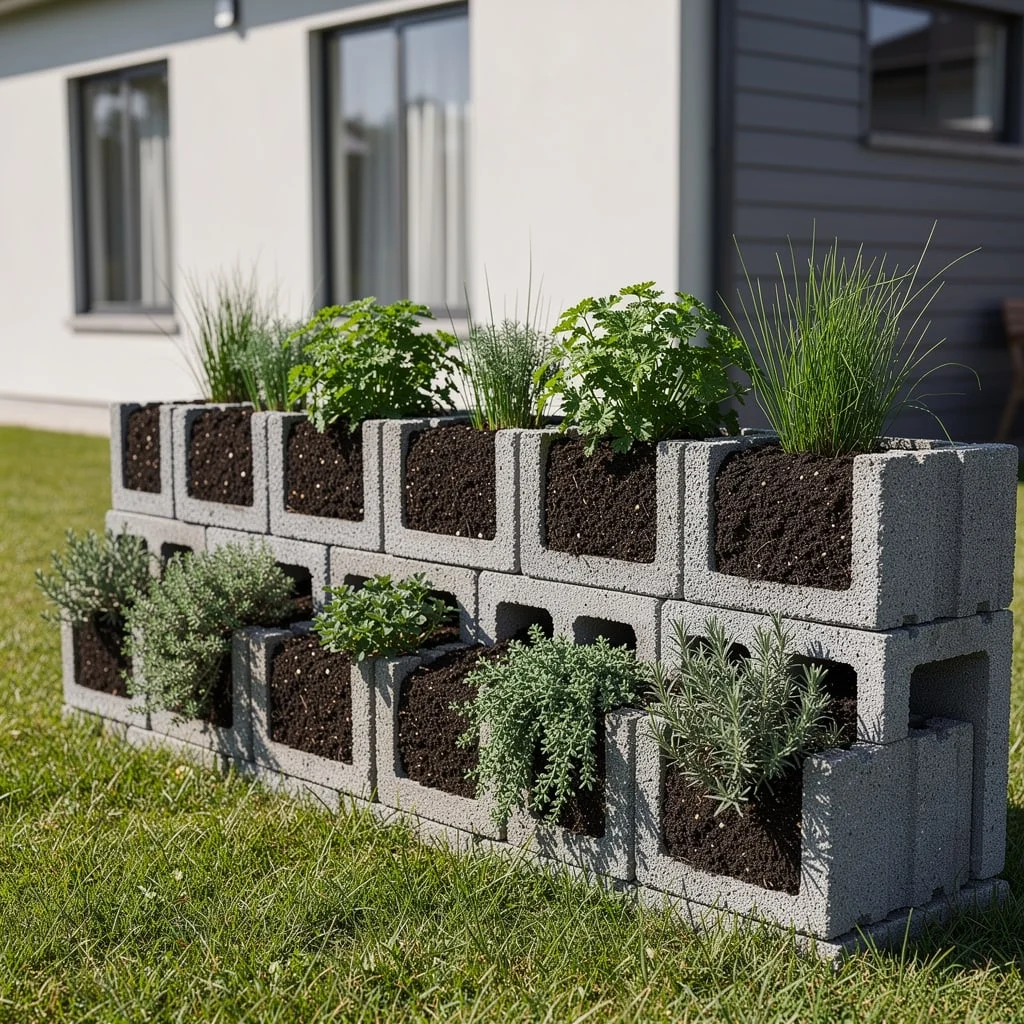
Stack standard concrete cinder blocks into a low freestanding wall — two layers high, running as long as your space allows. No mortar, no fixings. The blocks’ own weight holds the structure stable at this height. Offset the second layer half a block from the first, exactly as you’d lay bricks, so the vertical joints don’t align. This interlock makes the wall significantly more stable.
The hollow cores of the blocks — both the upward-facing ones on top and the side-facing ones on the second tier where they’re rotated — each become individual planting cells. Fill each core with potting mix and plant one small herb per cell. The top row of upward-facing holes takes taller herbs: chives, parsley, fennel. The side-facing holes in the second tier, where you’ve rotated blocks to face outward, take trailing and low-growing varieties: thyme, oregano, creeping savory.
The concrete grey of the blocks reads as industrial and intentional in a modern garden — especially against a rendered white wall. If it feels too stark, paint alternate blocks in a flat exterior paint in charcoal or sage green. Or leave it entirely raw. Concrete weathers well and the plants fill the gaps fast.
Recycled Bottle Vertical Garden
Collect five to eight large plastic bottles — 2-litre fizzy drink bottles work best. Clean them thoroughly and remove all labels. Using a craft knife or scissors, cut a wide rectangular opening on one side of each bottle, leaving the bottle cap end intact. The cap end becomes the base; drill or melt several small drainage holes through it.
Cut two lengths of sturdy natural rope or thick cord — each long enough to span the full hanging height you want, plus extra for knotting at top and bottom. Thread both ropes through the handle holes of a simple hook or carabiner at the top. Then tie each bottle between the two ropes using overhand knots — one knot below each bottle supports its weight, one above keeps it from tipping. Space the bottles 15–20cm apart so the plants have room.
Fill each bottle with potting mix and plant one herb variety per bottle. Label each with a strip of coloured masking tape and a black marker — the colour coding makes it functional as well as cheerful.
Hang the whole structure from a hook in a sheltered spot. Water from the top; it drains through each bottle in sequence. The coloured labels are the design detail that lifts this from scrappy upcycle to something deliberate.
Dark Panel Pot Grid
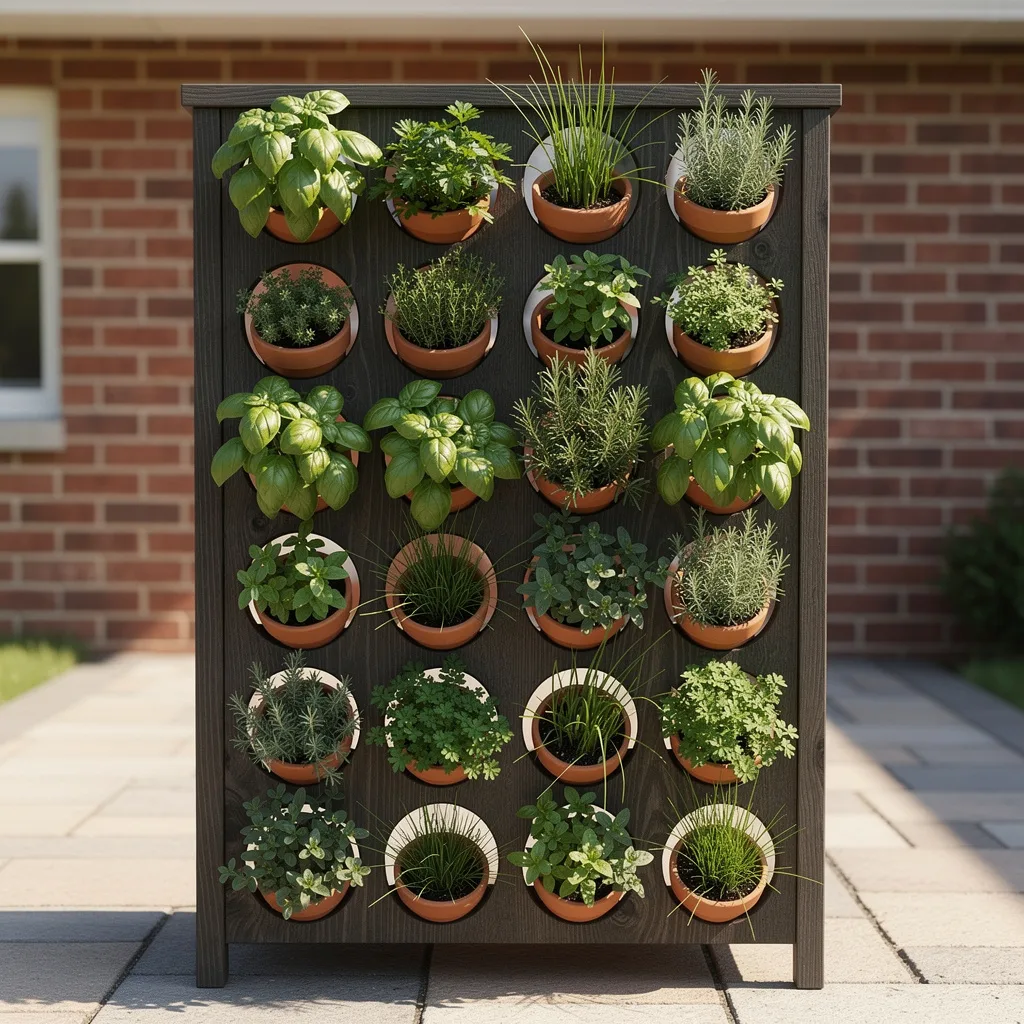
Build or buy a large freestanding rectangular panel in dark timber or painted MDF — roughly 120cm wide and 160cm tall. The panel stands on its own short legs or leans against a wall. Into the face of the panel, cut or drill circular holes sized to hold standard terracotta pots snugly — the rim of each pot sits in the hole with the body of the pot protruding through. Space the holes in a regular grid: four columns, five or six rows.
Press a terracotta pot into each hole. Because the hole holds the rim, the pots don’t need any additional support. Plant one herb per pot. Fill the grid systematically — drought-tolerant herbs like rosemary and thyme in the positions that will catch most sun; basil and parsley where they’ll get some afternoon shade.
The dark panel behind the terracotta creates a colour contrast that makes the whole thing look designed rather than assembled. Water each pot individually, checking moisture levels before watering rather than watering on a fixed rotation.
Hanging Gutter Planters on Chain
Source three lengths of white or grey PVC guttering — each about 80–100cm long. End caps are essential; fit one at each end of every length and seal with exterior PVC adhesive or silicone. Drill drainage holes along the base of each gutter section every 10cm.
Drill or punch two holes through each end of each gutter section near the top rim. Thread galvanised chain through the holes and link the sections together vertically, using S-hooks or chain links to connect them at adjustable intervals — roughly 30–40cm apart. At the top, fix a single hook or ceiling anchor rated for the combined weight, and hang the chain from it.
Fill each gutter level with potting mix. Plant the top tier with full-sun herbs that need the most light — basil or strawberries if you want to mix in edibles. The middle tier: lettuce, parsley, or chives. The bottom tier, which gets least sun and retains more humidity, suits mint or sorrel.
This system works exceptionally well on a pergola beam, a covered patio overhead, or a strong fence post. It’s also the most genuinely space-efficient option here — three growing levels using the footprint of nothing.
Vintage Toolbox Herb Garden
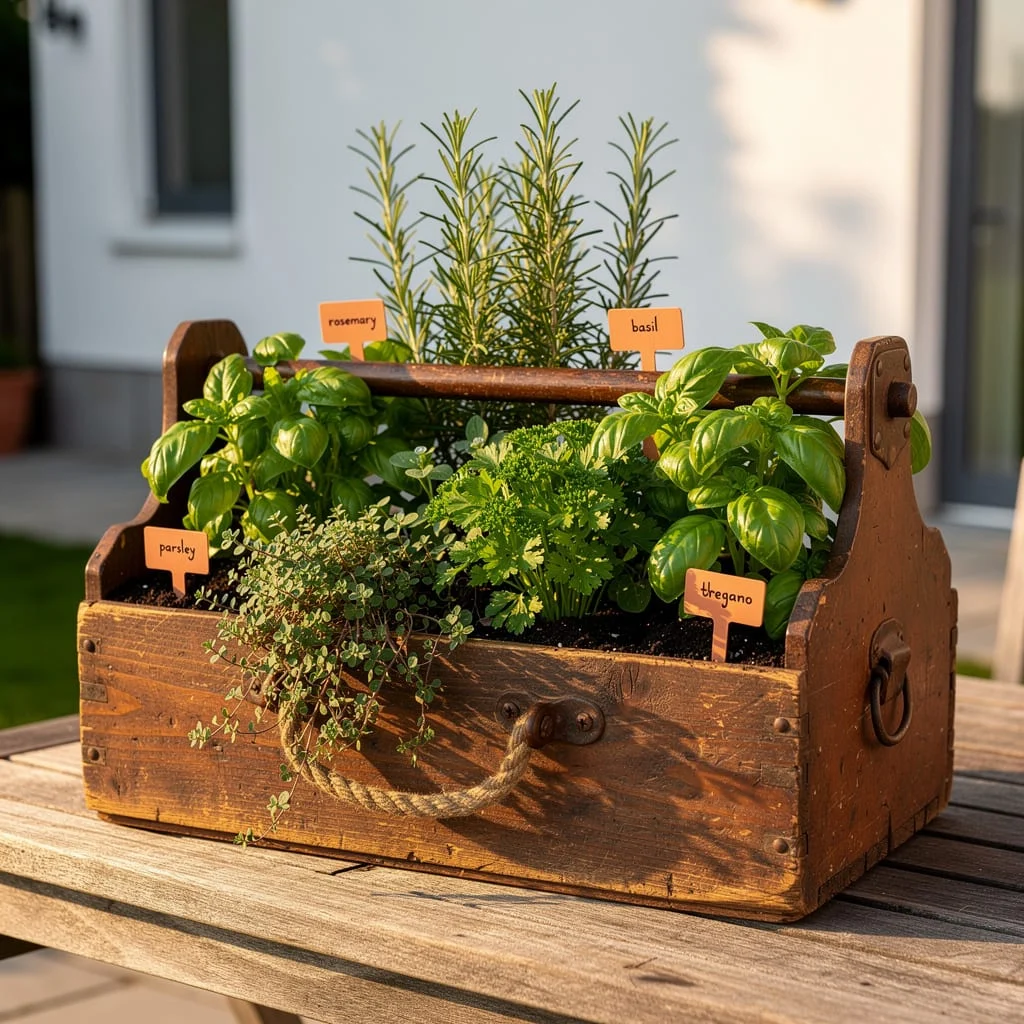
Find an old wooden toolbox — the kind with a central handle divider and two open compartments on either side. Antique shops and junk markets are the obvious sources. Condition doesn’t need to be perfect; the more battered and stained the wood, the better the character. Drill several drainage holes through the base of each compartment.
Line the inside with a piece of landscape fabric to prevent soil falling through the drainage holes. Fill with a potting mix that drains well. Plant the taller herbs — rosemary at the back, centre — so they rise above the central handle. Fill the two compartments with shorter varieties: basil, parsley, thyme, oregano. Let a trailing herb spill over one of the front edges.
Push small terracotta or copper herb labels into the soil in front of each plant. The labels are functional, but they also give the display a studied, almost collected quality that a plain unlabelled planter never achieves.
Place the toolbox on a timber table, a garden workbench, or a wide fence post cap. It needs to be positioned where it gets at least six hours of sun. Anywhere you spend time outdoors — a dining table, a potting bench, a back step — is the right place for it.
Painted Rock Labels in a Raised Bed
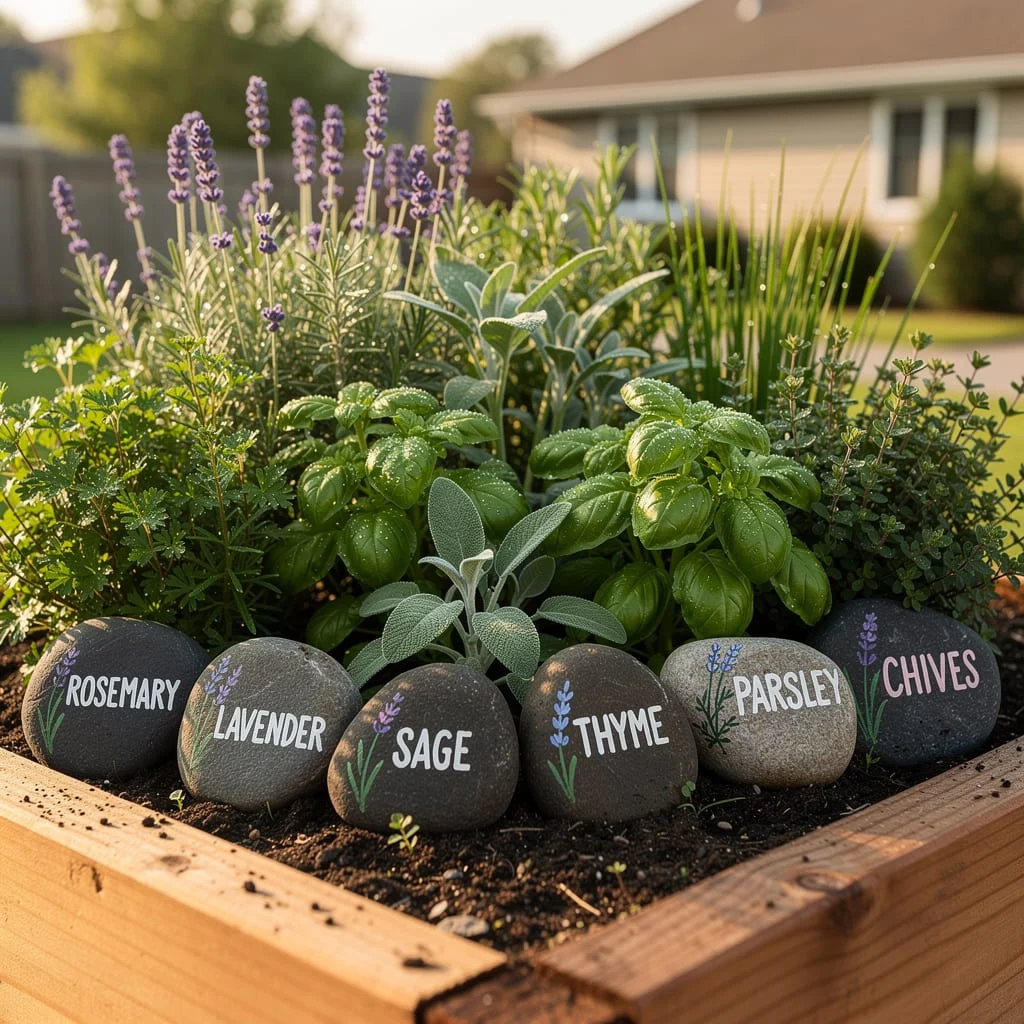
This one is a technique, not a standalone container, but it transforms the appearance of any herb bed or raised planter significantly.
Collect smooth, flattish river rocks or pebbles — large enough to paint clearly on, small enough to press into the soil at the base of each plant. Paint each rock in a matte dark grey or charcoal using outdoor acrylic. Once dry, use a fine white paint pen or white acrylic and a small brush to letter the herb name on each stone. Below the name, paint a small botanical illustration — a simple sprig of lavender, a three-leaf herb shape, a chive flower. It doesn’t need to be detailed. A two-stroke sketch is enough.
Arrange the rocks in a curve at the front of the raised bed, touching each other. The row of labelled stones serves as both a map and a border element, making the bed look like something someone thought about.
The technique also solves a practical problem. Herb seedlings all look alarmingly similar when young. Labelled rocks mean you’re not pulling up half your parsley thinking it’s a weed.
Painted Tins on a Fence Rail
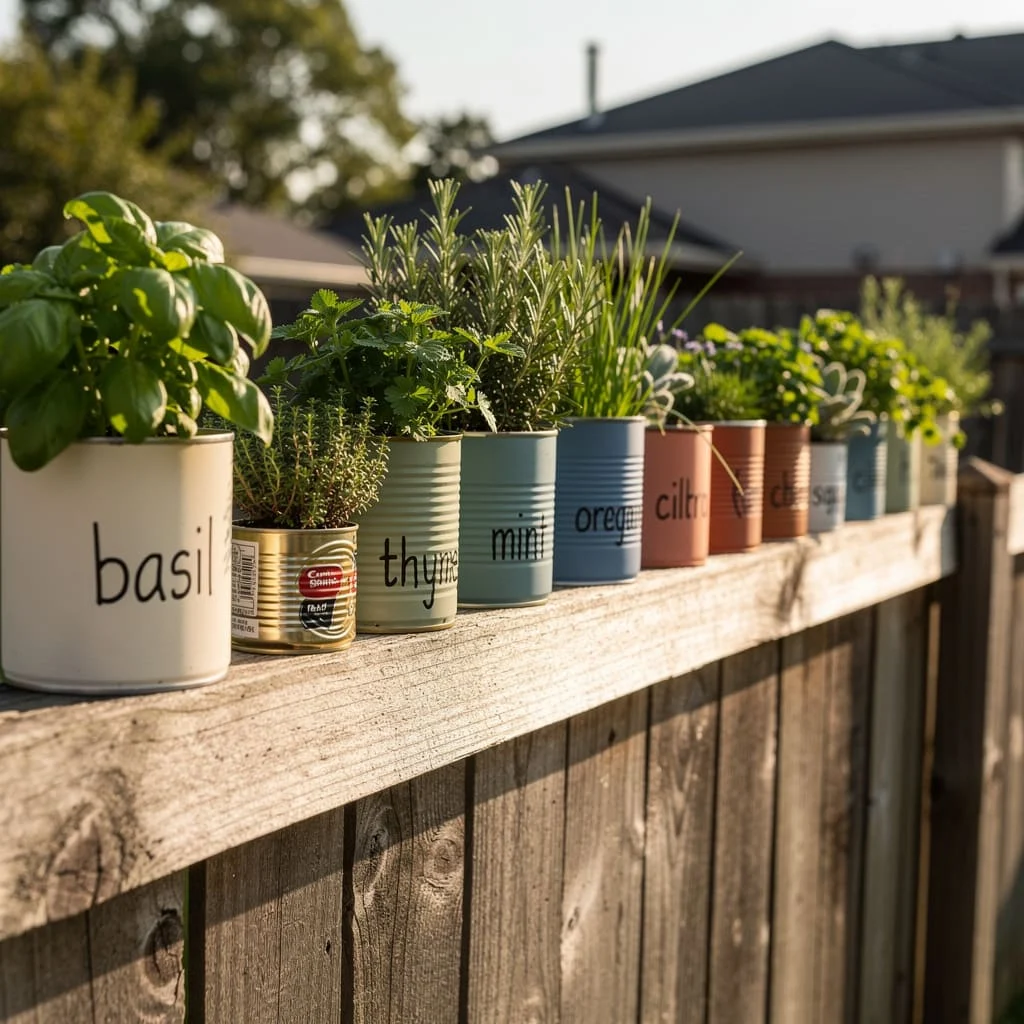
Fix a long timber rail horizontally to the top of a fence — either directly on the fence cap rails if they’re wide enough, or by screwing a new plank across two fence posts. The rail should be wide enough to sit a tin can on without it tipping — at least 5cm flat surface width.
Sand and spray-paint tins in a muted palette — dusty sage, warm terracotta, soft slate blue, off-white. Let each tin be a single flat colour with the herb name written along the body in a marker or paint pen. Punch drainage holes in the base of each tin. Sit them along the length of the rail in a single row, evenly spaced or grouped in threes with small gaps between groups.
Plant one herb per tin. The display reads as a colour sequence down the fence, which is a fundamentally different visual effect from a mixed planting. It’s graphic rather than lush — and in the right garden setting, particularly a modern fence with clean lines, that restraint is exactly right.
Stacked Vintage Suitcases
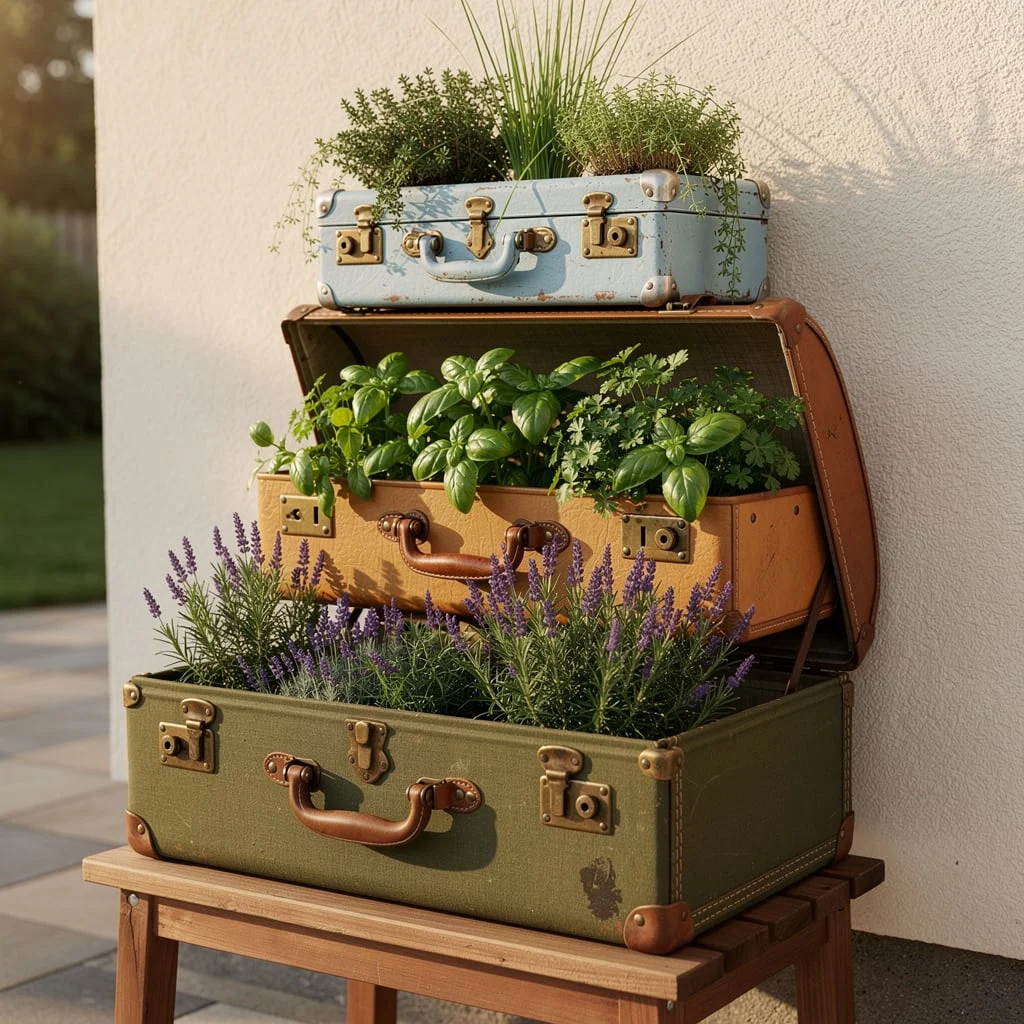
Source two or three vintage suitcases in different sizes — the hard-shell kind with metal clasps and leather or canvas exteriors work best outdoors. Check charity shops, estate sales, or online marketplace listings. They don’t need to be in good condition internally.
Open each suitcase fully. Line the inside with a heavy-duty bin bag or pond liner, stapled or glued to the interior walls, to protect the case from moisture rot. Puncture drainage holes through the liner and the base of the case every 10–15cm. Fill each case with potting mix.
Stack the cases in descending size order on a wooden stand or sturdy bench, with the largest open at the base and the smallest on top. Plant each level differently: the bottom case with sprawling, full-growing herbs like lavender and rosemary that will billow over the edges; the middle case with basil and parsley; the smallest top case with fine herbs like chives or dill that grow upright and give height.
Keep this one under a covered terrace or pergola. It handles light rain but prolonged wet weather degrades the exterior finish faster. The weathering of the cases is part of the aesthetic — but slow, graceful weathering is different from water damage.
Wicker Baskets on a Post

Fix a sturdy upright timber post in the ground — a 10x10cm post, sunk 60cm into a concrete footing. On one side of the post, fix two horizontal timber arms at different heights using coach bolts — one arm about 60cm from the ground, one at about 120cm. Each arm should extend 30–40cm out from the post.
Line two wicker or rattan baskets with coir liner or a heavy-duty bin bag punctured with drainage holes. Fill each with potting mix and plant a mixed arrangement in each basket — trailing herbs at the outer edges, upright herbs in the centre. Basil, thyme, parsley, and rosemary together work well. Hang the larger basket from the higher arm, the smaller from the lower, using jute rope looped through the basket handles and knotted around the timber arm.
Position the post where it gets full sun. It works particularly well at the edge of a patio, as a soft vertical feature that gives a garden a focal point without blocking the view.
Herb Garden on a Post
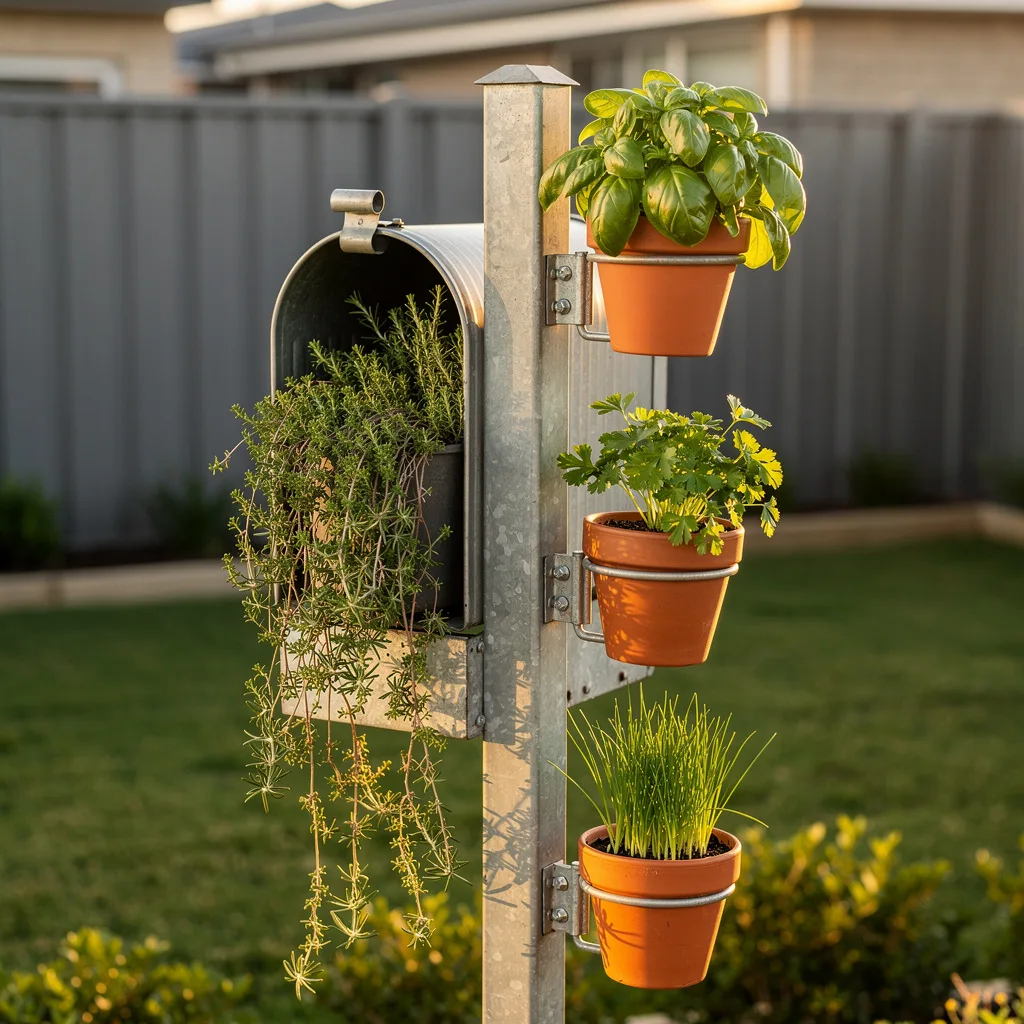
A galvanised metal mailbox, fixed to an existing post, makes a surprisingly capable herb planter. The interior is the right size for three or four small herb plants, and the box provides natural protection from wind on three sides, which smaller herbs appreciate.
Remove the door or prop it open permanently. Drill drainage holes through the base of the box. Line with landscape fabric and fill with potting mix. Plant trailing herbs that will spill out of the open front — thyme and savory both work well. Fix the box to the post using the existing mounting brackets.
On the same post, attach two or three small terracotta pot holders — the kind that bolt directly to a fence or post with a single bracket. Fix them at intervals above and beside the mailbox, staggered rather than evenly spaced. Plant a single herb in each — basil in one, parsley in another, chives in the third.
The result is a post that does double duty as a garden feature. It works best at the entrance to a garden, at the corner of a patio, or at the end of a path — anywhere it reads as a vertical marker.
Hanging Terracotta Peg Rail
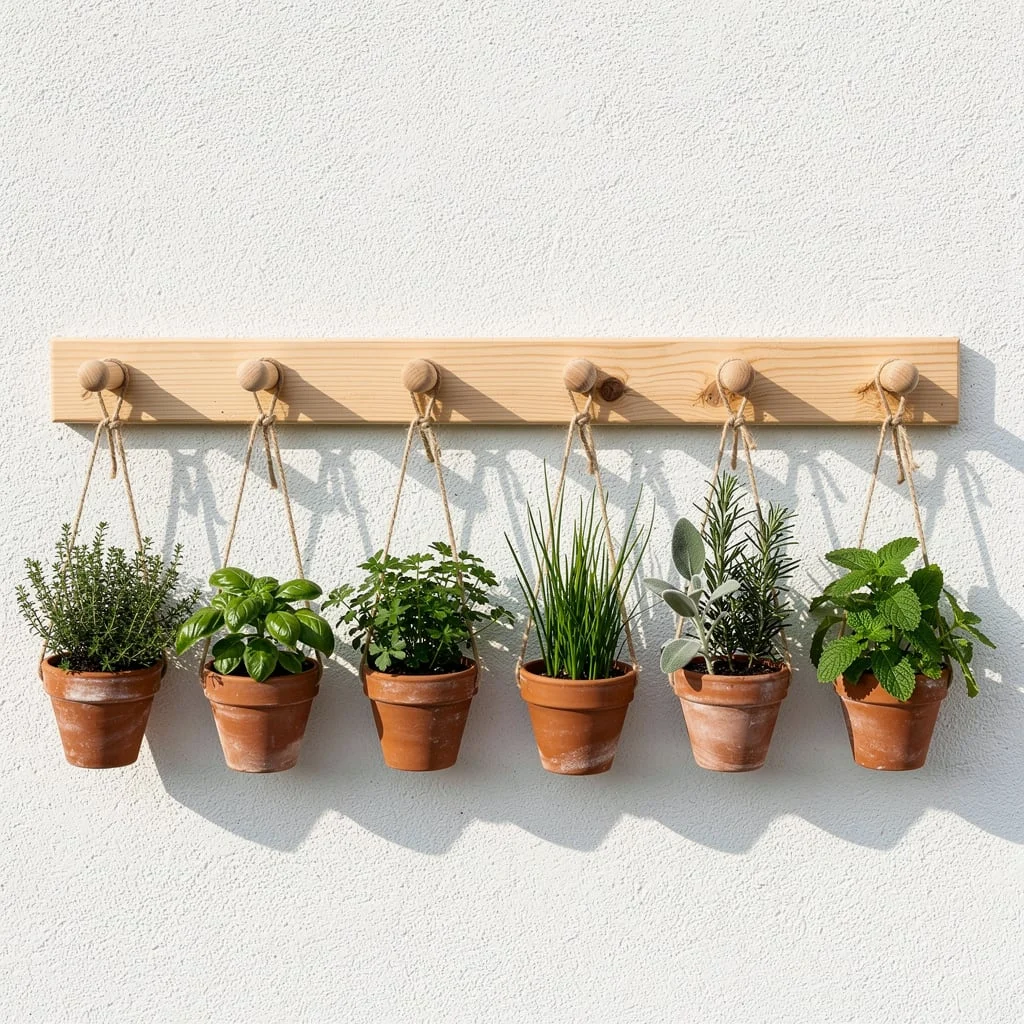
Fix a pine plank — approximately 100cm long, 10cm wide — horizontally to a rendered or painted wall using two wall anchors and screws. Into the face of the plank, screw six wooden furniture knobs or cup hooks, evenly spaced. These are the hanging points.
For each herb, take a standard small terracotta pot — 8–10cm diameter. Thread two lengths of natural jute twine through the drainage hole in the base, knot them inside the pot so they can’t pull through, and gather the four loose ends at the top, knotting them into a loop. The pot now hangs from its base with the opening facing down — but the soil and plant stay in place because the jute is knotted inside.
Hang each pot from a knob on the plank. Plant one herb per pot: thyme, basil, parsley, chives, sage, mint. The pale terracotta against a white or pale render wall, suspended on jute, with the wooden plank above — this is the simplest and cleanest version of the hanging herb garden. No paint, no salvage, no craft project. Just materials in their natural state, used well.
Galvanised Buckets from a Tree Branch
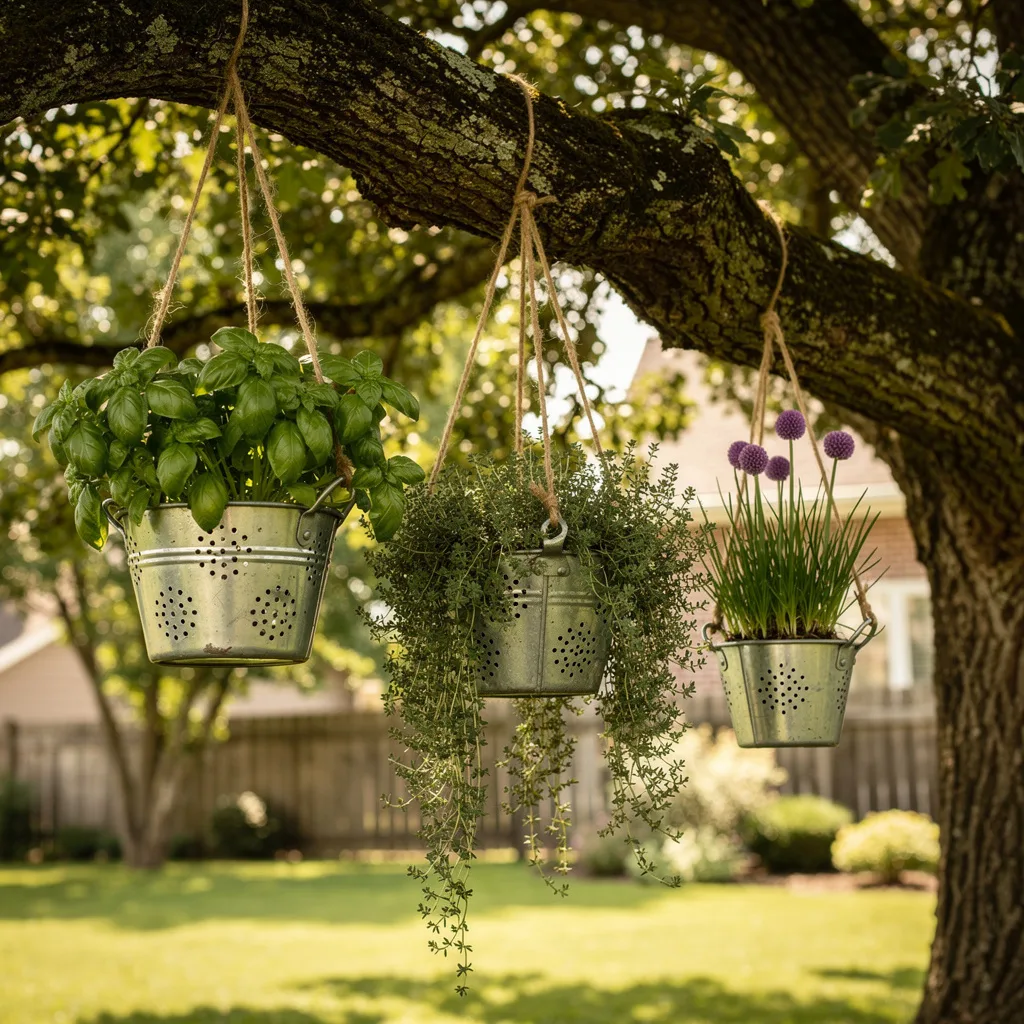
Find a substantial horizontal tree branch — at least 5cm diameter, and confirmed dead wood or genuinely robust live branch before loading it. Three buckets fully planted and watered represent a meaningful weight.
Source three galvanised metal buckets in a matching style — the kind with a simple handle and slightly tapered sides. Punch drainage holes across the base of each. Thread lengths of natural jute rope through each bucket handle and tie securely, leaving enough length to hang at different heights from the branch — vary the drop by 10–20cm between each bucket so they hang at staggered levels.
Tie each rope around the branch at different points along its length. Space the buckets so they don’t touch or crowd each other. Plant one herb per bucket: basil in the fullest, trailing thyme in the middle where it can cascade, and chives with their upright growth in the smallest bucket.
The dappled light under a tree is not ideal for full-sun herbs, so position this where the tree provides shade only in the afternoon, with morning and midday sun reaching the buckets directly. Basil particularly will not forgive full shade.
The Thing Nobody Mentions
Every one of these ideas costs less than a single month of buying fresh herbs. Most cost less than a week.
But the real return isn’t the money. It’s the shift in how you cook. When there’s a living rosemary plant two metres from your kitchen door, you use rosemary differently. You pick a sprig on the way inside and throw it in without thinking. The cooking gets better because the ingredient is always there, always fresh, always free.
That’s the actual argument for a DIY herb garden. Not the aesthetics, not the money. The fact that it changes what you reach for when you cook, and that costs nothing at all.