
Somewhere between the fridge magnet and the garden sculpture lives the painted rock. Most people treat it like the former. They dash something on a stone, lose interest halfway through, and end up with a lopsided stripe situation sitting by the mailbox, slowly fading into beige.
The problem isn’t the medium. A rock is a perfectly reasonable canvas. It’s round, it’s heavy, it sits well, it weathers with character. The problem is that people approach them without a concept. They start painting before they’ve decided what the rock is supposed to be — a decoration, a doorstop, a gift, a garden accent — and the result shows that uncertainty in every stroke.
Painted rocks done well are genuinely handsome objects. They hold their own in a vignette. They read as intentional. They can anchor a porch arrangement, contribute to a tabletop display, or stand alone on a marble pedestal and look like they mean it. The difference is a considered design, proper paint preparation, and knowing which finish to commit to before you pick up the brush.
This is where to start.
Why Most Painted Rocks Look Like a Craft Fair Table at 4pm
The Rock Itself Was the Wrong Choice
Not every rock is a canvas. The ones that work have a smooth, relatively flat face — something the eye can settle on without navigating a landscape of ridges and pits. A rock with deep texture is a fight. Your paint will pool in the low spots and lift off the high ones. You’ll spend more time compensating for the surface than you will actually painting.
The best rocks for decorative painting are river stones — smoothed by water over time, consistently oval, dense enough to feel substantial in the hand. They’re available by the bag at garden centers, craft stores, and online. Buying your rocks rather than collecting them from the backyard is not cheating. It’s the decision that determines whether the finished piece looks deliberate or accidental.
For large porch display rocks, flat-sided landscape stones work well. For hanging pieces, you need a rock with a consistent enough shape that a wire loop glued to the back will sit level. Know the intended use before you choose the rock.
The Paint Didn’t Stick
Acrylic craft paint applied directly to an unprepared rock surface is a two-season commitment at best. It chips at edges, flakes in moisture, and goes chalky in sun faster than it has any right to. The problem is adhesion, and the fix is a gesso or white primer coat before the first drop of color touches the surface.
Prime the rock. Let it dry completely. Sand lightly if there are any raised edges. Then paint. Every subsequent coat will behave better. The colors will be truer. The brush marks will smooth rather than drag.
For outdoor pieces, a UV-resistant clear sealer over the finished painting is not optional. It’s the difference between a piece that lasts three years and one that lasts thirty.
The Design Had No Hierarchy
A rock painted with equal visual weight across its entire surface reads as busy regardless of how carefully each individual element is executed. You need a dominant element — one thing that the eye goes to first — and everything else needs to support it, not compete with it.
On a small rock, this often means one motif against a solid ground. A single star on navy. A flag within a heart shape on white. On a large statement rock, it means one scene or message that occupies the majority of the face, with supporting elements kept genuinely small — a border of tiny dots or stars, a single complementary detail in a corner.
If you’re painting a flag, the flag is the dominant element. Don’t then add text and a decorative border and a floral accent. Choose one additional element. Let the flag breathe.
Patriotic Painted Rock Ideas
The Ladybug Collection in Full Patriotic Dress
Start with a collection of smooth river stones in a consistent oval shape, sized so they fit comfortably in a palm. These are your ladybug bodies. For each one, paint the entire upper portion — roughly the top two-thirds — in your chosen patriotic pattern: flag stripes in red and white, a navy star field, polka dots in red and blue on white. The lower third is painted solid black for the ladybug’s head.
Once the base is dry, paint the two round eyes in white, then black, then add a small white highlight dot to each. The antennae are painted with a fine liner brush — two thin curved lines extending upward from the head. Add a center line dividing the patterned “wings” from head to bottom. For the flag-striped versions, paint the stripes horizontally across the wing section before adding the center seam.
The magic of these is that each rock gets a different patriotic pattern on its shell. One gets stripes. One gets stars on navy. One gets white with red and blue polka dots. One gets the full flag design. Group them together and the variety reads as a collection rather than chaos because every single one has the same black head and eye treatment creating visual unity.
Seal with multiple coats of high-gloss varnish. The gloss is what makes the eyes look dimensional and gives the whole piece its finished quality.The Nightscape Fireworks Stone With Dark Ground and Luminous Detail
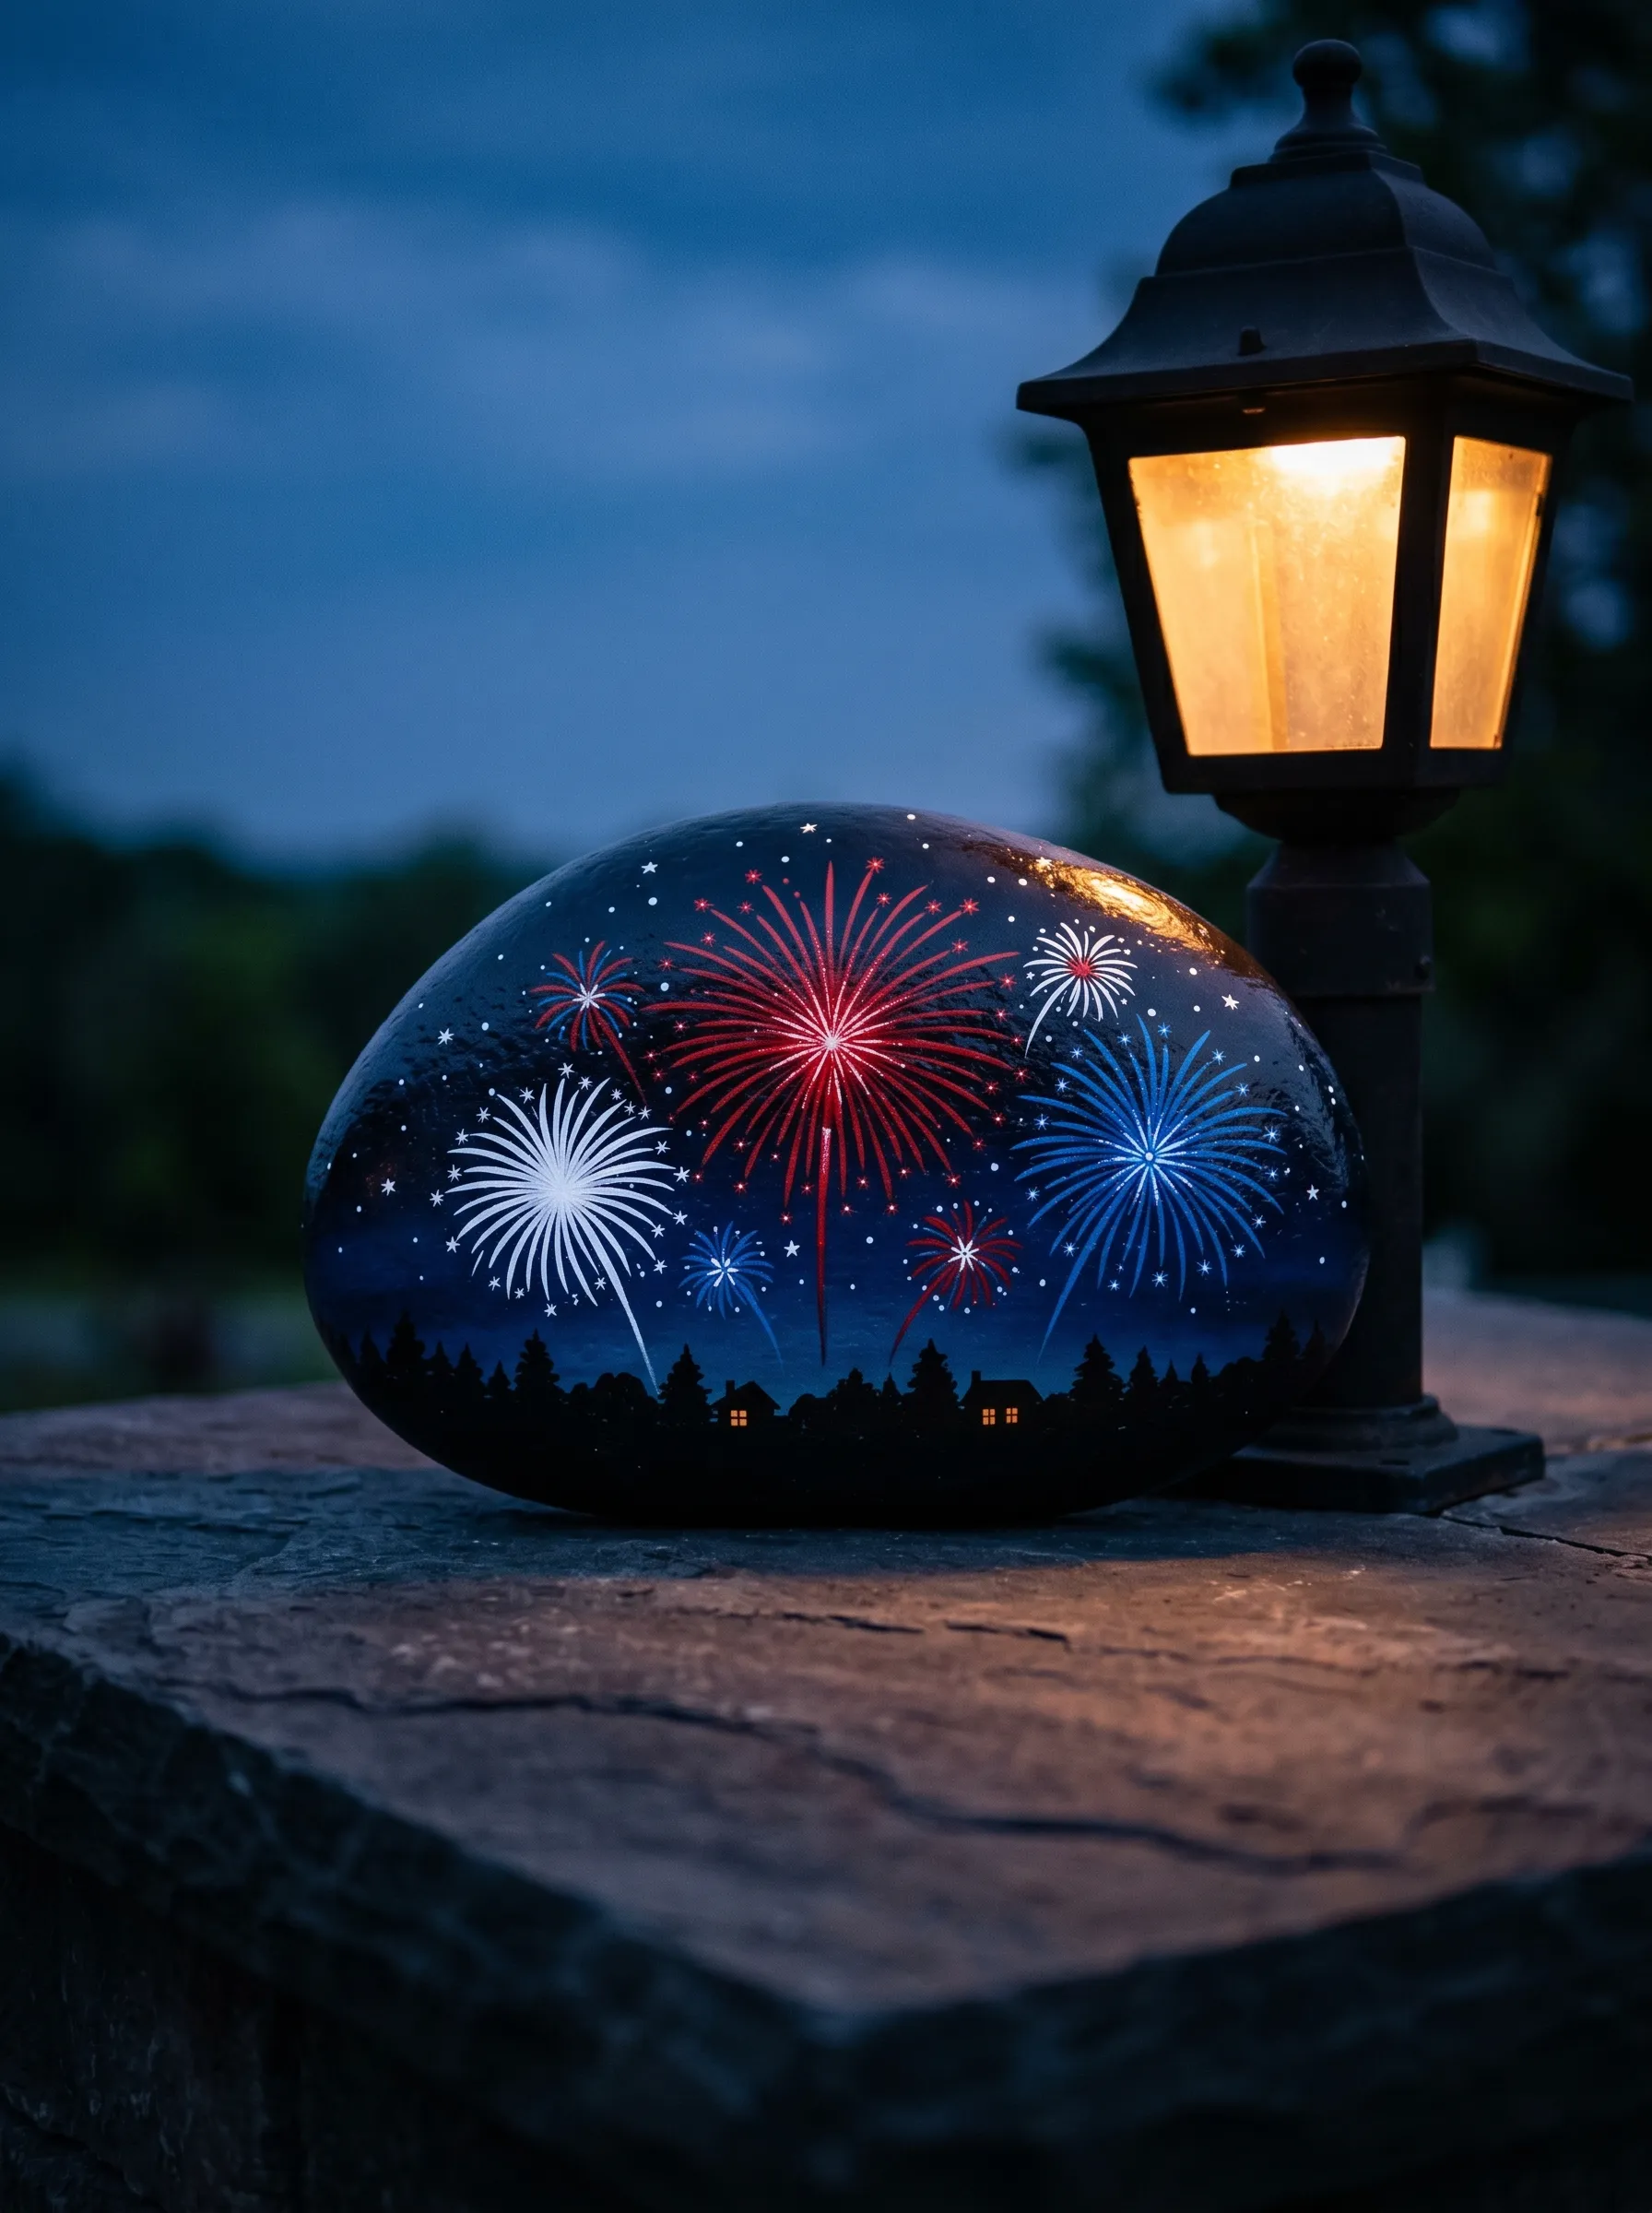
Prime a large, dark stone or paint a lighter stone in the deepest navy-to-black you can mix — a tone that has depth rather than flat black’s harshness. Let it cure fully. Paint a thin irregular tree line silhouette along the bottom of the stone face in flat black — small triangular conifers and a simple house roofline suggestion — just enough to establish ground and horizon without detail. Dot the windows of the houses with the tiniest possible orange-yellow dots to suggest lit interiors. Above the treeline in the sky portion, paint a fireworks display in three bursts: one in white, one in crimson, one in blue. Each burst starts from a central point with a stem trail and explodes outward in long radiating lines that terminate in small curled tips. Between the major bursts, add smaller single-line sparks and scattered dot stars in white. Use a very fine liner brush and white paint thinned to a medium consistency — thin enough to flow smoothly, thick enough to cover the dark ground in one pass. Seal with exterior gloss and display on a stone wall or garden ledge beside a lantern.
The Five-Rock Patriotic Set With Flag Heart, Peace Sign, Flowers, Dragonfly, and USA Seal
Collect five rocks in varying shapes: one flat heart-shaped stone if you can find it, three ovals of different sizes, and one wider flatter piece for the peace sign.
For the flag-heart rock, paint the entire surface deep red. Once dry, create a centered heart shape using painter’s tape or a steady freehand outline, then paint the left portion of the heart navy and fill it with small white stars. Fill the right portion with alternating red and white horizontal stripes that taper to the heart’s point at the bottom.
The peace sign rock gets a white ground coat. Once fully dry and sanded smooth, paint a full-size peace sign in red and blue — the circle in red, the internal dividing lines and lower forks in blue — against the white. Fill the sections between the peace symbol’s divisions with alternating patriotic colors.
The flower rock gets a red background with three blue forget-me-not style flowers with white detail centers painted in a cluster.
For the dragonfly, paint the stone sky blue. Center a stylized dragonfly with a flag-stripe body and two pairs of wings on either side, the upper wings larger than the lower ones.
The USA seal rock gets a dark navy ground with a large circular impression of a seal, stars, and the letters USA lettered across its face with a bold serif font.
The Painted Rock Garden Border Row With Varying Motifs
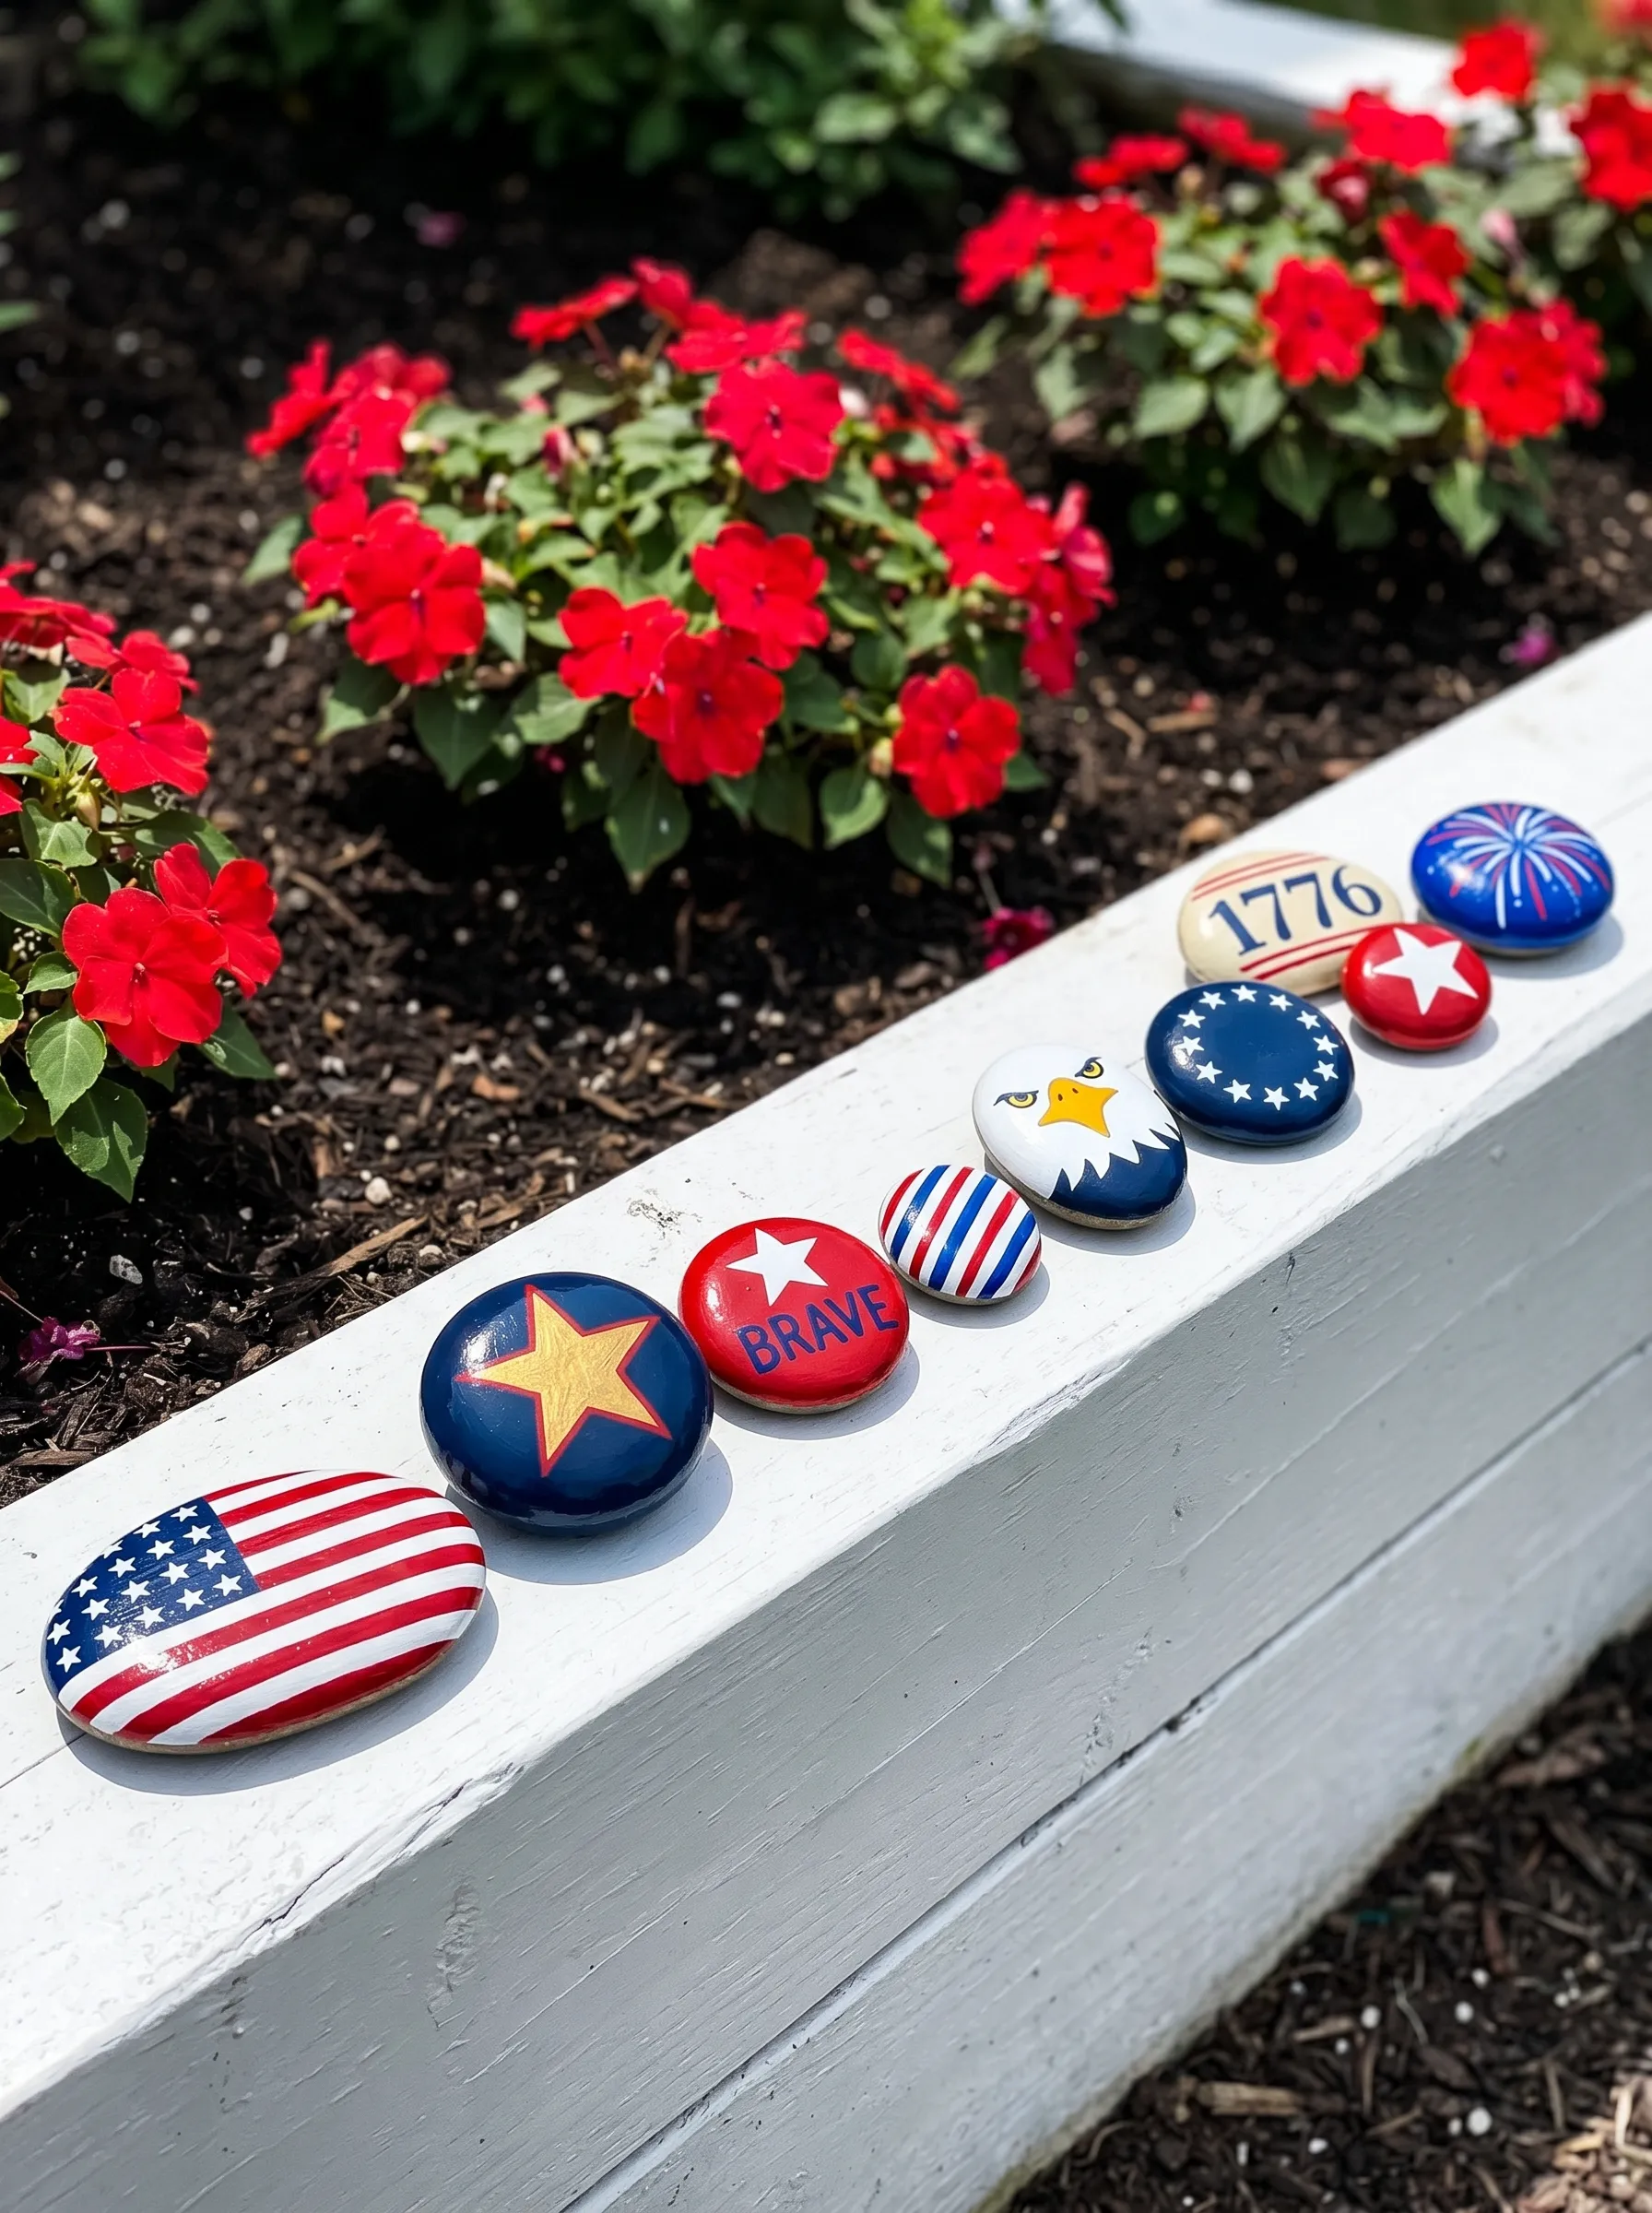
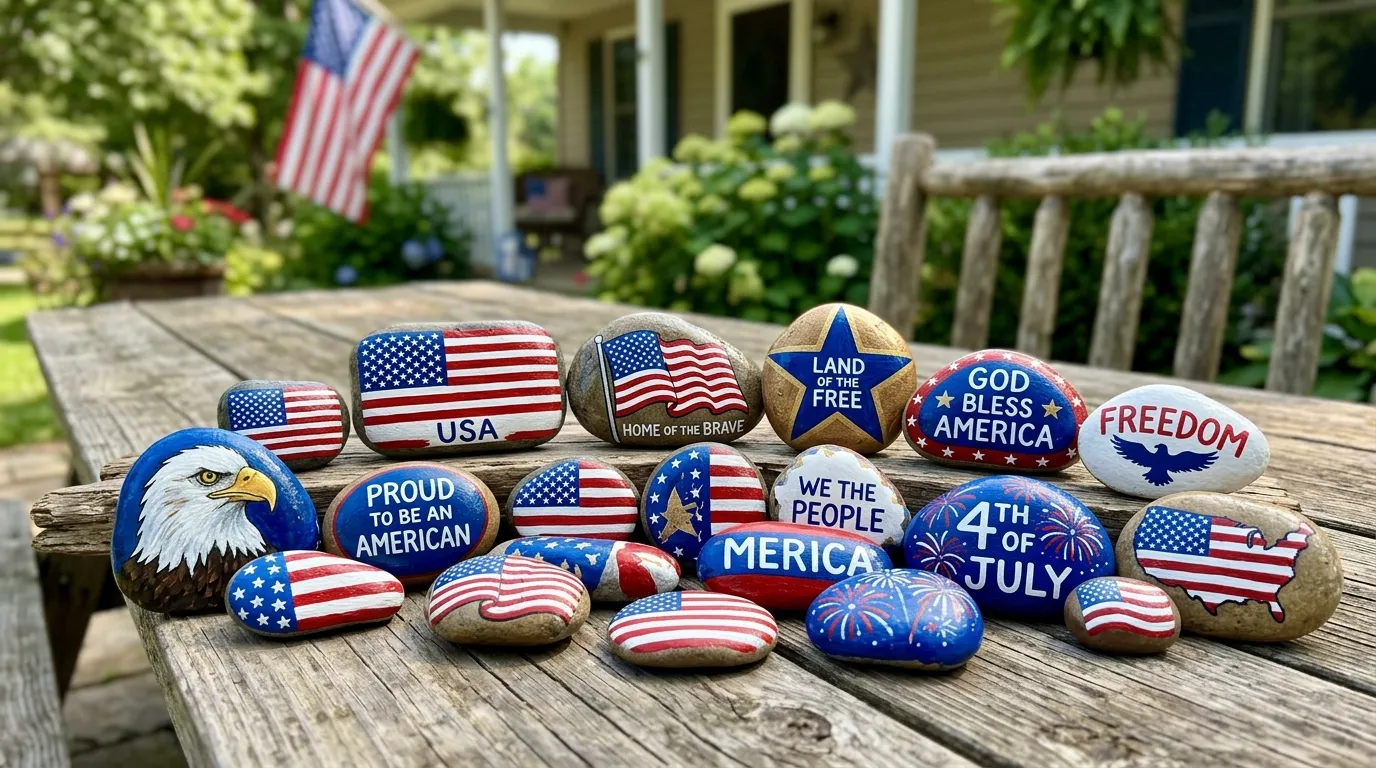
A collection of nine to ten rocks displayed in a row along a raised garden bed border — each stone painted with a different patriotic motif but unified by a consistent round-to-oval shape and a consistent gloss finish that makes them catch sunlight. The motifs work in a sequence: full flag on the large anchor stone, gold star on navy for a medium stone, a word stone, a Betsy Ross-style circle of stars on navy, a bald eagle head study on cream, a red star on cream, a fireworks motif on navy, a 1776 date stone, a striped design, and a small star stone to close the row. Vary the sizes so the arrangement creates a gentle up-and-down rhythm — not all the same height but not dramatically different either. Display them touching or barely separated along the top edge of a white-painted raised bed, with red impatiens blooming immediately behind them for the color contrast that makes the whole row pop.
The Large Display Rock With Flag, Pole, and Folk Art Flower Garden
Find the largest, roundest stone you can — something close to an irregular circle when viewed from the front. Prime it thoroughly. Paint the entire face in a clear sky blue — a true cerulean, not navy. While the blue is drying, mix small dots of the same color randomly across the sky portion to suggest texture without creating a pattern.
Paint the flag pole as a vertical brown stick with a small decorative finial at the top. The flag extends horizontally from the pole, its fabric given a slight wave by painting the stripes as gently curving rather than rigidly straight. Alternate seven red and six white stripes, keeping each one consistent in width. The blue canton occupies the upper left third of the flag. Fill it with rows of small white stars, keeping them evenly spaced.
At the base of the pole, paint a garden of folk art flowers in a row: simplified round-petaled blooms in red, blue, white, and yellow, each with a small contrasting center and a single green stem. The flower stems should overlap slightly for a casual garden feeling. Keep the flowers stylized rather than realistic — the contrast between a carefully rendered flag and cheerfully simplified flowers is part of the charm.
The Large Oval Hanging Rock With Watercolor-Style Flag Interpretation
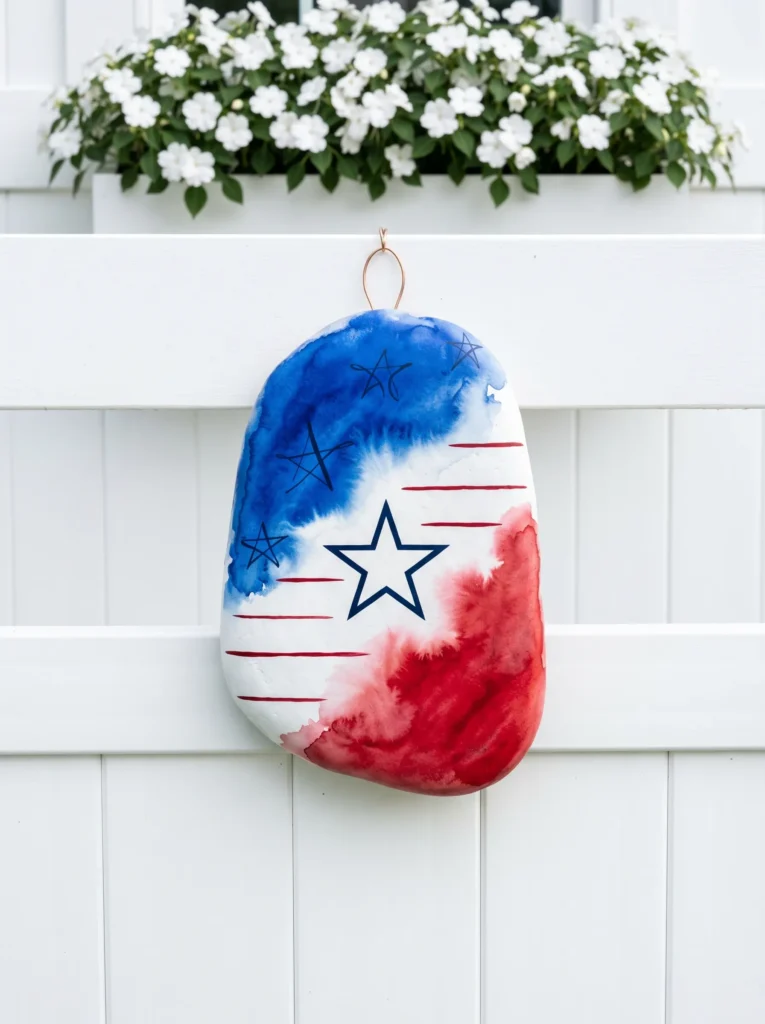
Source a large flat oval stone — the kind with a consistent enough face to hang on a fence or door. Drill a small hole or use strong adhesive to attach a copper wire loop to the top back of the stone, bent into a hanging ring shape. Prime the stone in flat white. Apply a base coat in white exterior-grade paint and let it dry to a smooth surface. Now work with very thinned acrylic — almost a watercolor consistency — letting the pigment spread organically rather than controlling every edge. Apply a wash of cobalt blue at the upper left area of the stone face, letting it bloom into the white and leaving the center open. Apply a wash of crimson red at the lower right, again letting the color feather into the white. While the washes are still slightly damp, draw stripes in dark crimson across the central white area using a thin brush — horizontal lines spaced evenly, suggesting the flag’s stripes without being rigidly literal. In the blue area, use a fine liner to draw star outlines in dark navy — not filled stars, just the five-pointed outlines in varying sizes. Draw one larger solid star with a navy outline at the center of the composition. The whole design should feel like a flag seen through gauze. Seal with exterior matte varnish.
The Navy Mandala Dot Rock With Concentric Red and White Rings
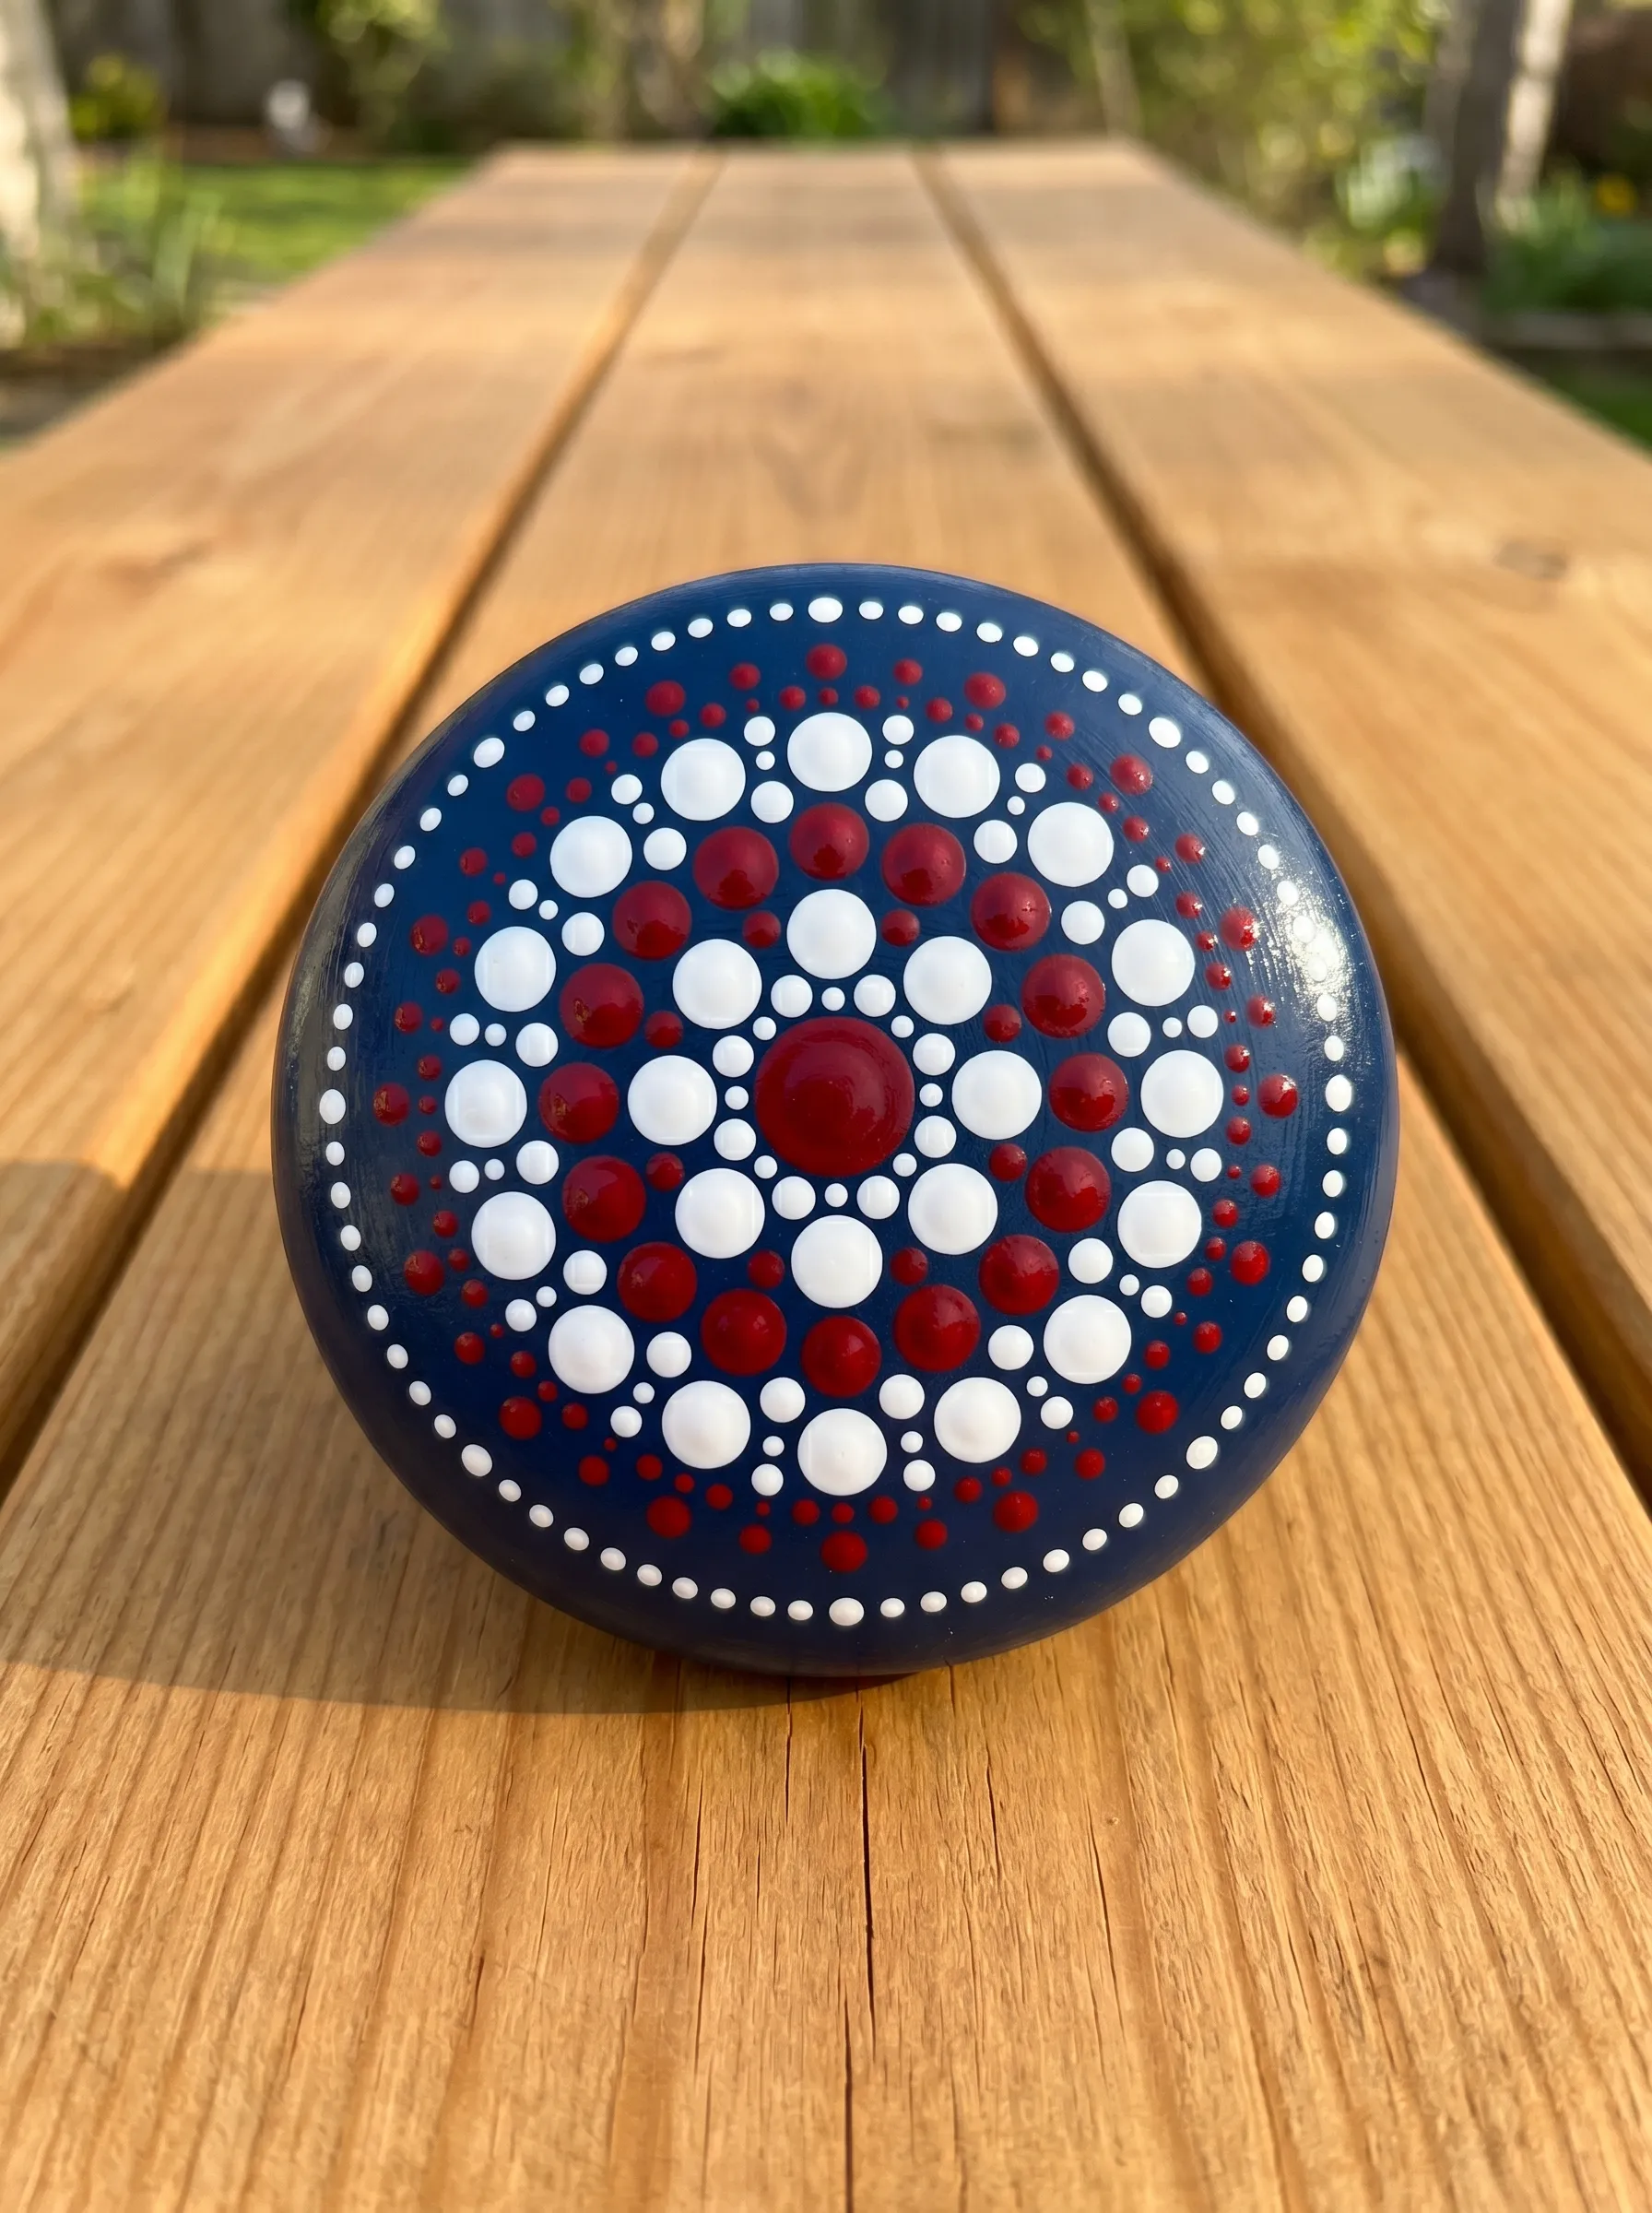
Start with a smooth round stone in any size, primed and base-coated in a deep, rich navy blue. Let it dry completely and apply a second coat. The navy needs to be dense and even — this is the ground that all the dots will read against. Find the center of the stone face. Place a single large dark crimson dot there using a stylus or the eraser end of a pencil dipped in paint. Work outward in concentric rings. The first ring around the center dot should be large white dots spaced evenly. The second ring should be small dark crimson dots between and slightly offset from the first ring’s positions. The third ring steps outward with large white dots again, then alternating medium crimson, and so on outward to the stone’s edge. The key to mandala dot work is consistent spacing and consistent dot sizes within each ring. Use a set of stylus tools in different sizes — or nail heads, toothpicks, and paint brush ends — to vary the dot sizes between rings. The outermost ring should be the smallest dots, creating a border that contains the design. Seal with multiple coats of high-gloss finish. The gloss makes each dot catch light individually and gives the mandala its jewel-like quality.
The Navy Doorstep Rock With Single Solid White Star

This rock earns its place by doing one thing only and doing it without apology. Select a large, dome-shaped rock — substantial enough to sit on a porch step without looking like it blew there — and prime it thoroughly. Apply two full coats of flat navy blue paint, sanding lightly between coats. On the widest, most visible face of the stone, draw a five-pointed star centered precisely on the surface. The star should be large — occupying the majority of the face, with no less than an inch of navy showing as a border around each point. Use a stencil or template for accuracy if needed. Paint the interior of the star in flat matte white, keeping the edges as clean as possible. No additional elements. No dots, no text, no border. The star is the entire point. Set it on a small square of natural linen or canvas fabric on your porch step. The fabric square lifts it slightly and gives it a deliberate feeling, as if someone placed it rather than just set it down. Apply exterior sealer appropriate for high-traffic surfaces.
The Word Stone Collection on Ticking Stripe Runner
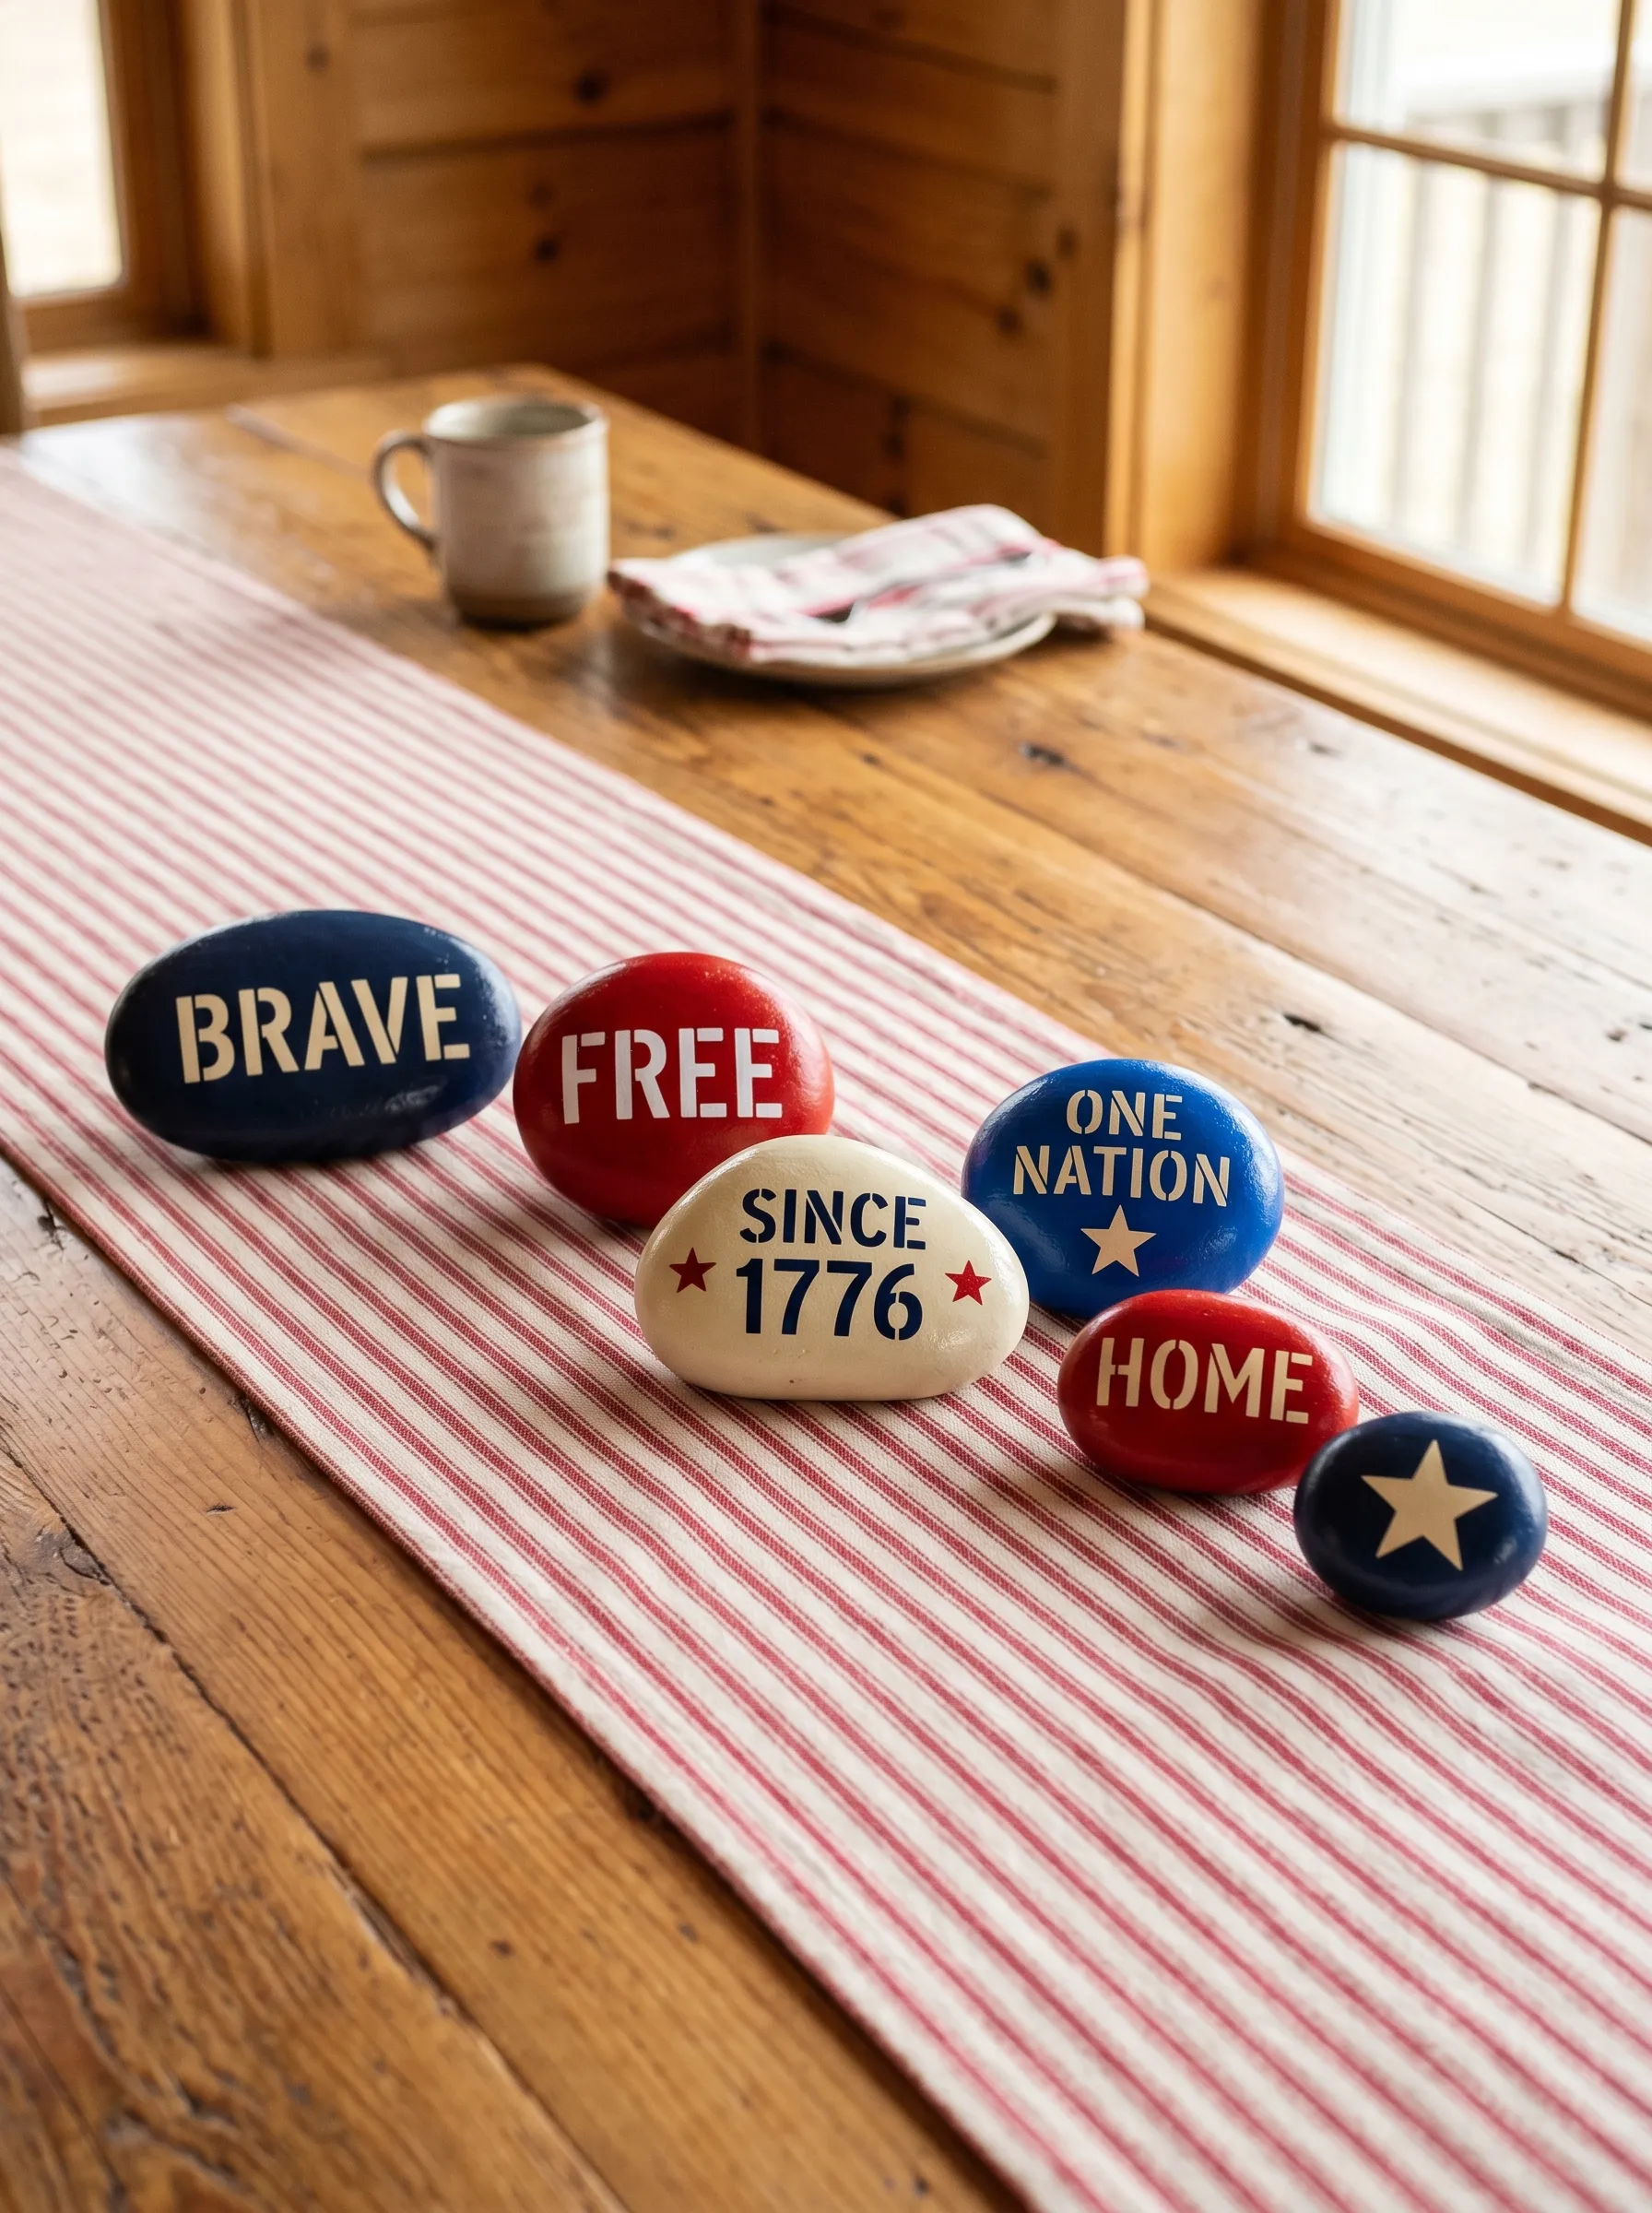
The concept here is a coordinated set of lettered stones — each one carrying a single patriotic word or short phrase — displayed together as a group arrangement. The coordination comes from consistent color use across the set rather than identical treatment on each stone. For each stone in the set, choose one ground color: navy, red, or cream. Cream stones get navy lettering. Navy stones get cream lettering. Red stones get cream lettering. Every stone in the collection uses only these three colors. The words for the set: BRAVE, FREE, HOME, ONE NATION, SINCE 1776, and a small star-only stone to anchor the arrangement visually. Letter each stone using a fine brush and the appropriate contrasting color. Use a simple serif or slab-serif letterform — not script, which reads as fussy at stone scale — and leave generous margins around the text. For the SINCE 1776 stone, add two small star motifs flanking the date. For the star stone, simply paint a single centered star. Display them scattered loosely on a red and cream ticking stripe table runner, allowing them to overlap slightly and sit at different angles.
The Sunflower and Patriotic Windowsill Row
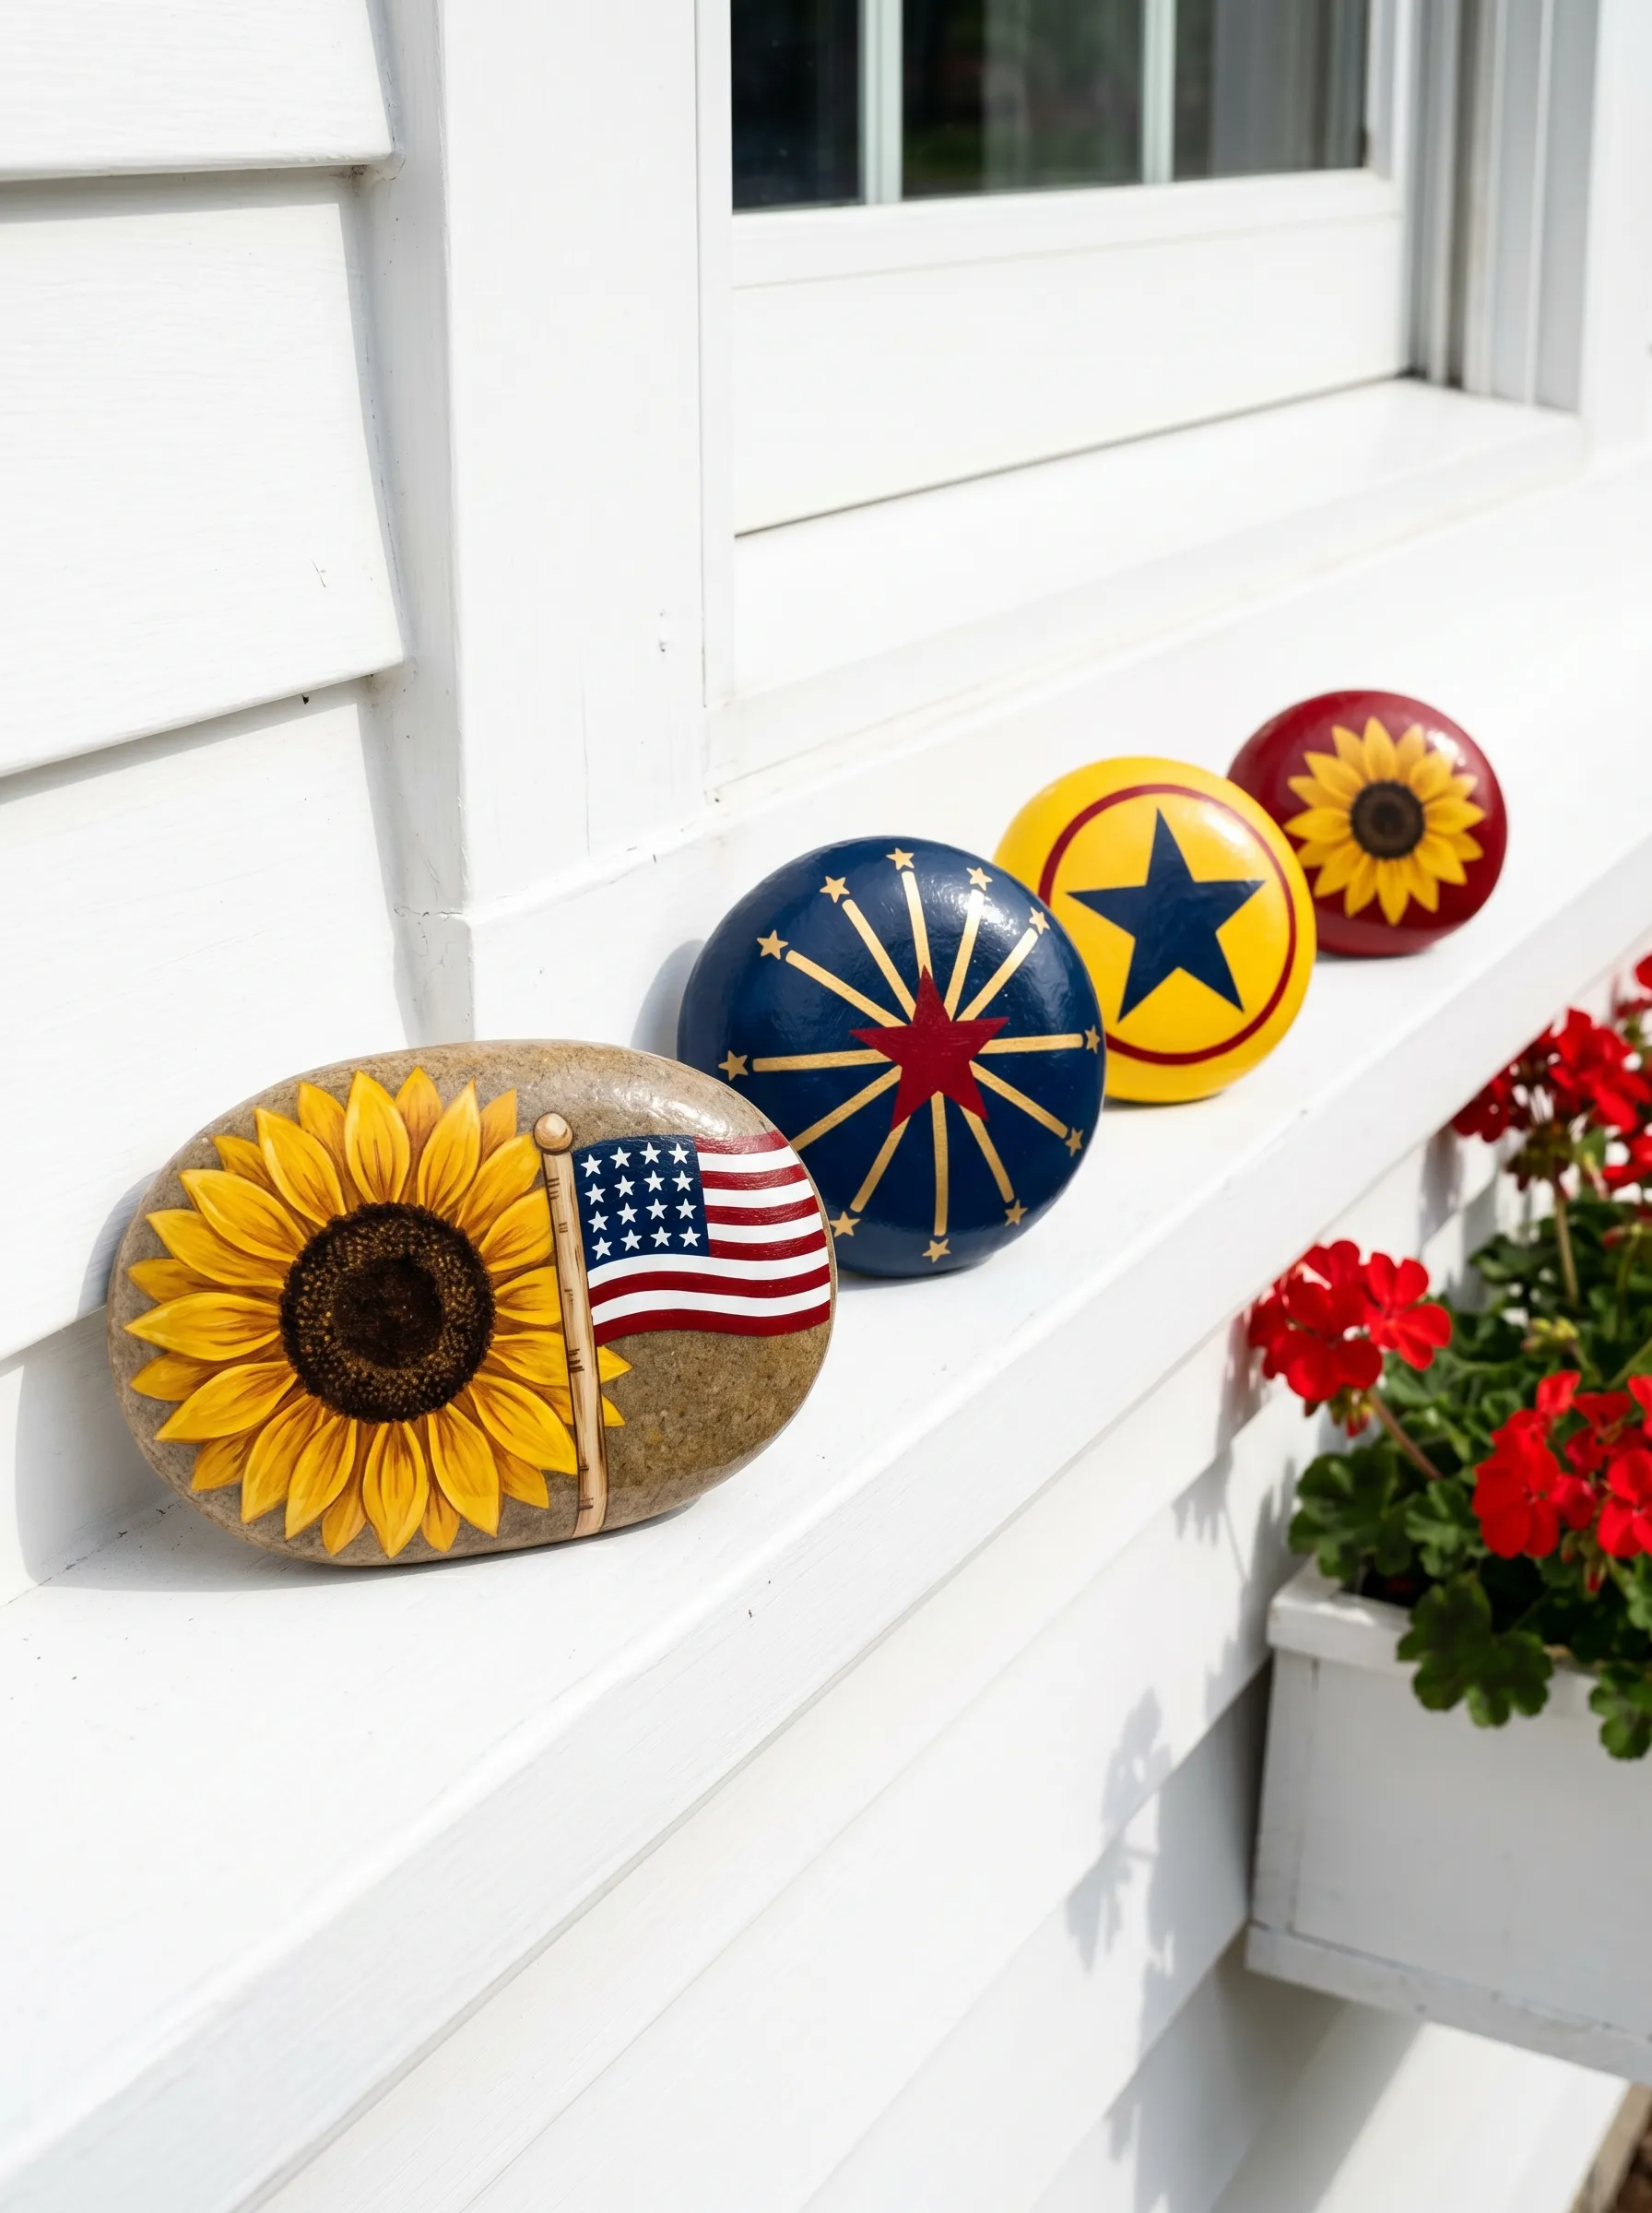
These four rocks are displayed in a row on an exterior windowsill and are designed to read as a collection from a distance. They are not identical but they share a consistent scale and a yellow-navy-red palette that pulls them together visually. For the large horizontal landscape rock, paint the left half with a detailed sunflower: a rich golden-yellow flower with dark brown center, petals rendered individually using a fan brush or flat brush, pulled outward from a painted center disc. The right half of the same rock gets a small painted flag with proper stripe and star proportions. For the navy fireworks rock, paint the entire surface in navy and add a starburst motif at center in cream and dark crimson — lines radiating outward from a red center point, with small dot stars along each ray. For the yellow star rock, paint the stone in a saturated school-bus yellow and paint a single large navy star centered on the face with a thin circular border in the same navy. For the crimson sunflower rock, paint the ground in deep crimson and paint a single golden sunflower face centered on the stone. Lined up in order on a white-painted windowsill with red geraniums below, the variation in pattern against the consistent scale and palette reads as a considered sequence.
The Large Cream Declaration Stone for the Garden Path
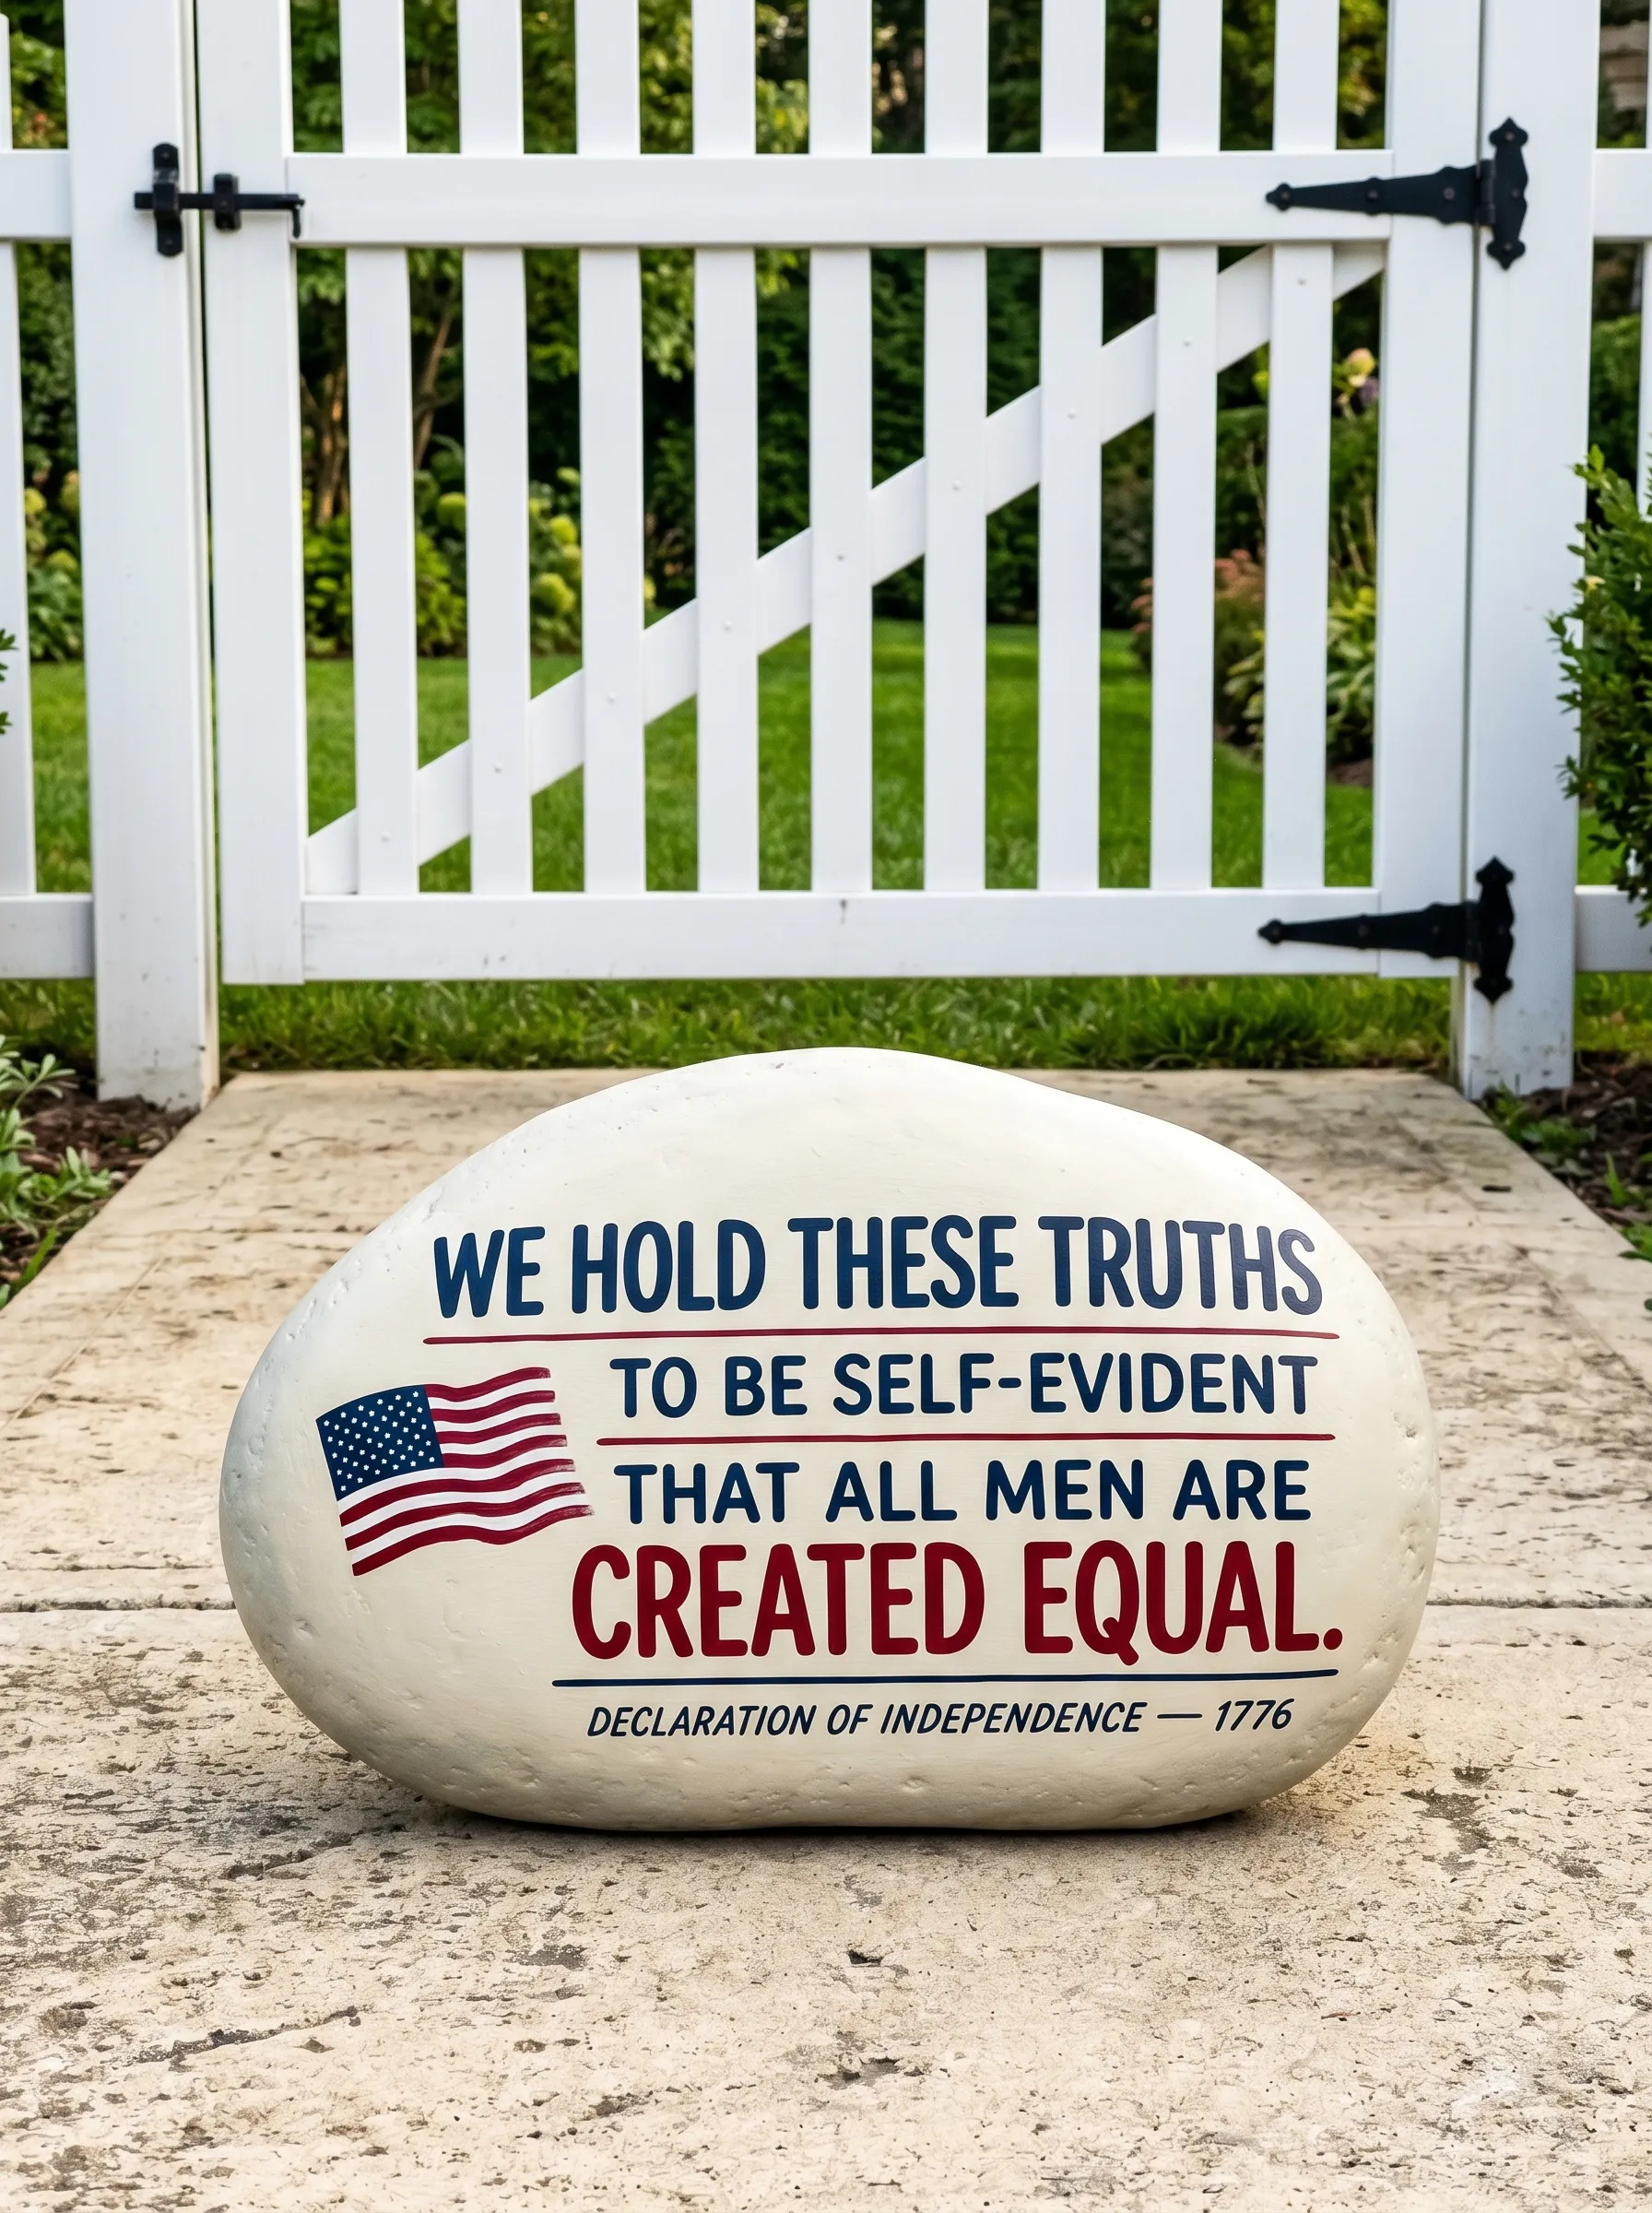
This is the largest rock in any collection — a genuine statement piece intended to sit at the base of a gate, along a garden path, or at the front of a porch step arrangement. It needs to be a rock you can barely lift. Prime it with exterior primer thoroughly, including the visible sides. Paint the entire face in a warm cream — not white, not yellow, but the color of aged paper. Once fully cured, transfer your lettering using chalk transfer or a light pencil sketch. The text layout works in three tiers: a large serif headline across the top two lines, body text in a smaller but still readable serif in the middle, and a source attribution line at the very bottom in small capitals. Include a single painted flag motif to the left of the text body — small enough to be a supporting element rather than competing with the words. The lettering colors work in two tones: navy for the main text, dark crimson for the emphasized words. The stone’s meaning depends entirely on the legibility of the typography. Every letter must be cleanly executed. Take your time with the letterforms before you commit to paint. Seal with at least three coats of exterior-grade gloss varnish.
The Painted Rock Coffee Table Tray Vignette
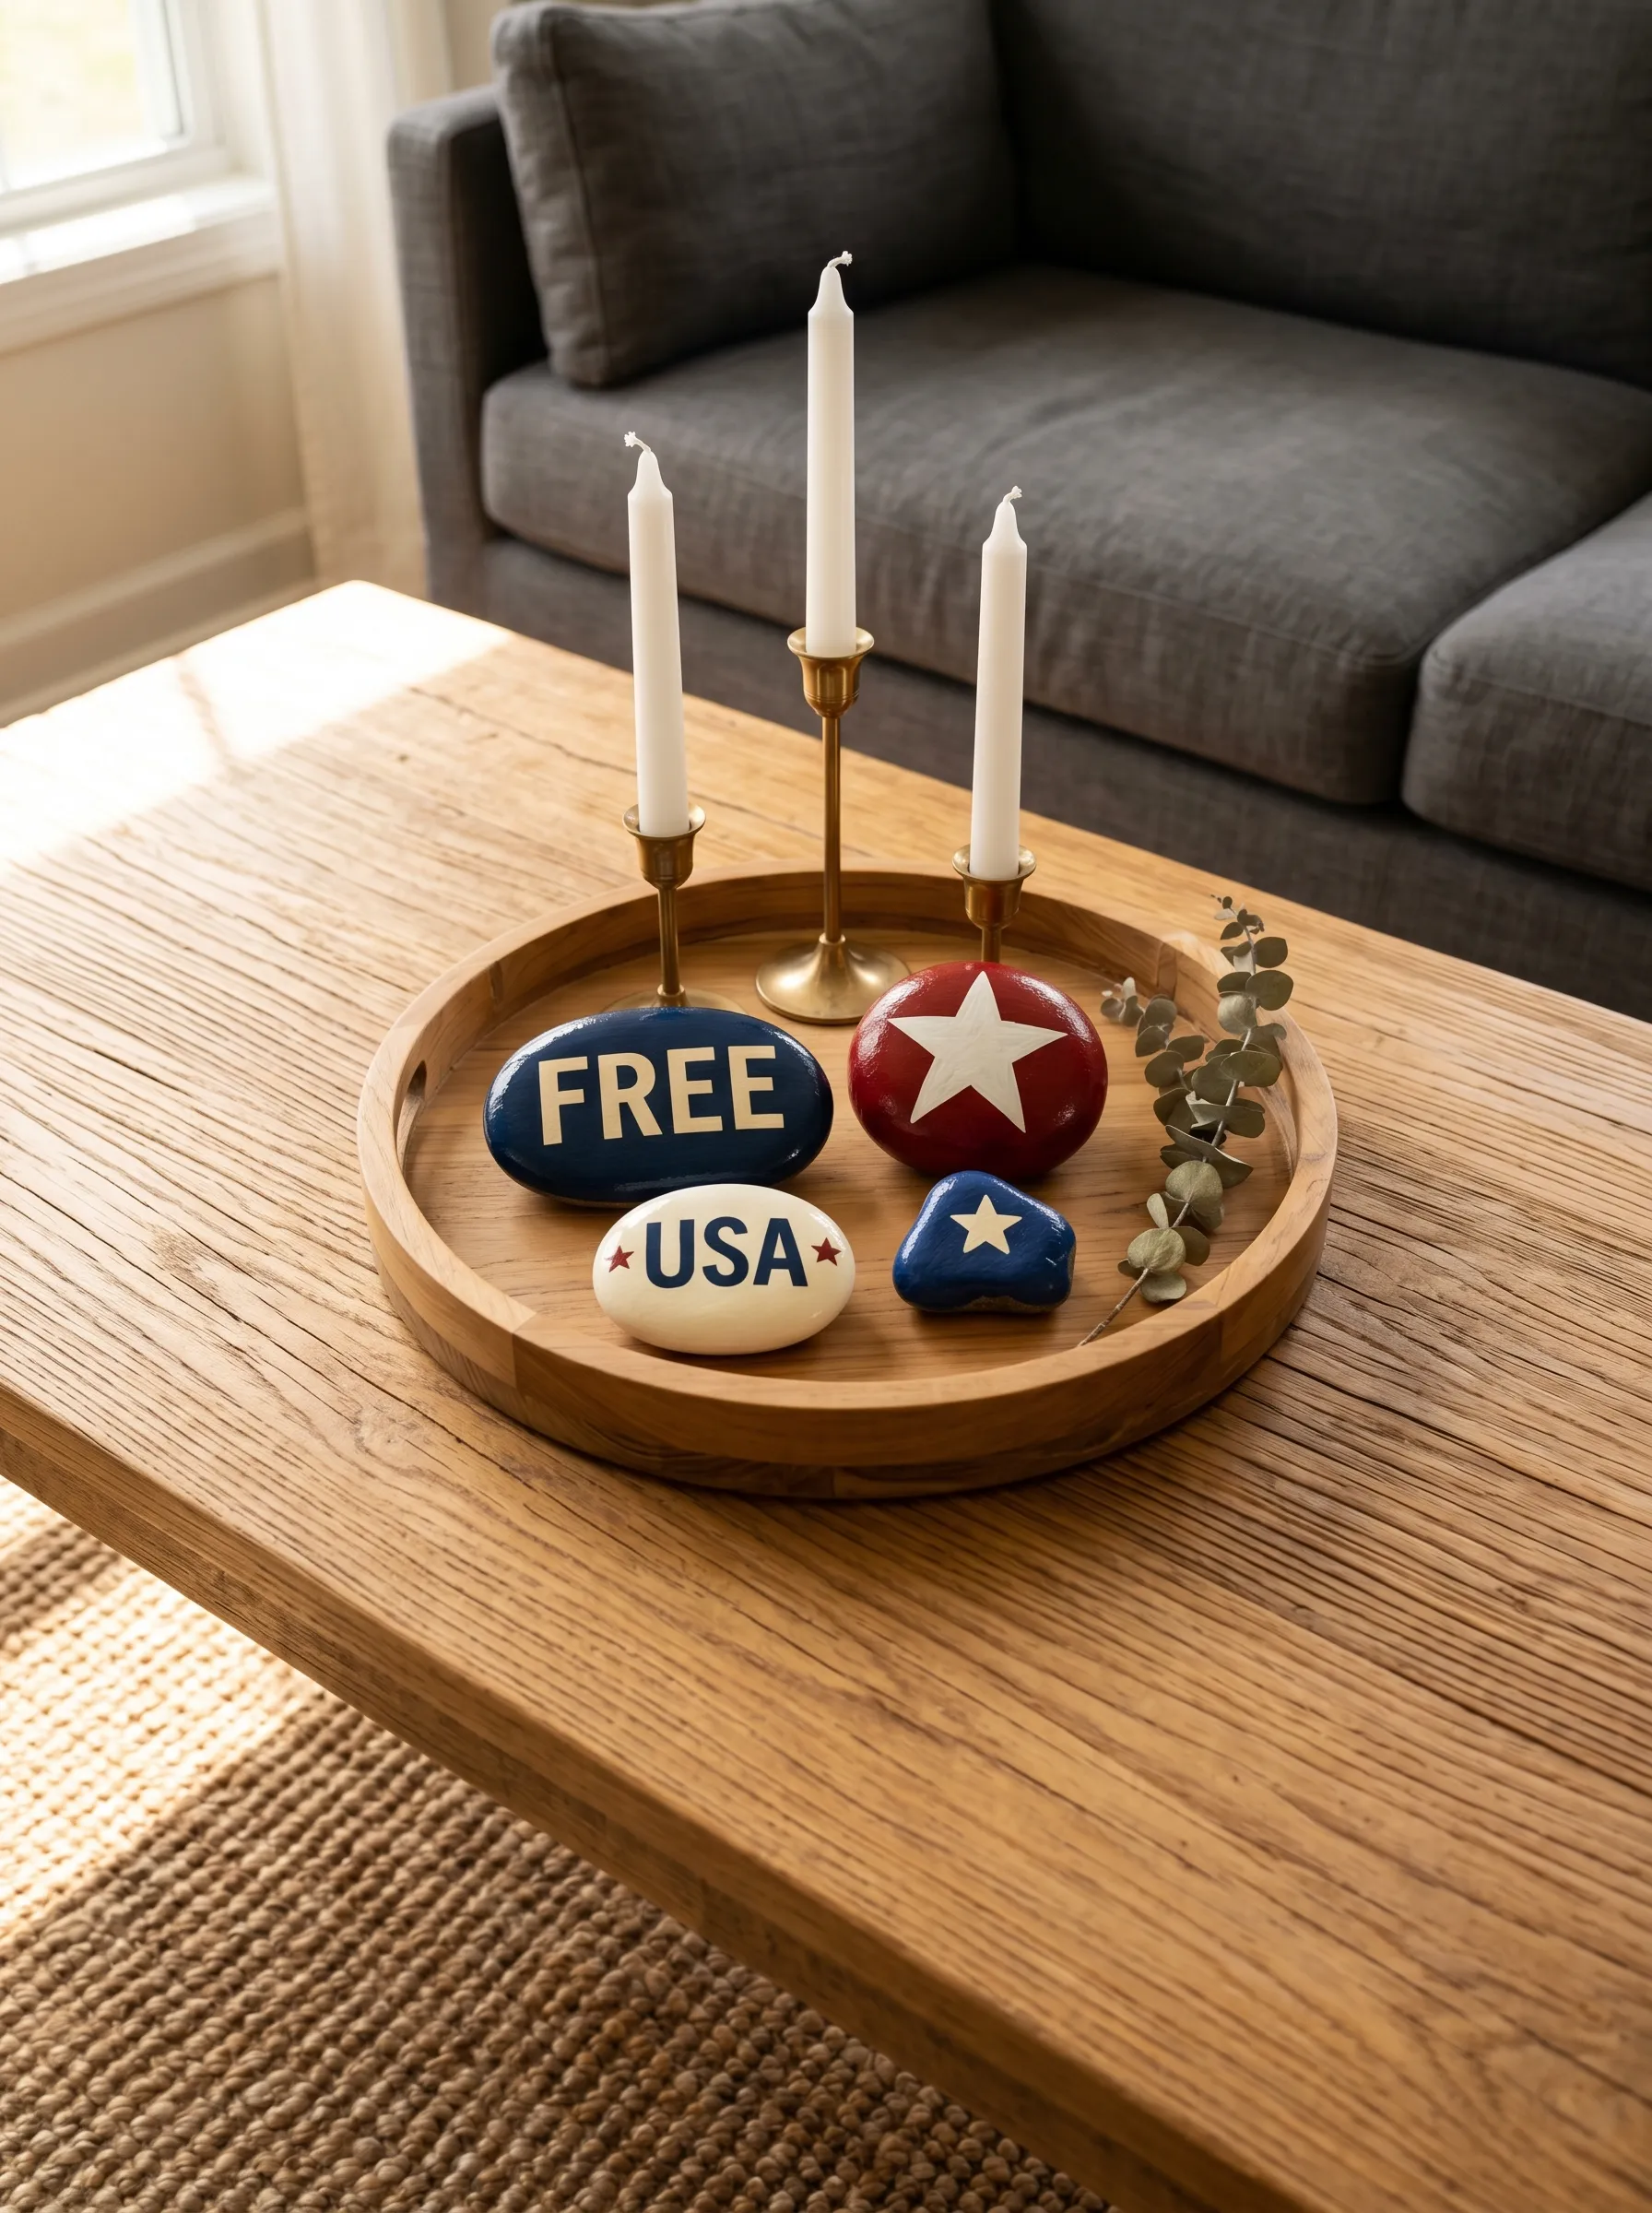
Four painted rocks arranged in a round wooden tray on a coffee table. The tray contains the arrangement and defines the vignette boundary. Within it, the rocks provide color, texture, and pattern variation. Select four stones of genuinely different sizes — one large, two medium, one small — so the arrangement has natural height variation when they rest against each other. Paint each one a different patriotic design in a consistent palette: a deep navy stone with a large cream-painted word in slab-serif font; a dark crimson stone with a single large white star centered on its face; a cream stone with a smaller patriotic word or USA in navy sans-serif; and a small dark blue stone with a simple white star. Arrange the rocks in the tray so the largest anchors the back center and the smaller ones cluster in front at varying angles. Add three slim brass taper candleholders with white candles rising from behind the rocks, and tuck a small sprig of dried eucalyptus at one side of the tray. The eucalyptus is the element that stops the arrangement from looking like a product display.
The Folk Art Flag Stone With Primitive Border and Home Sweet Home Text
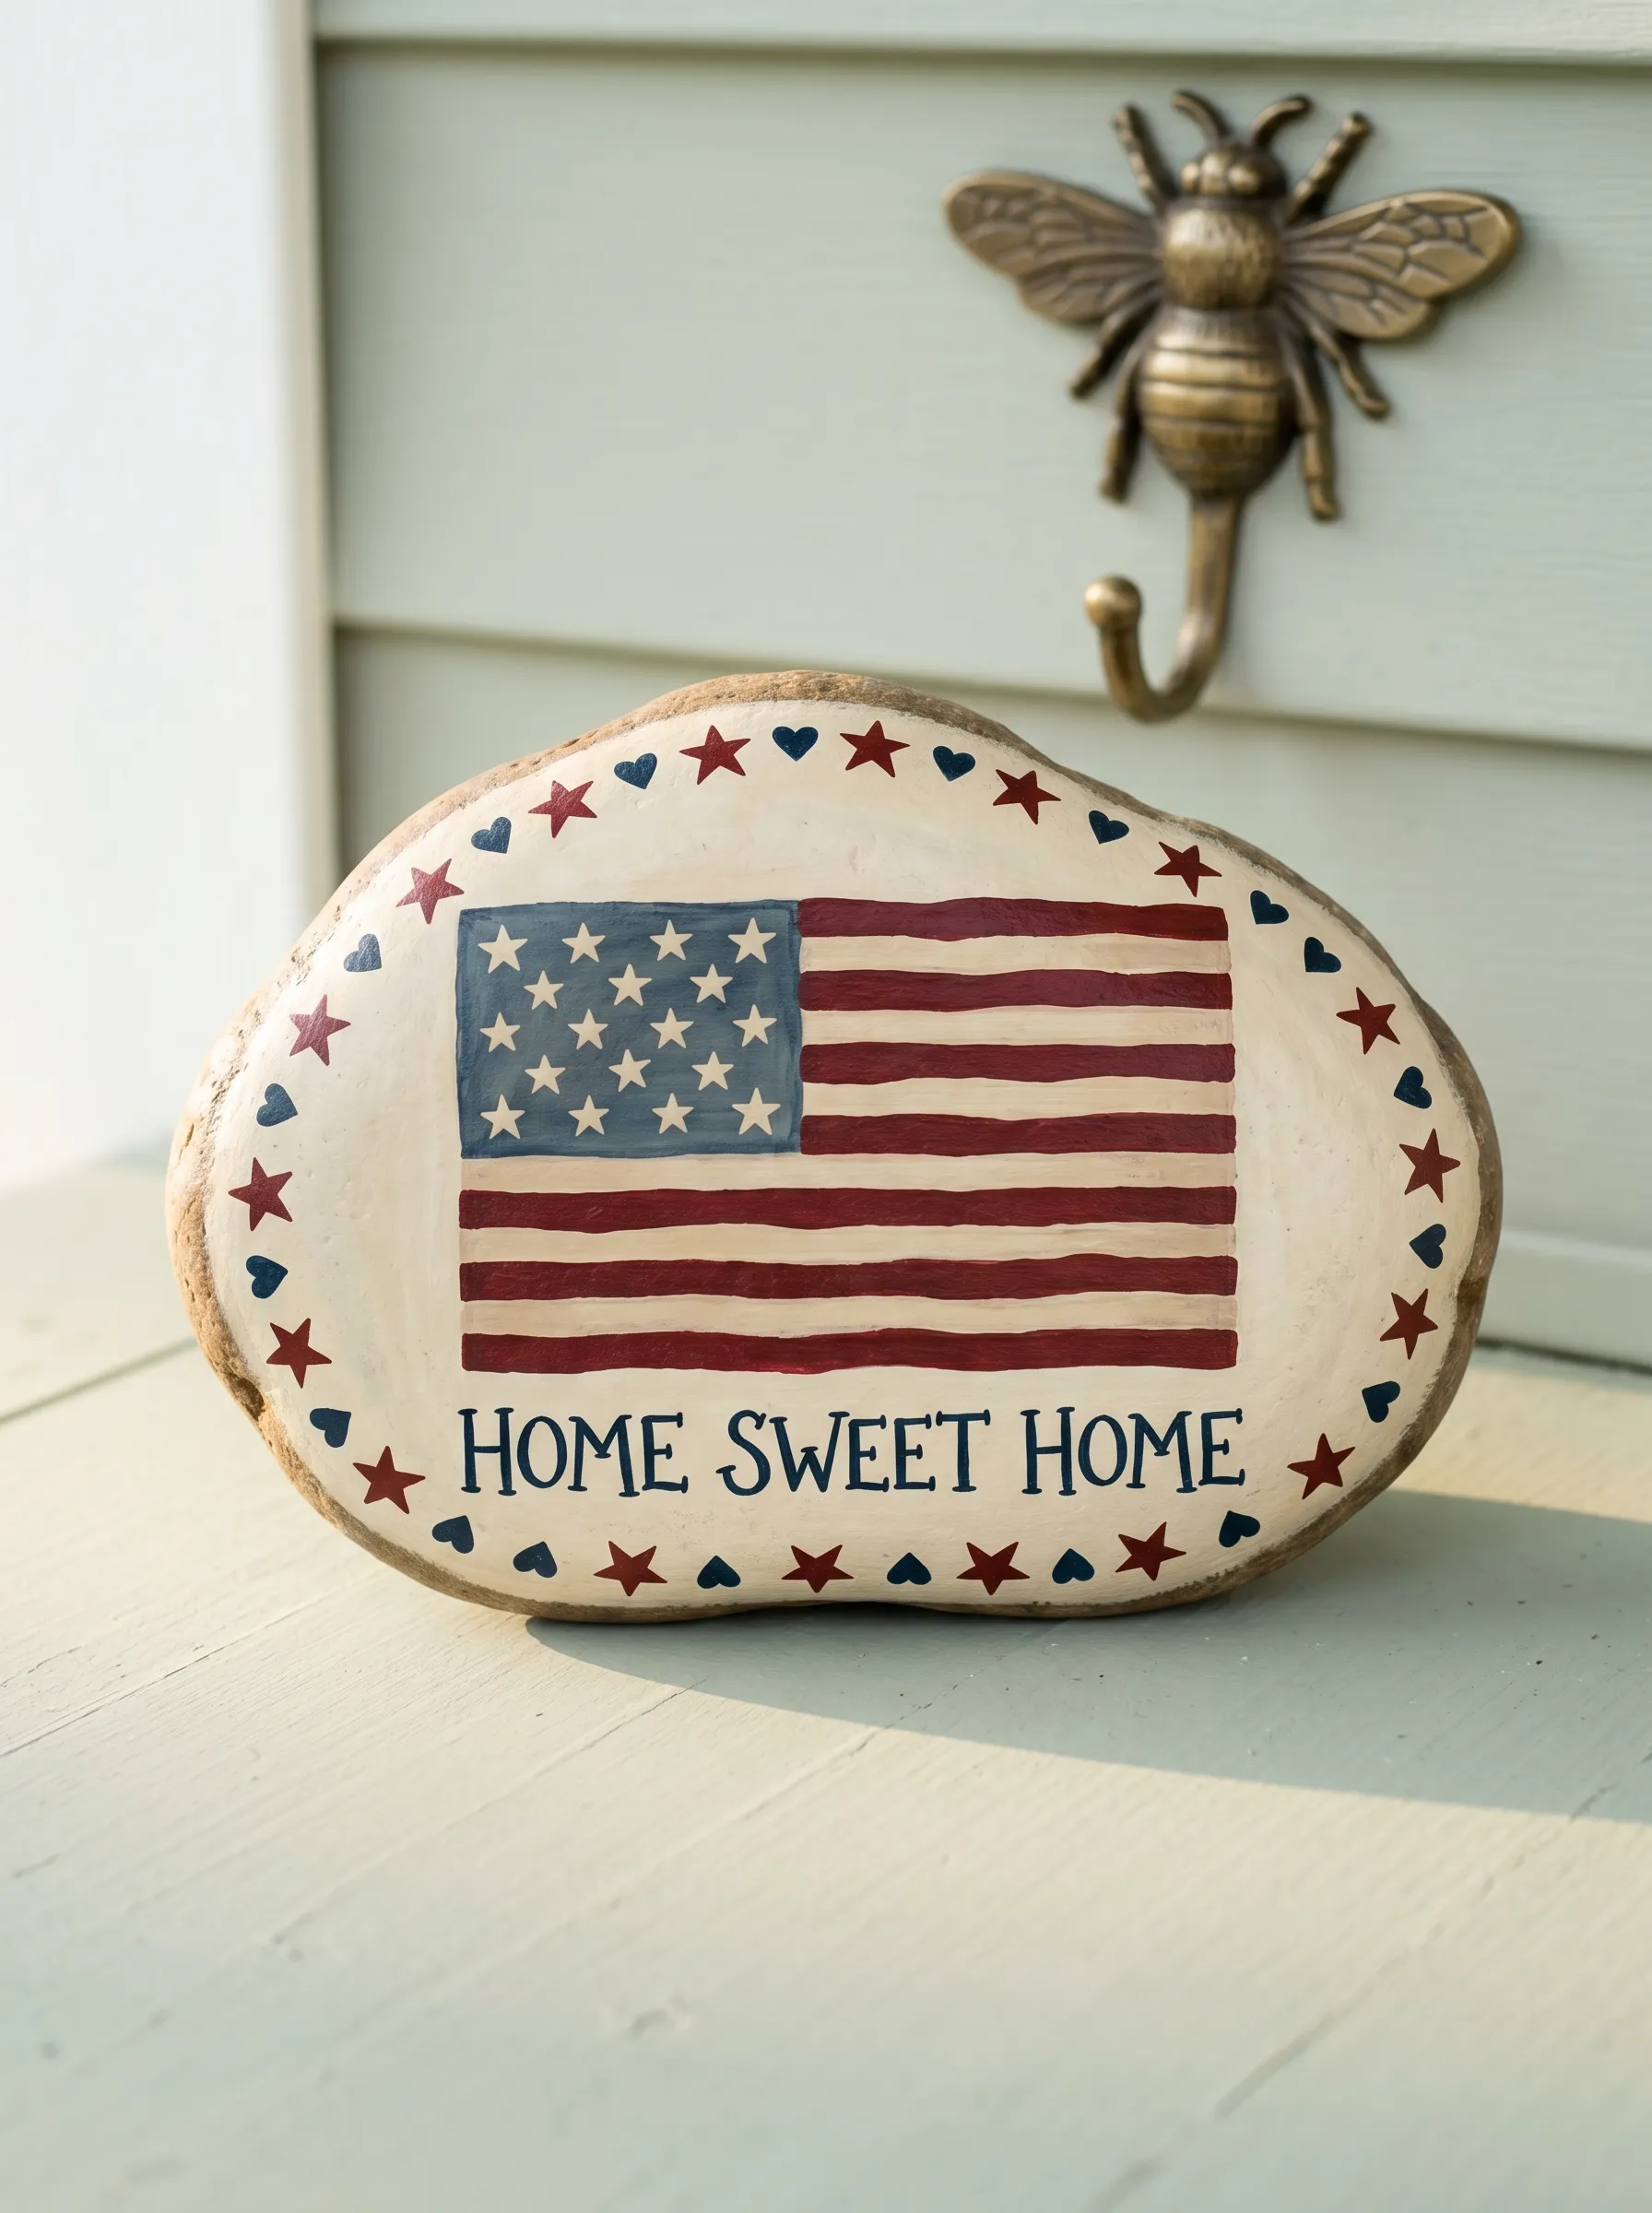
Paint a large, wide, relatively flat stone in warm cream — the same paper-white as the Declaration stone, applied in two coats. Once dry, paint the flag centered and large on the face: a faded blue canton with hand-painted stars done in a slightly imprecise folk art manner, and stripes in muted brick red rather than bright crimson. Let the paint be slightly uneven. This is meant to look painted by hand, not printed. Below the flag, letter HOME SWEET HOME in a simple, slightly naive serif font in deep navy. Leave generous space between the bottom of the flag and the top of the lettering. Around the perimeter of the stone’s face, paint an alternating border of small navy hearts and small dark red five-pointed stars, spaced evenly and kept small enough not to compete with the central flag. The border closes the composition and gives the piece a folk art sampler quality. The finished stone reads as something that could have been made at any point in the last two centuries. That timelessness is what makes it genuinely charming rather than seasonally trendy.
The Casually Painted Farmhouse Table Rock Collection on Gingham
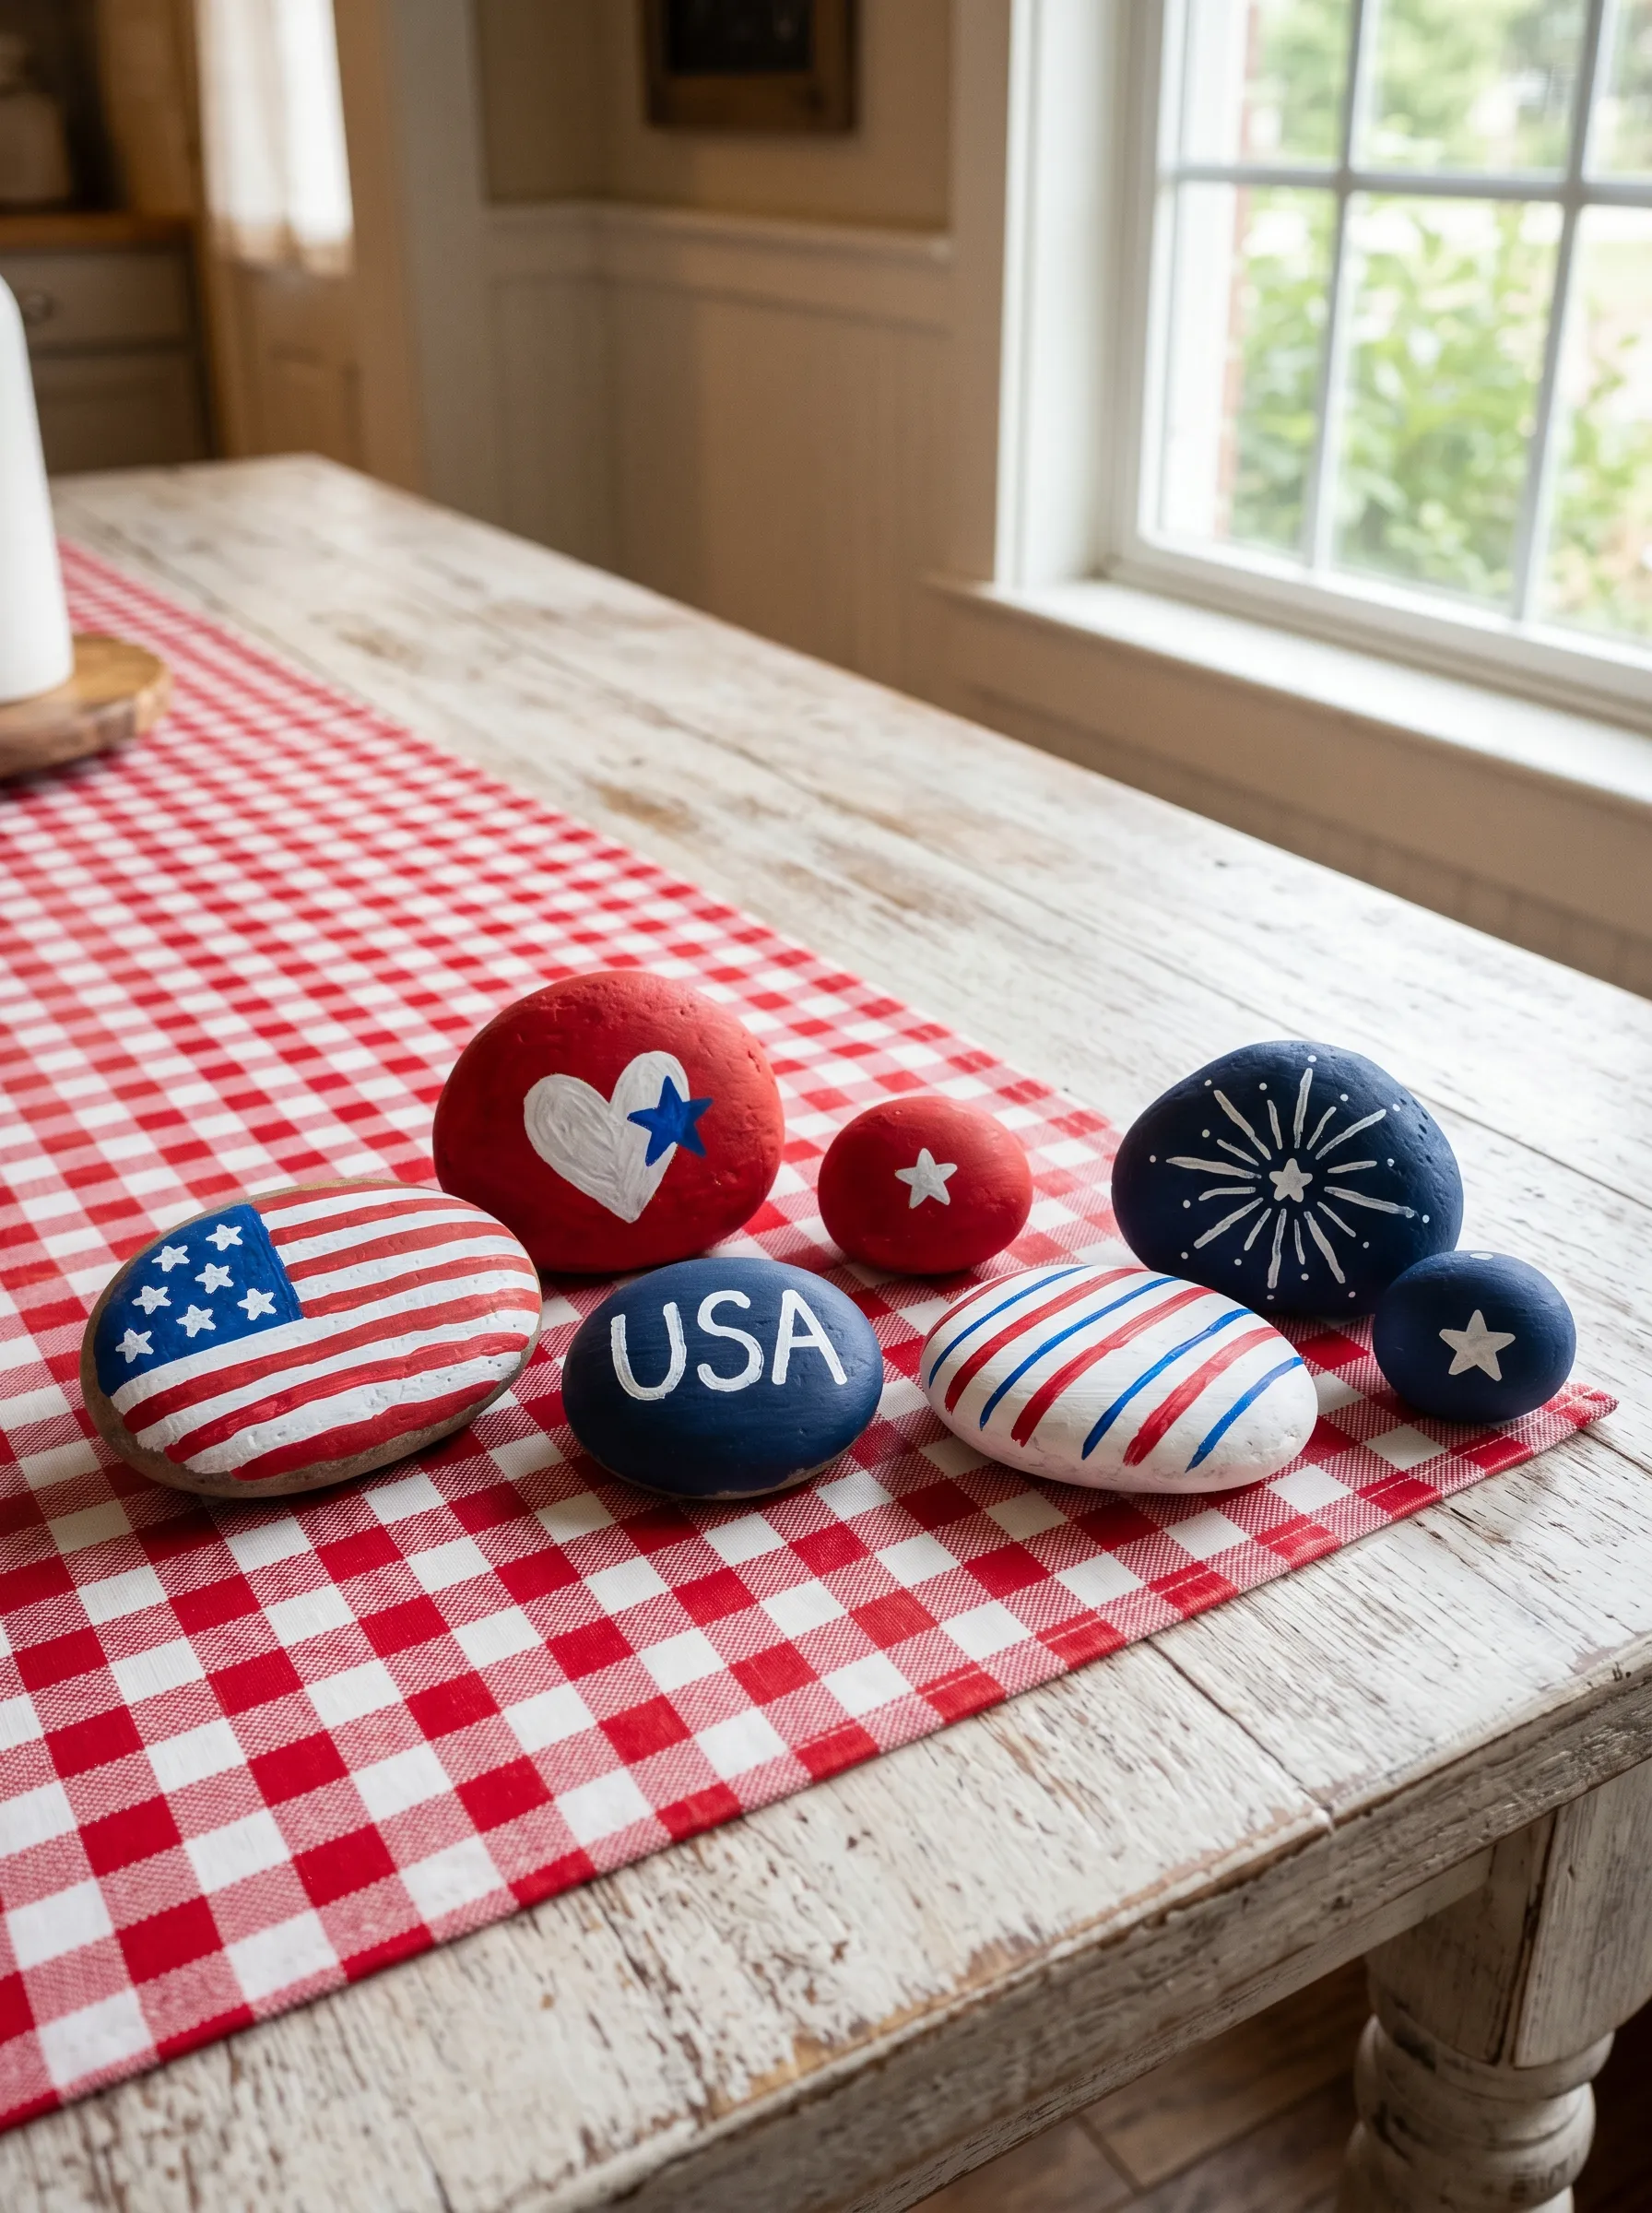
Seven rocks in varying sizes, displayed scattered on a red and white gingham cloth across a whitewashed farmhouse table. These are meant to look cheerful and unpretentious rather than precious. The designs in this collection: one full flag rock painted flat and clean; one large red rock with a white heart containing a blue star inside it; one very small red rock with a single white star; one navy fireworks-burst rock with white radiating lines; one navy USA text rock in white sans-serif; one white rock with red and blue offset stripes; and one tiny navy rock with a white star. These don’t need to be precious about their execution. The gingham cloth beneath them does much of the visual work. Paint them in a single afternoon with flat acrylic, seal them in matte, and arrange them in a loose scattered grouping with the larger rocks at the back and the smaller ones pulled forward. Their cheerful informality is the point. They belong at a table where people are eating outside in July.
The Navy Star Marble Pedestal Stone
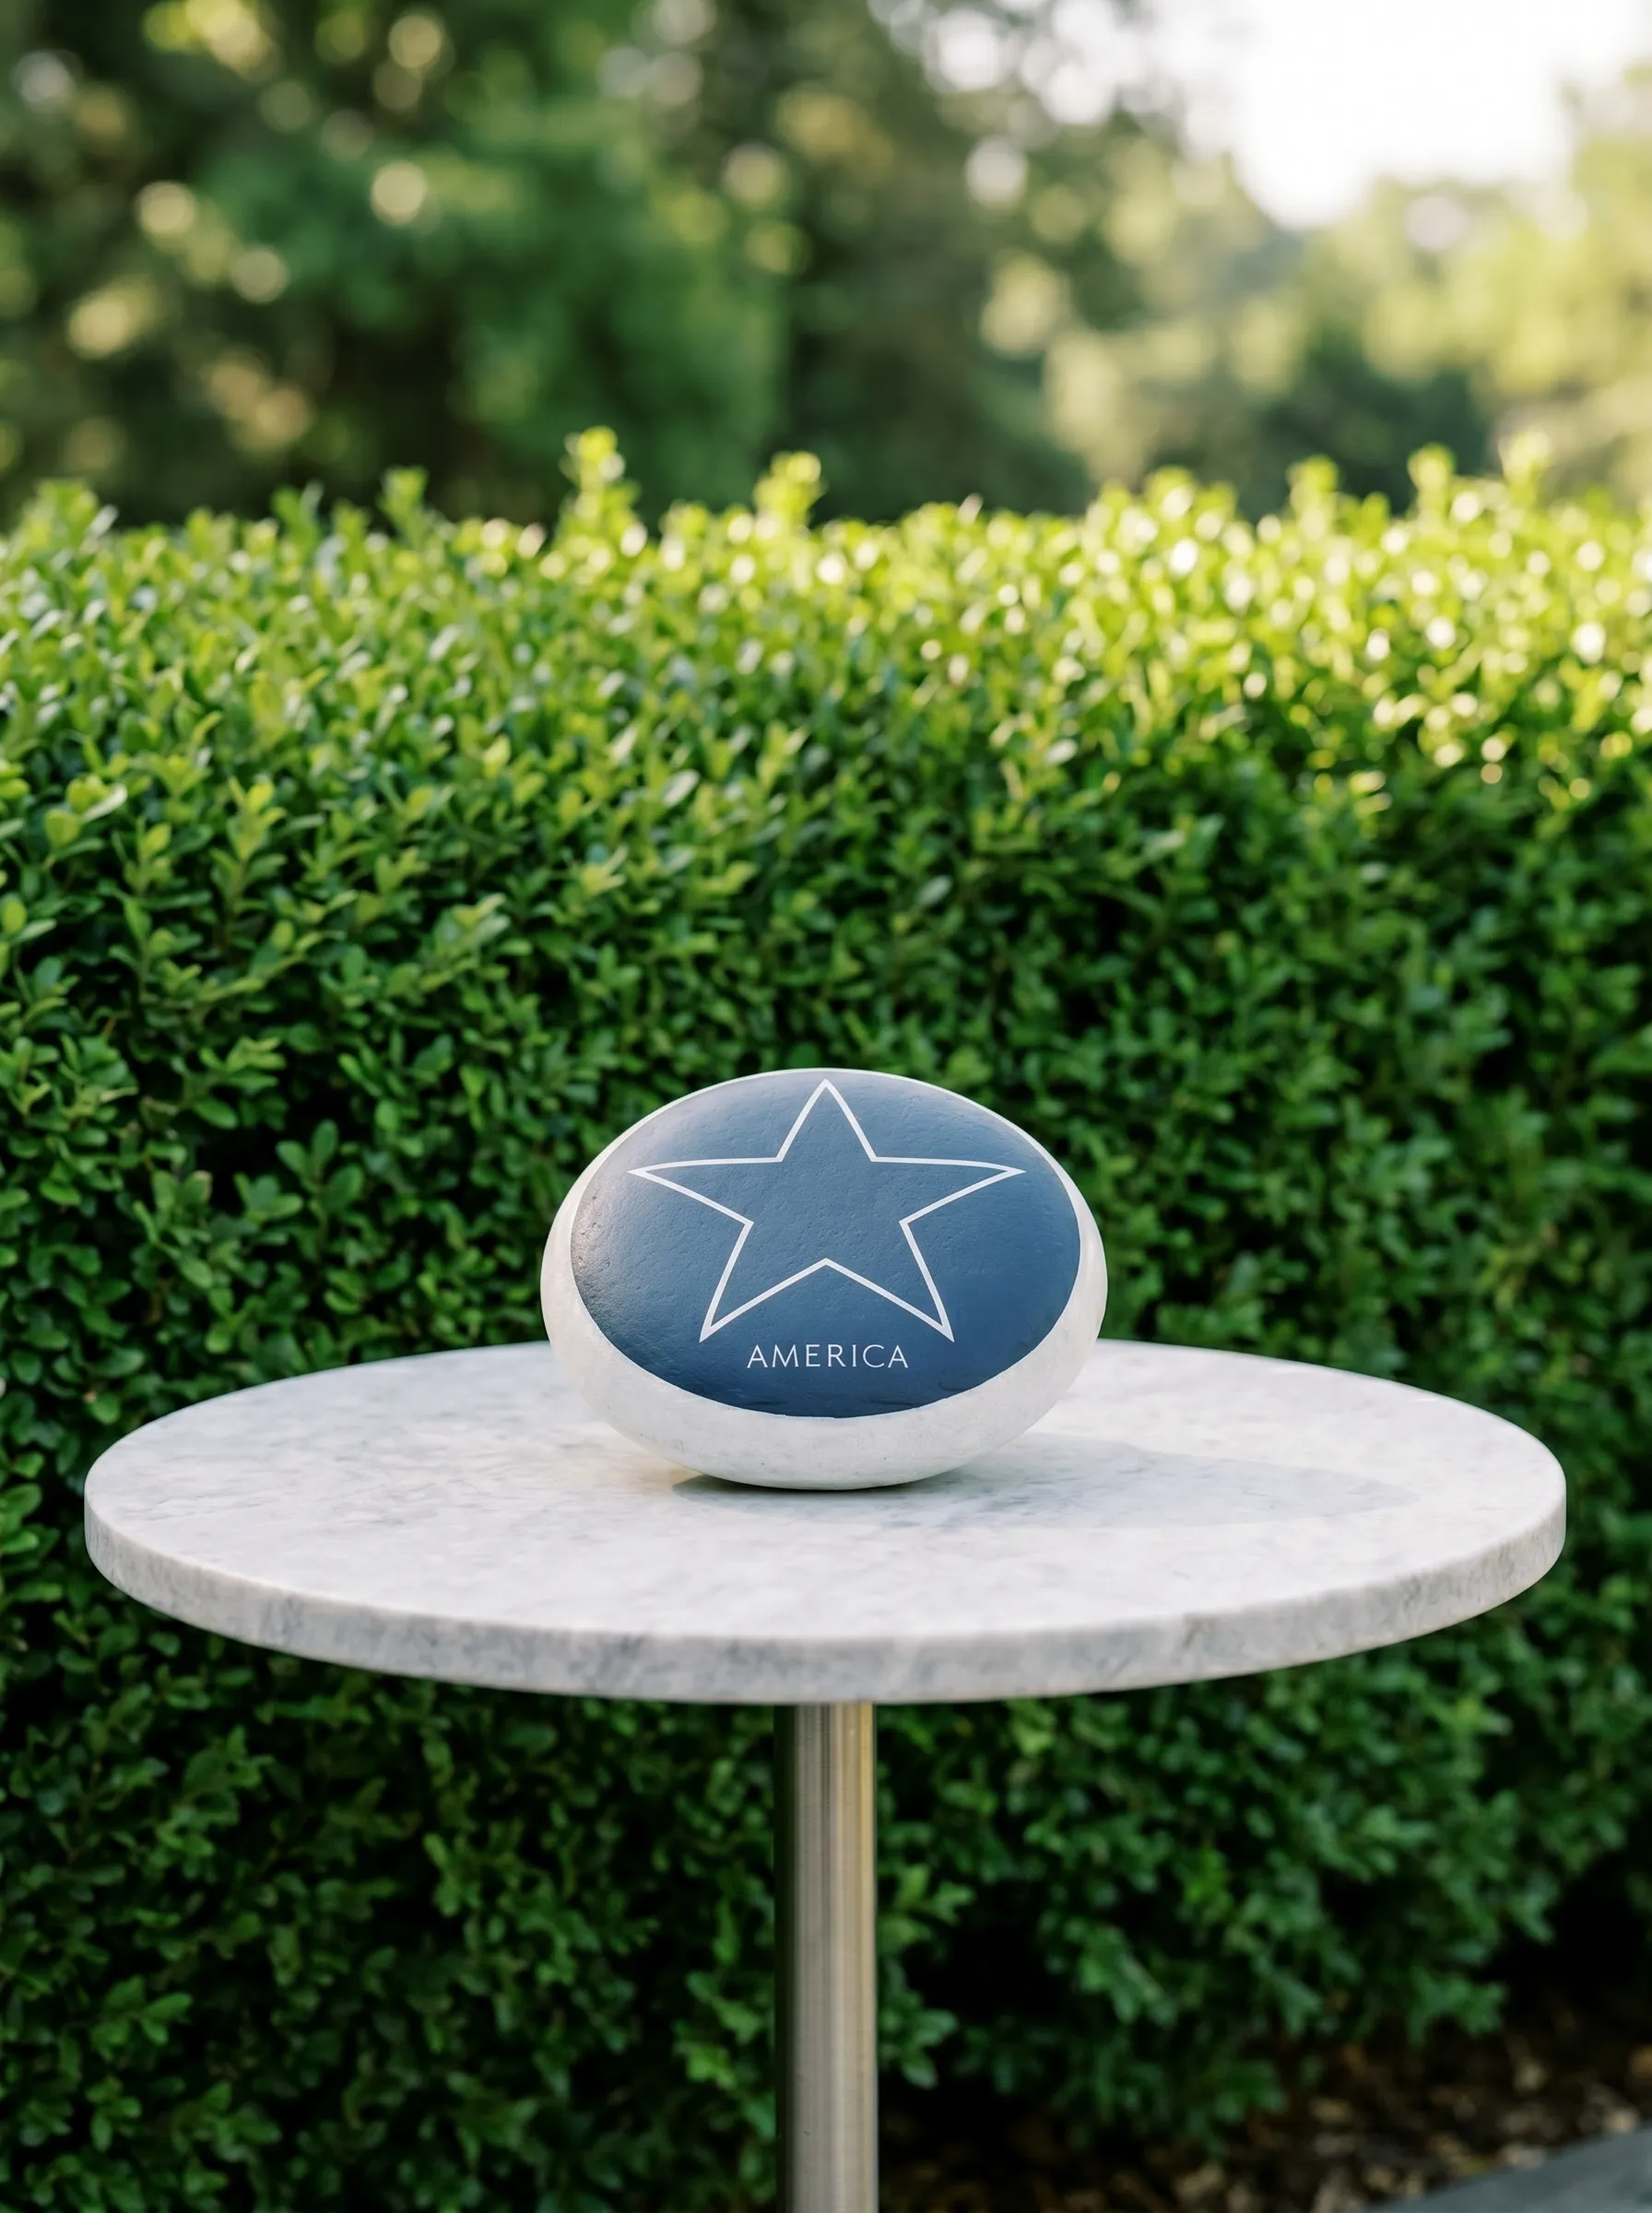
This is the single rock that functions as a standalone sculpture. It requires the quietest, most restrained design in the entire collection. Source a stone that’s naturally flatter on one side and more domed on the other — a disc shape rather than a sphere. Prime and coat the entire stone surface in a smooth, flat slate blue or muted navy that leans slightly towards grey. Apply two or three coats until the surface is completely even with no patchy areas. On the flattest, most visible face, draw a large five-pointed star outline centered on the surface. The star should be generous in size — the majority of the face — and drawn with clean, precise lines. Paint the star as an outline only: the interior remains the same navy as the ground, and only the five-pointed outline itself is painted in white, at approximately two to three brush-strokes wide. Below the star, letter a single word in small, lowercase white type: america. Display it alone on a white marble bistro table or on a column pedestal. It needs no company.
The Distressed Rustic Porch Step Rock Cluster
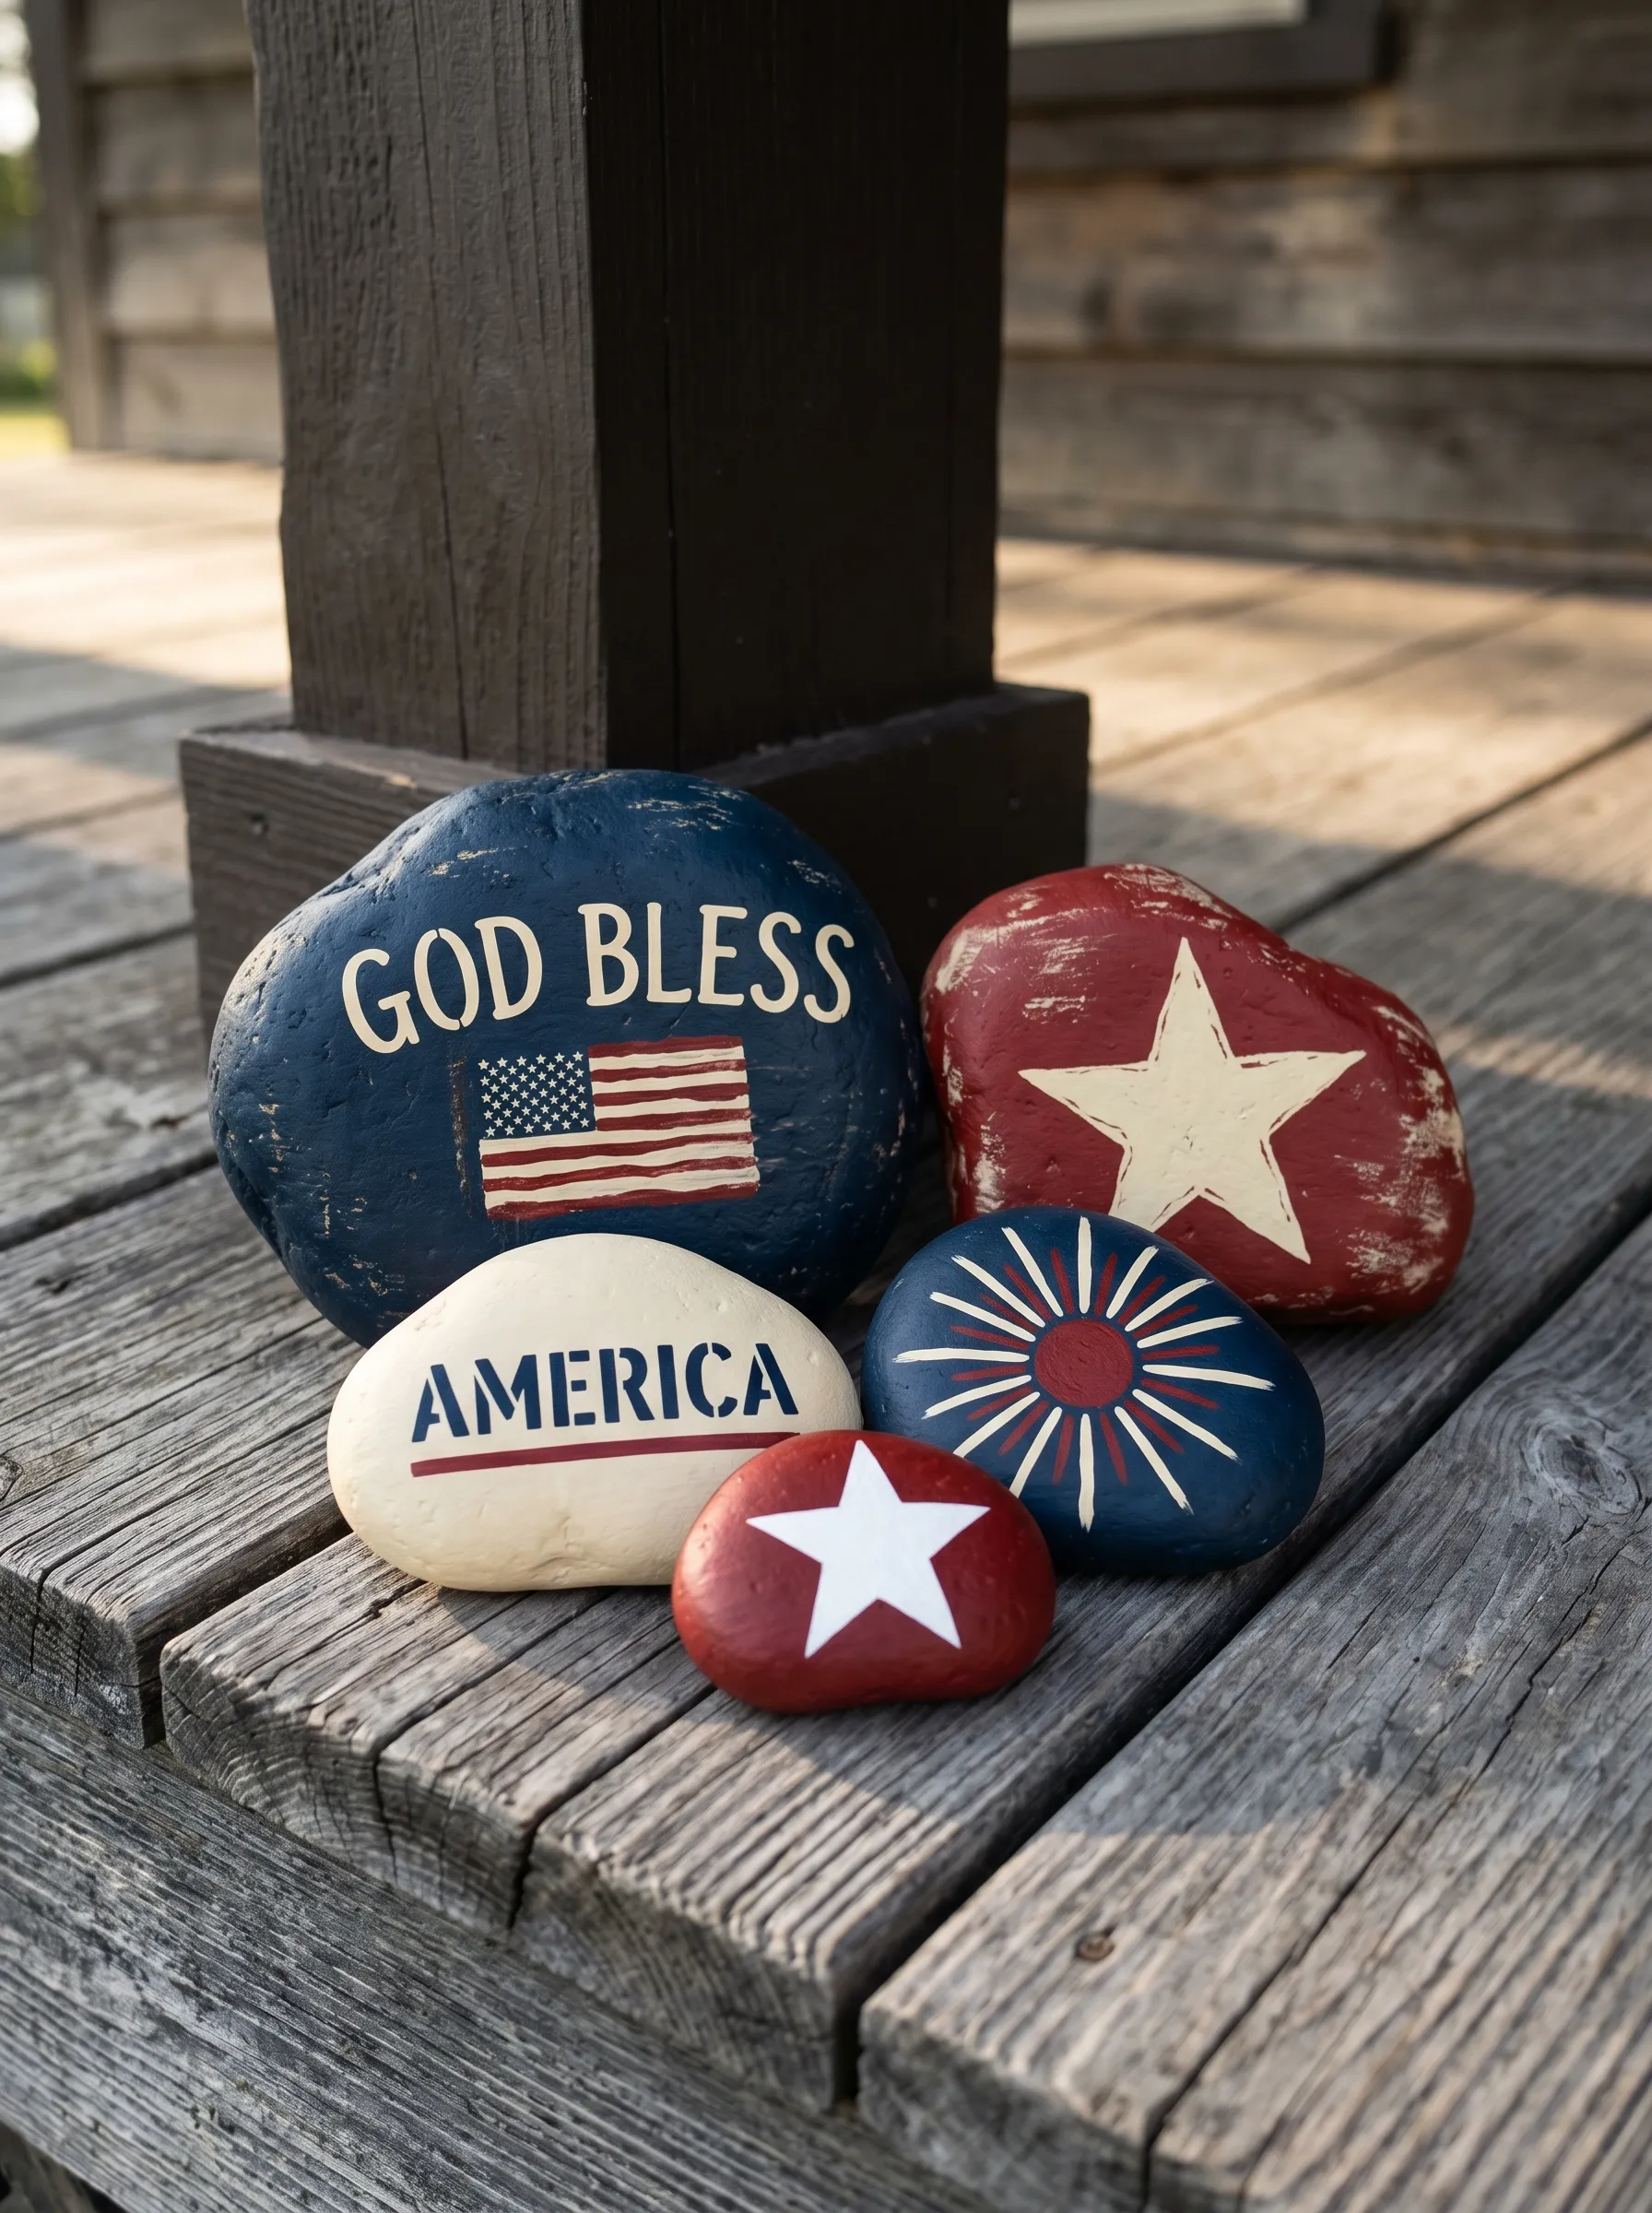
Five rocks with intentionally aged and distressed finishes, displayed stacked and leaning against a dark wooden porch post. The aesthetic here is rural and worn — not pristine — and the distressing is the most important technique in this set. Paint each rock with its base design: a large navy rock with cream GOD BLESS text and a small flag; a red heart-shaped rock with a distressed cream star; a cream rock with AMERICA in navy slab-serif; a navy rock with cream sunburst lines; and a small red rock with a solid white star. Distress each finished piece before sealing. Use a rough-grit sanding block to lightly abrade the paint on raised areas and edges — the way a painted surface naturally wears at its highest points. The goal is to reveal the primer or raw stone below in places, suggesting age without looking deliberately damaged. After distressing, apply a matte sealer. Matte finish on top of distressed paint is the combination that reads as genuinely old rather than decoratively affected.
The Classic Large Flag Rock for the Porch Step
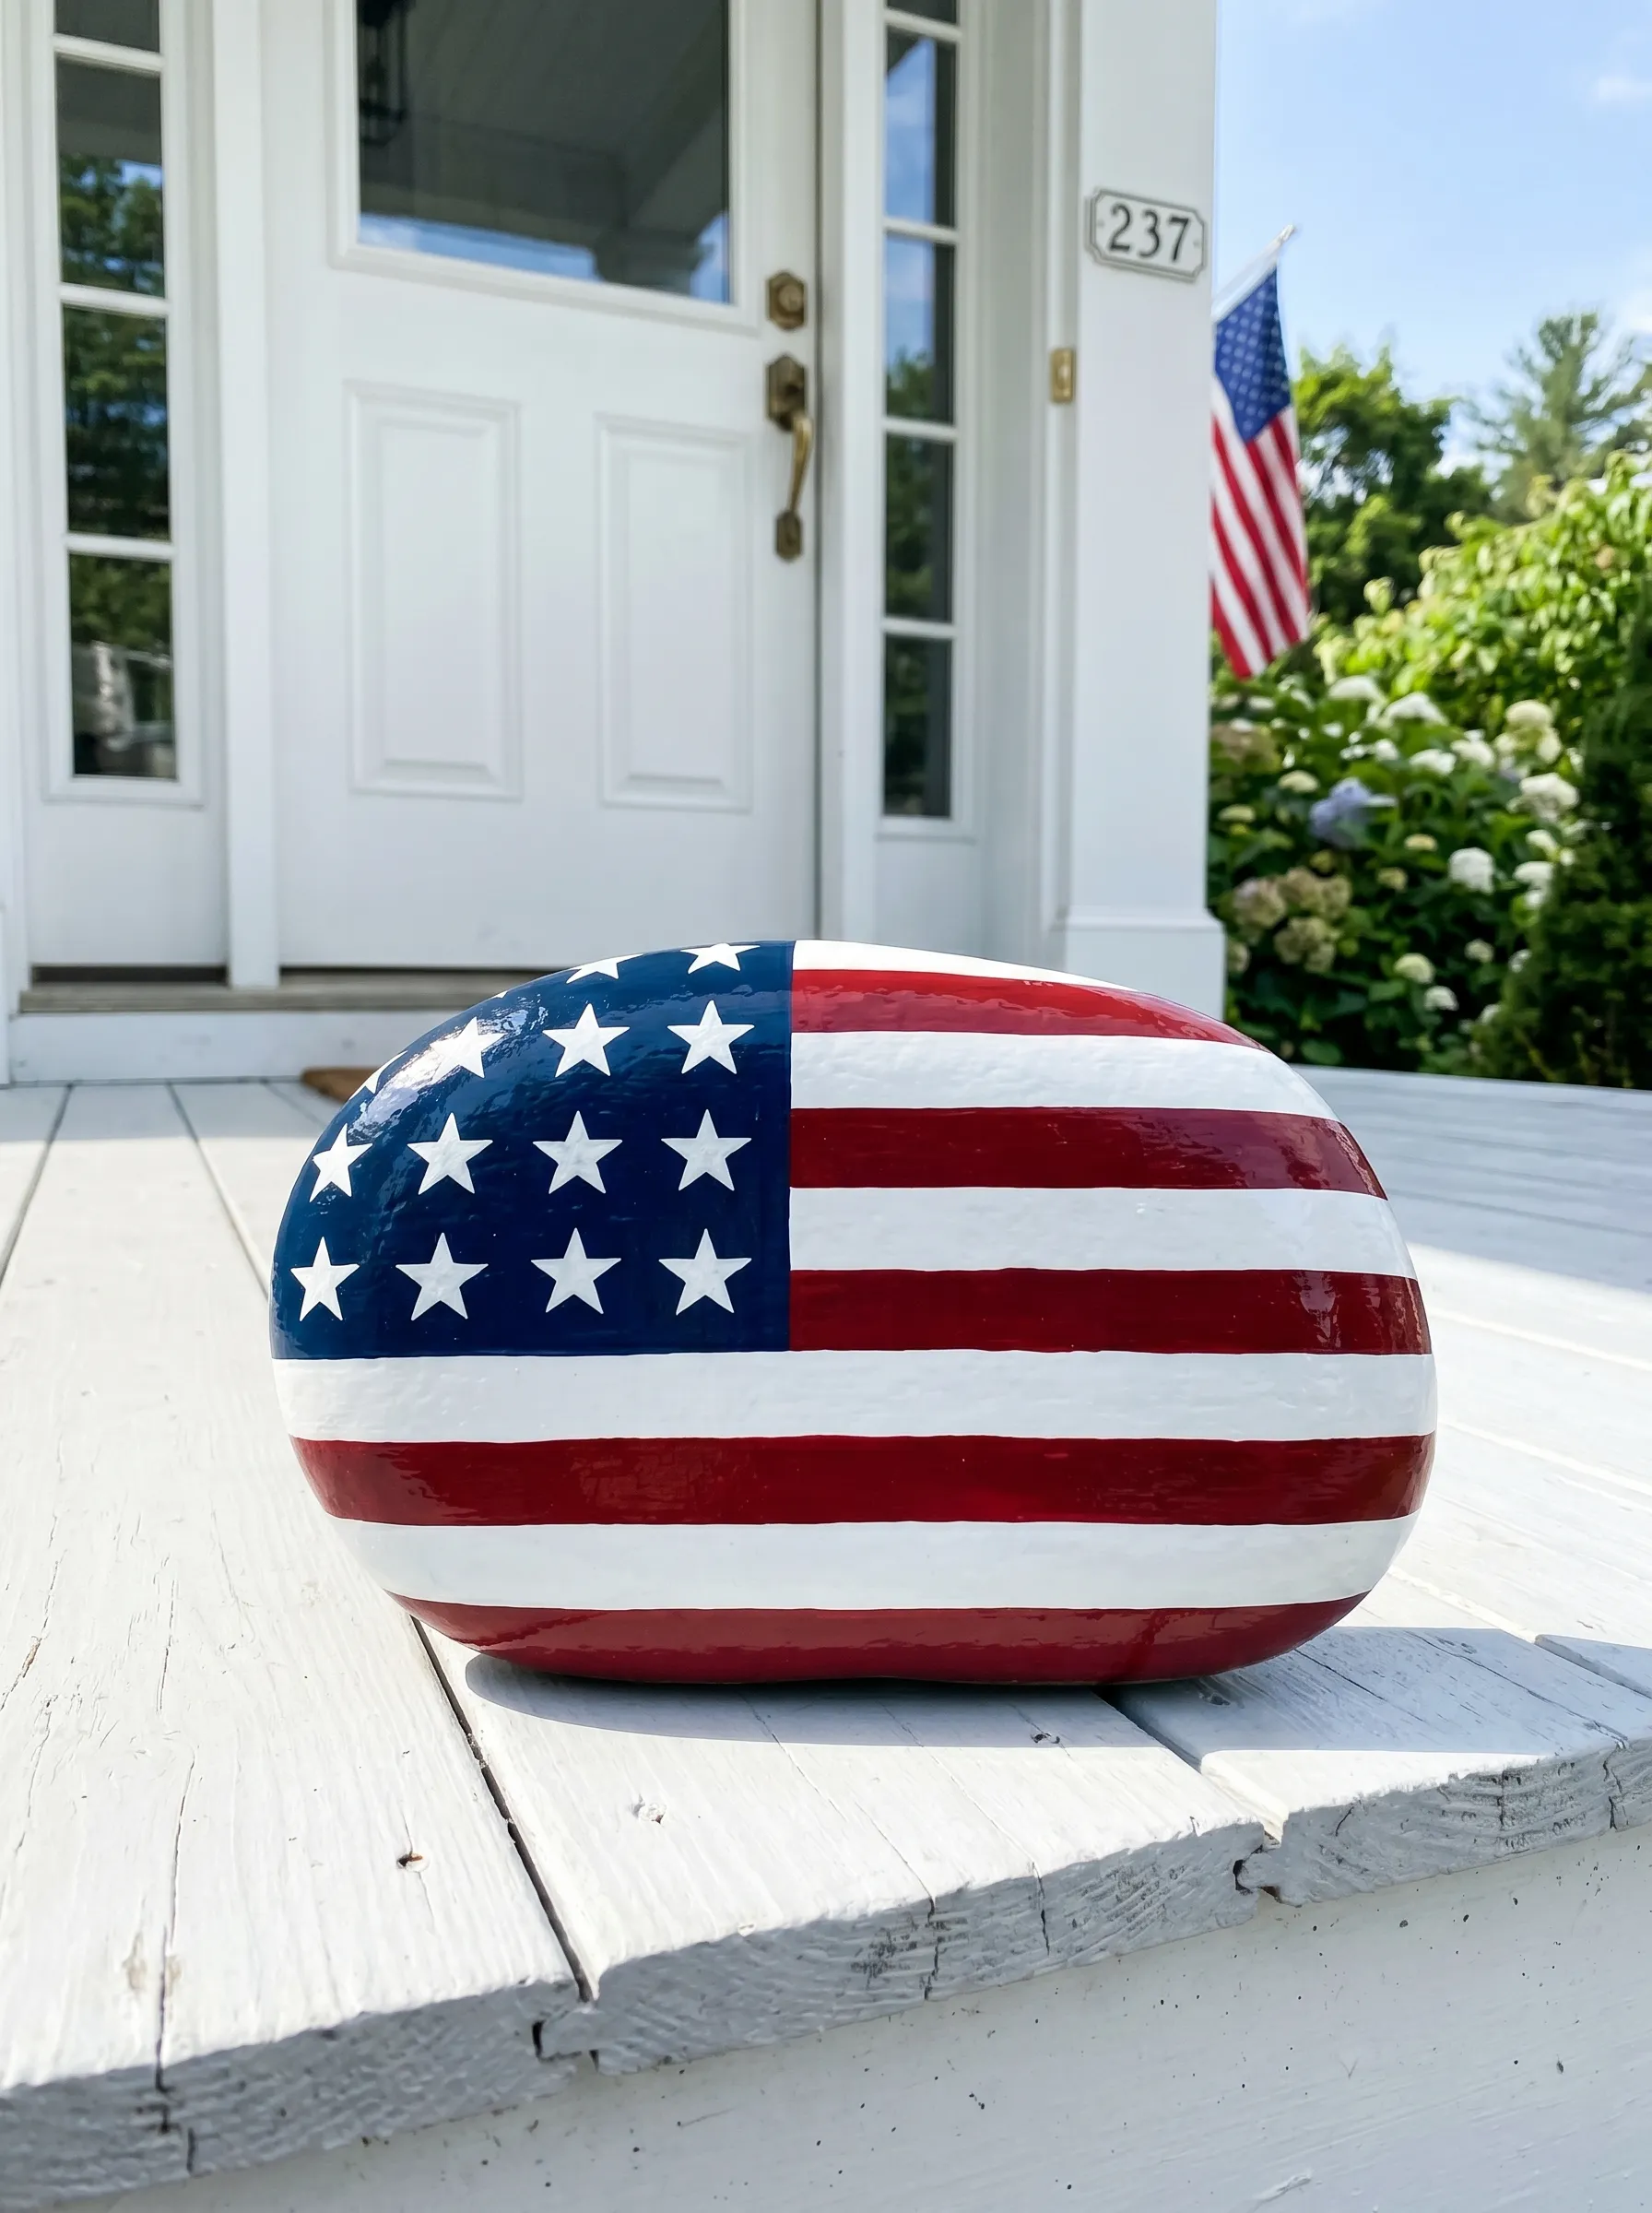
This is the fullest possible flag rendering on the largest possible stone — an unambiguous declaration of design intent placed in the most visible location available. Source the heaviest, most stable round stone you can find. Prime thoroughly. Apply two base coats of white exterior paint. Map the flag’s proportions in pencil before touching colored paint. The canton — the blue section — occupies the upper left quarter of the design. The remaining three-quarters is divided into thirteen even horizontal stripes, alternating red and white. The stripes should follow the curvature of the stone rather than trying to be perfectly straight; the slight curve of each stripe echoes the curve of the stone face and looks intentional. Paint the stripes in a clear flag red and leave the white stripes as the base white coat. Apply the navy canton once the stripes are dry and add fifteen to twenty stars in clean white, distributed in a grid pattern. Keep the stars consistent in size and spacing. Apply three to four coats of high-gloss exterior varnish. The gloss deepens the red, enriches the navy, and makes the whole piece look like a lacquered object rather than a painted stone. Place it at the base of the front porch step. It announces itself without trying.
Final Thoughts
A painted rock is not a lesser object than a bought one. The rocks in these images hold their own on porches, windowsills, coffee tables, and marble pedestals. Some look like folk art. Some look like they belong in a gallery. The variable isn’t the medium. It’s the decision.
Every one of these designs committed to something before the first brushstroke. A color. A technique register. A finish quality. A placement context. The commitment is visible in the finished piece, and the lack of it is equally visible.
Rock painting asks almost nothing of you in terms of materials or cost. It asks everything of you in terms of intention. A thought-through design on a ten-cent stone outperforms an impulsive attempt on a twenty-dollar blank every single time.
That’s a better deal than most decorating offers.