
Every pool eventually becomes a crime scene: one flip-flop, a deflated something, and four towels that definitely don’t belong to the four people currently arguing about them.
Pool organization isn’t about making the yard photogenic. It’s about reducing the number of times a day someone yells “whose goggles are these?” across the water.
The systems that actually work share one habit: everything gets a name, a spot, or both. Nothing floats free in a communal pile waiting to be lost.
Decisions To Make Before You Order Any Bins
Before any labels go up or bins get ordered, a few practical decisions need to happen first, the same way they would for any outdoor system that has to survive actual weather and actual kids.
Decide Outdoor-Rated Materials First
Anything living poolside permanently needs to handle direct sun, splash, and humidity, not just survive a rainstorm now and then.
Plastic that looks fine in a showroom can turn brittle and chalky after one real summer. Wood needs to be a rot-resistant species or properly sealed, not whatever was leftover from another project.
Check the material rating before the design. A beautifully organized system built from the wrong material is a one-season project, not a long-term fix.
When in doubt, choose the material the manufacturer specifically markets as outdoor or marine-grade, even if it costs more upfront.
Build Around The Wettest Item First
Towels and swimsuits are the items most likely to ruin a system, because they’re the ones that arrive soaking wet, every single time.
Design the wettest part of the system first: where towels go to dry before they’re stored, and where damp suits go before they’re put away.
Once that’s solved, the drier categories, sunscreen, toys, goggles, basically organize themselves with simple bins and labels.
Getting this backwards, starting with the toy bin and figuring out towels later, is how most systems end up smelling like mildew within a month.
Match The System To Who Actually Maintains It
The most elaborate label system in the world doesn’t help if the person who set it up is the only one who ever uses it correctly.
Before building anything complicated, think honestly about who’s actually going to re-stock totes, re-label a hook for a new guest, or empty a floating tray after every swim.
A simpler system an eight-year-old can maintain unsupervised beats an elaborate one that only works when one specific adult is paying attention.
Build for the laziest realistic version of pool day, not the ideal one, and the system will actually survive contact with a real summer.
Pool Organization Ideas
Gas-Strut Deck Boxes
Choose deck boxes with gas-strut hinges rather than basic lids, so the box stays open on its own with one hand free.
Dedicate one box specifically to dry textiles, towels and throws, and a separate box to large bulky floats like an inflatable shark.
Pick a weather-resistant composite material in a neutral tone that won’t fade or warp after a summer of direct sun.
Don’t mix wet and dry items in the same box. Keeping floats and towels separate means a damp float never dampens a stack of clean towels.
Position both boxes at the edge of the deck, close enough to the water that putting things away doesn’t require a detour.
Decorative Bin Hides Pool Floats
Choose a storage bin designed to look like furniture, a perforated metal box or woven-look planter shape, rather than anything obviously plastic.
Use it specifically for noodles, swim caps, and smaller floats that would otherwise clutter a lounge chair or get left on the ground.
Place it directly next to the seating area it serves, so putting a noodle away takes the same effort as leaving it out.
Don’t pick a bin so deep that small items sink to the bottom and disappear. A wide, shallow shape keeps everything visible from the top.
Coordinate its color with the rest of the patio furniture rather than treating it as a separate utility object; that’s what lets it pass as furniture instead of storage.
Built-In Linen Closet Pool Towels
Dedicate a full closet near the pool entrance specifically to pool linens, rather than relying on the house’s regular bathroom closet.
Use woven baskets on the upper shelves for smaller items, and reserve full shelves below for folded towels sorted by size or pattern.
Hang a few guest robes on a rod for anyone coming straight from the water, so a robe is never something someone has to ask for.
Add a hook on the inside of the door for one wet towel in transit, separate from the clean, folded stock on the shelves.
Restock this closet from the laundry directly, rather than routing clean towels through the house first. The fewer steps between dryer and closet, the more likely it stays full.
Numbered Hooks Named Tote Bags
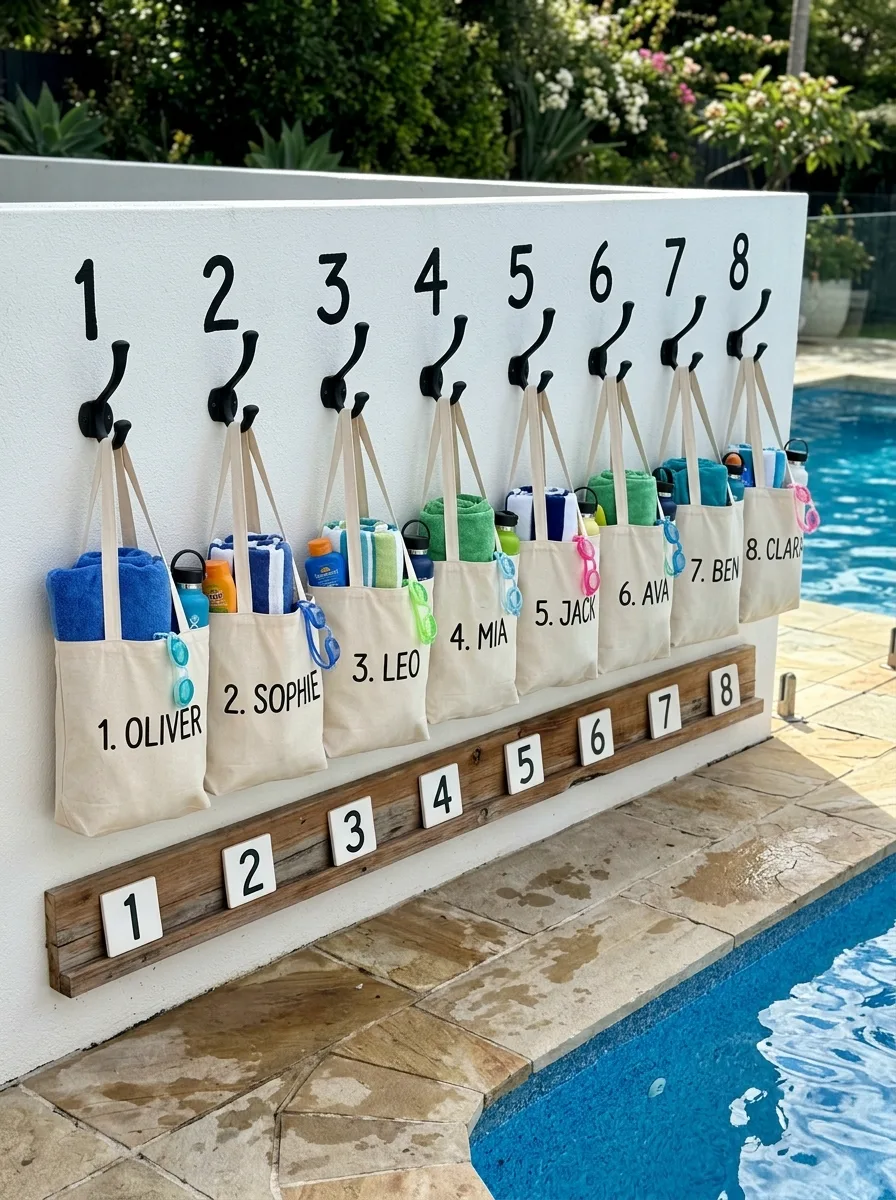
Mount a row of black hooks along a poolside wall, number them clearly above each hook, then assign each swimmer a canvas tote labeled with both their number and their name.
Stock each tote identically: one towel, sunscreen, a water bottle, and goggles, so nobody has to remember what they packed.
Add a small wood number plaque rail underneath as a backup, in case the hook numbers ever get hard to read from across the pool.
Don’t make the bags identical in color. Pick a different shade per person so kids can spot their own bag at a glance before they’re even close enough to read the name.
Refill and rehang every bag the same night, not the next morning. An empty hook by sunrise means the system actually works.
Color-Coded Noodle Storage Rail
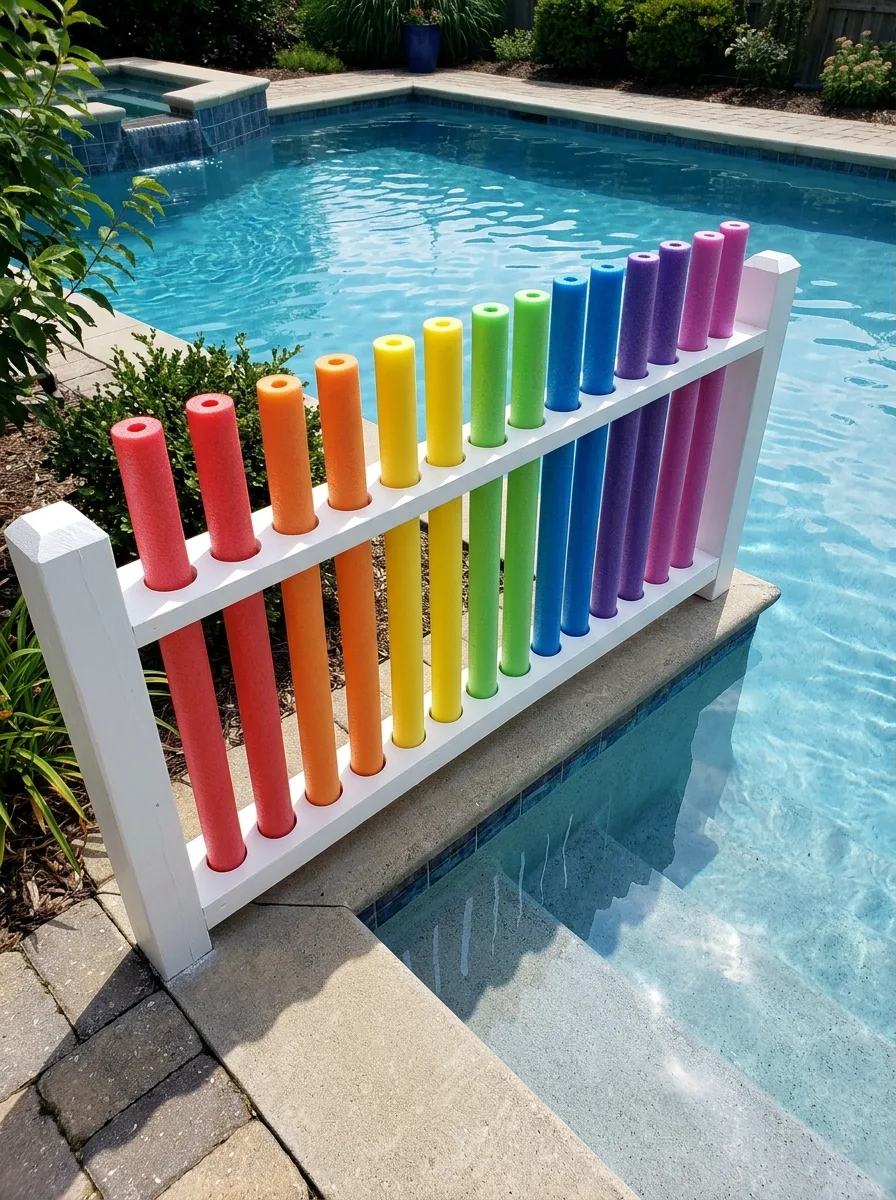
Build or buy a simple wood frame with drilled holes spaced for pool noodles, then sort the noodles by color before sliding them in.
Mount the rail at the edge of the pool steps, where it can double as a soft visual barrier as well as storage.
Use exterior-grade paint on the frame itself; this lives outdoors permanently and needs to survive both sun and splash.
Don’t toss noodles in randomly. The color-sorted rainbow effect is what makes this feel designed instead of just a rack with noodles stuck in it.
Trim any noodle that’s started to split or crumble before it goes back in the rack. One disintegrating noodle ruins the whole effect within a week.
Rolling Cart Named Goggle Bins
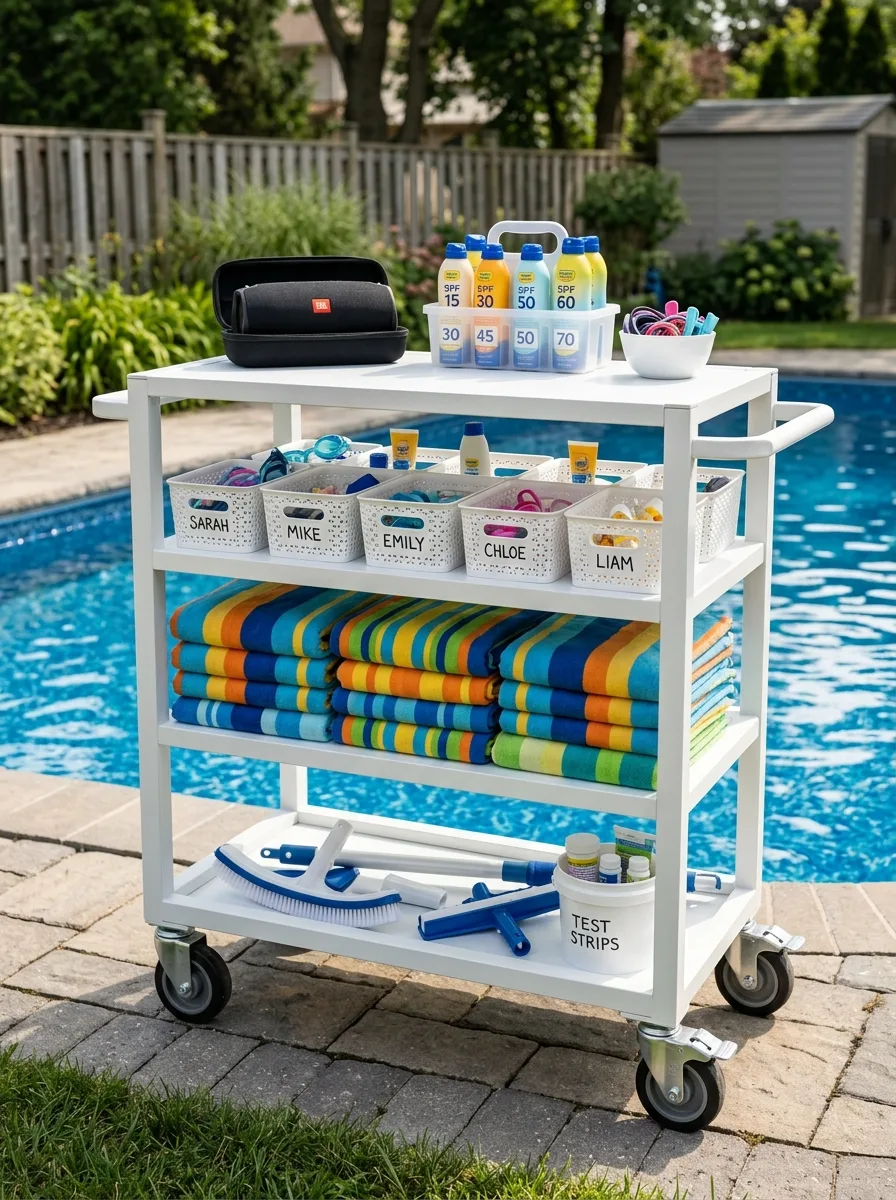
Use a multi-tier rolling utility cart so the whole pool kit can move with the party instead of forcing everyone back to one fixed spot.
Assign one labeled basket per person on the second shelf, stocked with their goggles and a small sunscreen.
Sort sunscreen by SPF number on the top shelf instead of by brand, so an adult can grab the right bottle without reading four labels first.
Reserve the bottom shelf for pool-cleaning tools and test strips, kept separate from anything a kid would touch.
Fold towels in matching stripes on the third shelf. It looks intentional, and a uniform fold makes it obvious at a glance how many are left.
Pegboard Wall Categorized By Item
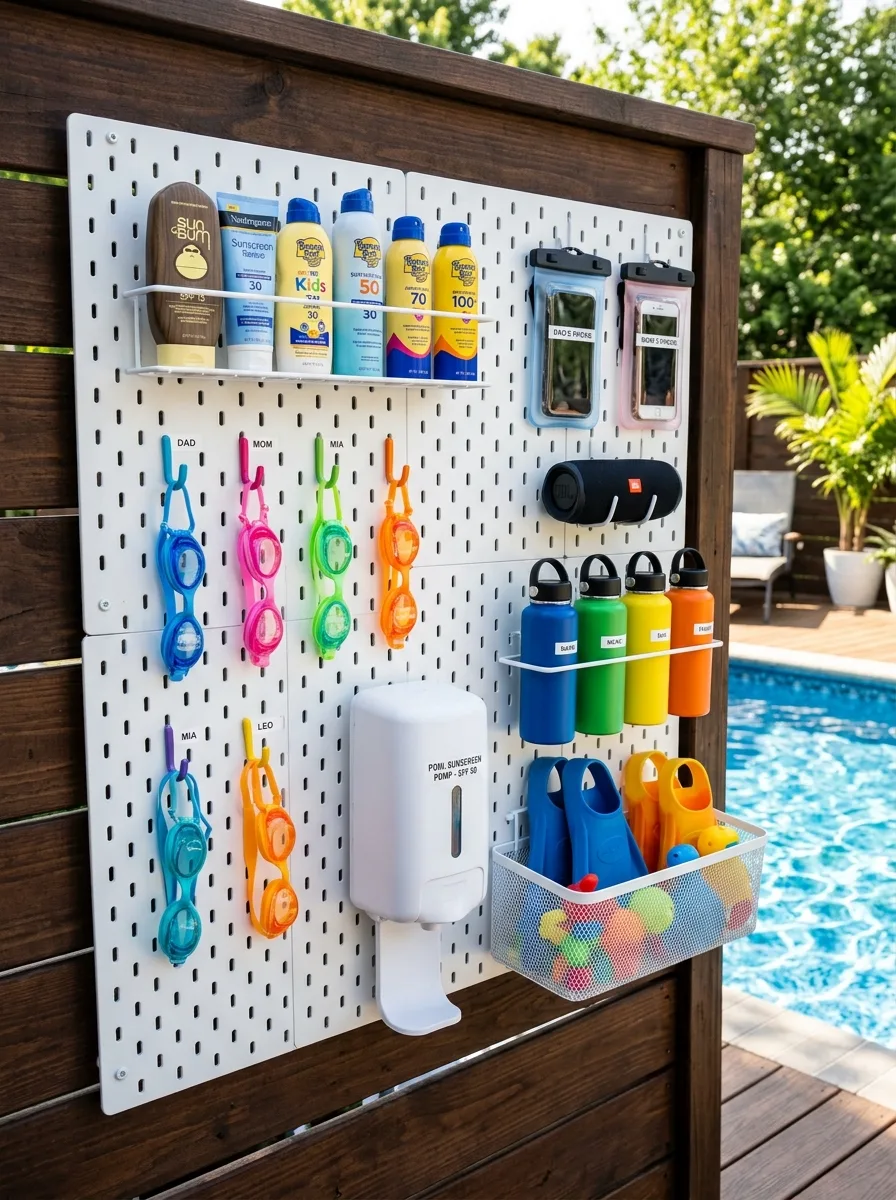
Mount a pegboard to a vertical post or fence panel near the pool entrance, then divide it into zones by category rather than by person.
Use a small shelf for sunscreen, hooks for goggles labeled by name, a slim rack for water bottles, and a mesh basket for loose toys like flippers and balls.
Add waterproof phone pouches on their own hooks, labeled per family member, so phones never end up sitting on a wet ledge.
Don’t mix categories on one hook. A pegboard works because each item type has exactly one place; once goggles and water bottles start sharing a hook, the system collapses.
Mount a pump-style sunscreen dispenser at kid height so reapplying doesn’t require an adult every time.
Color-Coded Hanging Family Totes
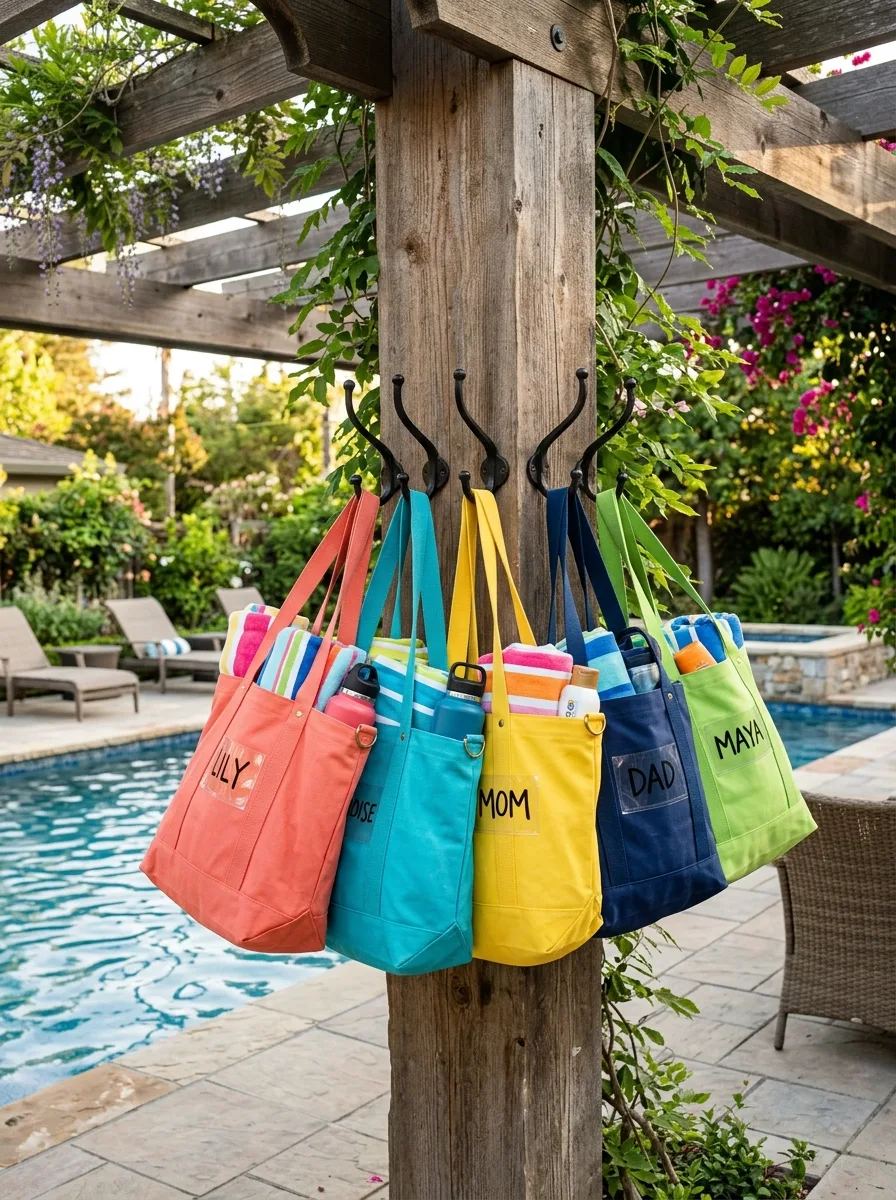
Install a row of sturdy iron hooks on a post near the pool, then assign each family member a tote in its own color.
Pack each tote with a rolled towel, a labeled water bottle, and a small bottle of sunscreen, so grabbing one bag means grabbing everything that person needs.
Use a fabric label or painted patch with each name, sewn or ironed on rather than written in marker, since marker fades fast outdoors.
Don’t share one giant family tote. Individual bags mean nobody has to dig through everyone else’s stuff to find their own towel.
Empty and re-pack each tote at the end of the day, while it’s still on the hook, so the next pool trip starts ready to go.
Tethered Floating Valuables Tray
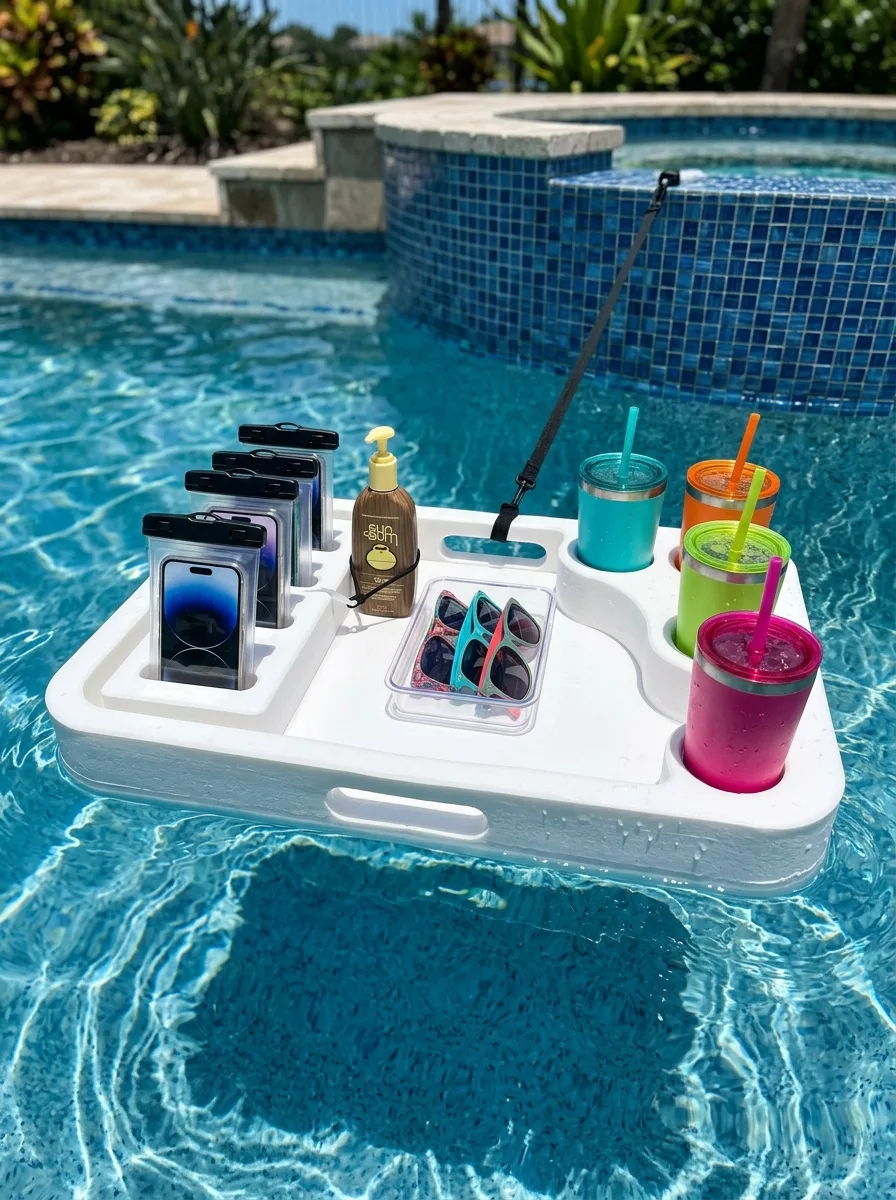
Get a floating foam tray sized for phones, sunscreen, sunglasses, and drinks, and clip its tether strap to a fixed point like a ladder rail or umbrella base.
Use waterproof pouches for phones rather than trusting the tray alone; a splash from a cannonball two feet away is still a splash.
Keep one small clear box just for sunglasses so they don’t slide into a cup holder meant for drinks.
Don’t skip the tether. An untethered tray drifts to the deep end exactly when someone needs their phone fastest.
Rinse the tray with fresh water after each use; sunscreen residue left on foam gets slippery and eventually grim.
Combination-Lock Lockers Per Person
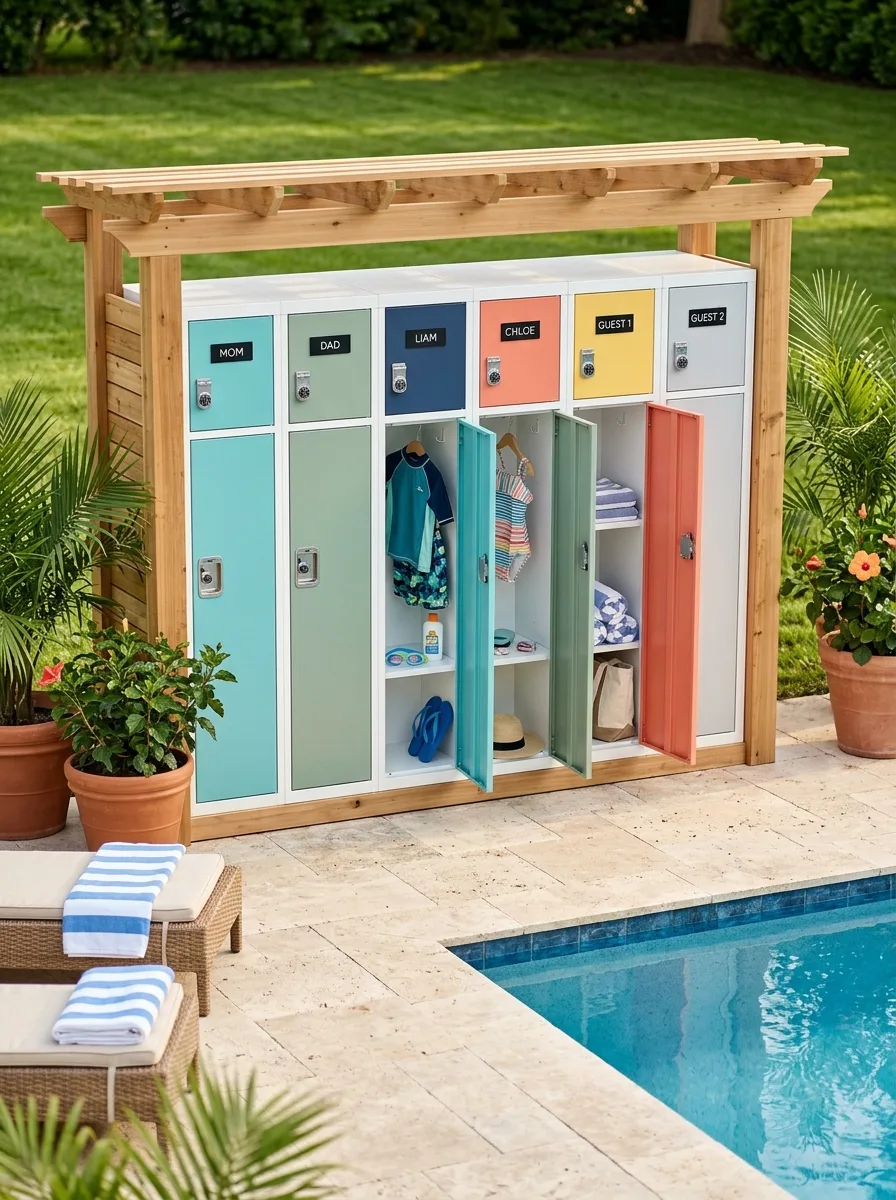
Install a small bank of metal lockers under a simple pergola frame, one per regular swimmer plus a couple of spares marked “guest.”
Color the locker doors differently per person, and label each with a name plate, so kids can find their own door without checking every lock.
Stock each locker with a hanging swimsuit, a folded towel, sunscreen, and a pair of sandals, so the locker functions as a full changing station.
Use simple combination locks rather than keys. Keys get lost in pools; a memorized number doesn’t.
Leave one or two guest lockers genuinely empty and ready, rather than using them as overflow storage, so unexpected visitors get the same system everyone else has.
Wheeled Bin Party Supply Sections
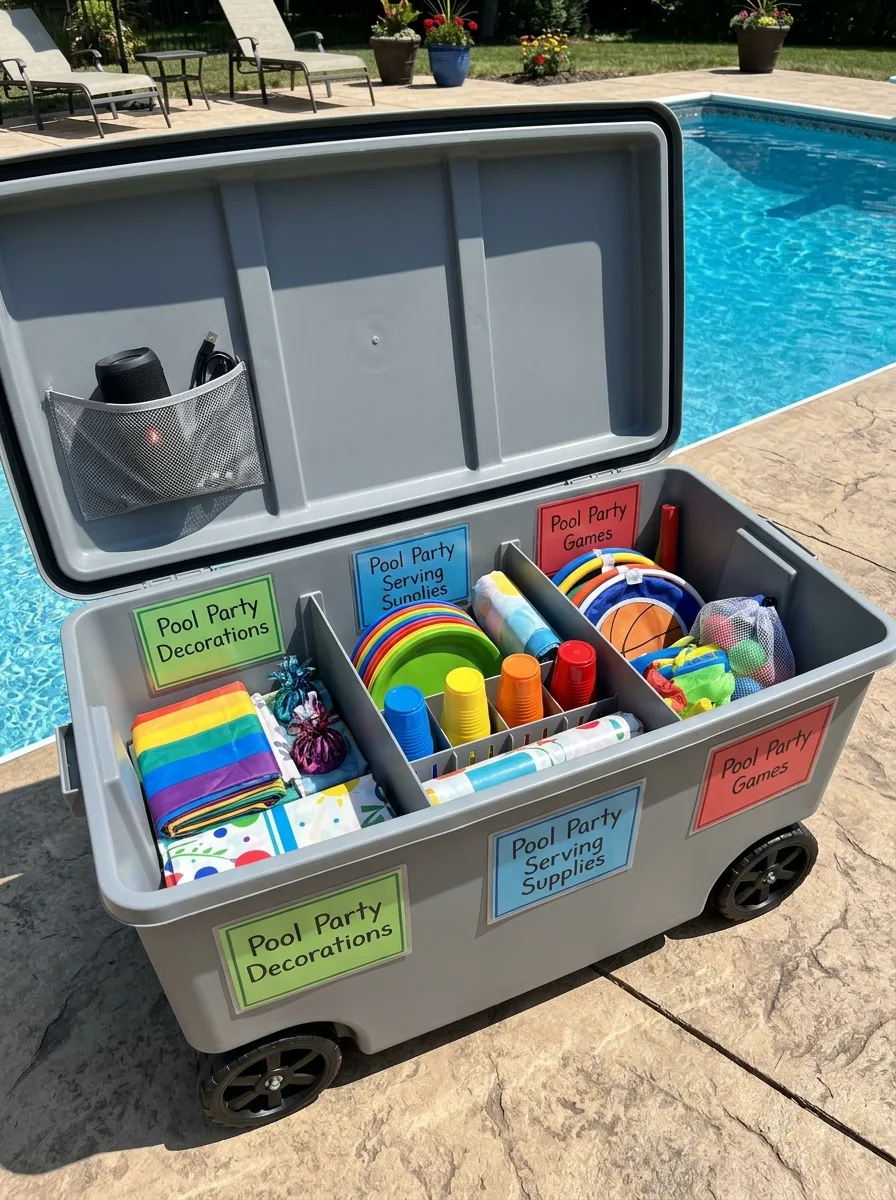
Use a wheeled storage tote with built-in dividers, and label each section by category: decorations, serving supplies, and games.
Keep a mesh pocket inside the lid specifically for a speaker and its charging cable, so the music doesn’t end up loose at the bottom under plastic cups.
Sort plates and cups by color within their section rather than by size, since color is what most people are actually looking for when setting up.
Don’t store food items in this bin. It’s built for the reusable party gear, decorations, games, serving pieces, not anything that needs to stay cold or fresh.
Wheel the entire bin to the party setup spot instead of carrying armloads back and forth. That’s the entire point of the wheels.
Locking Cabinet Pool Chemicals
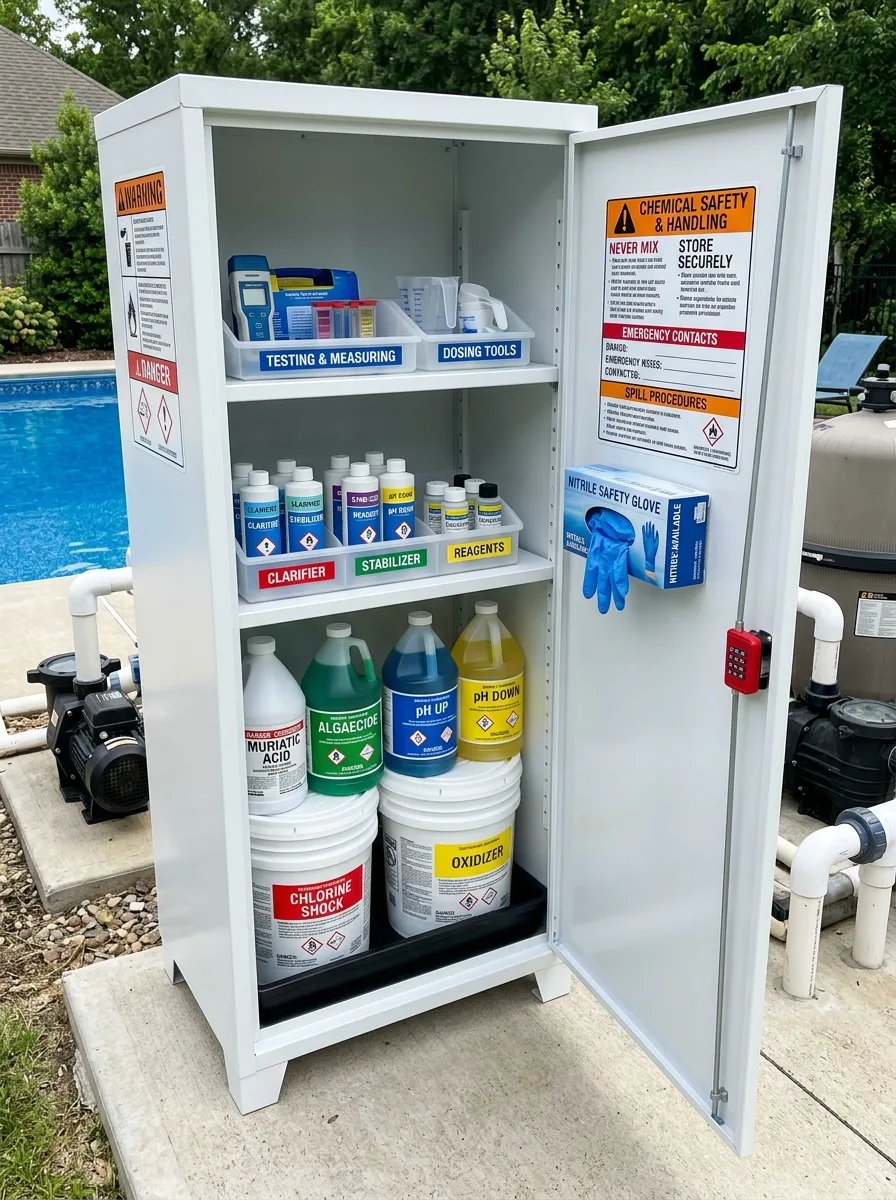
Use a dedicated metal cabinet with a lock, specifically for pool chemicals, kept separate from toys, towels, and anything kids might reach for.
Organize shelves by function: testing and measuring tools on top, clarifiers and stabilizers and reagents in the middle, and the heaviest bulk containers like shock and oxidizer on the bottom.
Post a chemical safety card inside the door listing what never to mix, plus emergency contact numbers, so the information is right where someone would need it in a hurry.
Don’t store chemicals in their original cardboard packaging on an open shelf. A locked cabinet with clear labels is the difference between an organized system and a hazard waiting to happen.
Keep a box of nitrile gloves mounted to the inside of the door, so nobody has to go searching for protection before handling anything inside.
Outdoor Shower Towel Hook Rail
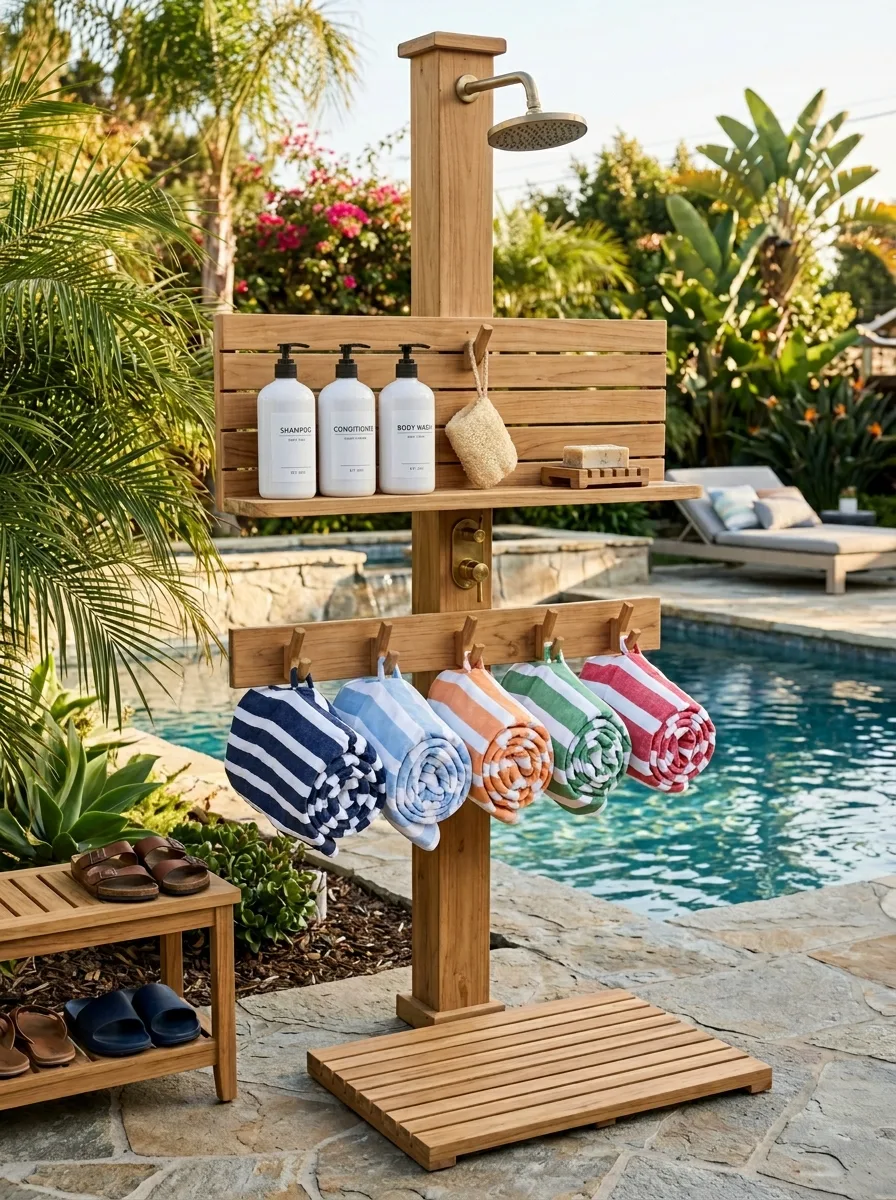
Build a single vertical post that combines a showerhead, a shelf, and a row of towel hooks, so rinsing off and grabbing a towel happens in one stop.
Stock the shelf with refillable pump bottles for shampoo, conditioner, and body wash, plus a natural loofah and a bar of soap.
Hang pre-rolled towels on individual hooks below the shelf, in a different stripe or color per person if multiple people share the shower.
Add a small wood bench with an open shelf underneath for sandals, so wet feet never have to touch bare stone on the way out.
Use teak or another water-resistant wood throughout. This piece lives in direct splash range permanently and needs to handle it.
Wall-Mounted First Aid Station
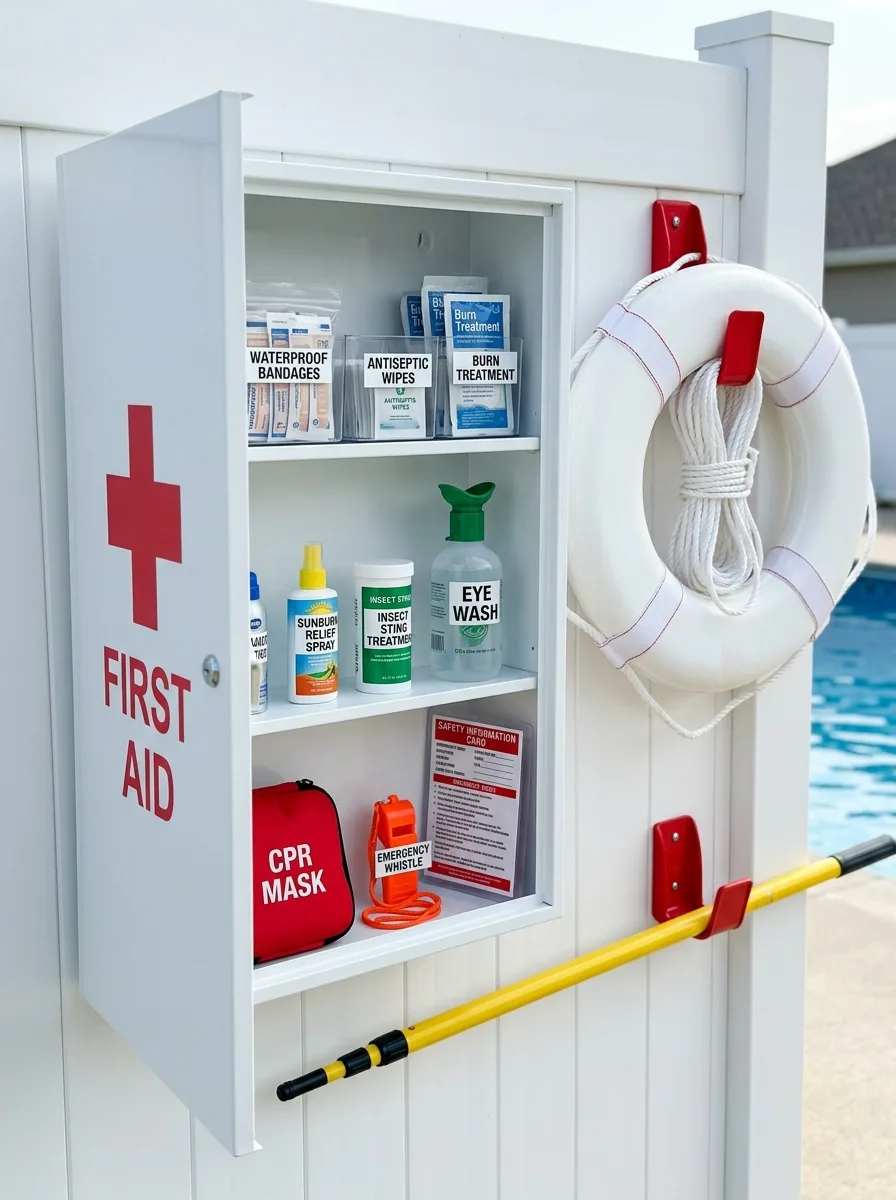
Mount a labeled first aid cabinet directly on a fence post or pool house wall, close enough to the water that nobody has to run far in an emergency.
Organize the inside by injury type: bandages and antiseptic on one shelf, sunburn and insect treatments on another, with the CPR mask and emergency whistle on the bottom.
Hang a life ring and a reach pole on the same wall, using bright clips so they’re visible and grabbable without searching.
Post a laminated safety information card inside the door with emergency numbers, rather than relying on someone’s memory during an actual emergency.
Check expiration dates on sprays and treatments at the start of every season; a first aid station only works if what’s inside still works too.
Whiteboard Maintenance Log System

Mount a large whiteboard near the pool equipment with three sections: a weekly task schedule, a monthly chemical log, and a simple diagram of the equipment flow.
Use color-coded magnets or stickers, green for done and red for not yet, so a glance tells you the week’s status without reading a thing.
Keep a spiral notebook clipped to the board as a backup log, in case the whiteboard ever gets erased before the data’s transferred anywhere else.
Label each piece of equipment in the diagram with its last service date, so anyone, not just the usual person, can tell what needs attention.
Store a set of dry-erase markers and equipment care stickers right on the attached shelf, so updating the board never requires a trip back inside the house.
Name-Labeled Goggles Wall
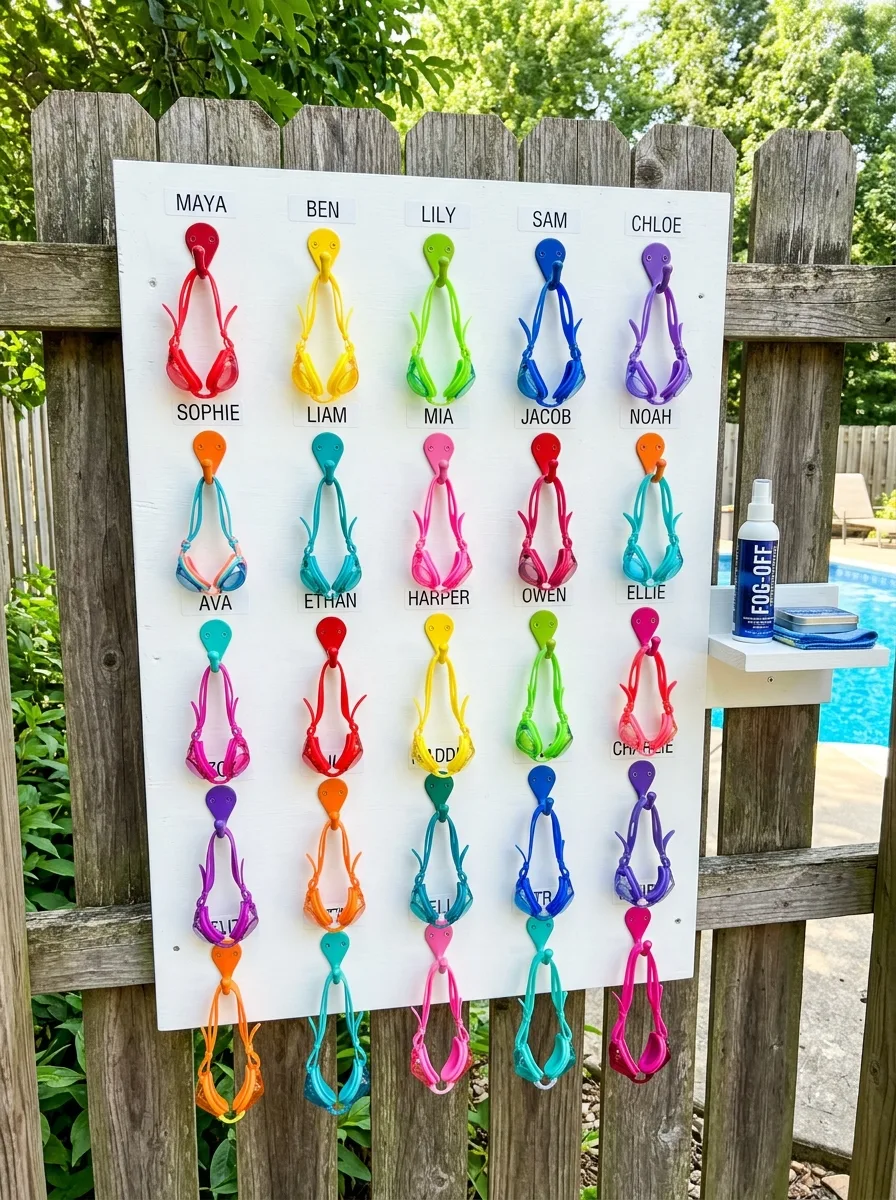
Mount a large board with a grid of colorful hooks, then assign one hook and a printed name label to every regular swimmer.
Match goggle color to each person where possible, so even before reading the label, the right pair is identifiable by color alone.
Attach a small shelf nearby stocked with anti-fog spray and a microfiber cloth, since goggles need quick maintenance right at the point of use.
Don’t try to fit names onto generic stickers that’ll peel in the sun. Use a proper label maker with weatherproof tape so the system survives a full season outdoors.
Add a couple of unlabeled hooks at the end for guests, so visiting kids get a spot too without disrupting the named system.
Labeled Cubby Wall Shoe Bench
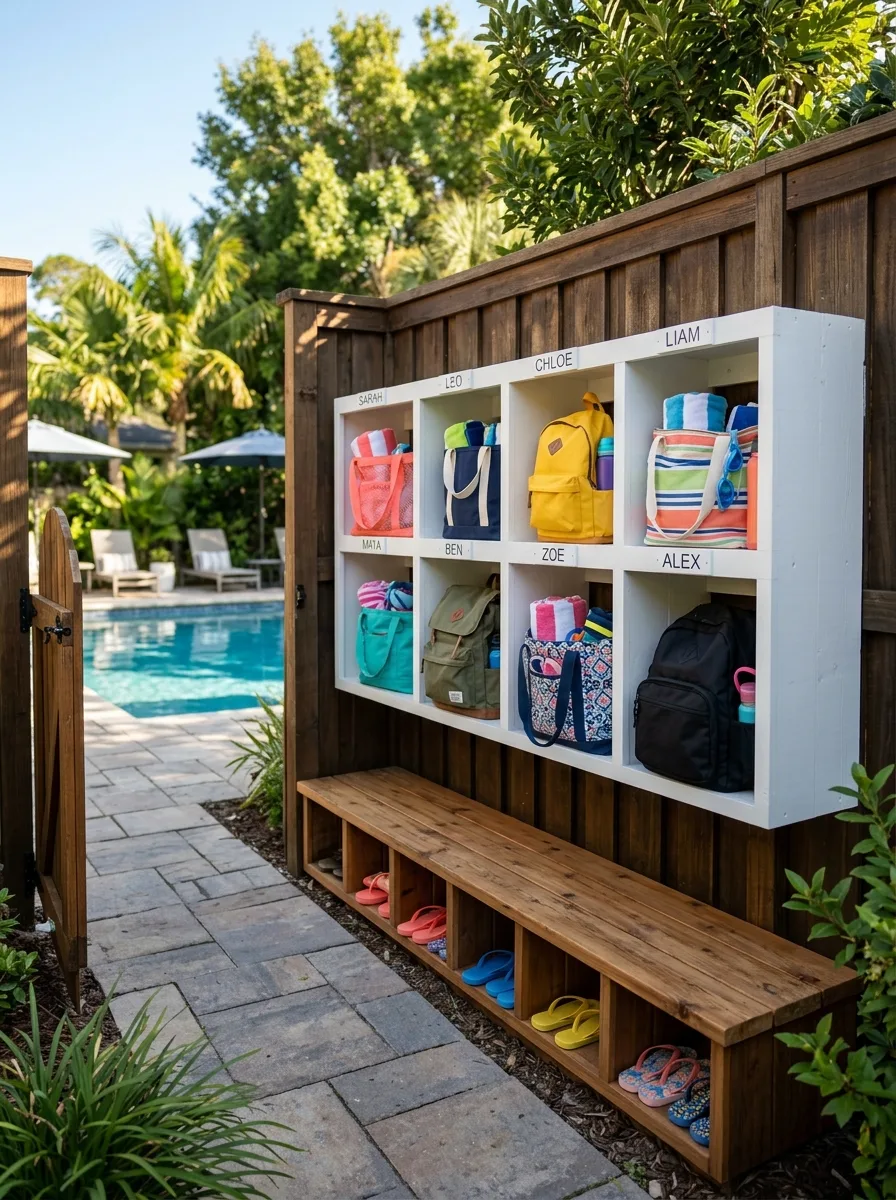
Build or mount a grid of open cubbies, two rows deep, and label each one with a name for a bag, backpack, or beach tote.
Pair the cubby wall with a slatted wood bench underneath specifically for shoes, so flip-flops have a home that isn’t the ground.
Use one bag style per cubby that’s distinct enough to recognize at a glance, backpack, tote, drawstring, rather than identical bags that all blend together.
Mount this near the entrance to the pool area, not inside the house, so wet feet and dripping bags never have to cross the threshold.
Leave one or two cubbies unlabeled for guests, the same way the locker and goggle systems do, so visitors aren’t left holding their stuff with nowhere to put it.
Walk-In Shed Labeled Bin Shelving
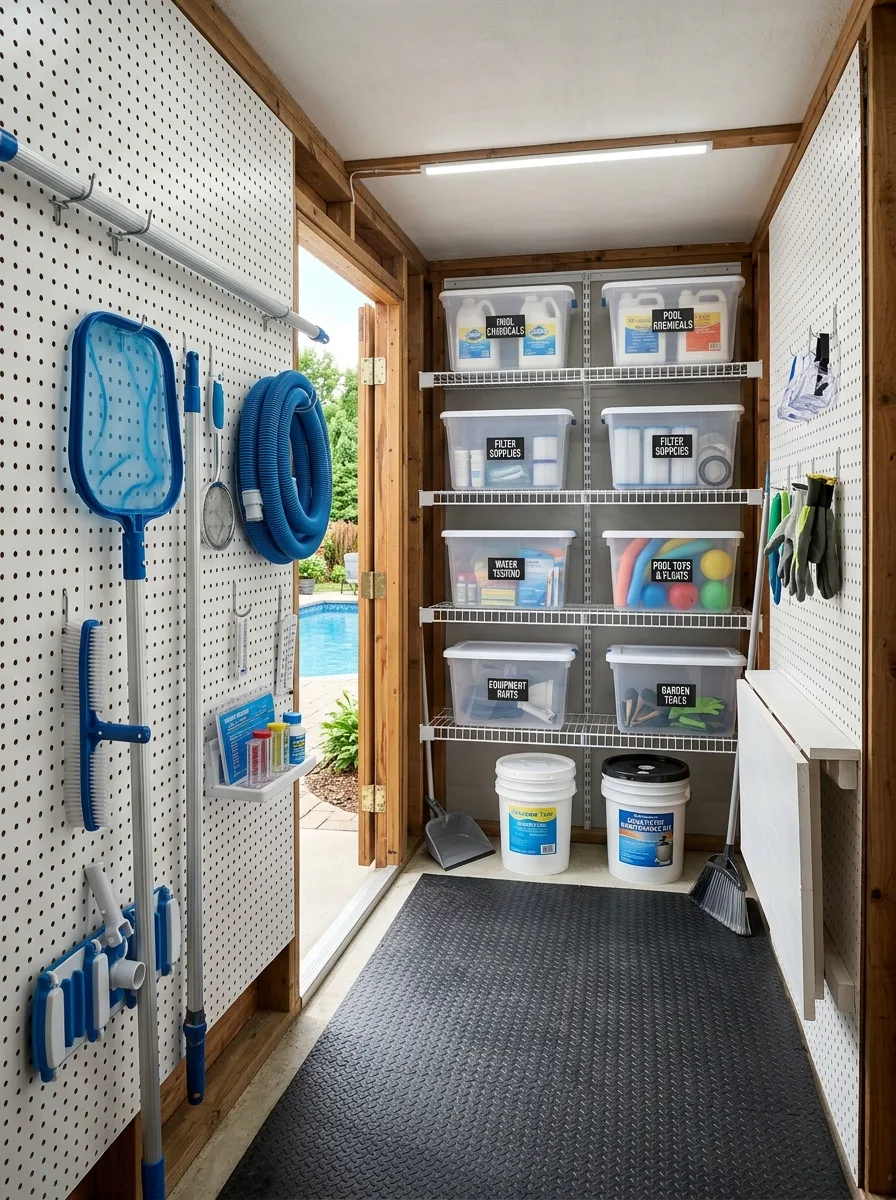
Dedicate a small shed or closet entirely to pool supplies, with pegboard on the walls for long-handled tools and wire shelving in the middle for bins.
Label clear bins by category, pool chemicals, filter supplies, water testing, pool toys, equipment parts, so contents are visible and findable without opening every box.
Hang the skimmer net, hose, and vacuum head on pegboard hooks rather than leaning them in a corner, where they tend to slide down and tangle together.
Add a rubber mat on the floor. This space gets walked through wet, and a hard floor without a mat gets slick fast.
Keep a small set of hand tools, a dustpan and brush, mounted near the door for quick daily tidying rather than buried on a shelf.
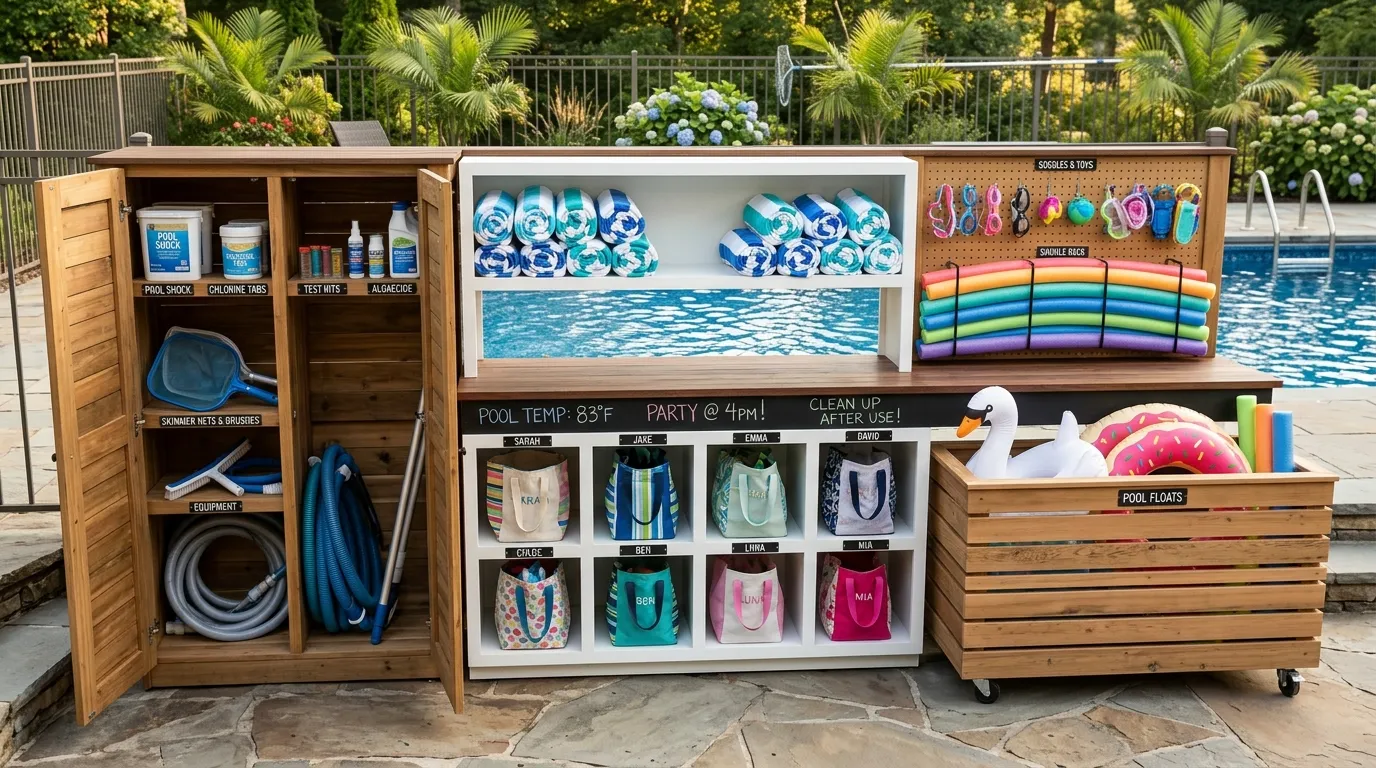
All-In-One Poolside Command Wall
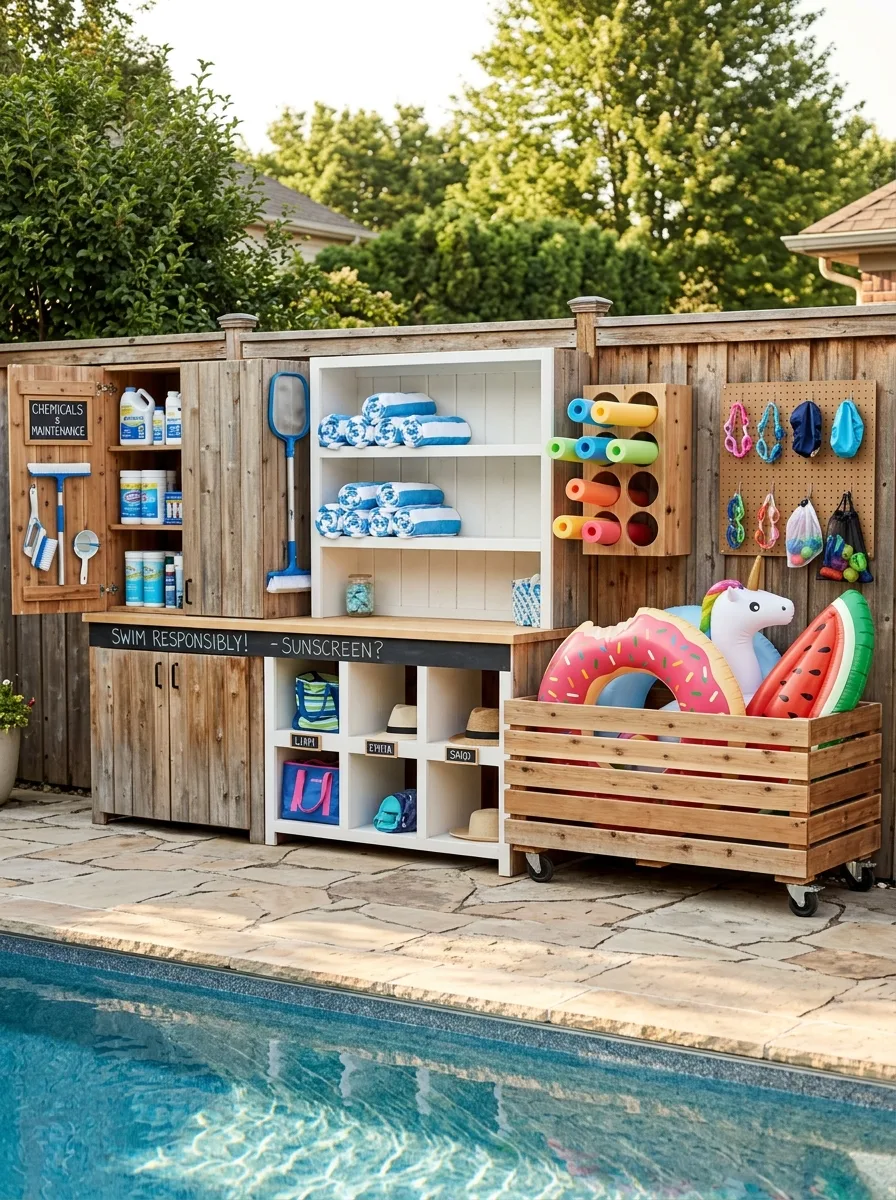
Build one continuous wall combining several systems at once: a chalkboard-labeled cabinet for chemicals, open shelving for towels, a vertical rack for noodles, and a pegboard for goggles.
Add a chalkboard message strip along the counter for reminders like “sunscreen?” that gets rewritten as needed rather than printed once and ignored.
Include a few labeled cubby slots underneath for hats and small bags, sized for kids specifically rather than full-size lockers.
Keep an outdoor wheeled wooden crate alongside for the bulky inflatables, donuts, unicorns, anything too big for a shelf, so the structured system isn’t fighting the inflatables for space.
Build this wall to face the pool directly. A command station only saves trips if everyone can see it from the water.
Final Thoughts
Every one of these setups solves the same root problem in a different costume: too many people, too many small items, and no agreed-upon place for any of it to live.
None of them depend on everyone suddenly becoming tidier. They depend on the system doing the remembering instead of the people, a hook, a label, a bin, doing the job that used to fall to whoever yelled “find your own towel” the loudest.
The fanciest version of this is still just an assigned spot for everything. A locker with a name on it and a hook with a name on it are solving the exact same problem at two completely different budgets.
Pick the version that matches your actual pool, your actual people, and how much maintenance you’re honestly going to do. Twenty different setups just proved there’s a version of this that fits almost anyone.