

The front yard is the one part of your property that everyone sees and nobody lives in. You don’t eat breakfast there. You don’t have a glass of wine there at the end of the day. It exists entirely for other people’s benefit and occasionally your own pride.
Which is why it’s baffling that so many people either spend a fortune on it or completely abandon it to a sad strip of struggling grass and two identical shrubs from the hardware store.
There’s a third option. It doesn’t cost much. It requires making deliberate decisions instead of convenience purchases. And it results in a front yard that actually reads as designed rather than maintained-to-minimum.
Every single idea in this post costs less than you’d expect. None of it requires a landscaper. All of it requires making a choice about what your front yard is actually supposed to say.
Why Front Yards Look Cheap Even When They’re Not
Spending money is not the same as spending it well. Most front yards look generic because they were assembled from whatever was available at the nearest garden centre on a Saturday morning.
The Problem Isn’t the Budget. It’s the Absence of a Concept.
A front yard without a concept looks like a list of things someone bought. A few shrubs here. Some gravel there. A plant that caught someone’s eye because it was labelled “low maintenance.”
The result is not a garden. It’s a collection of objects that happen to share a postcode.
The cheapest front yards that look expensive share one quality: they committed to a single idea and followed it through. That idea might be symmetry. It might be a specific colour. It might be a material used consistently. Whatever it is, the commitment is what registers as intentional design.
Uniformity Is Free and Most People Skip It
The single most powerful cheap upgrade available to any front yard is repetition. One plant species, planted multiple times. One material, used consistently. One colour, applied twice.
Repetition is free. It requires only the discipline to not keep buying different things because they’re on sale.
A row of the same marigold, planted densely along a fence, costs almost nothing. It looks completely deliberate. One marigold next to one petunia next to one salvia looks like indecision in plant form. The individual plants are the same price. The result is entirely different.
The Edging Problem Nobody Talks About
Most front yards look unfinished not because of the plants but because of the transition between the planted bed and the lawn.
A ragged, undefined edge where grass gradually thins into mulch makes the most expensive plantings look neglected. A crisp, defined edge — whether steel, brick, stone, or a simply re-cut spade line — makes the simplest planting look considered.
Edging costs almost nothing. It takes an afternoon. It makes more difference to the overall appearance of a front yard than most planting choices do. And almost everyone skips it.
Before You Buy a Single Plant, These Decisions Come First
Getting the sequence wrong is how cheap projects look cheap. The order of operations matters more than the budget.
Decide What the Ground Will Be Made Of
Gravel, mulch, or something else — this is the first decision, not the last. Plants get chosen in relation to the ground material, not before it.
Dark bark mulch works with almost everything. Light pea gravel reads modern and clean. White decorative stone against a brick house needs confident planting — it can look sterile without it.
Buy the ground material in bulk rather than in bags. A cubic metre of bark mulch from a landscape supplier costs a fraction of the same volume bought in bags from a hardware store. This is where most people overspend on cheap projects.
Define Every Edge Before You Plant
Lay your edging material first. Steel landscape edging, brick pavers laid on edge, or a simple spade-cut line in the turf — all of these need to go in before a single plant.
This changes the way you plant. You plant to the edge rather than the edge following the plants. The result is a tighter, more deliberate composition.
A bed without defined edges expands each year as the grass reclaims the boundary. A bed with steel edging holds its line permanently with no maintenance.
Choose a Colour or Material Theme and Buy Nothing Outside It
One front yard, one colour story. Orange and yellow marigolds against a white fence. Purple salvia and silver lavender against a brick wall. Green box spheres with black mulch against a grey rendered house.
The discipline to not buy the pretty thing that doesn’t fit the scheme is the entire skill. A single off-colour plant doesn’t ruin a garden. But a front yard where every purchase was made without reference to a unifying idea reads exactly as random as it is.
Cheap Front Yard Landscaping Ideas
The Painted Tyre Planter with Snake Plants
Source a car tyre from a tyre disposal service or tip shop — this is often free or close to it. Use a spray paint rated for rubber in whatever colour suits your front yard: yellow reads playful, white reads clean, terracotta reads warm.
Set the painted tyre on a level spot in your garden or lawn and fill the interior cavity with medium river pebble — not fine gravel, but rounded smooth stones at 30 to 50mm diameter. This pebble fill gives the planter its base material and allows drainage without soil loss.
Plant three to five small yellow painted pots — terracotta or plastic, spray-painted in the same colour as the tyre — inside the pebble fill. Stagger their heights using bricks or stones underneath as risers. In the taller back pots, plant Sansevieria — snake plants — for their upright spear-like form and extreme drought tolerance. In the shorter front pots, plant flowering annuals: compact petunias, marigolds, or alyssum for colour and spread.
The whole arrangement costs almost nothing if you already have access to secondhand materials. What makes it work is not the upcycling conceit but the discipline of using one colour consistently across every painted surface. The tyre, the pots, and the ground pebbles all need to feel like they’re from the same palette.
Place it in lawn or gravel, never in a mulch bed. It needs a neutral backdrop to read as a composition rather than an object dropped into a mess.
The Spilled Barrel Pansy Garden Against a Tree Base
Source a half wine barrel from a garden centre or online marketplace. You want one that has been cut in half lengthways and is already slightly weathered — new barrels look too polished for this look. If you can find one that’s starting to grey and show its hoops, buy it.
Lay it on its side at roughly a 30 to 40 degree angle, leaning against the base of a tree trunk or a large rock. Use wooden stakes hammered into the ground behind the barrel to stabilise it at the angle you want. Fill the inside of the barrel with bark mulch and enough planting mix at the open end to support the flowers.
Excavate a shallow irregular bed extending outward from the barrel mouth — this is where the flowers will spill. The bed should widen as it extends away from the barrel, like liquid pouring onto the ground. Prepare the soil with compost.
Plant the bed densely in pansies or violas in a mixed colour palette — yellow, purple, red, and white all together reads as abundance rather than confusion. Plant the densest section nearest the barrel mouth and allow the planting to thin naturally toward the outer edge of the bed. Add dark bark mulch between plants and at the bed edge.
The effect reads as the barrel has spilled flowers onto the ground. It requires no structure beyond the barrel itself and a prepared bed. The seasonal maintenance is simply refreshing the pansies each time they finish.
The Modern Black Mulch Front Bed with Box Spheres
Clear the existing front bed completely. Remove every plant, pull every weed, and rake the bed level. This is the hardest part of this project and also the most important — the final result depends entirely on starting with a clean surface.
Install black steel landscape edging around the entire perimeter of the bed. Push it into the soil so the top edge sits at or just below lawn height. Use timber stakes to secure the edging on long straight runs. On curved sections, score the back of the edging every 100mm to allow it to flex without kinking.
Apply weed matting across the entire prepared surface. Overlap joins by at least 300mm and staple every 400mm. Cut X-shaped holes at each planting position.
Plant your specimens through the weed matting. For this look: three rounded box spheres (Buxus sempervirens) at different spacings across the bed rather than evenly spaced, one small multi-stem ornamental tree positioned off-centre — not in the middle — and three to five clumps of ornamental grass for movement. Place four to six medium river stones as accent pieces between plants.
Apply black bark mulch at 75mm depth across the entire bed surface. Pull it away slightly from each plant stem to prevent collar rot. Water in, then stand back.
The strength of this scheme is in the dark mulch and the editing — fewer plants than most people use, more clearly separated from each other, with the stones giving visual rest between them.
The Weeping Crimson Tree in a Mulch Island on the Lawn
Choose the tree first, because everything else in this scheme serves it. A weeping variety with red or crimson foliage — weeping purple beech, crimson queen Japanese maple, or a weeping redbud — is the point of the whole exercise. Buy the largest specimen your budget allows. A bigger tree at planting makes a proportionally larger difference to how quickly this looks established.
Plant it as the single focal element of the front lawn, positioned off-centre from the house entry point. Not in the middle of the lawn — slightly to one side, so it creates an asymmetric composition when viewed from the street.
Excavate a circular mulch bed around the tree with a radius of at least 1.2 metres from the trunk. The bigger the tree bed, the better. A tree planted in a small hole looks stranded. A tree planted in a generous dark mulch bed looks settled.
Apply black bark mulch to 100mm depth across the entire bed. Keep mulch away from the trunk by 150mm to prevent rot.
Edge the circle with a steel landscape edging strip bent into a continuous curve. A perfect circle is not the goal — a generous, slightly organic oval reads more natural than a perfectly geometric disc.
Do not plant anything else in this bed. The tree is the garden. The mulch is the frame. Adding more plants reduces the impact of both.
The Weeping Crimson Tree in a Mulch Island on the Lawn

Choose the tree first, because everything else in this scheme serves it. A weeping variety with red or crimson foliage — weeping purple beech, crimson queen Japanese maple, or a weeping redbud — is the point of the whole exercise. Buy the largest specimen your budget allows. A bigger tree at planting makes a proportionally larger difference to how quickly this looks established.
Plant it as the single focal element of the front lawn, positioned off-centre from the house entry point. Not in the middle of the lawn — slightly to one side, so it creates an asymmetric composition when viewed from the street.
Excavate a circular mulch bed around the tree with a radius of at least 1.2 metres from the trunk. The bigger the tree bed, the better. A tree planted in a small hole looks stranded. A tree planted in a generous dark mulch bed looks settled.
Apply black bark mulch to 100mm depth across the entire bed. Keep mulch away from the trunk by 150mm to prevent rot.
Edge the circle with a steel landscape edging strip bent into a continuous curve. A perfect circle is not the goal — a generous, slightly organic oval reads more natural than a perfectly geometric disc.
Do not plant anything else in this bed. The tree is the garden. The mulch is the frame. Adding more plants reduces the impact of both.
The No-Lawn Gravel Front with Round Stepping Stones and Low Box Hedging
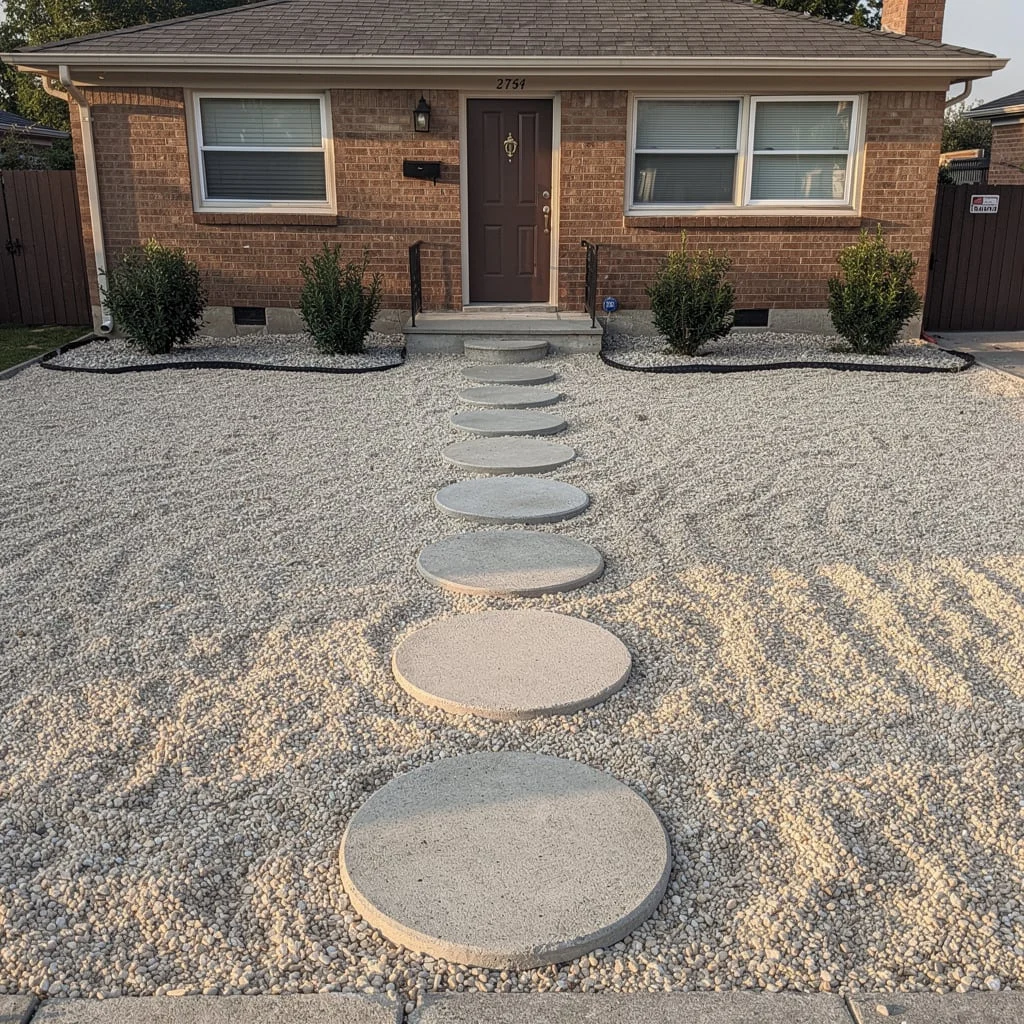
Strip the lawn completely. Use a sod cutter hired for the day or strip by hand with a sharp spade. Remove all organic material and rake the surface level. Apply a quality weed matting, overlapping all joins generously.
Lay round concrete stepping pads — pre-cast discs available inexpensively from any builder’s merchant — in a straight line from the street footpath to the front door. Space them at a natural walking stride: roughly 500 to 600mm from centre to centre. This line is your primary design axis.
Apply white or cream pea gravel — 10mm to 20mm diameter — across the entire front yard surface over the weed matting. Pour it, rake it level, and compact it lightly by walking across it. The depth should be 50 to 70mm. Less than that and the matting shows. More is unnecessary expense.
Plant three matching box shrubs (Buxus) along the house foundation line — symmetrically spaced in front of the windows. Add two or three matching plants at the bed edges as accent elements. Keep the species and form consistent. Variety undermines the clean reading.
The strength of this look is the restraint. No colour. No flowering plants. No decoration. Just the graphic contrast of pale gravel, dark round stepping pads, and clipped green spheres. Everything else would clutter it.
The White Picket Fence with a Dense Marigold Bed Along the Base
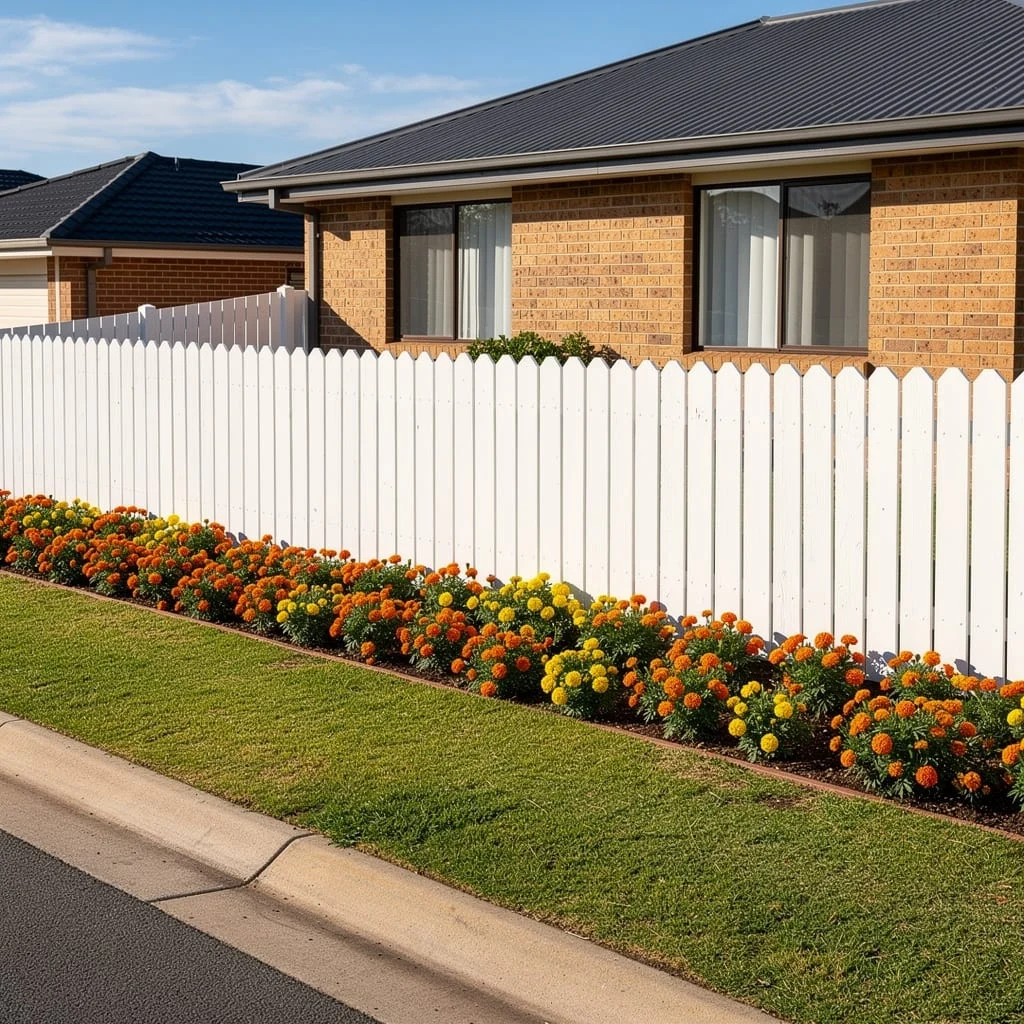
The marigolds are not the design decision here. The fence is. Get the fence right and the flowers are simply the obvious thing to put in front of it.
A white vinyl picket fence is the most practical option for this look — it requires no painting, never rots, and holds its white colour without maintenance. Install the fence posts in concrete at the correct spacing. Run the fence at a consistent height along the property boundary.
Prepare a planting bed directly in front of the fence, between the fence base and the lawn edge. The bed should be 400 to 600mm wide — wide enough for the plants to be generous but not so wide that they read as a formal garden rather than a cottage border.
Plant French marigolds in orange and yellow in a dense double or triple row, spacing at 200mm centres. They will merge within a few weeks of establishment. Do not mix other species into this bed. The power of the look is the unbroken repetition of the marigold along the full fence length.
Keep the lawn in front of the bed edged tightly. The line between lawn and bed is as important as the planting itself. Let the lawn grow ragged against the bed and the whole scheme immediately looks unprofessional.
Deadhead the marigolds weekly — remove spent flowers before they set seed — and the plants will flower continuously from early summer until the first frost. They cost almost nothing per plant. A flat of fifty marigolds plants a generous bed.
The Wildflower Lawn Replacement with a Concrete Path Through the Centre
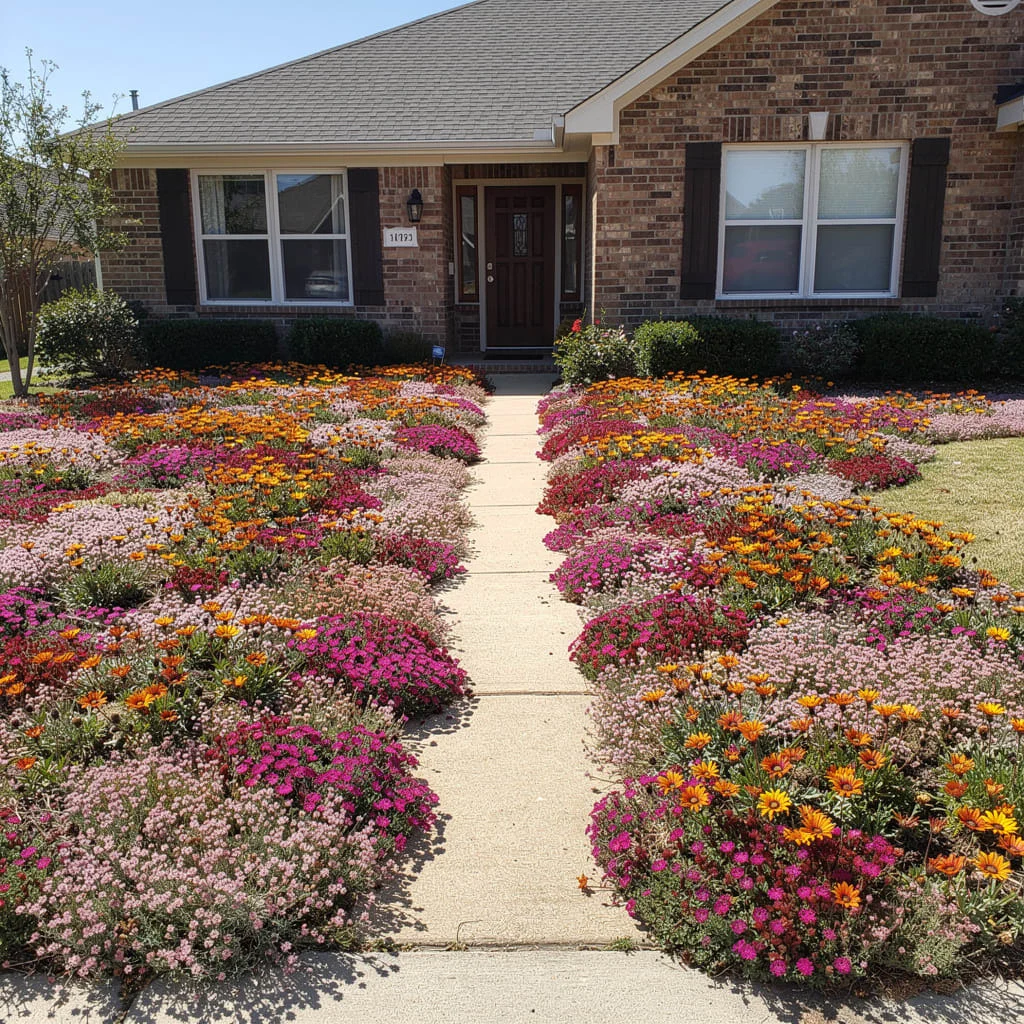
This is the commitment front yard. It looks spectacular when established and requires a specific kind of tolerance for the period before it fills in.
Remove the lawn, or mow it to as low as possible and apply a thick layer of cardboard to suppress the grass. Wet the cardboard, then cover it with a 100mm layer of quality topsoil or compost mix. The cardboard will break down in twelve weeks and the grass beneath it will die.
Sow a wildflower seed mix appropriate for your climate over the prepared surface. Scratch the seed into the top 5mm of soil lightly. Water daily for the first two weeks. Growth begins in three to four weeks and flowering in eight to twelve weeks depending on the season.
Run a central concrete path straight from the footpath to the door. A single slab path, 450mm wide, poured in two or three sections with expansion joints, costs almost nothing to install and keeps the composition organised. Without the path, the wildflower front reads as abandoned grass. With it, it reads as intentional.
Allow the flowers to grow up to and against the path edges. No edging, no trimming. The contrast between the clean concrete and the loose, abundant wildflower planting is the relationship that makes this look work.
The Morning Glory Vine Wall with Bamboo Cane Support Structure
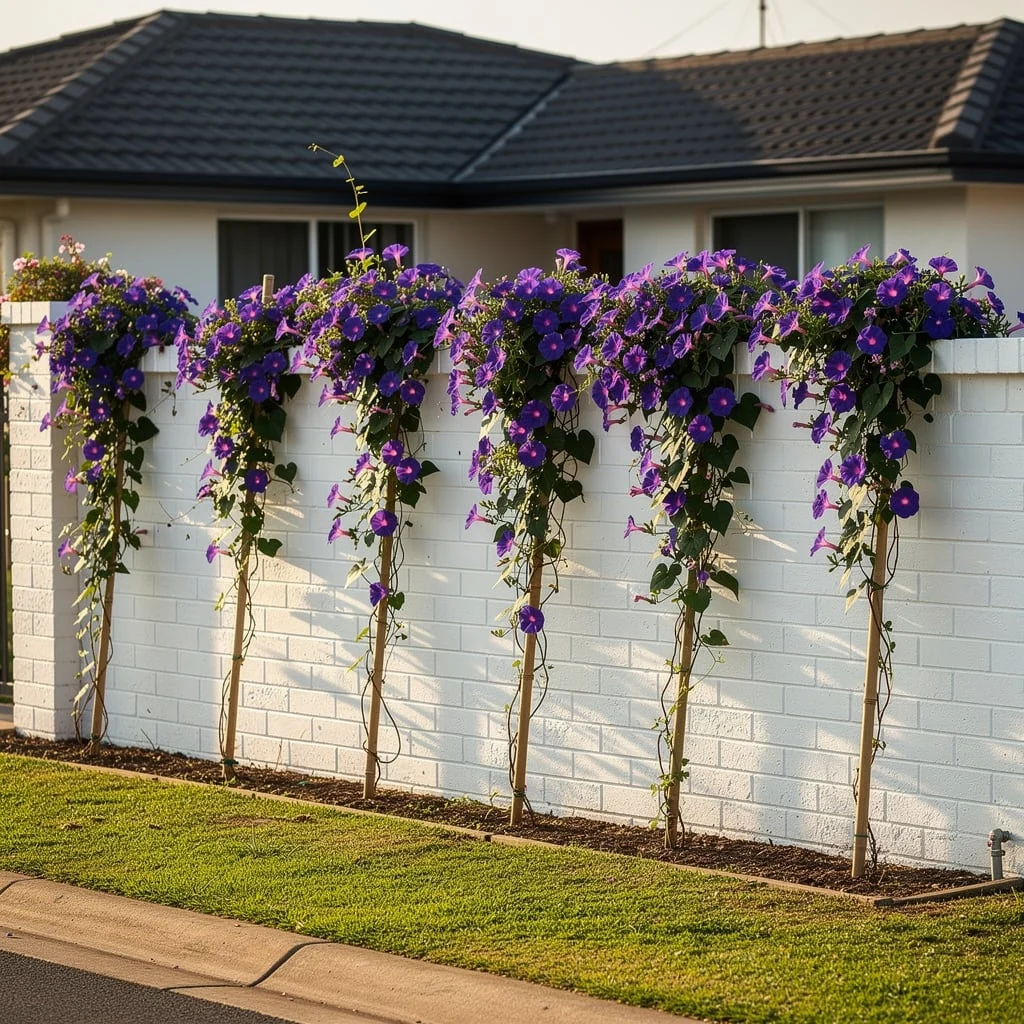
The wall is already there. You’re just deciding what happens in front of it.
Install bamboo canes — 1.8 metres tall, 25mm diameter — in a straight row along the base of the wall at 400mm spacing. Push each cane 300mm into the soil and secure the tops to a horizontal wire or cane running the full length of the row. This is the support structure. It costs almost nothing.
Plant Ipomoea purpurea — morning glory — at the base of every second cane, two seeds per position. Morning glory grows fast. In a good season it can cover two metres of vertical height in eight to ten weeks from seed. Thin to the strongest seedling at each position once they reach 100mm tall.
The flowers open in the morning and close by midday. This is the plant’s nature. The display is best in the first half of the day. Against a white painted wall, the intense purple-blue flower colour reads as one of the most vivid things in any garden.
Morning glory is an annual in most climates. It will need replanting each season from seed, which is cheap. Collect seeds from the spent flower heads in autumn for the following year — they self-seed freely once established in the right conditions.
Keep the base of the canes free of weeds and apply a thin layer of bark mulch as a ground cover. The mulch keeps moisture in the soil, which morning glory needs in abundance to sustain its rapid growth.
The Succulent and Gravel Driveway Border with Black Plastic Edging
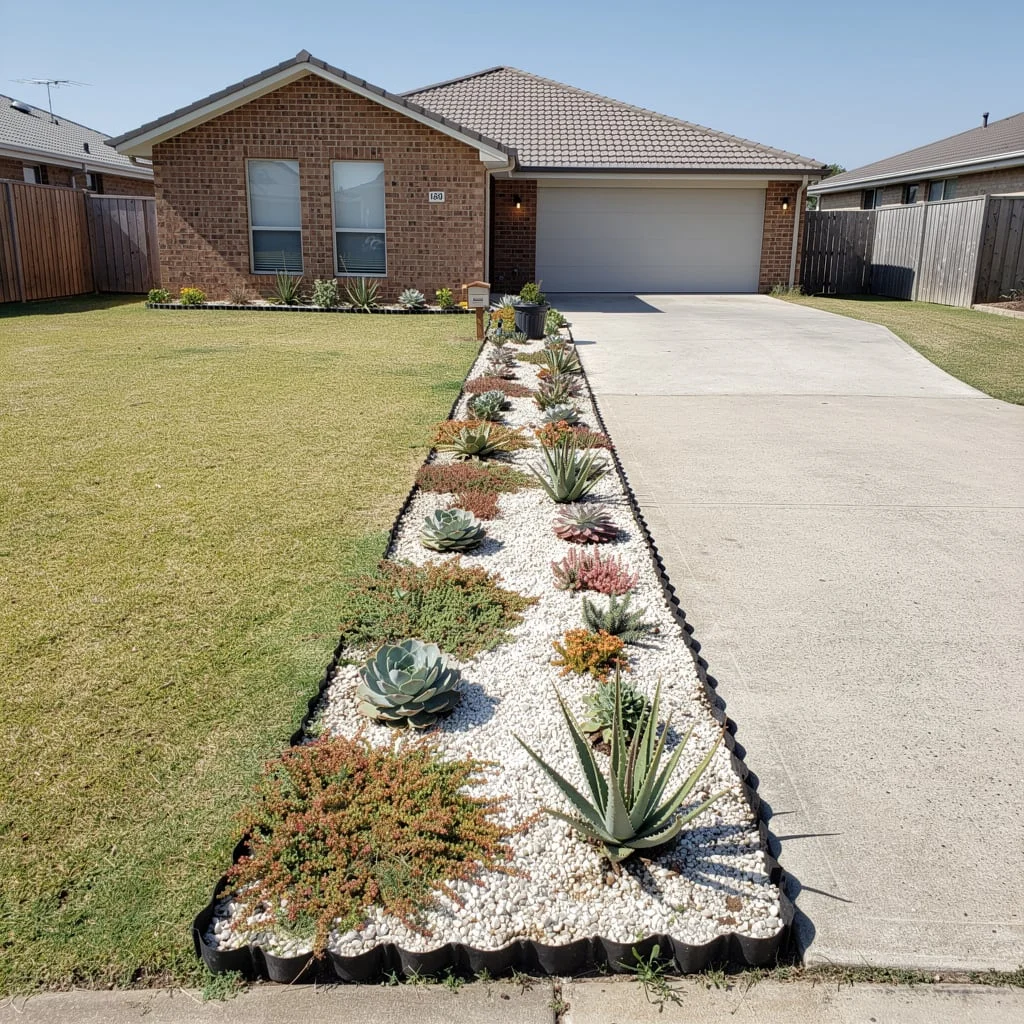
The driveway border is one of the most visible and most neglected spaces in any front yard. It gets walked on, driven over, and mowed against. Nothing planted there ever survives long unless it was chosen specifically for the conditions.
Succulents were chosen for the conditions. They tolerate the radiant heat from the concrete, the reflected light, the occasional foot traffic, and the near-zero rainfall that a driveway border receives. They are also, individually, inexpensive.
Install black plastic wave edging along the lawn side of the border — the plastic wave profile is cheap, available everywhere, and holds a clean edge against lawn. On the driveway side, the concrete edge does the containment work.
Apply white decorative pebble — 20mm washed white river pebble — to a depth of 50mm across the entire border surface over weed matting.
Plant a mix of succulents in varying heights and forms: large Agave americana for the structural vertical element, smaller echeveria rosettes as ground level accents, Sedum as spreading ground cover between larger specimens, and one or two aloe in each run for seasonal flower interest.
Plant sparingly. Succulents look best when they have clear space between them against the white pebble. Overcrowding turns a graphic, architectural composition into a confusing mass of grey-green.
The Foundation Bed with Brick Edging, Block Colour Annuals, and Clipped Shrubs

Most foundation beds — the beds that run along the house wall under the windows — are planted in an identical shrub mix with no colour and no hierarchy between the plants.
The brick edging first. Source secondhand bricks from a demolition yard or online classified — they are almost free. Set them on edge in a continuous line along the lawn boundary of the bed, pushed down so the top surface of the brick sits 50 to 75mm above lawn height. This creates a low raised border that frames the bed and makes it look deliberate.
Clear the bed, improve the soil with compost, and plant in distinct colour blocks rather than mixed plantings. One section in red — Salvia splendens or red begonias. One section in white — Impatiens or Vinca in white. One section in yellow — French marigolds or dwarf rudbeckia. Each block reads as a simple, confident colour decision.
Place clipped shrubs — compact box or dwarf pittosporum — at regular intervals between the colour blocks, like full stops in a sentence. These structural plants give the bed permanence through winter when the annuals have finished.
Refresh the annual colour blocks each season. The shrubs stay. The edging stays. The soil improves. Year by year this bed becomes richer with almost no new investment.
The Garden Path with Lavender, White Alyssum, and Roses at the Entry
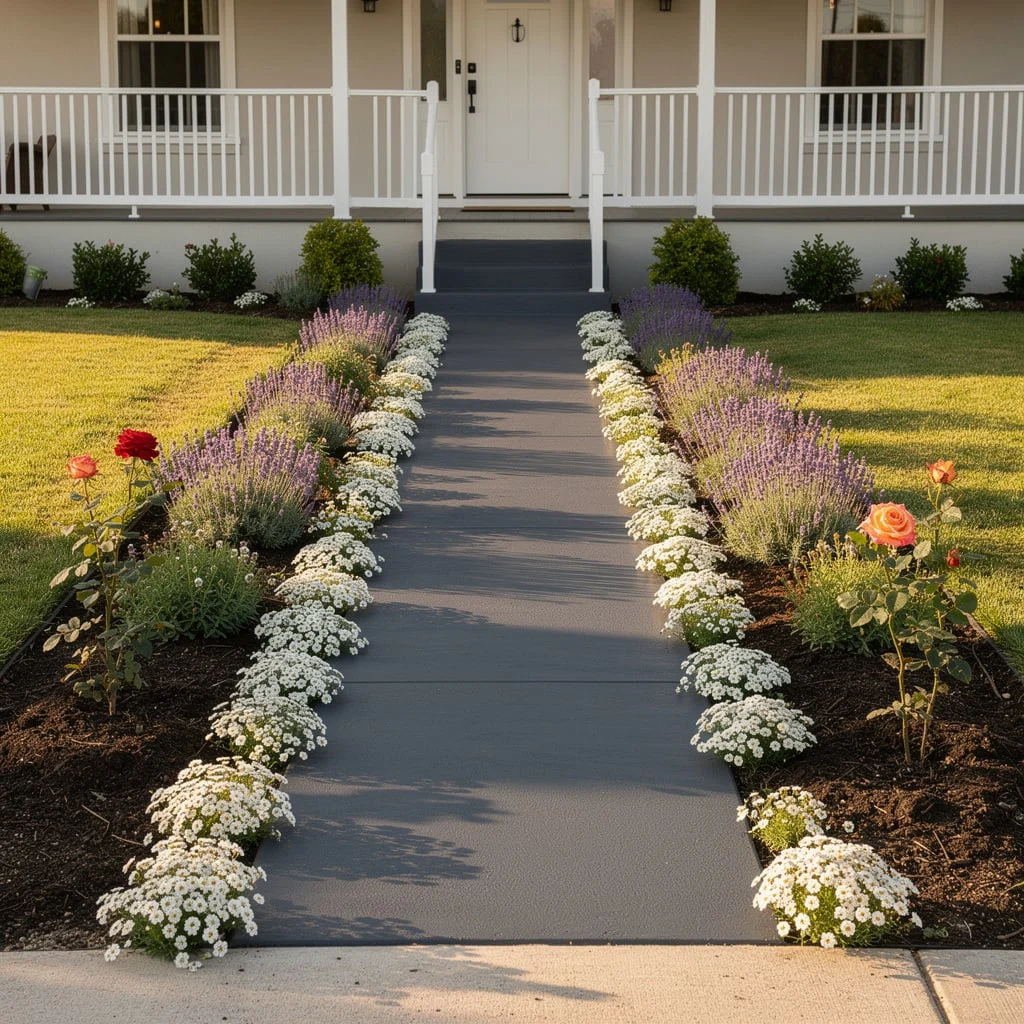
The path from the gate to the front door is a corridor. It should feel like an arrival, not a transition.
For the path surface, a grey concrete or slate surface works best — cool, neutral, and clean against the warm tones of flowering plants. Reseal an existing concrete path if it’s stained or aged. A clean path reads as intentional.
Plant the beds on either side of the path in a layered scheme. Closest to the path edge, alyssum — low-growing, white-flowering, spreading — as the ground level planting. This needs to overflow slightly onto the path edge. That slight overflow is the thing that stops the path looking like a car park.
Behind the alyssum, plant lavender in alternating positions on both sides — the same variety, the same height, but planted alternately so they don’t face each other mirror-image. Opposite plants should be slightly offset.
At the back of the bed, nearest the house wall, one rose on each side in a colour that works with the house. Peachy salmon against a warm brick. Deep red against a white rendered wall. These are the vertical anchors of the composition.
Keep the beds mulched dark. Keep the alyssum deadheaded. Let the lavender stand into winter — the dried flower stems add structure when nothing else is providing it.
The Two-Tree Lawn with River Stone Circles, Bulb Planting, and Black Mulch
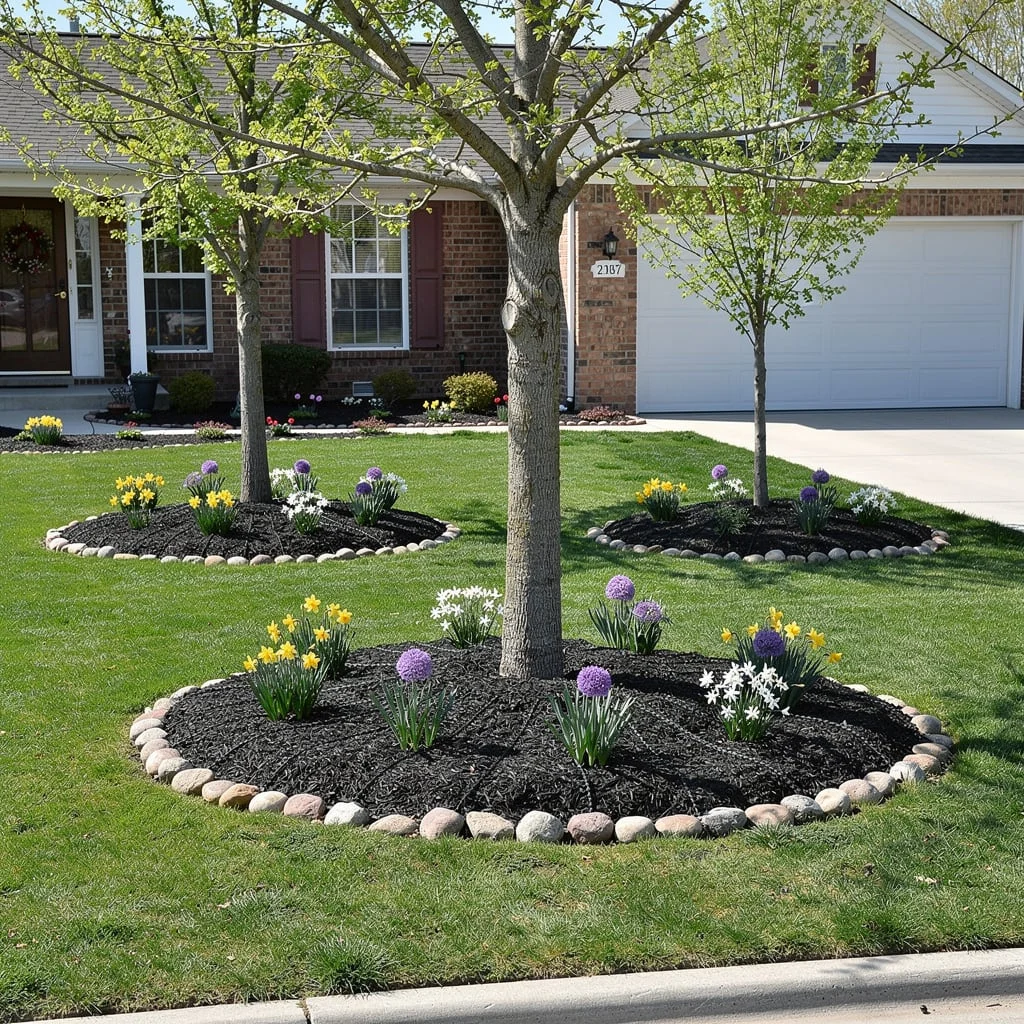
Two trees, positioned symmetrically on either side of the lawn — not too far apart, not too close — each with their own generous mulch circle. This is the entire front yard plan. Everything else follows from it.
Choose matching trees of the same species. Ornamental pears, amelanchier, or any deciduous tree with good seasonal interest — spring blossom, summer leaf, autumn colour. Buy matching specimens as close in size as possible. Asymmetry between the two trees destroys the symmetry of the composition.
Excavate a circle around each tree with a radius of 800mm to 1000mm. Remove the turf and improve the soil. Define the edge of each circle with river stones — round smooth cobbles at 100 to 150mm diameter, set in a single continuous ring. No mortar. Just placed firmly in a compacted base. The river stone ring is the frame of each bed.
Fill each bed with black bark mulch. Then plant bulbs through the mulch in loose, naturalistic groups — not in rows, not evenly spaced. Daffodils for early spring, allium for late spring, white snowflakes at the edge. Plant them at the correct depth for each species.
In spring, the bulbs push through the dark mulch inside the stone rings. The effect is immediate and seasonal. New bulbs can be added each autumn as the display improves.
The Clean Foundation Bed with Clipped Shrubs and Dark Mulch That Relies Entirely on Restraint
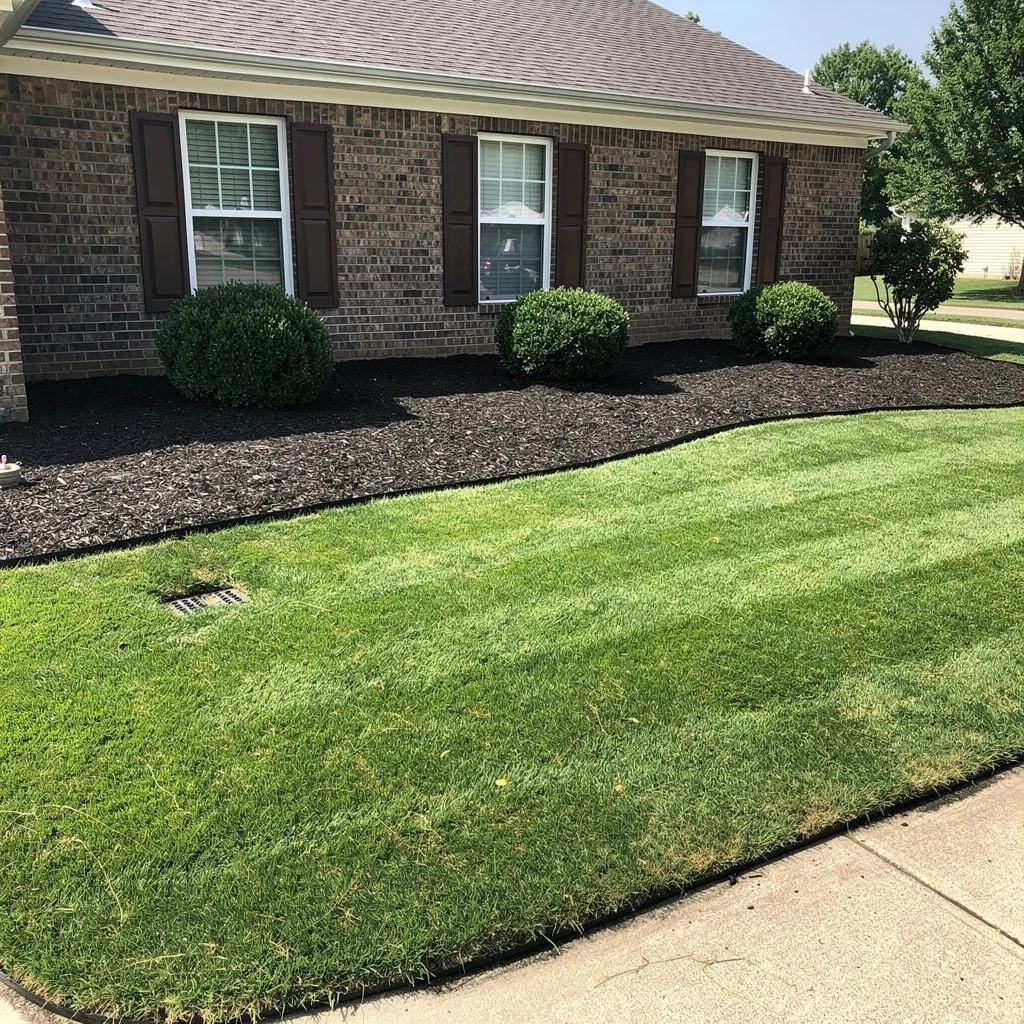
This is the front yard idea most people skip because it sounds too simple. There are no flowers. No colour. No seasonal interest beyond the slow growth of the shrubs.
Prepare the foundation bed, improve the soil, and install black steel landscape edging along the lawn edge. Apply black bark mulch at 75mm depth across the entire bed.
Plant seven to nine rounded shrubs in a single species — compact Buxus, Pittosporum ‘Tom Thumb’, or Lonicera nitida — in a loose, slightly irregular spacing. Not perfectly even. Not perfectly random. Somewhere between the two: each plant has clear space around it, but the distances vary by 100 to 200mm.
Clip each shrub into a soft rounded form once a year in early summer. Not a hard sphere — a relaxed mound that retains the character of the plant while suggesting it has been given attention.
This front yard looks expensive because it is confident. It chose one thing and did it without apology. The dark mulch, the single clipped species, the crisp steel edging — none of these elements is expensive. The combination reads as considered in a way that a garden stuffed with different plants never does.
The Terracotta Pot Pair at the Front Door with Clipped Box Spheres
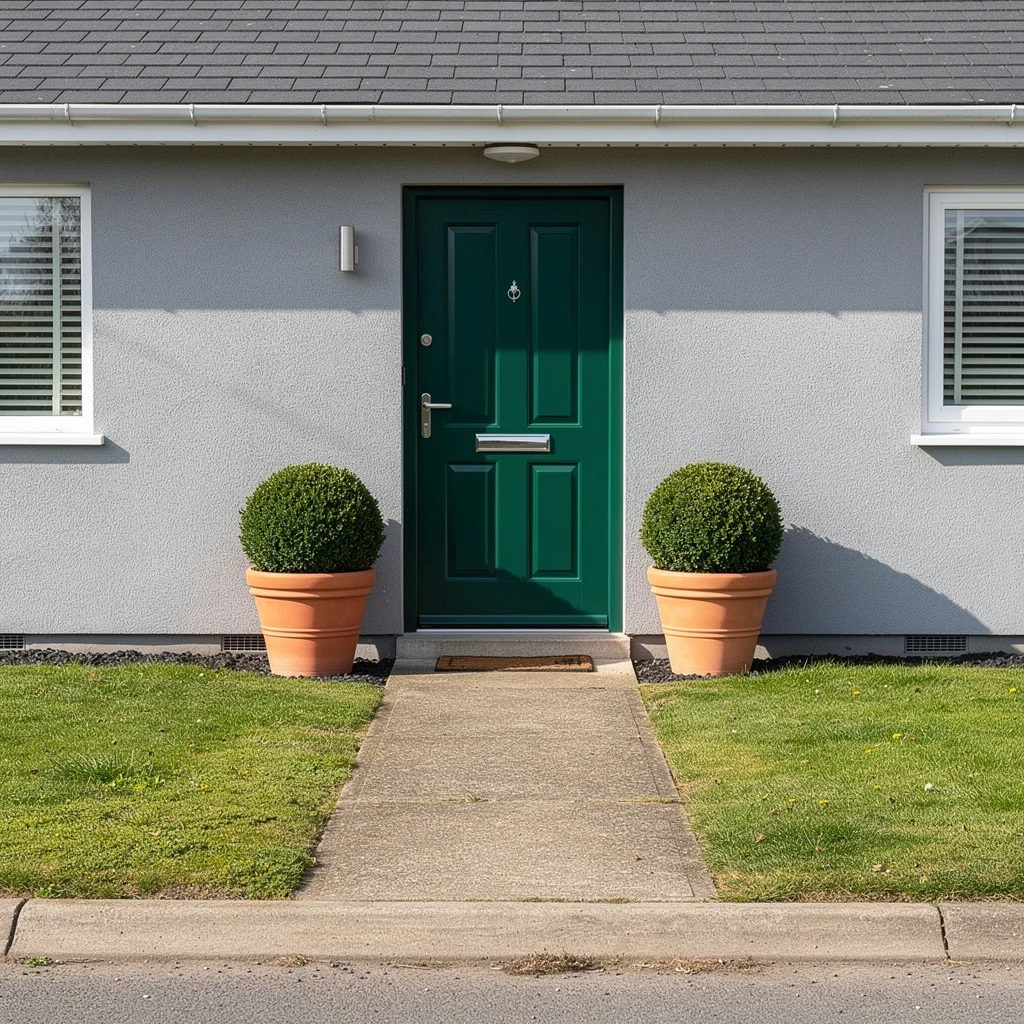
Two large terracotta pots, one either side of the front door. A single clipped box sphere in each. Nothing else.
This is not underachievement. This is editing.
Source terracotta pots at 450 to 500mm diameter minimum. The scale needs to read as significant from the street. Small pots flanking a front door look like they’re trying to be a proper entrance and failing. Large pots flanking a front door are a proper entrance.
Plant each pot with a box sphere — Buxus sempervirens — in as large a size as your budget allows. A 300mm diameter sphere in a 500mm pot looks right. A 150mm ball looks lost. Fill the pot with a quality loam-based compost, not multipurpose — the roots will be in this pot for years and need the structure that loam provides.
Clip the spheres twice a year: once in spring as new growth firms up, once in early autumn before the growing season closes. Between clipping, do nothing except water when the top 50mm of compost feels dry.
The door colour matters in this composition. A dark, saturated front door — deep green, navy, charcoal — makes the terracotta and the clipped box read as a complete colour conversation. A beige or white door dissolves the whole thing. If the door colour is wrong, paint it. A tin of exterior satin paint costs almost nothing.
The Timber Sleeper Raised Border Along the Street Frontage with Lavender and Ornamental Grass
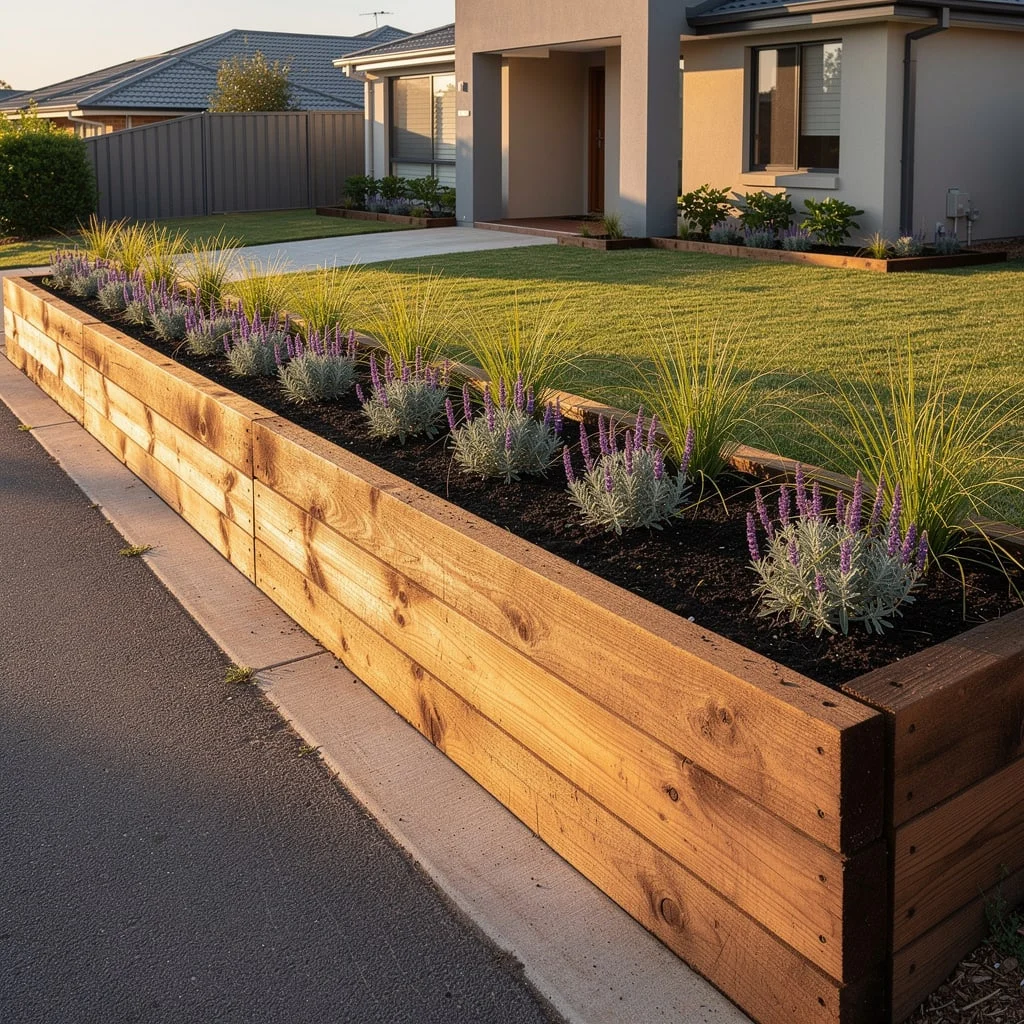
Treated pine sleepers, stacked two courses high, create a raised bed that looks far more substantial than its cost suggests. Source 200 x 75mm treated pine sleepers from a landscape supplier. Cut to length and stack in an overlapping brick-bond pattern, using 300mm steel pins or rebar hammered through pre-drilled holes to secure the courses together.
The bed this creates sits approximately 400mm above street level. That additional height changes the visual weight of everything planted in it — the plants read as more prominent, the bed as more architectural.
Fill with a mixture of quality topsoil and compost. Apply dark bark mulch at 75mm depth after planting.
Plant in alternating groups: lavender (English variety — Hidcote or Munstead for compactness) as the primary species, with Karl Foerster or Stipa ornamental grass as the vertical accent at irregular intervals. The lavender provides the mass; the grass provides the movement and height contrast.
The timber sleeper face is the dominant visual element from the street. Keep it clean — no climbing plants, no trailing growth over the face of the sleepers. The raw timber against the dark soil and the purple lavender is the composition. Let the contrast do the work.
The Thing Every One of These Ideas Already Knew
Budget and quality are not the same variable in a garden. One costs money. The other costs commitment.
Every one of these front yards made one decision and followed it through. The decision might have been a colour. A material. A single plant species. A ground cover.
What none of them did was add things because they were available. Or buy something because it was on sale. Or compromise the scheme to use something they already had that didn’t quite fit.
Restraint is not a design strategy that sounds exciting. But it’s the one thing that separates front yards that look designed from front yards that look assembled.
Your front yard doesn’t need more. It needs better. And better, in almost every case, means less — less variety, less busyness, less hedging between competing ideas. One strong idea, properly executed, at whatever budget you have.
That’s the whole secret. It was never complicated.