
You’ve been mowing the same patch of grass for years. Watering it. Feeding it. Edging it every single weekend. And for what? So it can look like every other front yard on the block — a green rectangle with ambitions of beige.
Low maintenance doesn’t mean low effort at the planning stage. It means making smarter decisions upfront so you’re not held hostage by a garden hose every summer. The front yards that look effortlessly good aren’t lucky. They were thought through.
Most people treat front yard landscaping as an afterthought. They plant whatever the nursery had on sale, throw down some mulch, and call it done. Then they wonder why it looks fine but not interesting. Fine is not the point.
These ideas prove that low maintenance and high impact aren’t mutually exclusive. You just have to know where to put your effort.
Your Front Yard Has One Job. Stop Making It Harder.
The front yard exists for one reason: to make your house look like it belongs to someone who has their life together. That’s it. Everything else — the plants, the path, the mulch — is in service of that single goal.
Grass Is the Most Demanding Guest You Keep Inviting Back
Grass requires weekly mowing, seasonal fertilizing, consistent watering, and aggressive edging if you want it to look sharp. And even when you do all of that, it still manages to look patchy in August and muddy in March.
The front yards in these images that look the cleanest? Most of them have dramatically reduced their grass footprint. Some eliminated it entirely. That’s not laziness. That’s a decision.
When you cut down the amount of turf you’re maintaining, you immediately cut down the number of hours you’re spending outside with equipment you’d rather not be operating.
The Mulch and Rock Conversation Nobody Finishes
People pick mulch or rock and then wonder why their beds look average after three years. The answer is almost always installation depth.
Mulch needs to go down three inches deep. Not two. Three. Anything less and weeds push through within a season.
Rock needs a proper weed barrier underneath — not the cheap fabric that breaks down in two years, but a commercial-grade ground cloth that actually does its job. Skimp on either of these and you’ve created a weed farm, not a garden bed.
Dark-dyed mulch looks sharp but fades fast in direct sun. Natural hardwood mulch ages more gracefully. River rock and pea gravel are permanent once you commit, so make sure you like the color before you order six cubic yards of it.
The Plant Selection Problem
Most people pick plants because they’re pretty at the nursery in April. They don’t ask how big the plant will be in five years, whether it spreads aggressively, or whether it actually suits the sun exposure in their front yard.
A plant that needs pruning four times a year is not a low-maintenance plant. It’s a commitment you made without reading the terms and conditions.
Stick to plants with slow to moderate growth rates, natural rounded forms that don’t need constant trimming, and deep root systems that handle drought once established. The images here tell you exactly which categories work — ornamental grasses, boxwoods, arborvitae, drought-tolerant silver plants, and ground-hugging flowering covers all show up for a reason.
The Geometry of a Front Yard Is a Decision, Not a Default
Walk out to the street and look at your house. What shape is the planting bed? If the answer is “I don’t know” or “sort of rectangular,” that’s the problem. The shape of your bed is as important as what you plant in it.
Curves Versus Lines and When Each One Works
Curved beds feel relaxed and organic. Straight-edged beds feel deliberate and architectural. Neither is wrong, but mixing them without intention makes a yard look unresolved.
If your house has strong architectural lines — brick, clean siding, symmetrical windows — straight beds and formal plantings will feel intentional. Brick edging, clipped hedges, structured arborvitae: these speak the same language as the house.
If your house is more relaxed in style, or if you’re working with an irregular lot, flowing curves give the yard movement and personality. The key is that curves need to be genuinely curved — not wobbly and accidental. Lay a garden hose to trace the shape before you cut anything.
Edging Is Doing More Work Than You Think
The difference between a bed that looks finished and one that looks like it’s dissolving into the lawn is edging. It’s not optional. It’s the frame around the picture.
Brick edging, concrete borders, steel edging, and stone all work. What doesn’t work is no edging, or cheap plastic edging that warps after one winter and starts coming out of the ground like it’s trying to escape.
Install edging before you put down ground cover. Dig a proper trench and set it level. This is the step most people skip and then spend years compensating for.
Symmetry Is Lazy in the Best Possible Way
Symmetrical front yards look pulled together with minimal design effort. Mirror a planting bed on both sides of a central path and the yard reads as intentional immediately. You don’t need a landscape architect to tell you that two matched arborvitae flanking a door looks better than three arborvitae shoved against a wall in a row.
When working with symmetry, the proportions matter. The plants on each side should be the same species and roughly the same size. Swapping out one side for a slightly different variety because the nursery was out of stock is how you end up with a yard that looks almost right but never quite there.
Low-Maintenance Front Yard Landscaping Ideas
The Oversized Concrete Paver Garden
Scale is the move here. Large pavers in a small space look more confident, not more cramped. Cut the pavers large — four by four feet minimum — and lay them in a loose offset grid with generous gravel gaps.
Use fine crushed granite or pea gravel in the gaps, not coarse rock. Fine gravel shifts and settles into the crevices, creating a seamless surface between stone and ground cover.
Frame the space with clipped topiary — ball-form Buxus, lollipop-trained standard hollies, or similar controlled forms. Pot them in heavy stone or concrete containers rather than planting direct if you want flexibility to rearrange.
White flowering potted plants — Agapanthus, Nicotiana, or Phlox — provide seasonal color without requiring permanent bed maintenance. You swap pots as seasons change. Nothing is permanent except the hardscape.
The hardscape is the investment. Once laid, it requires nothing but an annual power wash.
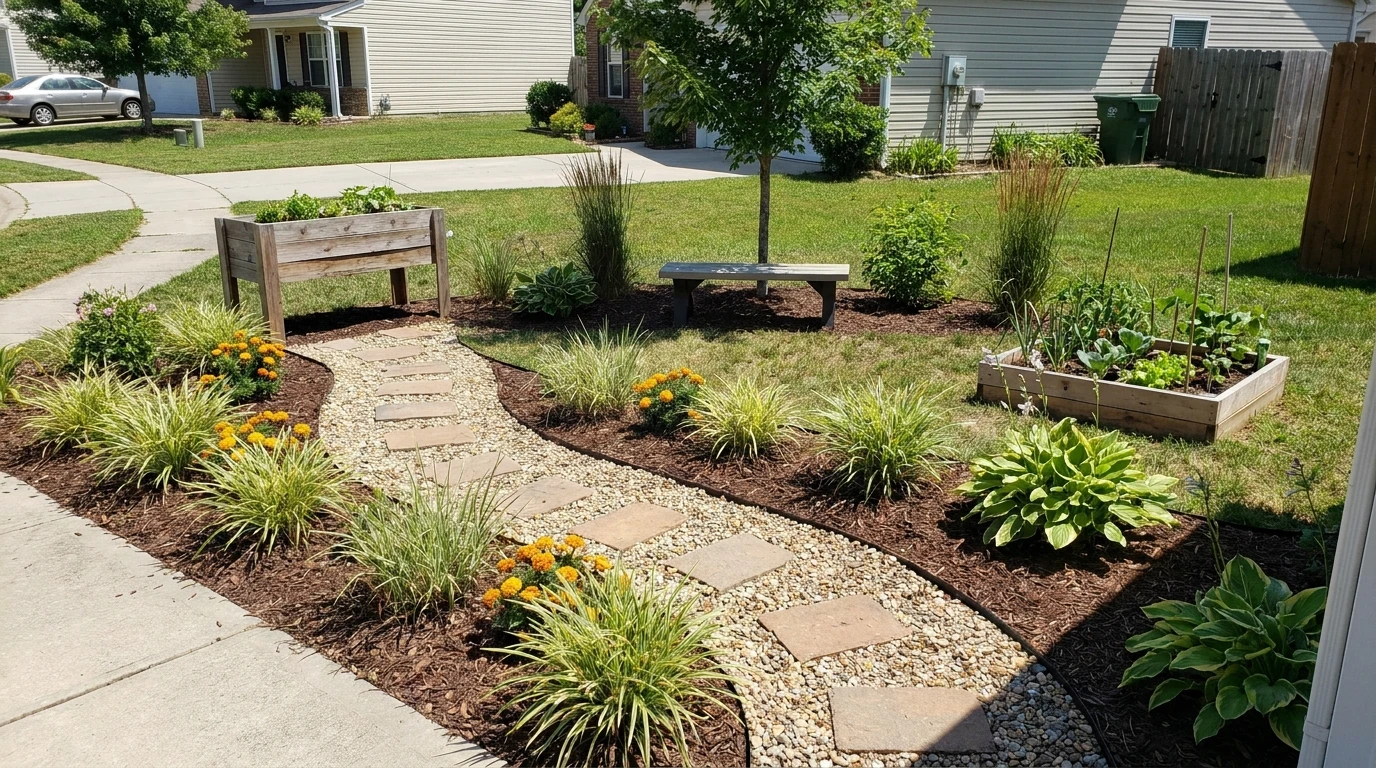
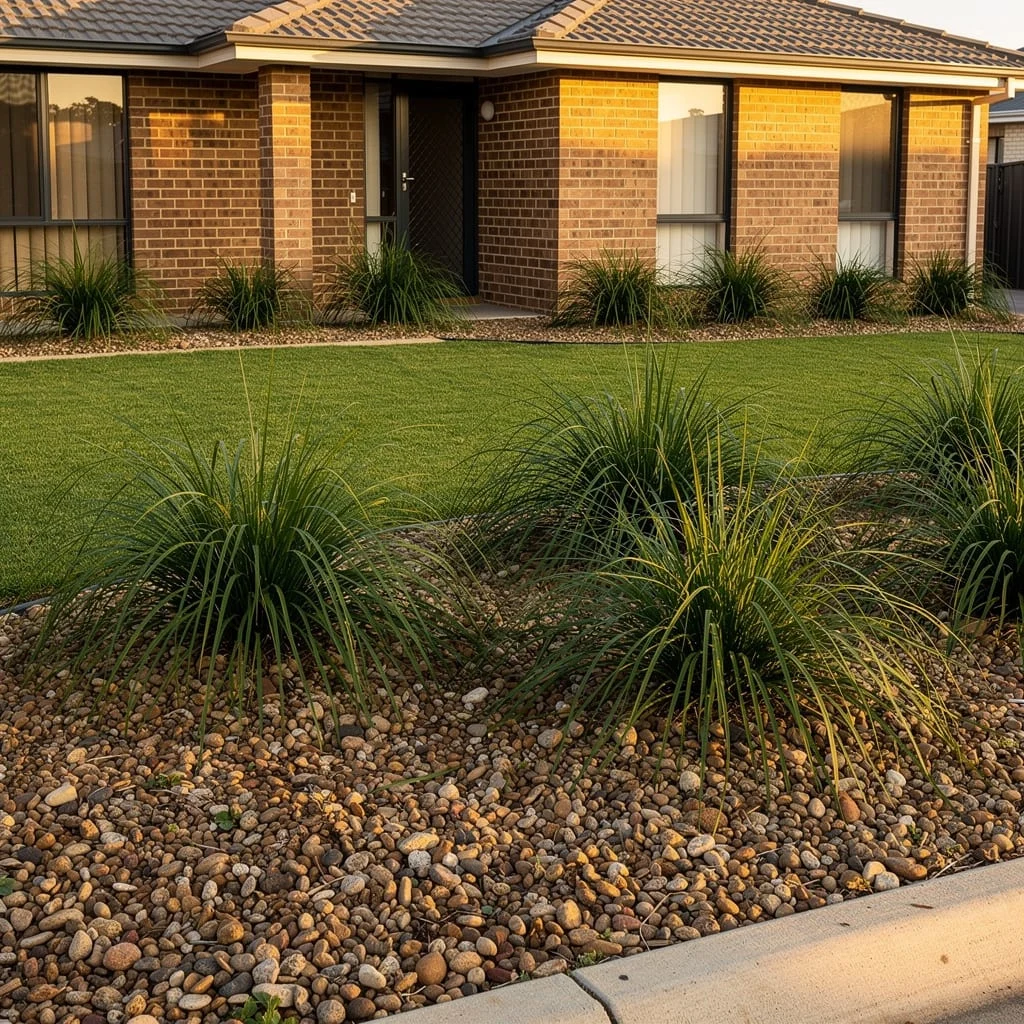
The Ornamental Grass and River Pebble Combination That Looks Better Every Year
Divide your front bed into two zones: a river pebble zone closest to the street and curb, and a lawn zone behind it. The pebble zone handles the dry, compacted, hard-to-grow strip that battles foot traffic and car exhaust. The lawn handles the open center.
Plant ornamental grass — Lomandra or Dianella work well in warm climates, Karl Foerster in cooler ones — in loose clusters of three within the pebble zone. Space the clusters randomly, not evenly. Irregular placement makes the design feel deliberate rather than mechanical.
The grasses will spread and fill over three seasons. They need cutting back hard once a year in late winter — literally take shears to them at ankle height — and then they regrow dense and tidy. That annual haircut is the entire maintenance requirement.
Use mixed warm-toned pebble rather than uniform-colored gravel. The variation in stone size and tone gives the bed texture and avoids the flat, artificial look of single-color rock.
The Black Slate and White Marble Chip Path That Is Actually Two Decisions at Once
This path is two materials performing together. The black slate stepping stones and the white marble chip surrounding them create a graphic contrast that photographs well and reads clearly from the street.
Source honed or slightly rough-textured black slate flagstones, not polished. Polished slate becomes dangerously slippery when wet. Honed gives you the colour without the liability.
Lay the stones in a double-wide staggered pattern — two stones abreast rather than single file — so the path reads as generous and intentional rather than a narrow stepping stone trail. Set each stone firmly on a sand and grit bed, checked for level before the surrounding rock goes down.
Fill the entire planting zone with white marble chip to a depth of three inches over weed barrier. Plant low spreading ground cover or small flowering perennials into pockets cut in the barrier — the blue-flowered Plumbago or Convolvulus mauritanicus shown in tropical climates, or Nepeta ‘Walker’s Low’ in cooler zones.
Install bronze pathway lights flush with the stone or set just above the gravel line. The white gravel reflects ambient light at night, making the path readable without bright fixtures.
Maintain by raking the white marble chip back into place twice a year as foot traffic and weather disturb it. Replace any stone that heaves or settles unevenly. That is the entirety of the maintenance commitment.
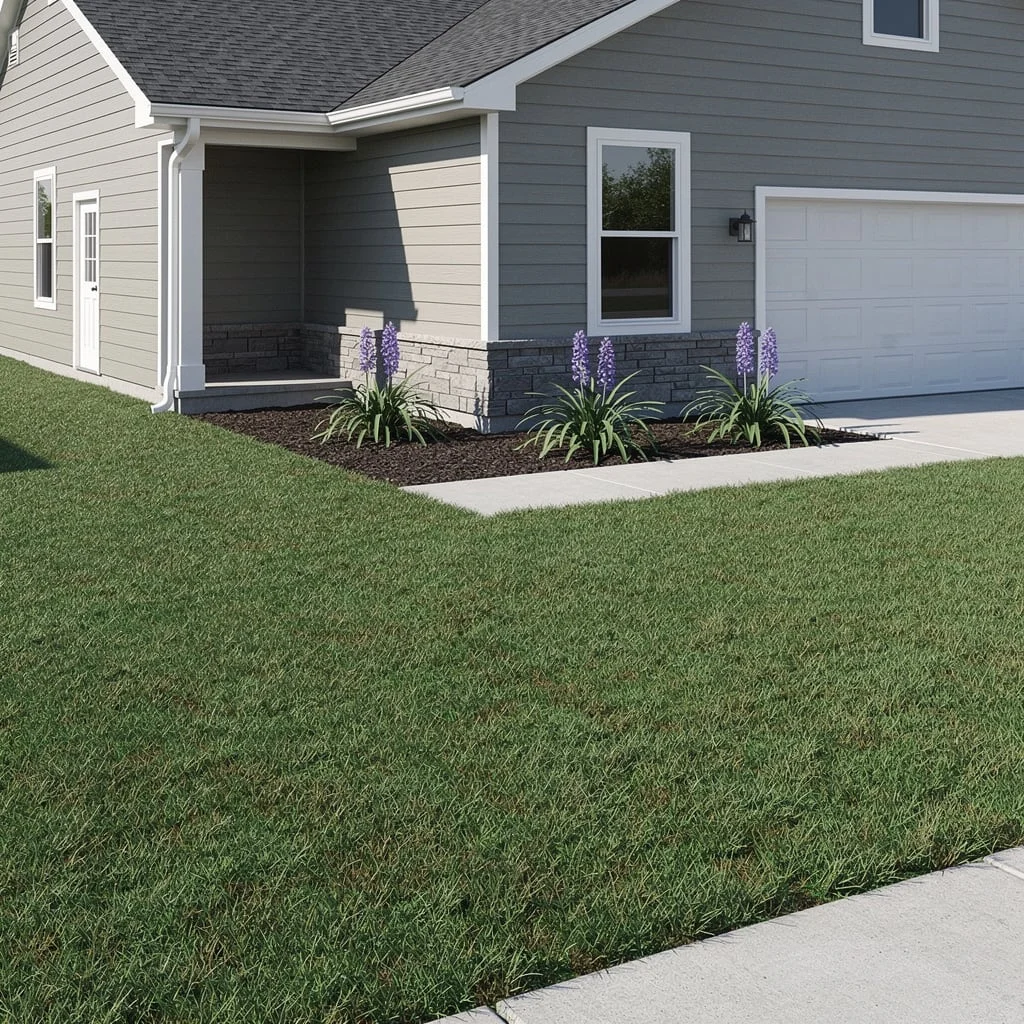
The Black Mulch and Clipped Boxwood Bed That Understands Contrast
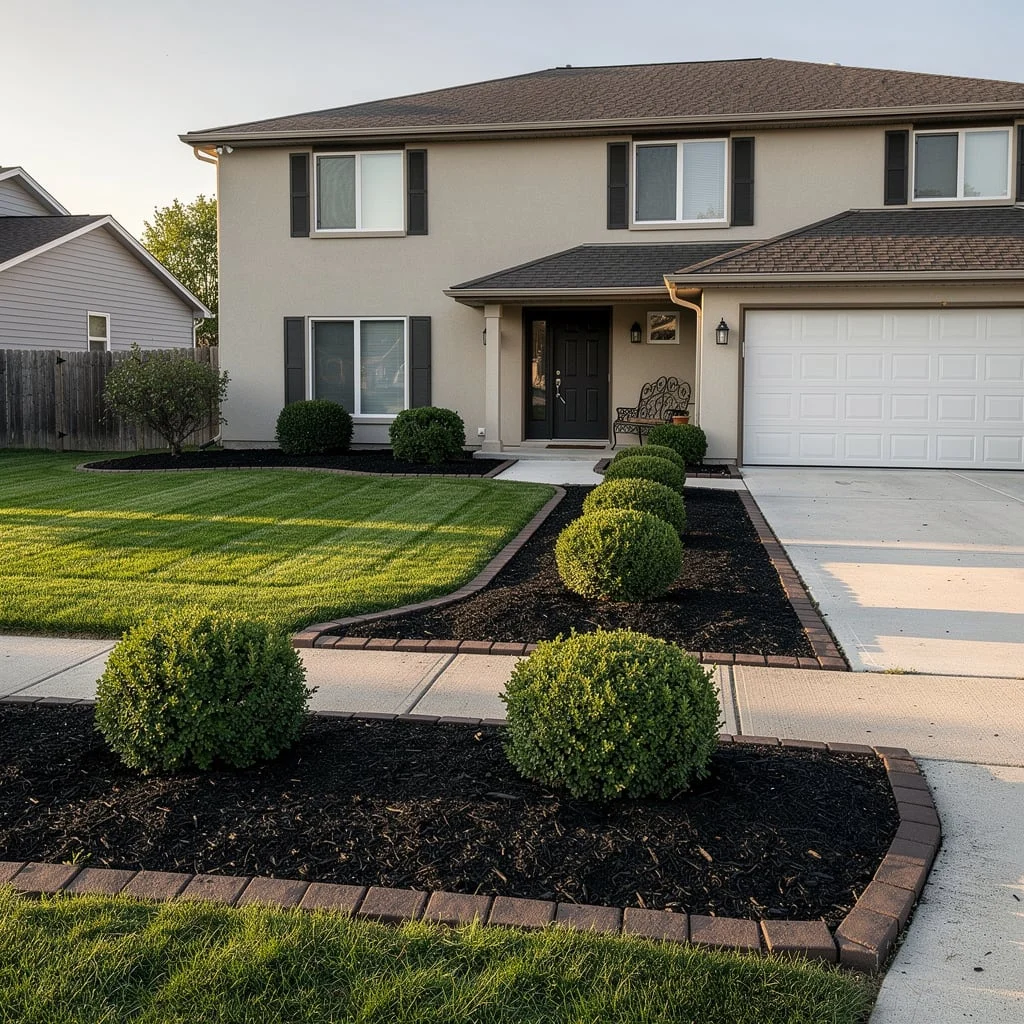
Start with a properly shaped planting bed along your foundation — curved edge meeting the lawn, straight edge meeting the house, with at least eighteen inches of depth to give plants room to breathe. Install a continuous brick or paver border along the curved edge, setting the bricks on their sides in a trench so only an inch protrudes above ground. This creates a clean, mowable edge that holds the bed in place for decades.
Fill the bed three inches deep with black-dyed hardwood mulch. Go dark. The black reads almost like soil and makes every green plant in front of it look sharp and deliberate.
Plant clipped globe boxwoods at irregular intervals — not evenly spaced, but in groups that follow the natural curve of the bed. Space them far enough apart that they won’t touch at mature size, which is roughly three to four feet for most compact varieties. These are slow-growing and need trimming once a year at most.
Add a second row of smaller globe boxwoods between the main planting and the sidewalk if you have a wider bed. The layered height from front to back gives the bed depth. Avoid the urge to mix in other plant types. The power of this look is its restraint.
The Gravel and Silver Herb Garden That Stopped Needing Water After Year One
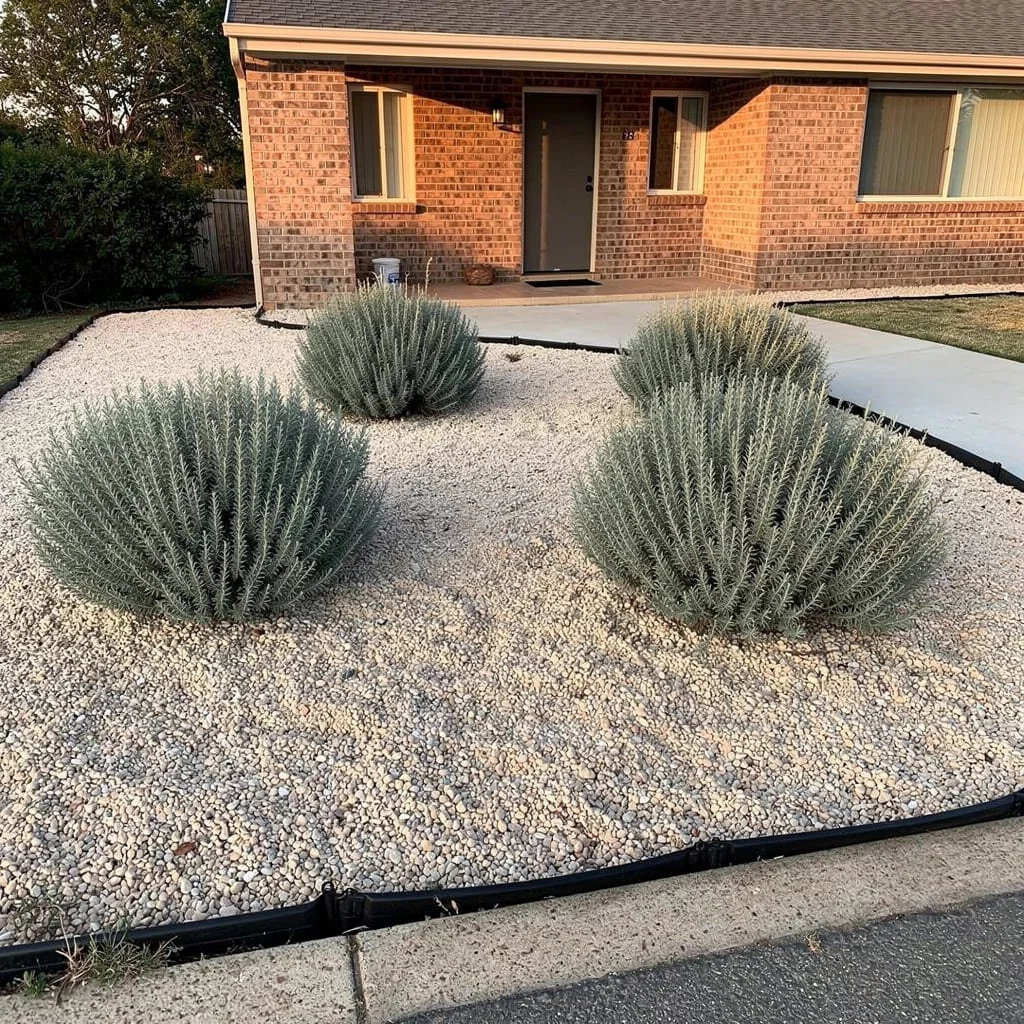
Remove all existing lawn from the front bed area and install a commercial woven weed barrier over the bare soil — not the thin black plastic kind but the heavy grey fabric used in commercial landscaping. Staple it flat.
Cover the barrier with three to four inches of light-colored river pea gravel or white limestone chip. The color matters: lighter gravel reflects heat and reads as clean and deliberate against a warm brick facade.
Plant large silver mounding herbs — Salvia chamaedryoides, Artemisia ‘Powis Castle’, or Lavandula ‘Silver Mound’ — spacing them well apart so each plant becomes a distinct sculptural form rather than a mass. These plants love heat, hate wet feet, and genuinely look better slightly neglected.
The black plastic edging visible at the bed perimeter in execution should be swapped for steel edging if budget allows — it holds its line for decades and doesn’t buckle. This entire setup requires watering only in the first season while plants establish.
The Hydrangea Wall That Pretends It Wasn’t Planted on Purpose
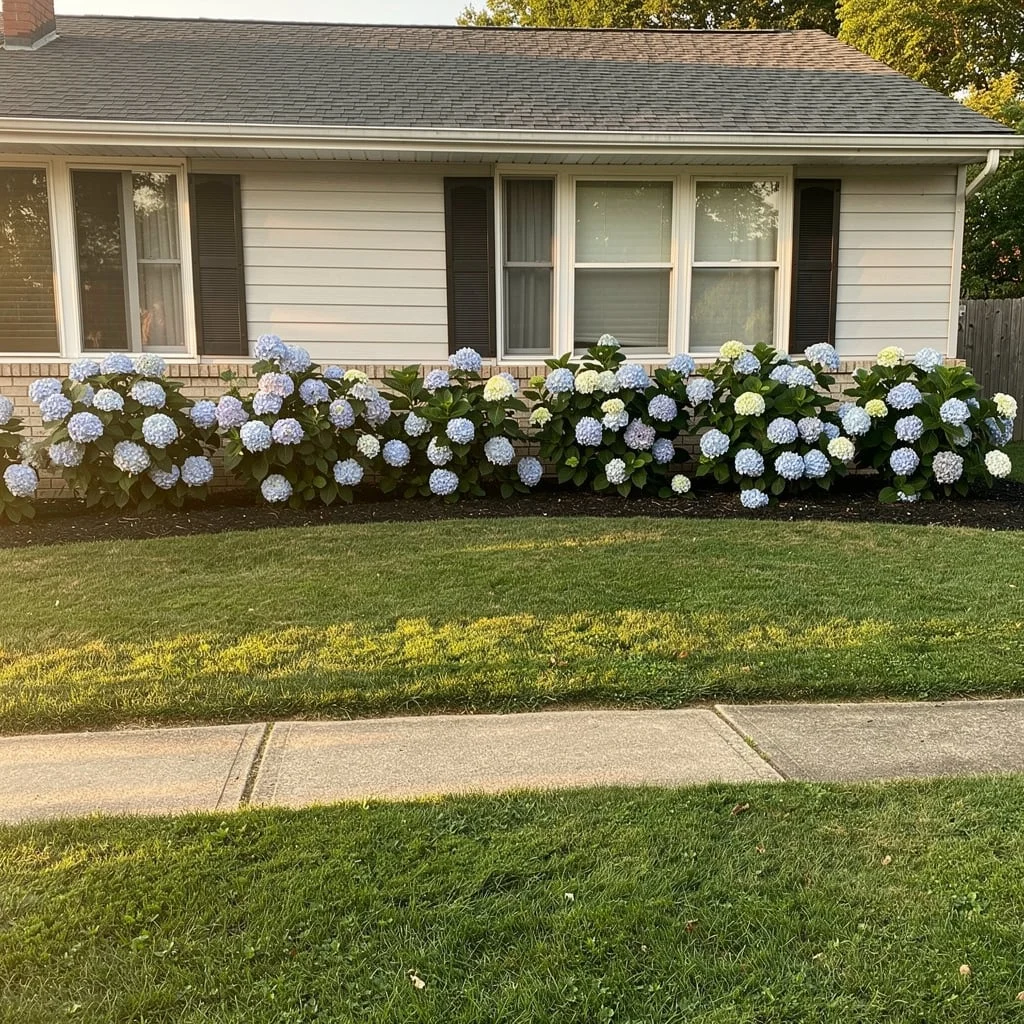
Mass a single variety of hydrangea — Endless Summer or Incrediball are both reliable performers — along the entire front foundation of the house. Not a mix of varieties. One. The uniformity is what makes this look intentional rather than assembled.
Plant them at roughly three to four feet apart from center to center, and no closer than eighteen inches from the foundation to allow air circulation and prevent moisture problems against the wall. They will fill in and merge within two to three seasons.
Keep the mulch bed beneath them clean and dark. Don’t add any other plants. The hydrangeas are the statement. Additional plants dilute it.
Hydrangeas of this type bloom on old wood, so the one rule you must follow: never cut them hard in fall. Remove only dead stems in very early spring. Nothing else. This is genuinely the most effort this planting asks of you in a given year.
The Mixed River Rock and Slim Tree Bed With Pathway Lighting That Works After Dark
This is about the quality of materials, not the quantity. A planting bed filled with mixed-size stone — some smooth white marble, some grey river rock, some smaller pebbles — has a surface texture that catches light throughout the day and changes character entirely after dark.
Build a low masonry retaining wall using concrete cap blocks in a warm sandstone tone. Set it on a compacted gravel base and mortar the capstones level. The wall height should be twelve inches — enough to create visual definition without blocking the planting above it.
Plant deciduous columnar trees at regular intervals in the bed — Amelanchier or Pyrus calleryana ‘Chanticleer’ work in most climates and provide a brief but brilliant spring flower display followed by clean summer foliage. Leave an exposed root collar of cedar mulch around each trunk and fill the rest of the bed with the mixed stone.
Install low-profile pathway lights between the trees. Bronze or matte black fixtures disappear into the stone during the day. At night the uplighting makes the tree trunks visible and the stone glows.
The Arborvitae Trio on Black Mulch That Nails Proportion
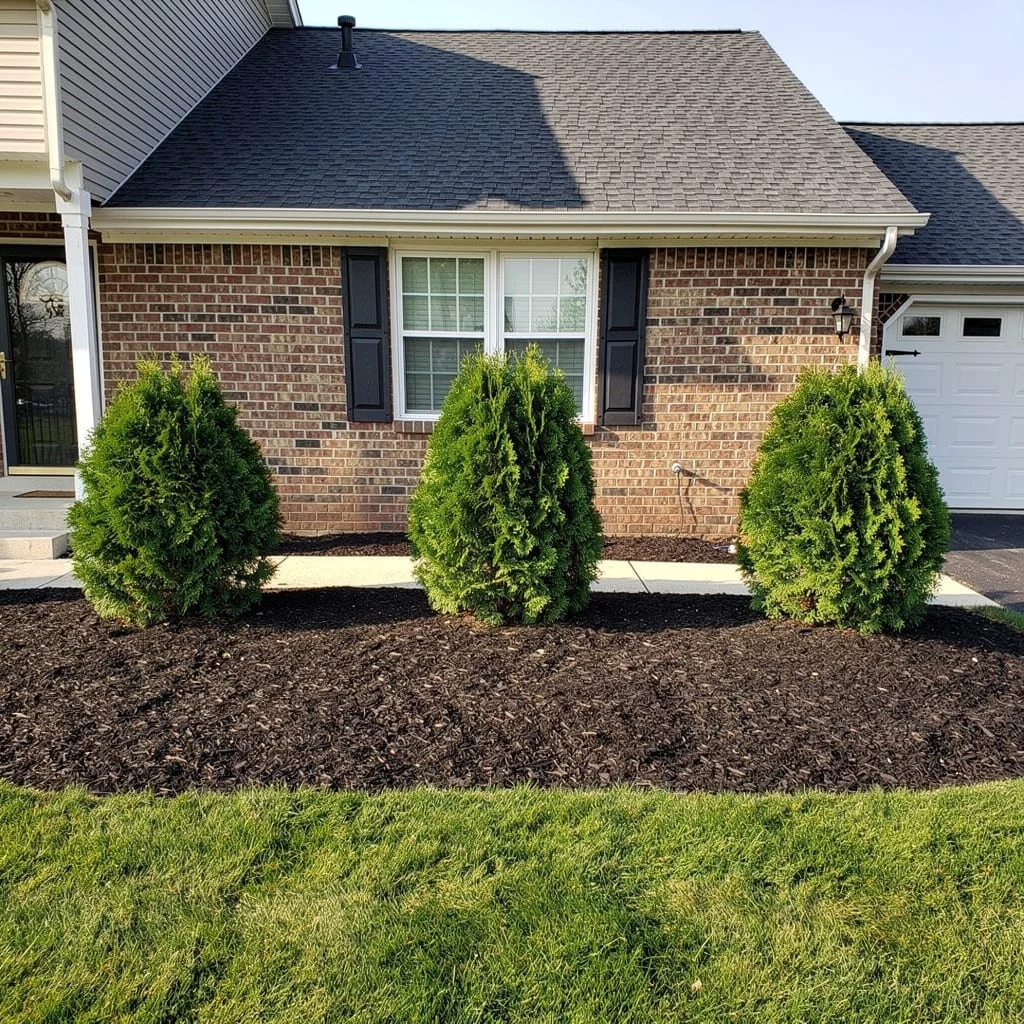
Measure the width of your foundation wall and divide it into thirds. Your three arborvitae go at those third-points — not centered, not clustered, but evenly distributed across the wall. This creates the visual rhythm that makes the planting look designed.
Choose Emerald Green Arborvitae. They grow to about twelve feet tall and stay naturally narrow — three to four feet wide. They require zero pruning if placed correctly. The mistake most people make is planting a variety that will eventually exceed the width of the window above it, forcing annual trimming that defeats the purpose.
Lay black mulch four inches deep throughout the bed. No other plants. The three vertical green cones against the brick and the dark mulch bed is a complete and resolved composition on its own.
Water deeply once a week for the first season. After that, arborvitae are largely on their own unless you experience extended drought.
The Creeping Thyme Lawn With Round Stepping Stones That Asks Nothing of You

Kill your grass. All of it. Use a non-selective herbicide or smother it with layers of cardboard and compost over one growing season. You are not coming back from this decision, so commit.
Lay round concrete stepping stones in a straight line from the sidewalk to the front door — not a meandering path, but a clean, direct axis. Space them at comfortable walking stride distance, roughly eighteen to twenty-four inches center to center. Press them firmly into the prepared soil so they sit slightly below grade.
Plant creeping thyme plugs between and around the stones, spacing them six to eight inches apart. Thymus serpyllum ‘Pink Chintz’ gives the pink-lavender bloom shown. This plant spreads aggressively on its own, handles foot traffic, releases fragrance when stepped on, tolerates drought completely after establishment, and blooms in late spring.
Mowing is replaced by trimming back any plants that creep onto the stones twice a season. That’s the full maintenance schedule for this front yard.
The Boxwood-Lined Formal Path That Earned Its Symmetry
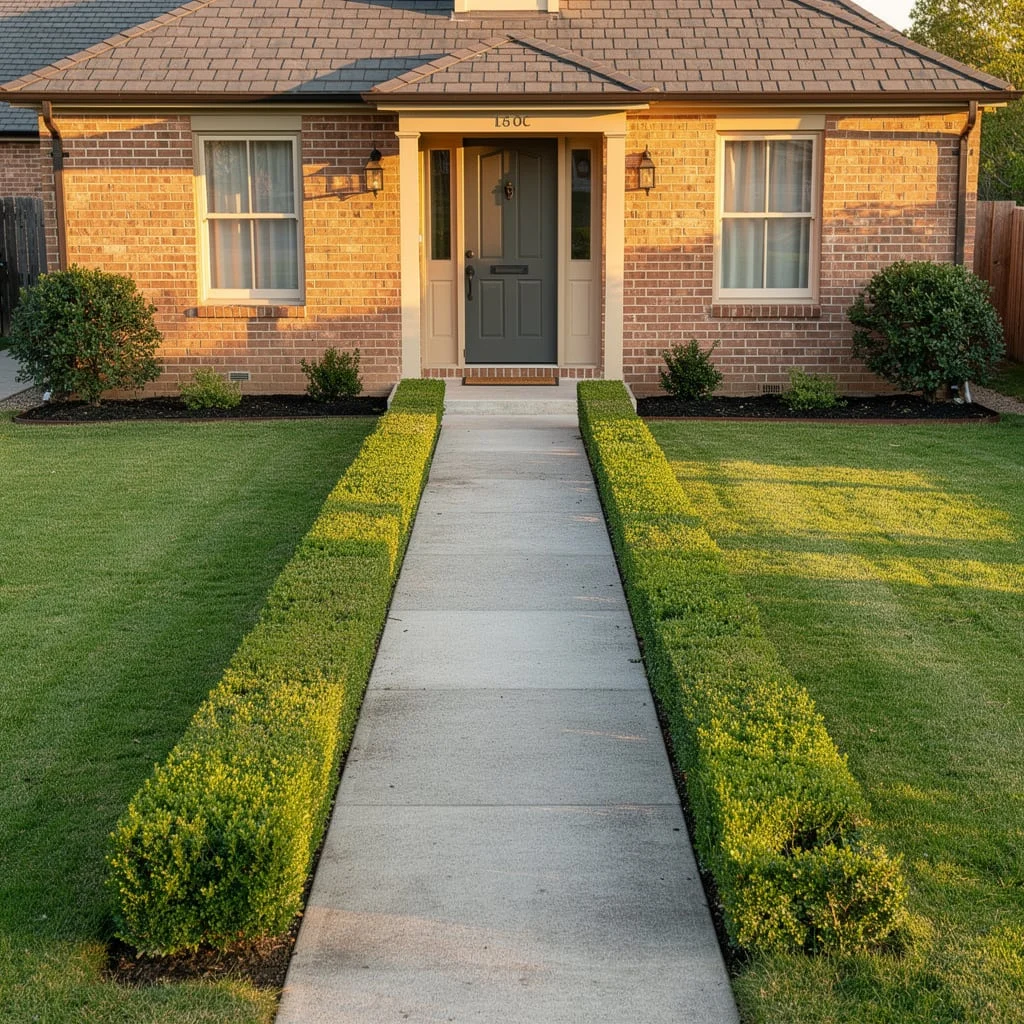
Lay a concrete or paver path of at least three feet wide — four is better — running straight from the sidewalk to the front door. The path cannot be narrow. A narrow path on an otherwise expansive lawn looks tentative.
Plant a continuous low boxwood hedge on both sides of the path, running its full length. Keep the hedge trimmed to eight to ten inches tall and perfectly flat on top. The flatness matters more than the height. Clipped flat hedges read as intentional; rounded ones look like they need another trim.
Maintain a dark mulch foundation bed behind the hedges along the house. Plant small, clipped round shrubs at intervals against the foundation wall itself to complete the frame.
This is not zero-maintenance — the hedges need two to three trims per season. But the visual return per hour of effort is significant. A symmetrical path like this doubles the apparent value of the house standing in front of it.
The Red Rose Strip Against a Wooden Fence That Commits to Color
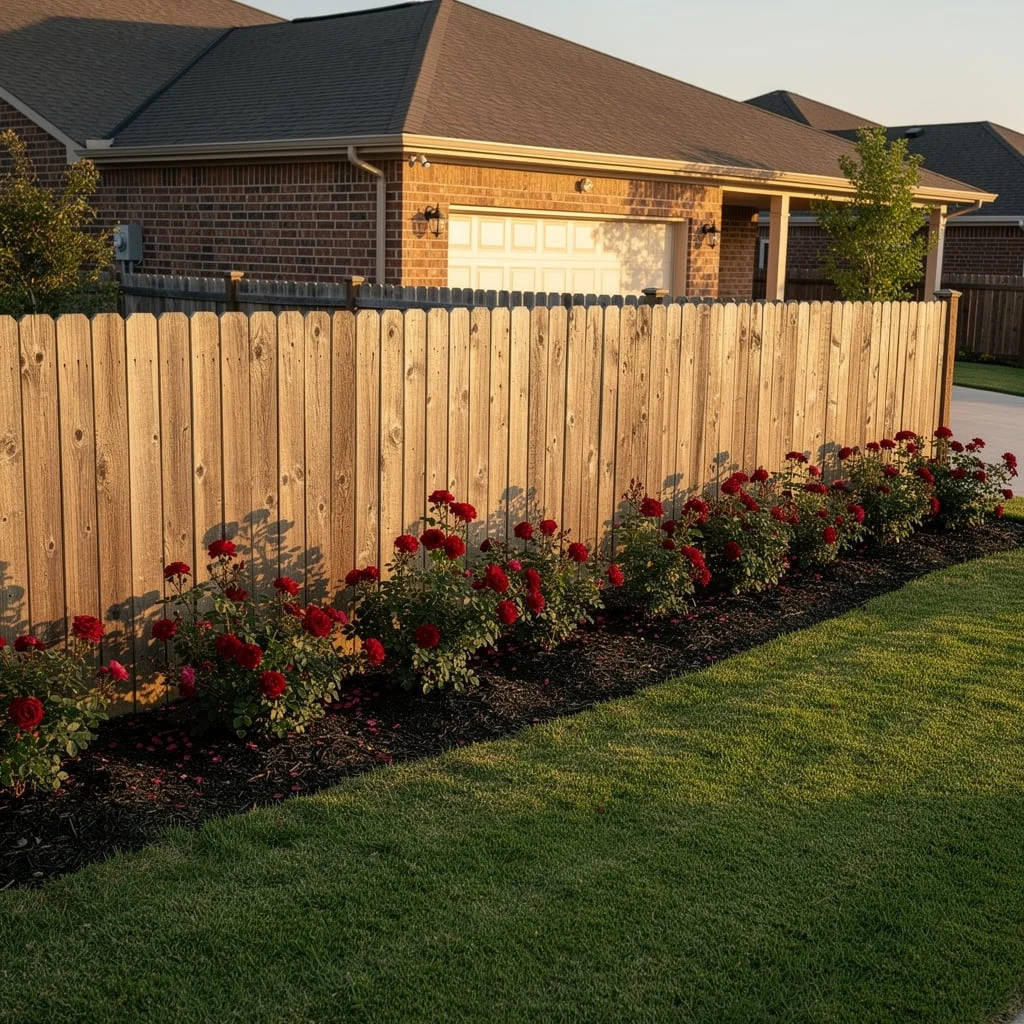
Dig a bed along the full length of the fence, extending twenty-four inches out from the fence line. Install steel edging along the lawn side. This defines the strip and keeps the grass from creeping in.
Fill with a dark premium mulch — triple-shredded hardwood in dark brown or black. Go four inches deep along the fence where you’ll have vertical stakes eventually and three inches in the open areas.
Plant Knockout Rose varieties eighteen to twenty-four inches apart. These are not the fussy antique roses that require spraying programs and constant attention. Knockouts are disease-resistant, continuous bloomers from late spring through frost, and require only one hard annual pruning in early spring.
Cut them back to about twelve inches tall in late February or early March, before new growth emerges. That’s the intervention that keeps them dense and productive rather than leggy. Water deeply twice a week until established, then rely on rainfall except during serious drought.
The red against the natural weathered wood fence is the whole composition. Don’t add anything else.
The Purple Agapanthus on Dark Mulch Against Stone Cladding That Earns Its Place
Agapanthus does one spectacular thing: it sends up dramatic spires of blue-purple flowers above strap-like foliage in summer. Then it sits quietly and does nothing for the rest of the year. This is exactly what low-maintenance landscaping needs — a moment of drama that costs nothing in upkeep.
Plant it in clusters of three against a foundation with interesting architectural detail — stone cladding, board and batten, or textured render all work as backdrops. The plant’s clean, graphic form needs something with visual interest behind it to pop, not a blank stucco wall.
Space clusters eighteen inches apart within the cluster, and allow two feet between clusters. Layer dark rubber or hardwood mulch beneath them at three inches.
Agapanthus divides itself over years and you’ll need to split and replant clumps every four to five years when they get congested. Other than that — and removal of spent flower stalks — this plant is self-managing.
The Raised River Rock Bed With Slim Trees and Uplighting That Reads as Architecture
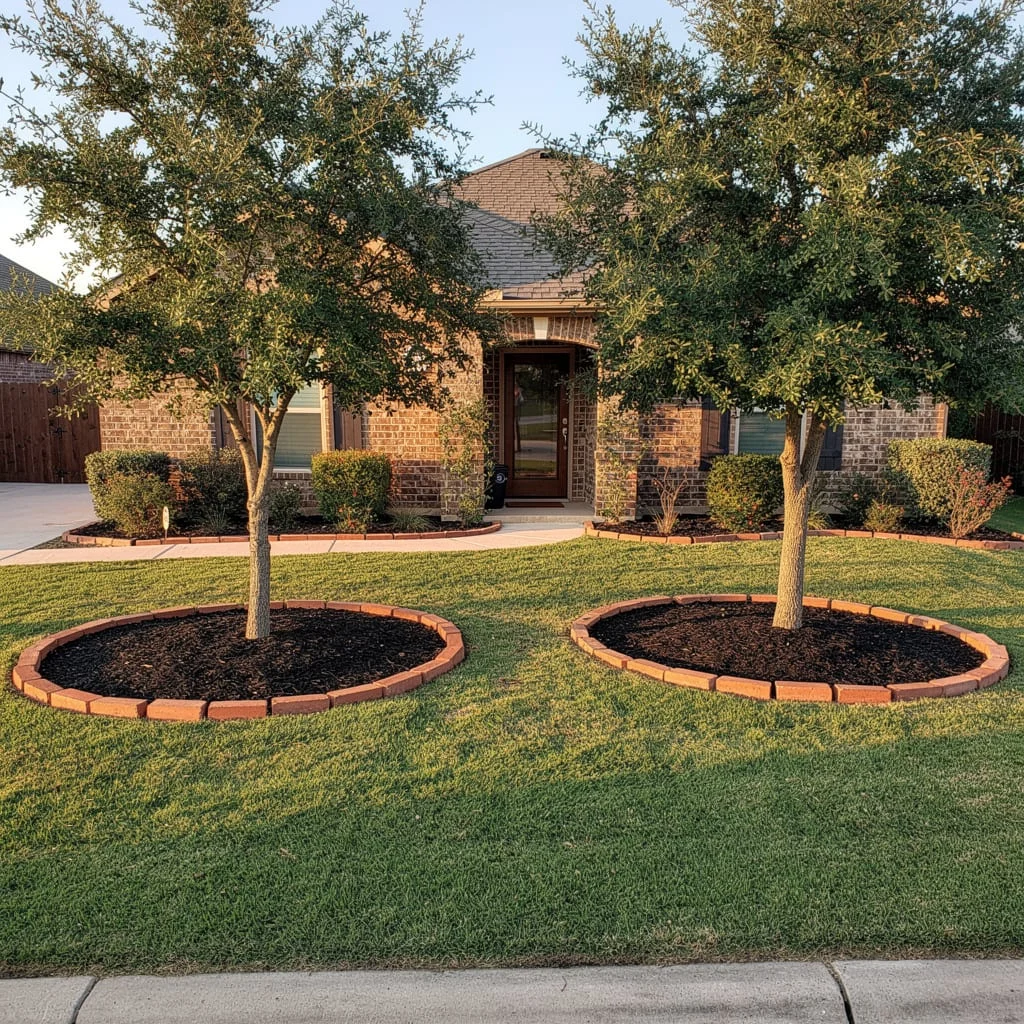
Build or install a concrete block retaining wall to create a raised planting bed — twelve to sixteen inches above grade. The wall itself is the structural design element. Use smooth concrete blocks rather than textured stone if you want the contemporary look; the clean face of the wall matters as much as what you plant in it.
Fill the raised bed with mixed river rock — a blend of white and grey pebbles in varied sizes reads as natural rather than manufactured. Leave circular mulched planting pockets for each tree. Use these pockets to plant slender columnar trees — Italian Buckthorn, Sky Pencil Holly, or similar narrow-form varieties that grow vertically without spreading.
Install low-voltage pathway uplights between the trees, angled upward at forty-five degrees. These are solar or hardwired, and they transform the bed at night into something that looks like it was designed by someone who charged by the hour.
The permanent nature of this installation means the heavy work is upfront. Once it’s in, the maintenance is raking leaves out of the river rock twice a year and an annual tree feeding. That’s it.
The Front Yard Has Nothing to Prove. But It Does Have to Try.
Every front yard in this collection made one decision clearly and then committed to it. The mulch and boxwoods. The gravel and silver plants. The thyme instead of grass. Each one is a single idea executed with enough consistency that it doesn’t need anything else to feel complete.
The front yards that fail are the ones that try to hedge. A little grass, a few flowers, some random shrubs, whatever was on sale. No through line. No material or plant that ties the space together into something coherent.
Low maintenance is not about choosing easy plants. It’s about choosing fewer plants and using them with intention. A yard with three well-placed elements will always outperform a yard with thirty poorly considered ones.
Your front yard is the first impression your house makes on everyone who passes it. It’s worth spending more time on the plan and less time with a mower.