

The driveway is roughly forty percent of what people see when they look at your house. You’ve probably spent more time picking a sofa no one sits on than deciding what to do with it.
That’s the honest problem with driveway landscaping. Everyone treats it as infrastructure. A strip of concrete you pull in and out of twice a day without looking up. But the driveway isn’t background. It’s the approach. It sets the entire tone for the house before anyone opens a door.
Get the driveway wrong and the nicest front door in the neighborhood can’t save you. Get it right and a modest house looks like it belongs to someone with taste and intention.
These ideas prove the point.
The Surface Itself Is the First Design Decision, Not an Afterthought
Most people choose their driveway surface based on whatever the contractor quoted them first. Concrete is default. Asphalt is cheaper. Pavers are expensive. That’s the full analysis, and it produces driveways that look like parking lots.
Your Surface Colour Is in Conversation with Your House
A charcoal asphalt driveway against a charcoal rendered house makes both disappear into each other. A warm terracotta paver driveway against red brick is either harmonious or repetitive, depending entirely on how you handle the edges and planting.
The surface needs to either match or deliberately contrast. Matching means staying in the same family — cool grey against cool grey render, warm buff aggregate against warm stone cladding. Contrasting means making a decision: the dark driveway that makes a pale house pop, or the pale aggregate that softens a dark facade.
Drifting into accidental middle ground — a mid-brown concrete against a mid-brown brick — produces the visual equivalent of a mumbled sentence.
Texture Communicates More Than Colour Does
Smooth concrete reads as cold and institutional unless something deliberately softens it. Exposed aggregate — where small stones are visible on the surface — reads as warmer, more textured, and infinitely more forgiving of tyre marks and staining.
Resin-bound surfaces feel contemporary and clean. The stone aggregate is bonded flat, so the surface reads smooth from a distance but has visual depth up close. The colour palette runs from cream to charcoal, and the surface drains through rather than pooling water at the edges.
Brick pavers and cobble-style pavers carry warmth automatically. The patterning does work that plain concrete can never do.
The Edge Is Where Most Driveways Collapse
A driveway without a defined edge looks unfinished regardless of how much was spent on the surface itself. The edge is where the driveway meets the lawn, the bed, or the path — and that transition needs to be deliberate.
A contrasting border course of darker or smaller pavers around a main surface works. Steel or concrete edging buried flush into the lawn line works. An abrupt cut edge with clean steel edging works.
What doesn’t work: letting the driveway simply dissolve into the lawn with no defined boundary, or using cheap plastic edging that curves upward after one winter.
Planting Along a Driveway Plays by Different Rules
A driveway border is not a garden bed. The conditions are brutal. Compacted soil at the edges from tyre overhang. Heat reflecting off the surface all summer. Salt spray in winter climates. Exhaust and oil drip at the base near the street.
Plants That Go in the Ground Here Need to Mean It
Lavender is the obvious choice for good reason. It tolerates heat, reflected light, poor soil, and dry conditions with genuine indifference. It blooms for months, smells like something worth walking past, and looks presentable even out of flower.
Ornamental grasses — feather reed, switchgrass, blue oat grass — handle driveway conditions similarly well. They move in wind, add height without bulk, and require cutting back once a year.
The mistake is planting anything with high water requirements in driveway beds. Hostas, impatiens, astilbe — these are not driveway plants. They will struggle and look it.
The Relationship Between Scale and the Driveway Width
A narrow planting strip on a wide driveway looks apologetic. If the driveway is wide, the plantings need scale to match. That means massing — not one lavender plant every four feet, but continuous swaths of lavender running the full length. Not one ornamental grass, but clusters of three at intervals.
Single plants spaced out along a long driveway look like someone ran out of budget and didn’t want to admit it.
Height Breaks the Horizontal
Every good driveway planting has something tall in it. The low lavender or boxwood at the border needs a vertical moment somewhere — a clipped standard, a columnar tree, a tall ornamental grass plume — to give the approach a sense of arrival rather than a flat strip leading to a garage door.
The vertical element doesn’t have to be large. It has to exist.
Driveway Landscaping Ideas
The Circular Concrete Driveway With Boulder and Bonsai Island
This design lives in the centre island. The driveway surface — large-format coloured concrete with saw-cut expansion joints radiating outward in a circular pattern — provides the architectural frame. The island does the actual design work.
Plant a single multi-trunk ornamental tree — Japanese Black Pine, Olive, or a naturally contorted specimen — into the centre of the island. The drama of the tree depends on its form. A standard nursery tree with a single straight trunk misses the point. Look for a specimen with character: movement in the trunk, a canopy that reads as sculpted rather than simply round.
Surround the tree with a combination of large weathered boulders and low planting — sedum, creeping juniper, or spreading rosemary — flowing between the rocks. The boulder scale needs to feel significant against the tree, not decorative.
Edge the island with a continuous river pebble border, held by steel edging, transitioning to the concrete. The island reads as a naturalistic composition entirely at odds with the formal concrete driveway surrounding it. That tension is what makes it interesting.
The White Agapanthus Driveway Border That Blooms Twice a Year and Then Stops Asking for Things
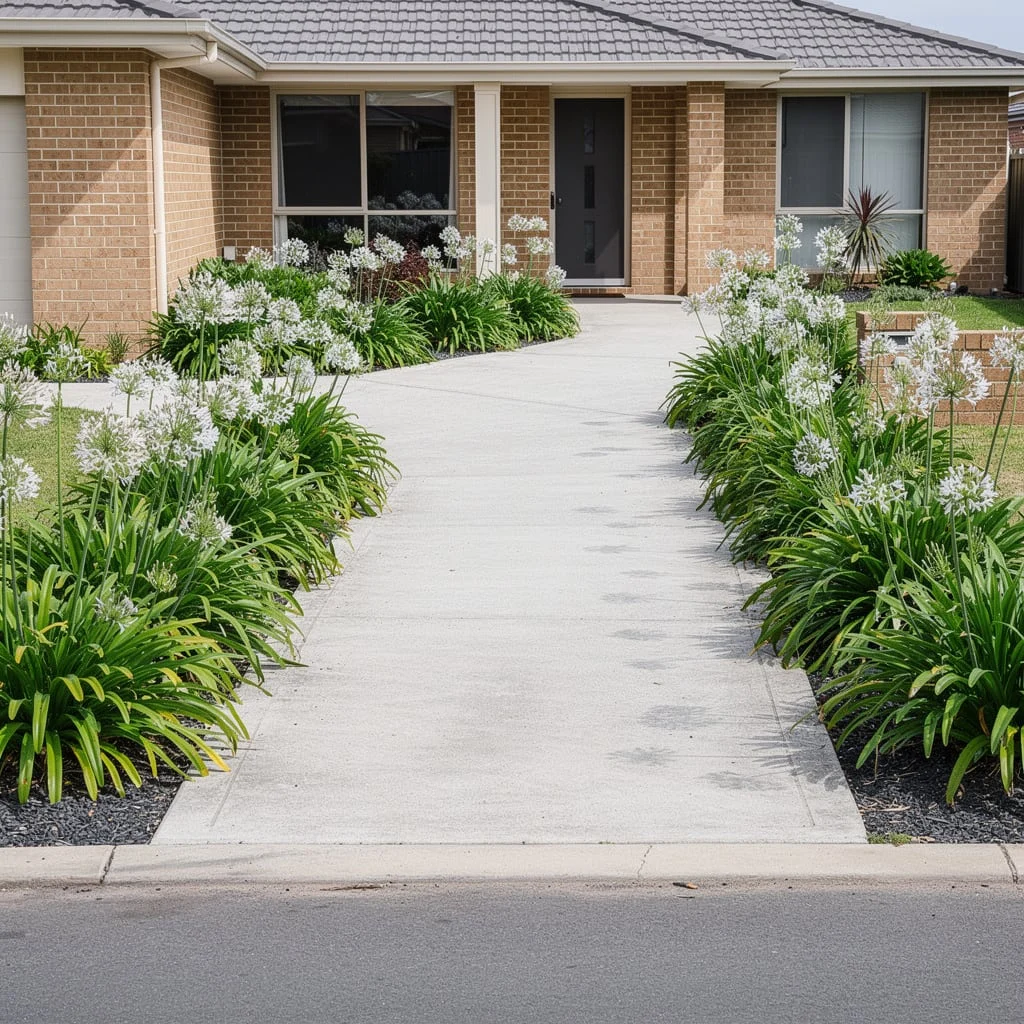
Prepare wide beds — minimum two feet — along both sides of a clean concrete or brushed aggregate driveway. Install steel edging along the lawn-facing edge and the driveway edge, defining the bed precisely.
Plant Agapanthus praecox in white — the standard large-leafed variety rather than dwarf types — at twelve-inch spacings throughout the entire bed. These are sold as tube stock or established clumps. Either works, though clumps establish faster.
Layer dark fine gravel — not mulch — two inches deep between the plants as a ground cover. The grey-black gravel between the dark green Agapanthus strap-leaves looks contemporary and clean, and unlike mulch it doesn’t break down or require annual top-dressing.
These plants bloom in late spring and sometimes again in autumn. They divide themselves and slowly fill any gaps. Every four to five years you’ll need to lift and divide congested clumps. That’s the gardening commitment for a driveway border that looks immaculate through every season.
The Blue-Grey Stone Paver Driveway With Lantana and Boxwood Border
Set large-format stone-look pavers in a random ashlar or modular grid layout, using a cool blue-grey tone that reads as contemporary and calm against almost any house facade.
Prepare narrow planted borders of equal width on both sides. Layer dark mulch as the ground base. Plant low growing Lantana — the spreading mounding varieties, not the tall standards — in patches of colour. Add clipped compact Boxwood balls as structural anchors between the Lantana drifts every four feet.
Install low-voltage path lights flush to the paver surface along both edges, spaced every six feet. Directional lighting along the driveway surface dramatically changes the property’s appearance after dark — the paver surface catches and spreads the light in a way plain concrete never does.
The Lantana needs deadheading to keep blooming continuously through summer. The Boxwood needs trimming twice a year. This is the full maintenance schedule.
The Espalier Apple Tree Fence Line That Has Something to Say
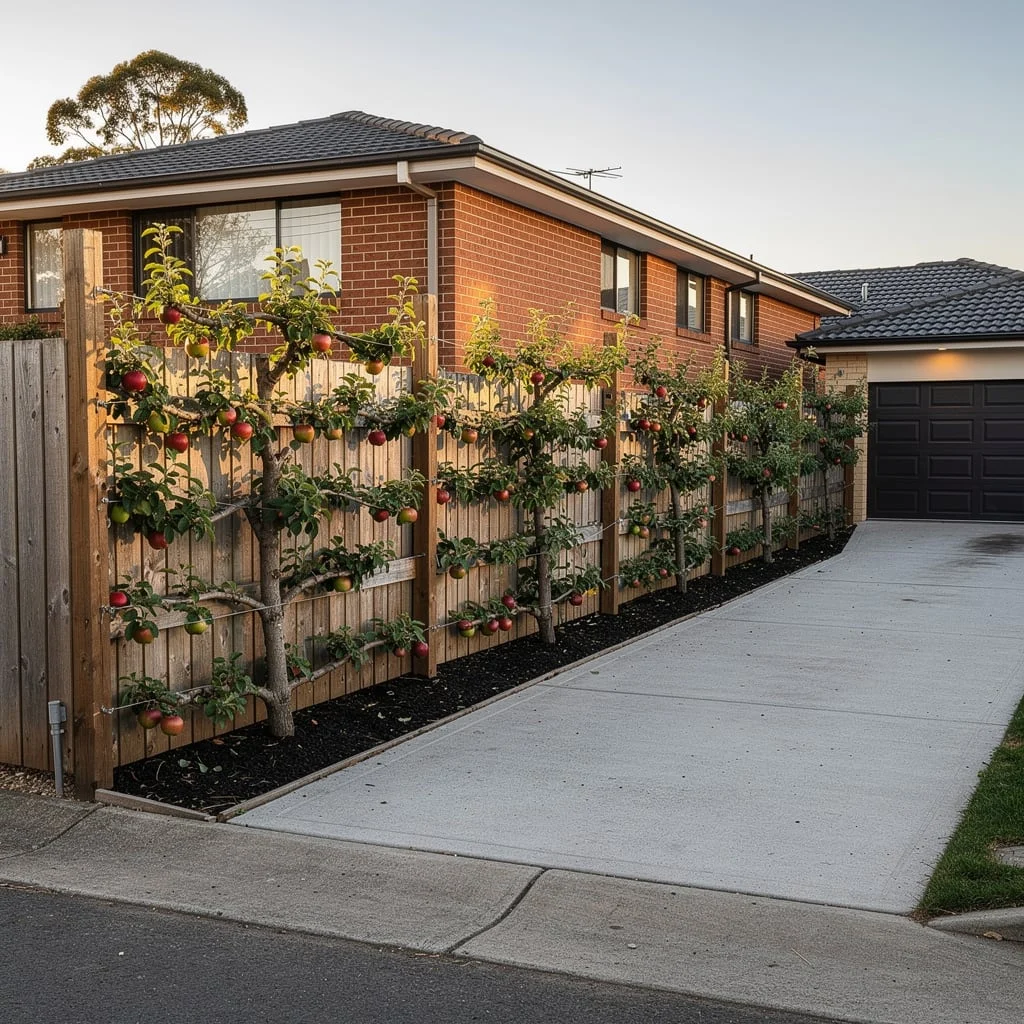
Run a solid timber fence along the driveway boundary — vertical board-on-board in natural cedar or hardwood. The fence needs to be six feet tall minimum and built with horizontal wire runs at twelve-inch intervals secured to the vertical posts with eye bolts. These wires are what the espaliered trees will be trained along.
Purchase semi-mature espalier apple trees — already trained in the flat, branching form — from a specialist nursery, or buy young whips and train them yourself over two to three seasons. Space trees at six to eight feet apart along the fence length.
Dig a generous planting hole — twice the width of the root ball — in the narrow bed between the fence and the driveway edge. Fill with compost-enriched soil. Tie the lateral branches gently to the horizontal wires using soft garden tape, not wire.
Annual pruning involves removing any growth that projects forward from the fence plane, cutting back extension growth on the horizontal arms to two leaves, and training new leaders upward as needed. The fruit is a side benefit. The living wall of structured branches against the fence is the point.
The Herringbone Clay Brick Driveway With Colourful Cottage Border
Lay dark red or terracotta clay brick in a herringbone pattern — the forty-five degree layout that creates diagonal lines running across the width of the driveway rather than along its length. This pattern moves the eye differently and gives the surface more visual energy than a standard running bond.
Install concrete apron strips at the street entry and at the garage threshold — two smooth poured sections that bookend the brick with a contrasting material and create a practical transition between the softer paver surface and the harder concrete kerb and garage floor.
Plant the narrow border beds on both sides with a mix of annuals changed seasonally — Impatiens and Begonias in summer, Violas and Cyclamen in cooler months — layered behind a continuous low Boxwood or Dwarf Pittosporum hedge that provides year-round structure.
The annual planting requires seasonal replacement, which is the one higher-effort element here. But the colour contribution to the overall picture is substantial enough to justify it. A classic brick driveway with seasonal flowering borders is the sum of its parts and those parts all work.
The Dark Tarmac and Clipped Box Hedge Driveway That Got the Brief Right
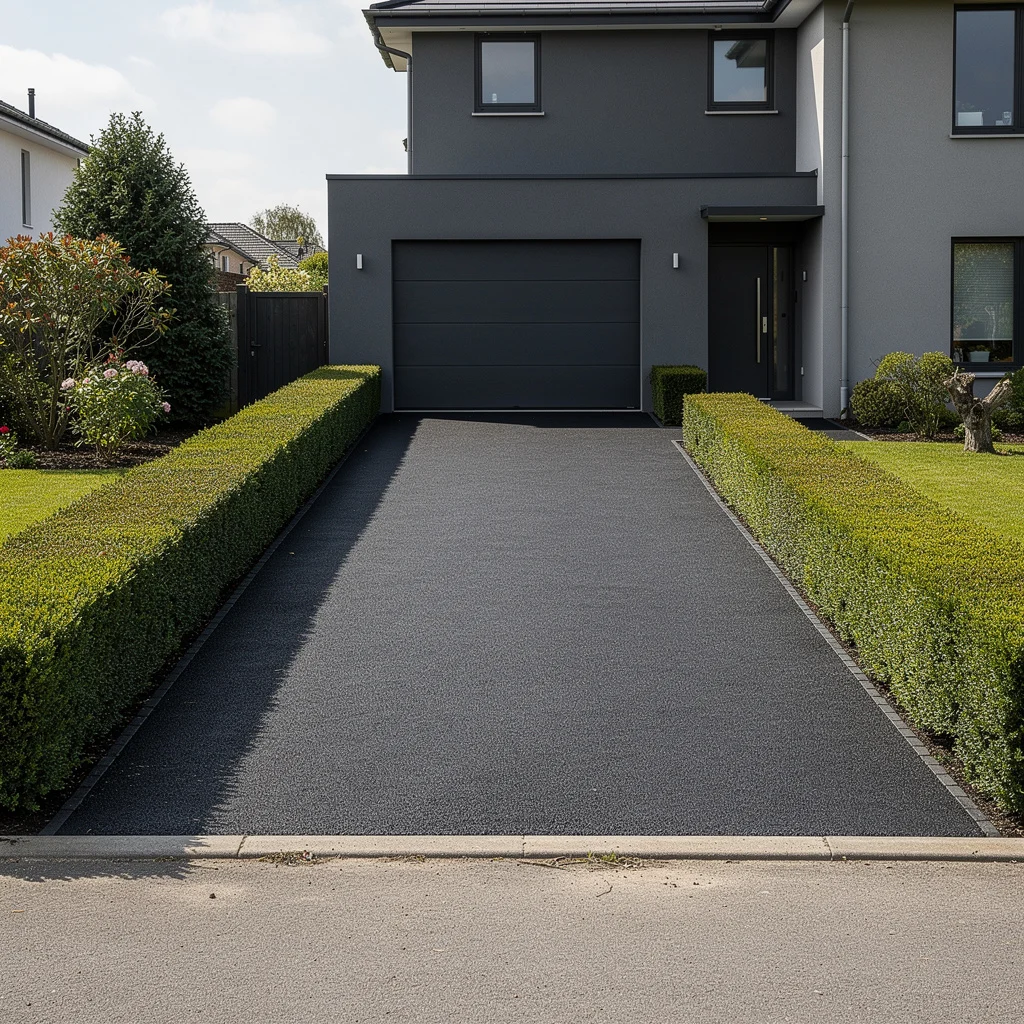
Lay a full-width dark grey or charcoal tarmac or asphalt surface — colour-matched to the house facade if possible, contrasting if not. The surface width should be generous: a minimum of ten feet, twelve if the property allows. Narrow driveways look cramped regardless of what surrounds them.
Run a continuous clipped box hedge along both sides of the driveway at an equal height — thirty to thirty-six inches — kept rigorously flat on top and vertical on the sides. The hedge runs the full length from street to garage, creating a green corridor that makes the approach feel intentional and considered.
Leave a gap in the hedge on one or both sides where an existing planted bed begins, allowing the green to transition naturally into the broader landscape beyond. This prevents the tunnel effect that solid hedging on both sides can produce.
Trim twice a year. This is the full maintenance commitment for a driveway that looks like it belongs to a serious house.
The Concrete Runner With Grass Channels and Ornamental Grasses in the Gaps
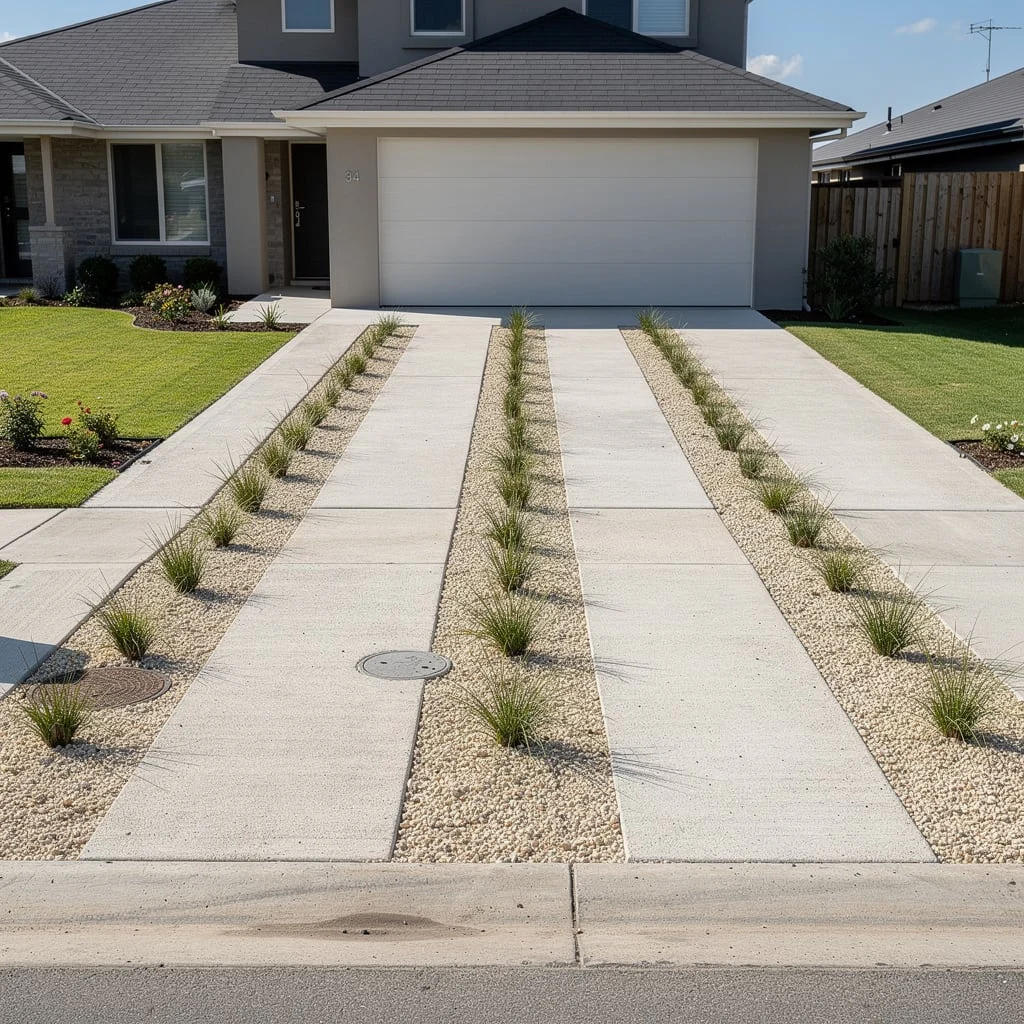
Pour two parallel concrete runners — each approximately eighteen to twenty-four inches wide — leaving a central channel of roughly twelve to eighteen inches between them. This is your tyre track. The channel between them and the borders outside are planted.
Fill the central channel and the outer borders with a fine ornamental grass — Zoysia, Dwarf Mondo, or similar fine-bladed varieties in warm climates. These handle the compaction and heat between the concrete strips with reasonable tolerance.
Plant larger ornamental grasses — Calamagrostis ‘Karl Foerster’ or similar feathery upright types — in the wider border beds alongside the runners, spaced at three-foot intervals. These provide the vertical movement and scale that the low channel grass can’t.
The overall effect is a contemporary, permeable driveway that looks nothing like standard concrete. The construction cost is lower than full-width concrete and the visual result is significantly more interesting.
The Resin-Bound Aggregate Driveway With Curved Planting Borders
Resin-bound surfacing is poured and levelled as a liquid mix of aggregate and resin binder, producing a seamless, permeable surface that looks like bound gravel but performs like tarmac. Install it in a warm sand or buff tone against a brick house — this is the classic British combination for good reason.
Lay a contrasting darker block paver border around the full perimeter of the driveway — a single row of charcoal or blue-black pavers sitting flush with the resin surface. This edge is the detail that makes the surface look finished rather than poured.
Plant the surrounding beds with a mix of compact lavender, small clipped boxwood balls in grey planters near the entry, and low drifts of ornamental grass. Keep the planting vocabulary tight — three species maximum across the entire scheme.
Place two large lead-look planters symmetrically at the entry point, each containing a dense standard ball-form Buxus or Pittosporum. These mark the entrance and frame the approach without requiring a gate.
The Exposed Aggregate Driveway With Tall Grass Borders and Black Mulch
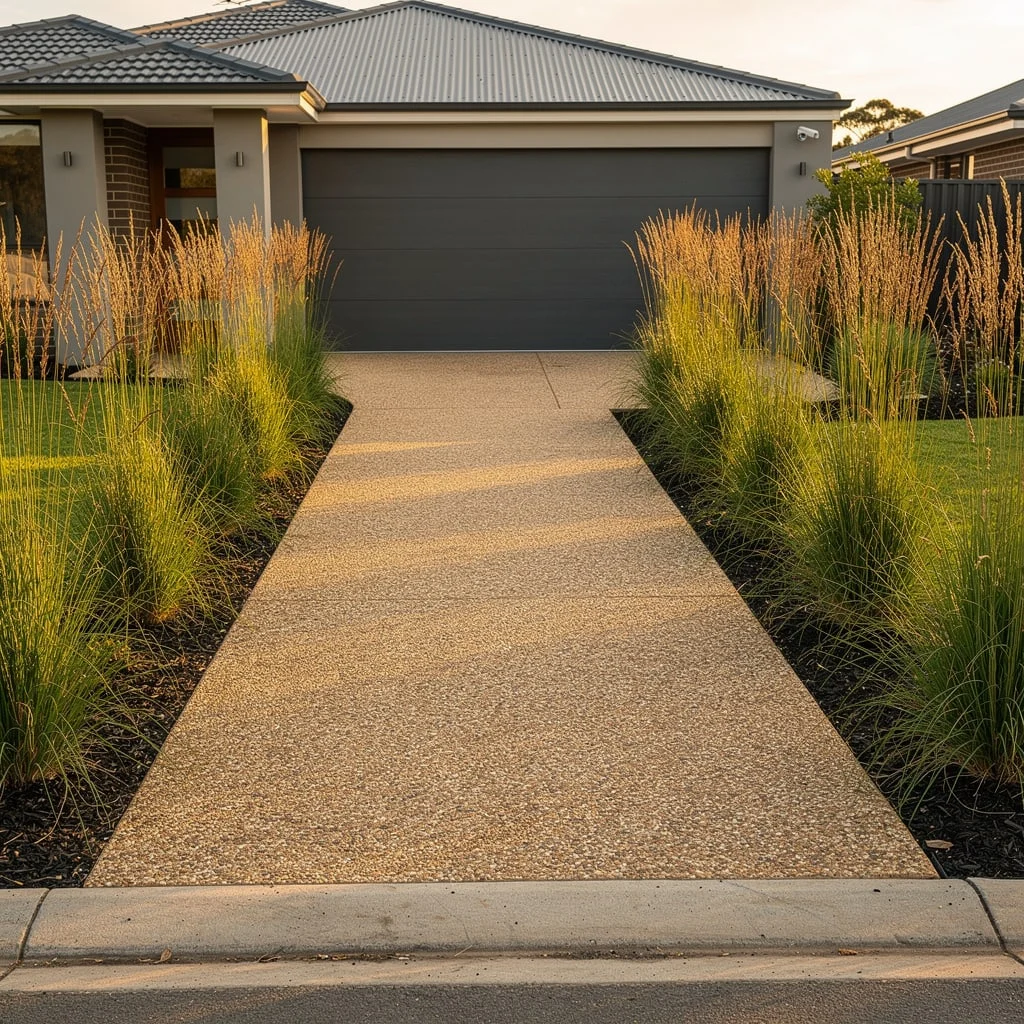
Have your concrete poured with an exposed aggregate finish in a warm sandy or honey tone. The aggregate reads warmer than standard grey concrete and gives the surface enough texture to handle reflective heat without looking utilitarian.
Prepare wide border beds on both sides — minimum two feet, three is better — and fill them four inches deep with dark-dyed shredded mulch. Against the warm aggregate surface, the dark mulch border creates strong visual contrast that makes both materials look more deliberate.
Plant tall ornamental grasses — Miscanthus ‘Morning Light’ or Calamagrostis — in clusters of three every four feet along the border. These grow to four to five feet in a full season, bloom with a feathery plume in late summer, and require a single hard cutback in late winter.
Nothing else goes in the border. The grasses and the dark mulch are the composition.
The Warm Buff Brick Paver Driveway With Lavender Borders
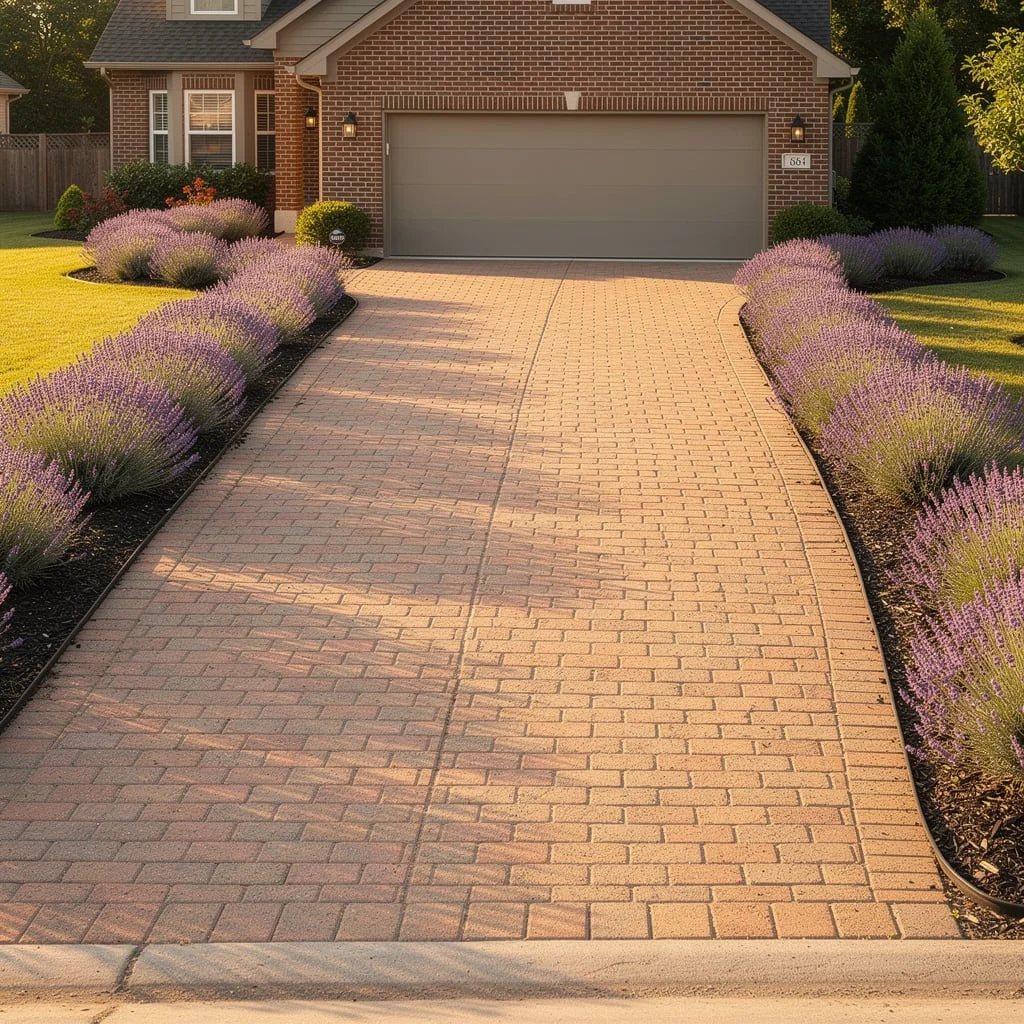
Lay standard brick pavers in a running bond or herringbone pattern in a warm sand or buff tone. Use a slightly darker course of paver as a border — two bricks wide along each edge and at the street entry — to give the surface a defined frame.
Install steel or concrete edging along the full length of the planting borders before laying any stone. The edge is what keeps the paver from creeping into the bed over time.
Plant lavender in the borders in groups, not individual plants. English lavender for cooler climates, Spanish or French for warmer zones. Space groups eighteen inches apart with individual plants twelve inches apart within the group. Allow them to billow over the edge of the paver slightly — this softens the hard line of the brick in a way that looks relaxed and intentional simultaneously.
Top-dress with dark mulch within the bed to suppress weeds and retain moisture during establishment. After the first season, lavender is essentially self-managing on well-draining soil.
The Circular Driveway With Weeping Tree Island and Agapanthus Ring
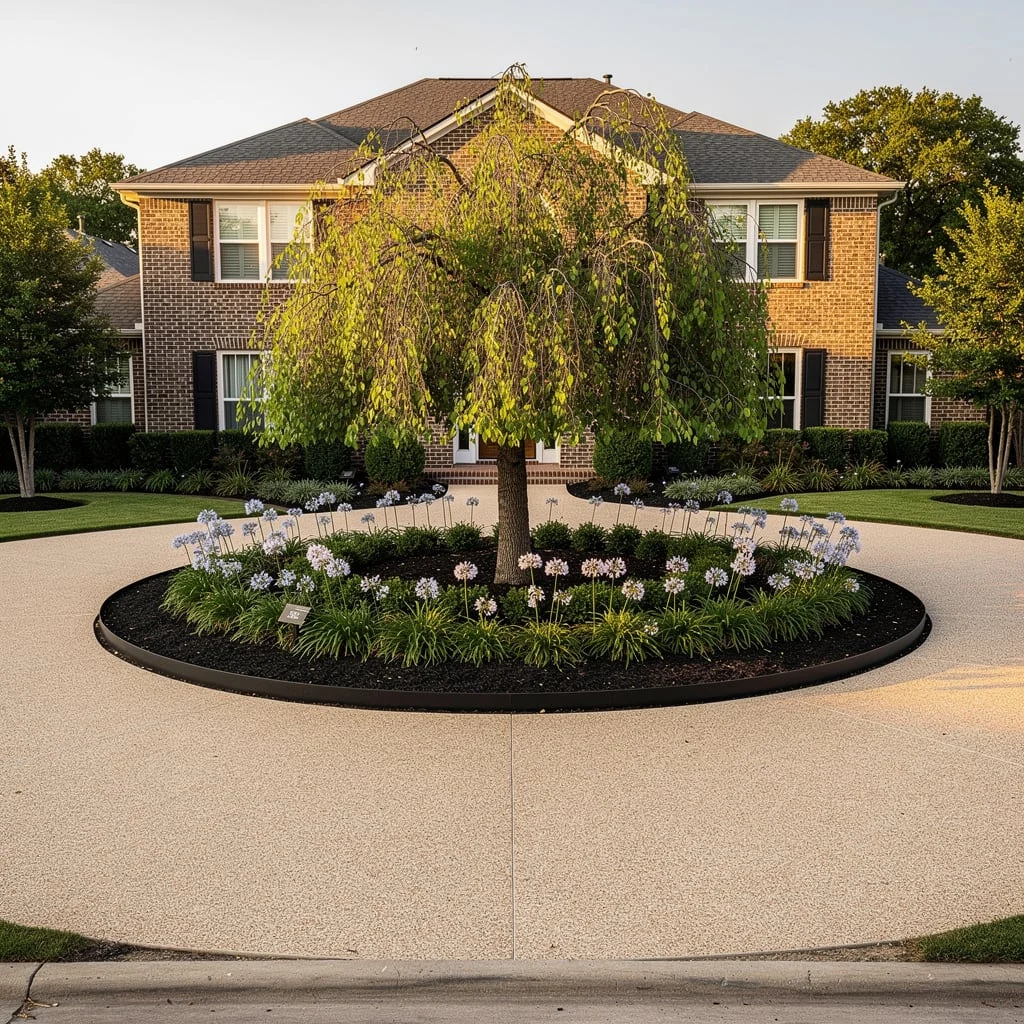
A circular or horseshoe driveway requires a central island, and most people treat that island as an obligation rather than an opportunity. This approach does the opposite.
Plant a single weeping ornamental tree — Weeping Cherry, Weeping Silver Pear, or Weeping Mulberry — at the centre of the island. The tree becomes the focal point of the entire property, visible from the street and framed by the circular sweep of the driveway.
Prepare a planting circle around the tree trunk extending outward four to five feet from the base. Fill with dark mulch. Plant Agapanthus — the taller African Lily varieties, in white or blue — at twelve-inch spacing throughout the circle. These bloom in summer with tall stalks and round flower heads that sit above the foliage, creating height variation beneath the tree canopy.
Edge the island with a continuous black steel edging border, installed perfectly round. The geometry of the circle needs to be true. An oval or irregular island in a circular drive looks like a mistake.
The Dark Granite Paver Grid With Black Mondo Grass Channels and Lollipop Topiary
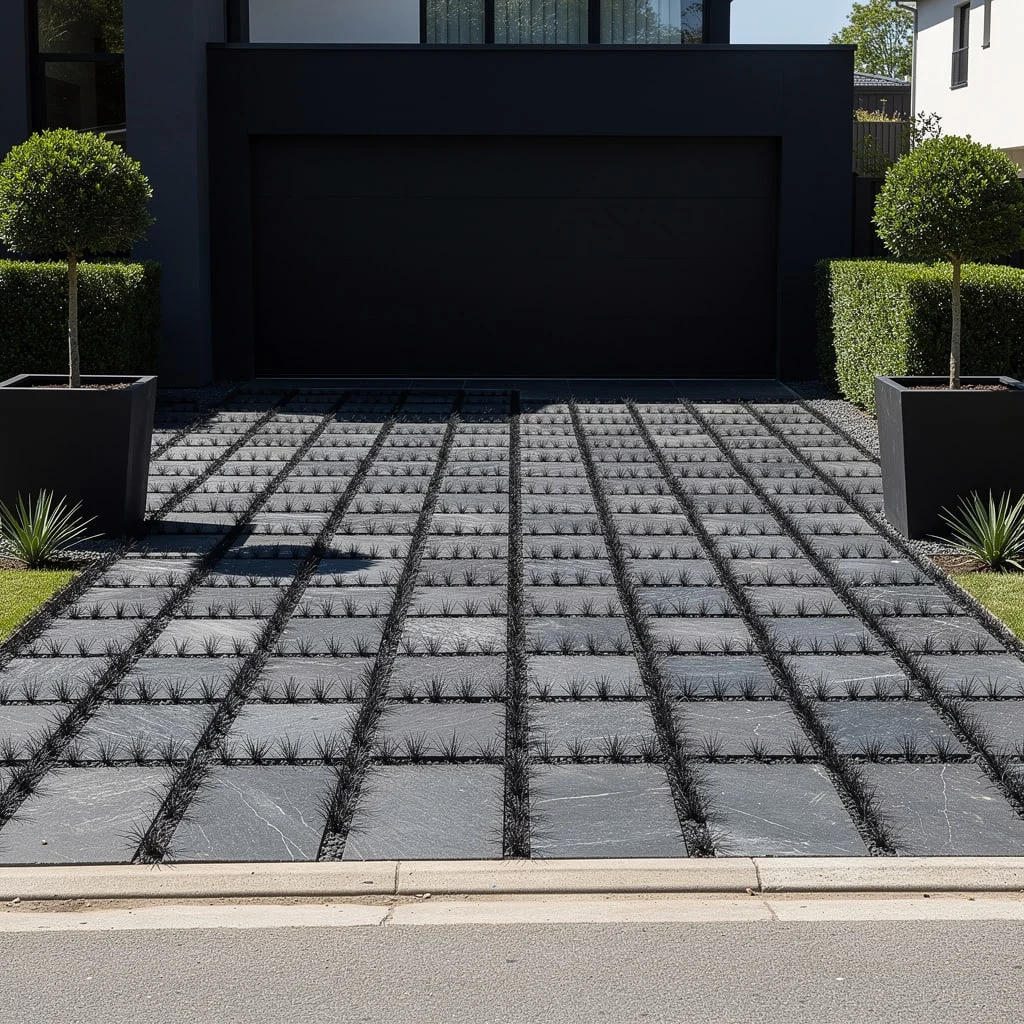
This is the most committed design decision in this collection and it’s the right one for a contemporary house with strong architectural language.
Lay large-format dark grey or charcoal granite pavers in a grid pattern — approximately twenty-four by twenty-four inches — with consistent two-inch gaps between each paver. Fill every gap with fine black or very dark Mondo grass plugs, planted densely so the surface reads as a grid of stone with dark organic lines between each tile.
Flank the driveway with two large square planters — rendered or raw concrete, black or charcoal — positioned symmetrically at the entrance. Plant standard lollipop topiary into each planter. The clean sphere on a single stem mirrors the geometry of the paver grid.
Add low clipped hedging along the outer perimeter of the driveway area and allow a small planting pocket on each side for a thin vertical agave or Dianella. These provide accent without competing with the grid.
Maintenance means keeping the topiary spheres trimmed true twice a year, edging the hedge perimeter, and removing any seasonal growth that breaks the clean grid lines. This is not a high-labour garden. It’s a high-commitment design.
The Honey Gravel Drive With Railway Sleeper Edging and Wildflower Borders
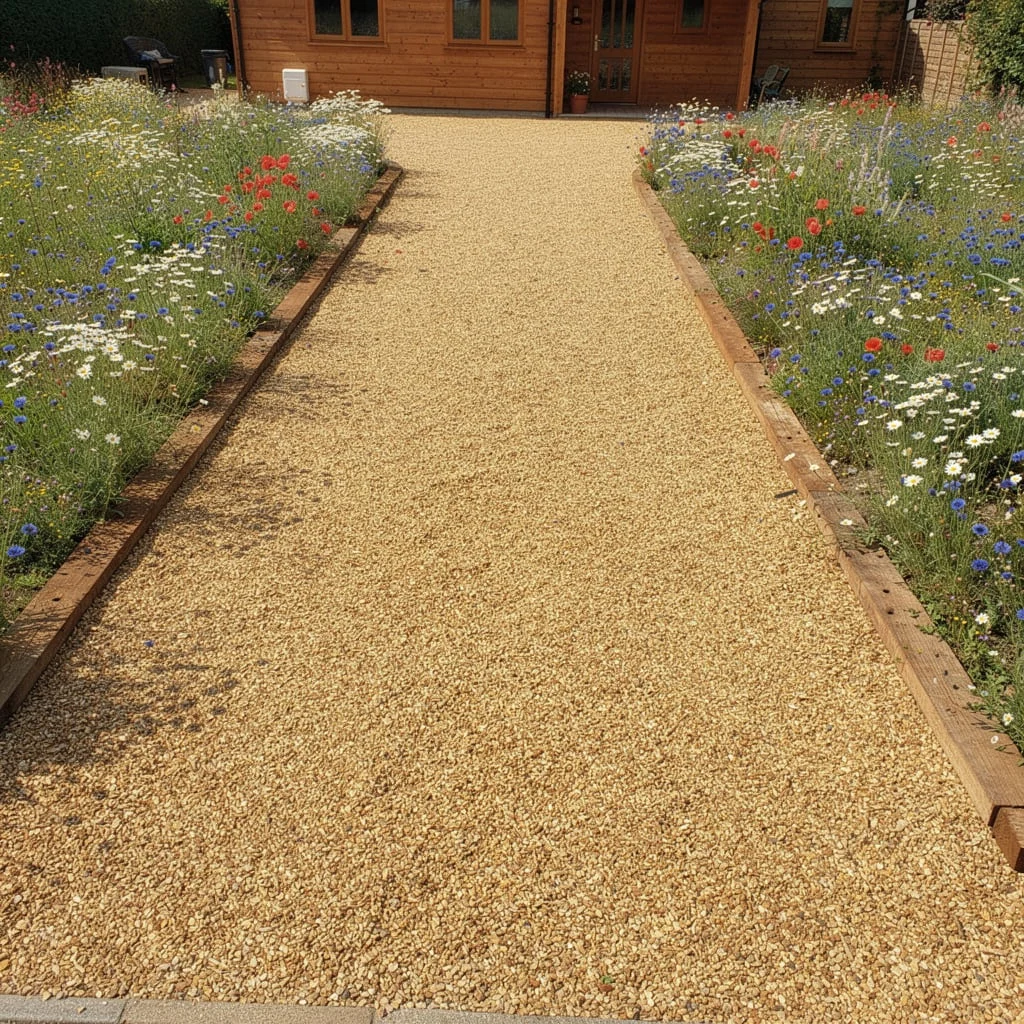
Order fine pea gravel in a honey or buff tone — not the grey road chipping that reads as utilitarian, but the warm golden variety used in cottage gardens. Lay it over compacted hardcore to a depth of three to four inches. This surface drains freely, crunches satisfyingly underfoot, and looks warm in almost any light.
Edge both sides with reclaimed railway sleepers set flat on the ground — one sleeper wide, either parallel or at a slight inward angle. The dark weathered timber against the golden gravel is the material contrast that makes this work.
The borders outside the sleeper edging are sown with a wildflower meadow mix — annual or perennial depending on climate — in a strip at least three feet wide. Poppies, cornflowers, ox-eye daisies, and nigella all establish from direct sowing onto cleared, raked soil in spring or autumn.
Wildflower meadows require cutting once annually after the flowers have set seed, usually in late summer. Beyond that, they resow themselves and require no intervention.
The Red Knockout Rose Strip Along a Clay Brick Paver Driveway
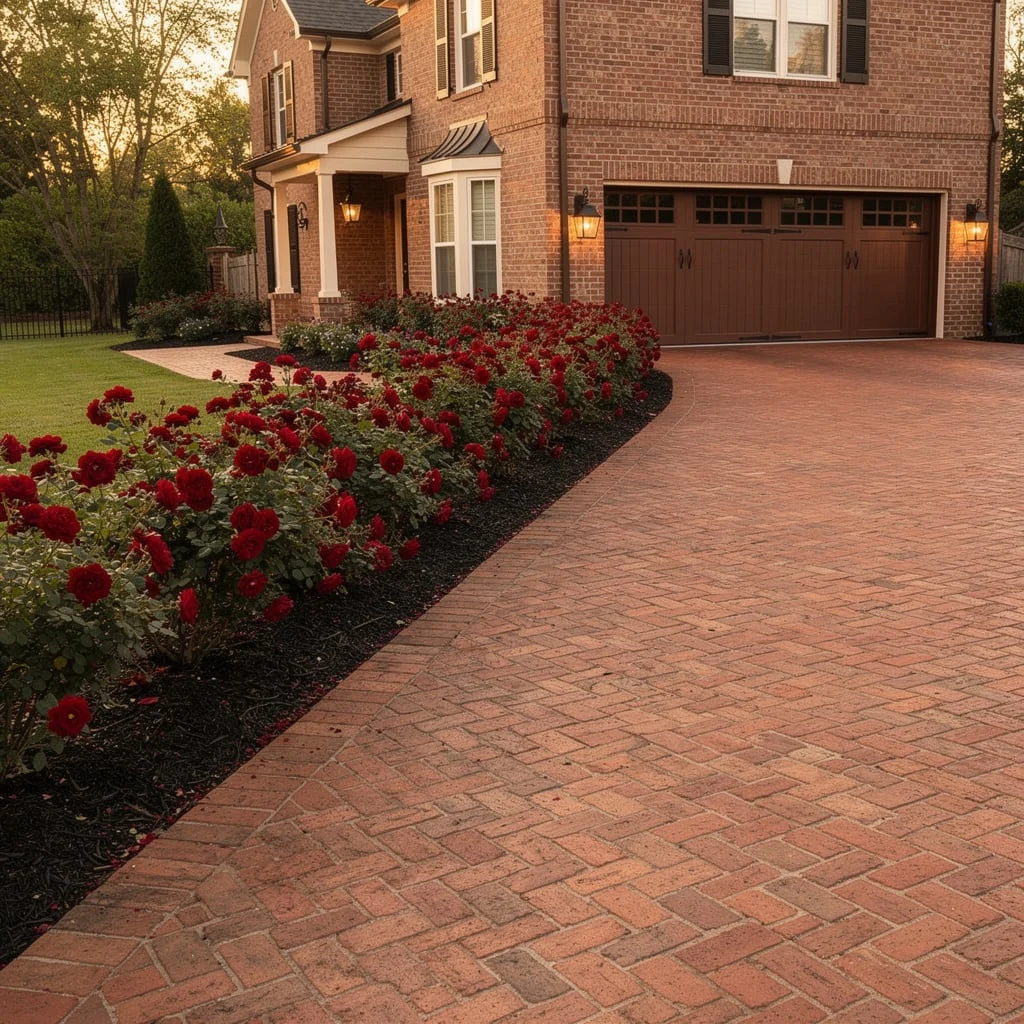
Lay a full-width clay brick paver driveway in a warm terracotta or red-brown tone using a running bond pattern. The warmth of the brick is the starting point for everything else.
Prepare a curved border bed running the length of the driveway alongside the lawn edge. The curve should be gentle — following the sweep of the driveway line rather than cutting across it.
Plant Knockout Rose in deep red — specifically the double variety, which gives a denser bloom than the single — in continuous drifts at eighteen-inch spacing throughout the bed. Dark mulch beneath. Steel edging at the bed boundary.
At night, the warm tones of the clay brick under driveway uplighting and the deep red roses in the border create an entirely different reading of the property. Install directional pathway lights set into the paver edge before the roses are planted. The light grazing across the brick surface is the detail that separates a driveway from an entrance.
The Pink Rose Standard Tree Allee on a Brick Paver Drive That Commits to Romance
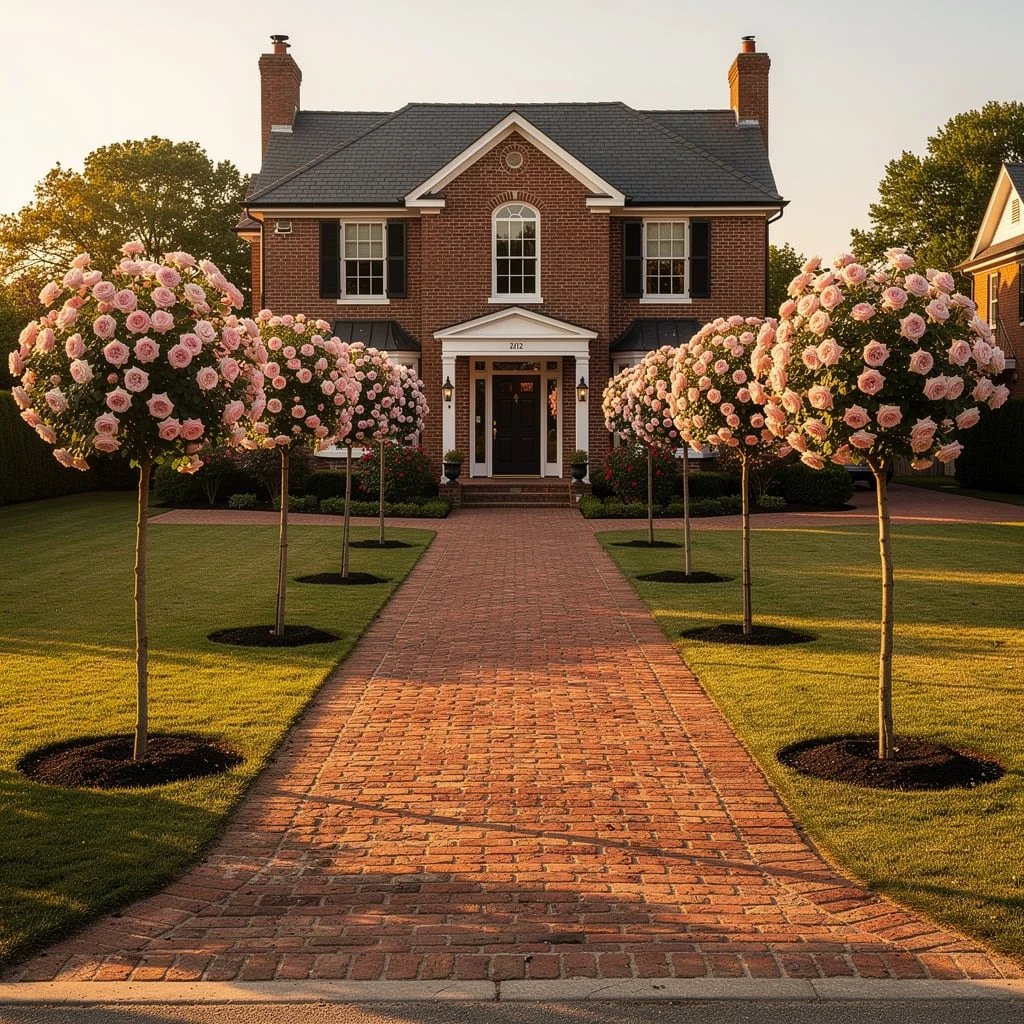
Plant rose standard trees — grafted ball-headed roses trained to a single tall stem — at even spacing on both sides of a central brick paver path or driveway. The spacing should be consistent: six feet between standards, three feet from the driveway edge. Even numbers on each side are not required, but whatever number you plant must be mirrored exactly.
The stem height should be at least four feet — tall enough that the flowering ball reads clearly above the lawn line and creates an archway effect without the branches actually meeting overhead.
The circular mulch rings beneath each standard need to be consistent in size and shape. Measure them, don’t eyeball them. A mulched circle that’s roughly round is not the same as a circle. The geometry of the avenue depends on every element being precise.
Purchase grafted standards of a repeat-flowering variety — Eden Rose, Queen of Sweden, or Olivia Rose Austin all give the dense, full blooms that justify the lollipop form. Stake each one with a sturdy single stake, tied with a wide tie below the graft union. Remove the stake after the first season once the root system has established.
A Driveway That Looks Good Is a Driveway That Was Thought About
Every approach in this collection made one clear decision about surface and stuck to it. One decision about planting scale and committed to it. One decision about the relationship between the hard surface and the soft border — and then executed it with enough consistency that nothing feels accidental.
The driveways that disappoint share the same problem. The surface is whatever was cheapest. The planting is whatever the garden centre had. There’s no through line connecting the materials, the house, and the landscape.
Your driveway is the first thing that reads, before the door colour and before the window frames. It sets the tone for everything that comes after it. Treat it like the design decision it is, not the infrastructure problem you’ve been pretending it is.