
You have a glue gun. You have three days until the Fourth. You’ve already looked at twelve Pinterest boards and pinned forty-three things you will never make.
Stop. This is the guide that assumes you will actually finish what you start.
The crafts here range from a Sunday afternoon to a single hour. None of them require skills you don’t have. All of them look like you put genuine thought into your home rather than panic-buying a bag of plastic stars at the checkout line.
Here’s how to make them well.
Why Most Holiday Crafts Look Homemade in the Wrong Way
There’s a version of DIY that looks apologetic. You can tell the person who made it wasn’t sure it was going to work. The craft equivalent of a shrug.
The Cheap Materials Problem
Dollar store foam, thin cardstock, plastic twine — these materials betray themselves immediately. They don’t hold shape. They fade. They look exactly like what they cost. The difference between a craft that gets complimented and one that gets politely ignored is almost always materials. Spend a dollar more per project on the base material and the result improves disproportionately. Real cotton fabric instead of polyester. Thick cardstock instead of copy paper. Cotton rope instead of synthetic cord. A walnut stain board instead of raw pine.
The holiday craft world has convinced people that cheap and handmade are the same thing. They are not. Handmade means you made it. Cheap means it shows.
The Scale Problem
Most holiday crafts are too small to matter. A four-inch painted rock disappears on a porch. A six-inch wreath looks like something fell off a larger wreath. A single luminaria on a table looks forgotten.
The crafts that photograph well and feel intentional in a space are made at a scale that commands attention. A full-width flag banner. A wreath so full it fills a door frame. A macramé wall hanging wide enough to anchor a whole wall. When you decide what size to make something, double your first instinct and then reconsider.
The Finish Problem
Most crafts die in the last ten minutes. The paint isn’t dry but you handled it anyway. The glue is showing. The edges are frayed in the wrong direction. The bow is tied once and drooping.
The finish is the part people actually see. Seal painted surfaces. Trim loose threads deliberately. Fluff fabric and ribbon after assembly. Give things a day to dry completely before you display them. A craft finished well looks expensive. A craft finished poorly looks like a craft.
The Design Principles Behind the Best July Fourth DIY
The projects in this collection share certain qualities that separate them from generic holiday decor.
Texture Over Print
The most visually interesting pieces in this collection — the string art flag, the macramé wall hanging, the pressed flower frame, the ribbon wreath — all work by texture rather than by printed imagery. They catch light differently from different angles. They reward a second look. A printed flag image on paper is flat. The same flag rendered in woven cord, pressed botanicals, or crossed string is dimensional and alive.
When you’re deciding how to render a patriotic motif, ask whether you can make it three-dimensional. If you can add texture — through knotting, folding, layering, pressing, or building — you should.
Intentional Imperfection Versus Accidental Messiness
There is a meaningful difference between these two things and it is worth understanding. Intentional imperfection means a bleach-painted shirt with deliberately loose, gestural brushstrokes. A hand-lettered sign where the unevenness is the point. A rag wreath where the fraying was planned.
Accidental messiness means drips where there shouldn’t be drips. Glue strings that weren’t noticed. Painted edges that bled under the tape because the tape wasn’t pressed down firmly enough.
The first looks handmade. The second looks unfinished. The distinction is control. You have to know what you’re doing and then choose to be loose with it. That sequence cannot be reversed.
The Power of a Unified Collection
A single painted pot on a windowsill is a plant. A row of seven painted pots with cohesive motifs is a design moment. A single luminaria on a path is easily missed. Six in a row, every ten inches, is a statement.
The most effective projects in this collection are shown in groups. They compound. If you’re going to make one painted rock, make eight. If you’re going to make one luminaria, make a dozen. Collections create impact that individual pieces cannot.
What to Decide Before You Start Any Project
Know Your Display Context
A string art flag looks extraordinary on a clean white wall. It disappears against a patterned wallpaper. Paper fan garlands need a ceiling or a bracket system to hang from. Luminarias need outdoor space or a long surface. A wind spinner needs a covered porch with airflow.
Before you begin, know exactly where the piece will live. Then build or buy for that specific context. Nothing is sadder than a finished craft that doesn’t have a home.
Match the Craft to the Time You Actually Have
Be honest. A pressed flower flag frame is beautiful. It also requires pressing flowers two weeks before the holiday, sourcing three distinct varieties, and spending two hours arranging them. That is not a Tuesday night project.
A bleach-pen t-shirt is thirty minutes of active work and four hours of drying time. A popsicle stick flag is twenty minutes. A folded paper mobile is an afternoon. Map your available time to your ambitions honestly, or you will end up with a half-finished pressed flower project and a bare wall.
Decide on Your Color Approach
The most striking projects here choose a specific relationship to the red, white, and blue palette. The bleach shirt works because the colors are navy and warm cream — the bleach doesn’t make white, it makes a warm bone tone that feels intentional. The string art flag uses deep burgundy rather than fire-engine red, with an ivory cream rather than pure white. The mason jar candles layer the colors in bands of different saturations.
Think about your version of the palette before you buy supplies. Saturated and bright reads festive and cheerful. Muted and deep reads sophisticated. Aged and faded reads historical and sentimental. All three are valid. Choose one and build to it.
Fourth of July Craft Ideas
The Paper Uncle Sam Hat
Cut a rectangle of white cardstock to your desired circumference plus one inch, and approximately six inches tall. Roll into a cylinder and tape or glue the seam. Cut a circle two to three inches larger in diameter than the cylinder from red cardstock — this is the brim. Cut a center hole the size of the cylinder diameter and slide the cylinder through, gluing it in place from the inside.
Cut a strip of navy blue cardstock approximately two inches wide and long enough to wrap the cylinder at the midpoint. Cut or stamp white stars along this strip, then glue it around the cylinder as the hat band. For the stripe section above and below the band, use a ruler and red marker to draw vertical stripes on the white cylinder surface, or cut narrow strips of red cardstock and glue them on.
This scales up to a full-size wearable hat if you use a foam cylinder form from a craft store as the base, and it works as a miniature table accent or party favor at small scale. For table display, add a craft stick to the brim underside and prop it in a sand-filled jar.
The Flag Wind Spinner Porch Hanging
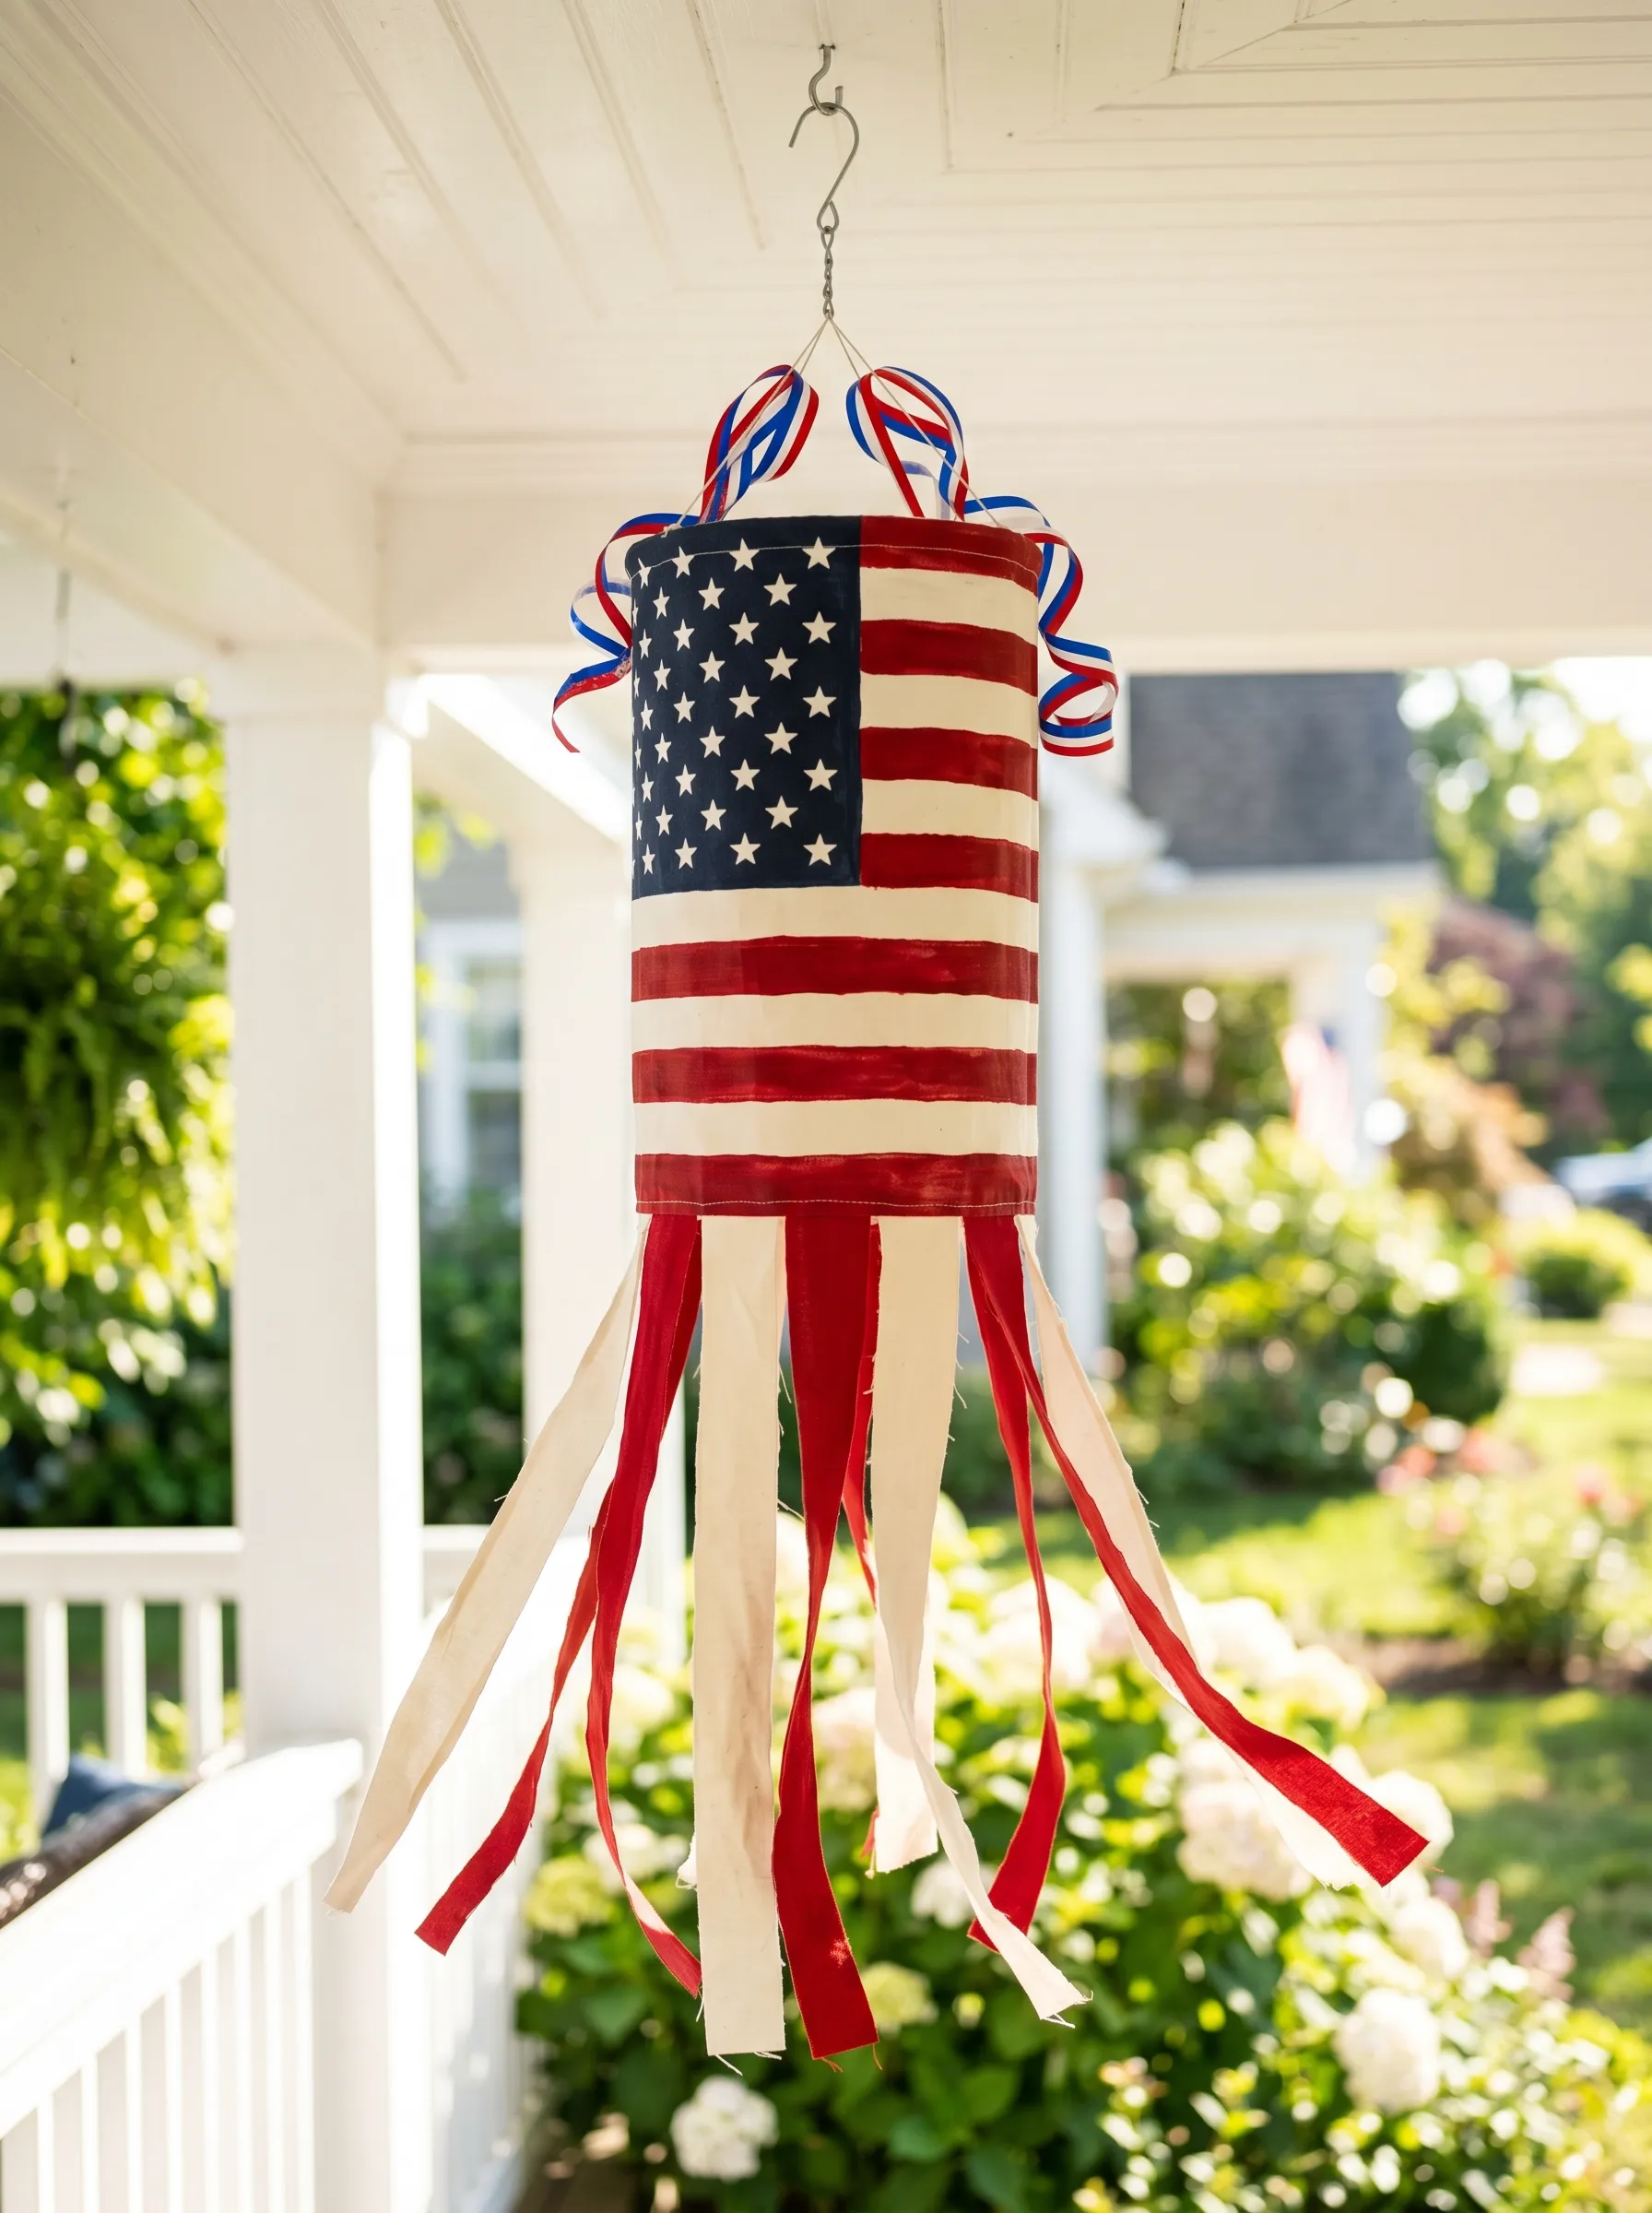
Source a ready-made cylindrical wind spinner in a patriotic print — the full flag rendering wrapped around a cylindrical fabric form — or construct one by sewing a rectangle of flag-print fabric into a cylinder, hemming one end closed and leaving the other open at the bottom. The cylinder should be roughly twelve inches tall and ten inches in diameter.
Cut the bottom open edge into strips approximately one inch wide and ten to twelve inches long, alternating red, white, and cream fabric strips if you’re making your own. These strips hang down and move in the wind. At the closed top, attach a swivel hook through a reinforced grommet.
At the top opening edge, attach a ring of curled ribbon in coordinating colors — use a bone folder or scissor blade to curl the ribbon tightly, then attach at even intervals around the circumference. This creates the ruffled crown effect visible in the image.
Hang from a porch ceiling hook at a height where the ribbon tails can move freely. The spinner works best at least eighteen inches below the ceiling and away from walls on at least two sides.
The Popsicle Stick Flag
Collect eight standard craft sticks and two longer tongue depressor sticks. Lay six standard sticks side by side, touching, on a flat surface. Glue two horizontal sticks across the back — one near the top and one near the bottom — to hold the parallel sticks together. Glue one tongue depressor stick vertically along the left edge of the assembled sticks as a handle, extending below.
Once the glue is fully cured, paint the surface in stripes: alternate red and white stripes across the right two-thirds of the face. For the blue canton, paint the upper left section in bright navy and let dry. Add white star stickers or paint simple stars in the canton using the eraser end of a pencil dipped in white paint.
Seal with a coat of Mod Podge over the whole painted surface. Make multiples and display them tucked into flower pots, stuck into a foam block on a table, or laid flat in a row as a tablescape element. They are a ten-minute project and they look exactly like what they are — which is the entire point.
The Bleach Pen Flag T-Shirt
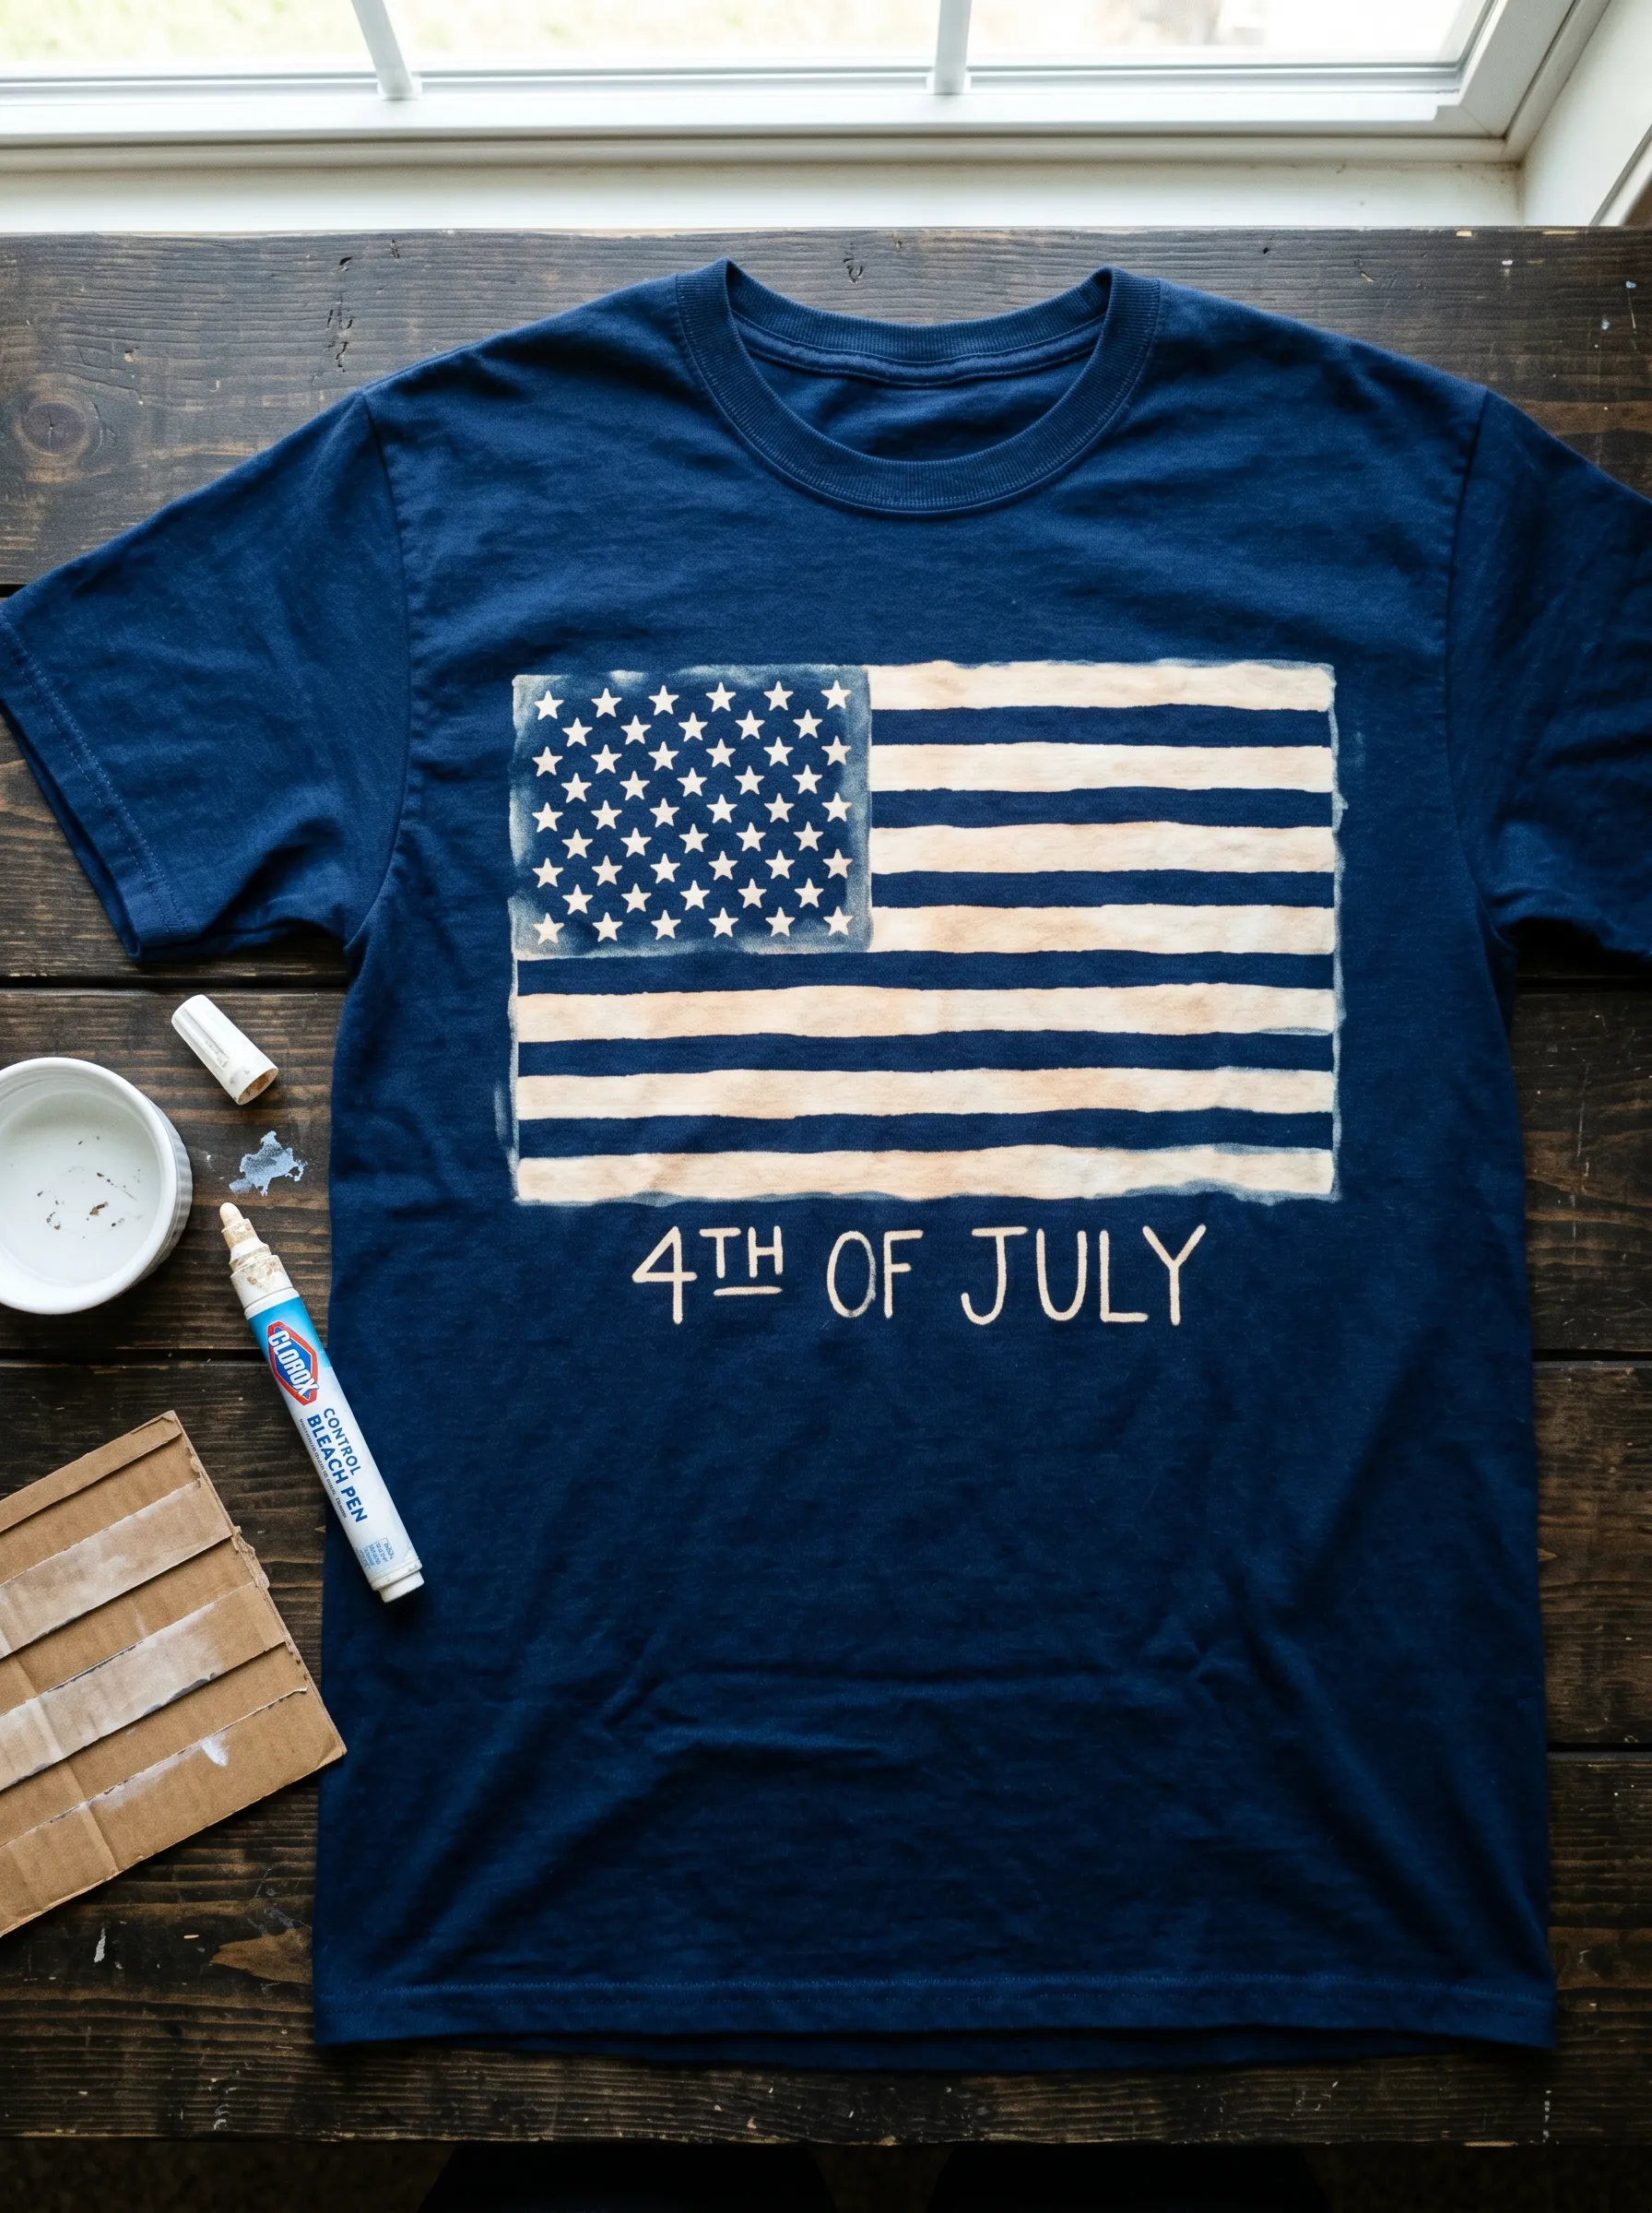
Buy a 100% cotton t-shirt in navy blue. Polyester blends do not bleach correctly — the result will be orange or uneven. Wash and dry the shirt before you work on it.
Cut a piece of cardboard to the interior width of the shirt and slide it inside to prevent bleed-through. Using blue painter’s tape, mask off the stripe section of the flag with parallel horizontal lines of tape, leaving roughly half-inch gaps between tapes for the stripe channels. Press the tape edges down firmly with your fingernail to prevent bleeding.
Shake a Clorox bleach pen and apply the gel into the gaps between the tape strips using broad strokes — work quickly, as the bleach acts fast. Don’t go back over areas you’ve already covered. For the canton, draw the rectangle freehand with the pen, then fill it in with even horizontal sweeps of gel. For the stars, dab the pen tip repeatedly to create rough star shapes.
The key is working in a well-ventilated space and watching the color change — it will shift from navy to teal to a warm cream tone over three to five minutes. Once you reach the cream tone, immediately rinse the shirt in cold water. Do not wait for it to go white or you will over-bleach. Wash with detergent and dry completely. The bleached areas will be cream, not white, which is what makes this look intentional rather than damaged.
The Fabric Word Star Craft Tiles
Cut star shapes from thick chipboard or thin wood — a four-inch star punch or a jigsaw with a simple template works well. Sand the edges smooth.
Paint each star in three diagonal sections: upper point in red, mid-section in white, lower points in light blue. Use painter’s tape between each section for a clean line, removing the tape before the paint is fully dry. Let the color sections cure completely.
Thread letter beads — the kind sold for friendship bracelets — onto a length of clear elastic cord and stretch it across the mid-section of the star, gluing the ends to the back. Spell out single words: HONOR, REMEMBER, BRAVE, LIBERTY, SERVE. One word per star.
Make small printed pennant cards from white card stock with a word or phrase at center — hand letter or print from a computer — and edge them with torn fringe at the top. Display the stars and pennants together as a flat lay composition on a coffee table or console, propped against each other with a small disco ball or glass orb for visual variety. This is a memorial day or Fourth of July sentiment display that says something specific rather than decorating generically.
The String Art Flag on a Walnut-Stained Board
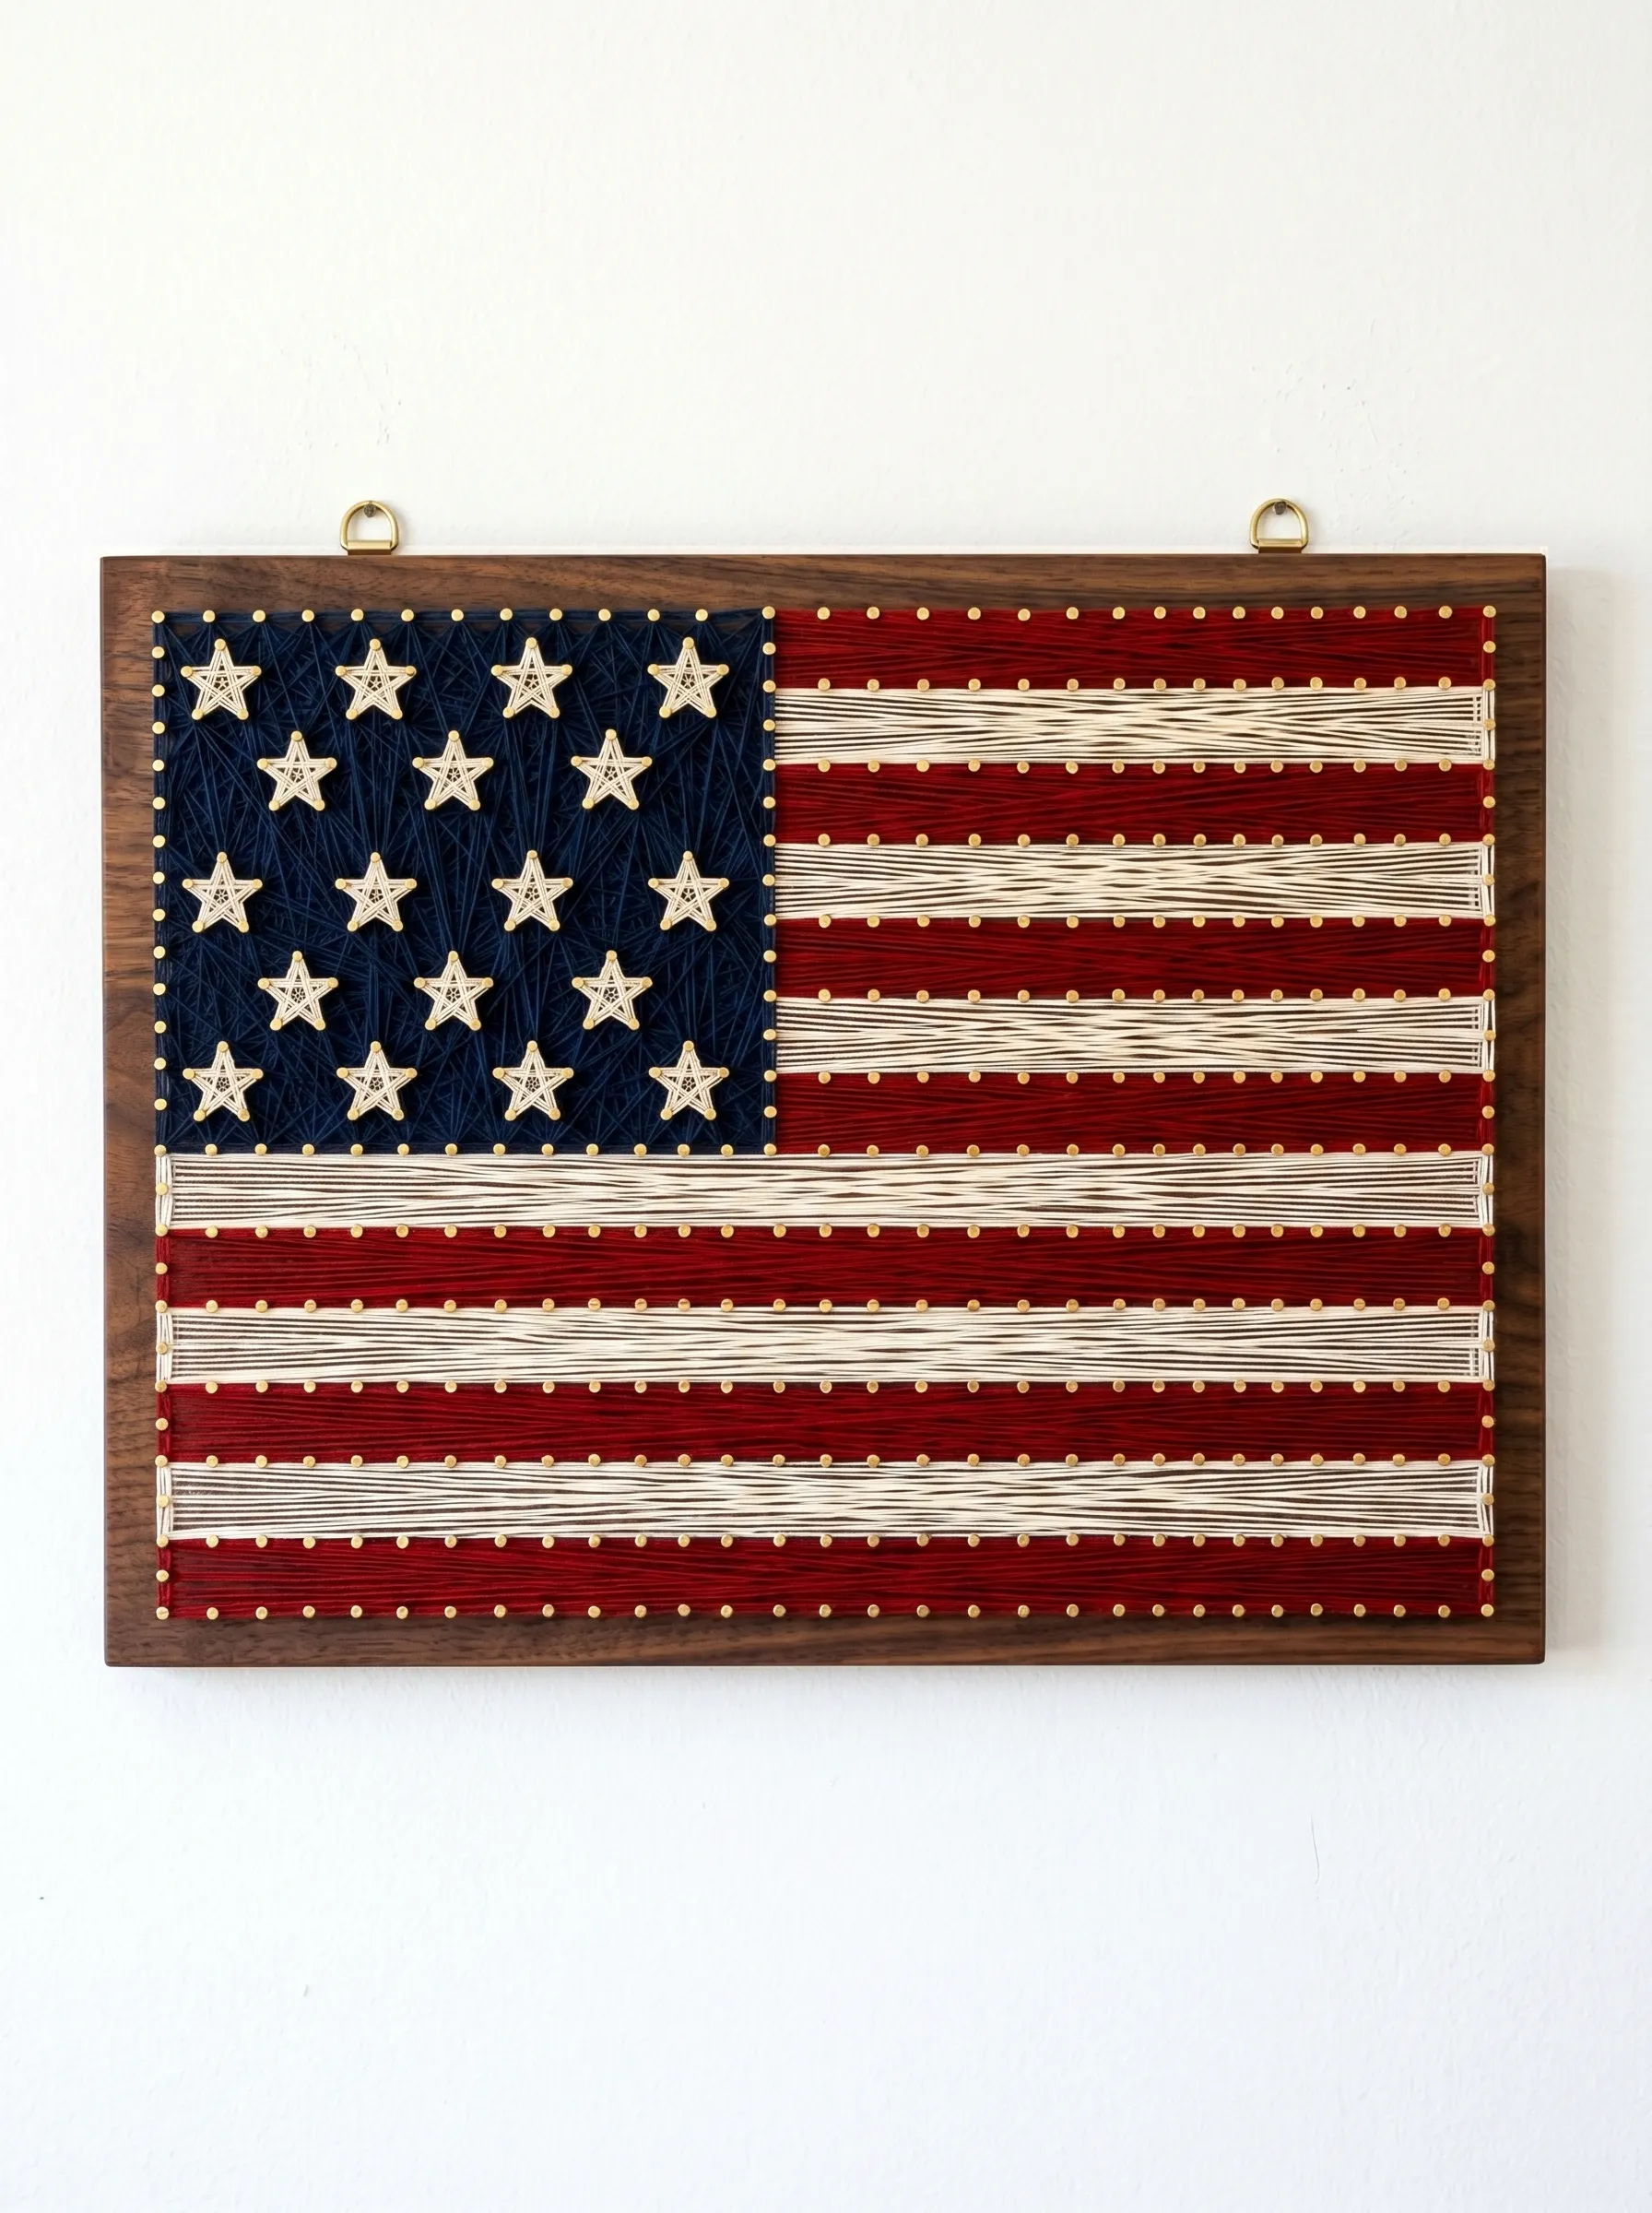
Source a piece of smooth pine board cut to approximately twenty-four by eighteen inches. Sand it until it’s fully smooth, then stain it with a dark walnut or ebony stain and let it cure for twenty-four hours. The board color matters: the dark stain creates contrast that the stringing depends on.
Map your flag design lightly in pencil — the canton (star field) in the upper left, with the stripe section filling the right side and bottom. Hammer brass escutcheon pins or small gold finish nails along all the outer edges of the design, spaced approximately one-half inch apart. Add nails at the inner corners where the canton meets the stripe field.
For the stripe section, wind red embroidery floss or thin cotton string back and forth between the nails in a continuous weave, using separate winding for each red stripe section and leaving gaps for the cream/white stripes. For the canton, fill the background densely with navy thread wound in all directions to create a solid field. Cut small star shapes from heavy cream card stock and glue them into the thread at even intervals in the Betsy Ross thirteen-star circle pattern, or use star-shaped escutcheon pins if you can find them.
Attach two small brass D-rings to the back top edge and hang on two picture hooks. Leave the board perimeter exposed — the stained wood frame is the finish.
The Cricut Patriotic Tote Bag
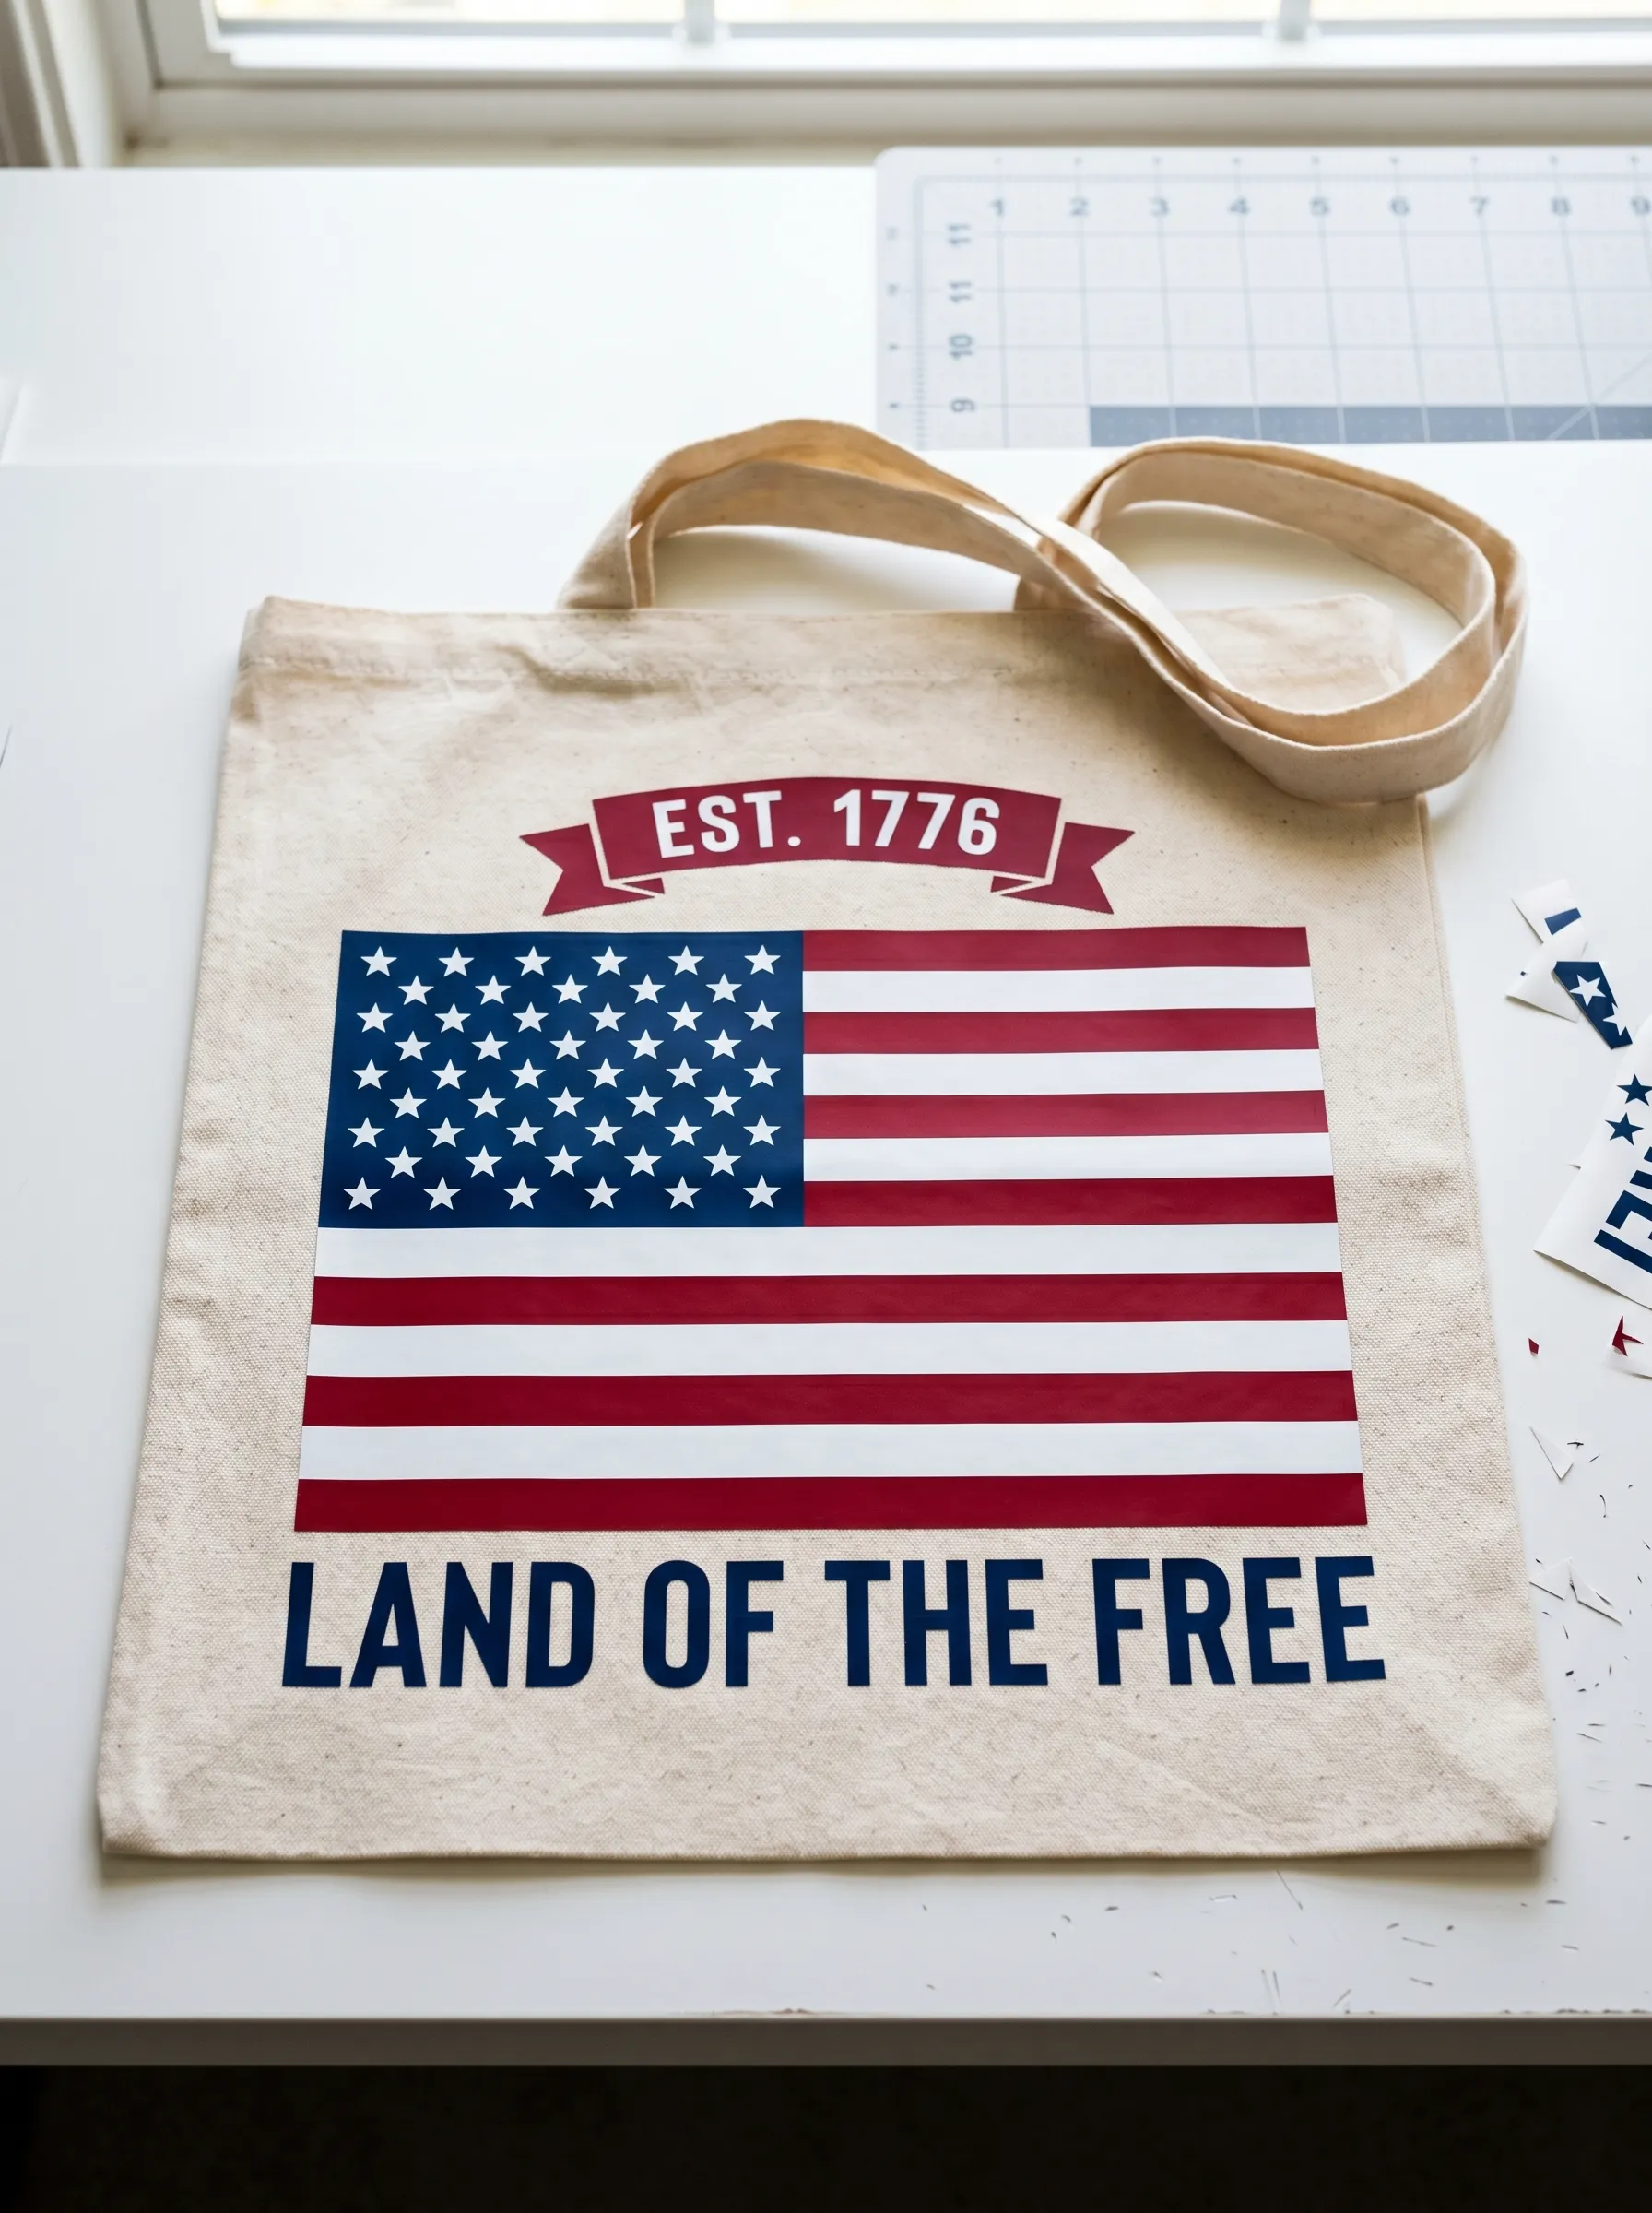
Purchase a natural canvas tote bag with flat, untextured handles — the heavier the canvas weight the better. A twelve-ounce canvas holds heat transfer vinyl far better than the thin bags often sold in craft stores. Wash and dry the bag before applying anything, even if it’s new, to pre-shrink the fabric.
Design your graphic in Cricut Design Space or a compatible program. The design shown uses a banner ribbon element at top, the full flag in the center, and bold block lettering across the bottom. Use a mirror image when cutting if you’re using heat transfer vinyl. Cut each color element separately: the navy canton, the red stripes, the white stripes, and the text.
Layer the vinyl from bottom to top, pressing each layer at around 305 degrees Fahrenheit for twenty to thirty seconds with firm pressure. Let it cool completely before you lift the carrier sheet. The most common failure point is lifting the carrier while the vinyl is still warm — it pulls.
If you have a Cricut, the trim scraps from cutting will scatter. Keep a small container on your work surface to collect them as you go. The cutting mat stays stickier longer if you keep scraps off it between cuts.
The Patriotic Wicker Basket Door Arrangement
Find a large oval wicker basket — at least twelve inches tall — with an open top. The natural wicker texture is part of the look: painted baskets don’t read the same way.
Wrap a long scarf or fabric piece in American flag print around the outside of the basket, tucking it in at the rim and letting it overlap in a loose, generous bow at the front. Tie a second strip of flag ribbon in a multi-loop bow and pin it to the front of the fabric layer using floral wire.
Fill the basket with a foam or chicken wire foundation packed to just below the rim. Build the flower arrangement in the classic asymmetrical style with three height zones: tall stems of white blossom or feathery green at the back and sides, mid-height flowers (navy blue silk mums, red silk carnations) in the middle zone, and low flowers (white anemones, white cosmos) at the front and sides. Add fern fronds throughout for green fill and to disguise the foam.
Dot small red berry stems and blackberry stems throughout for texture and depth. The finished arrangement should overflow the basket on all sides and look lush rather than tidy. Hang on a brass or bronze door hook — the metal tone warm matches the wicker.
The Mod Podge Decoupage Patriotic Tray
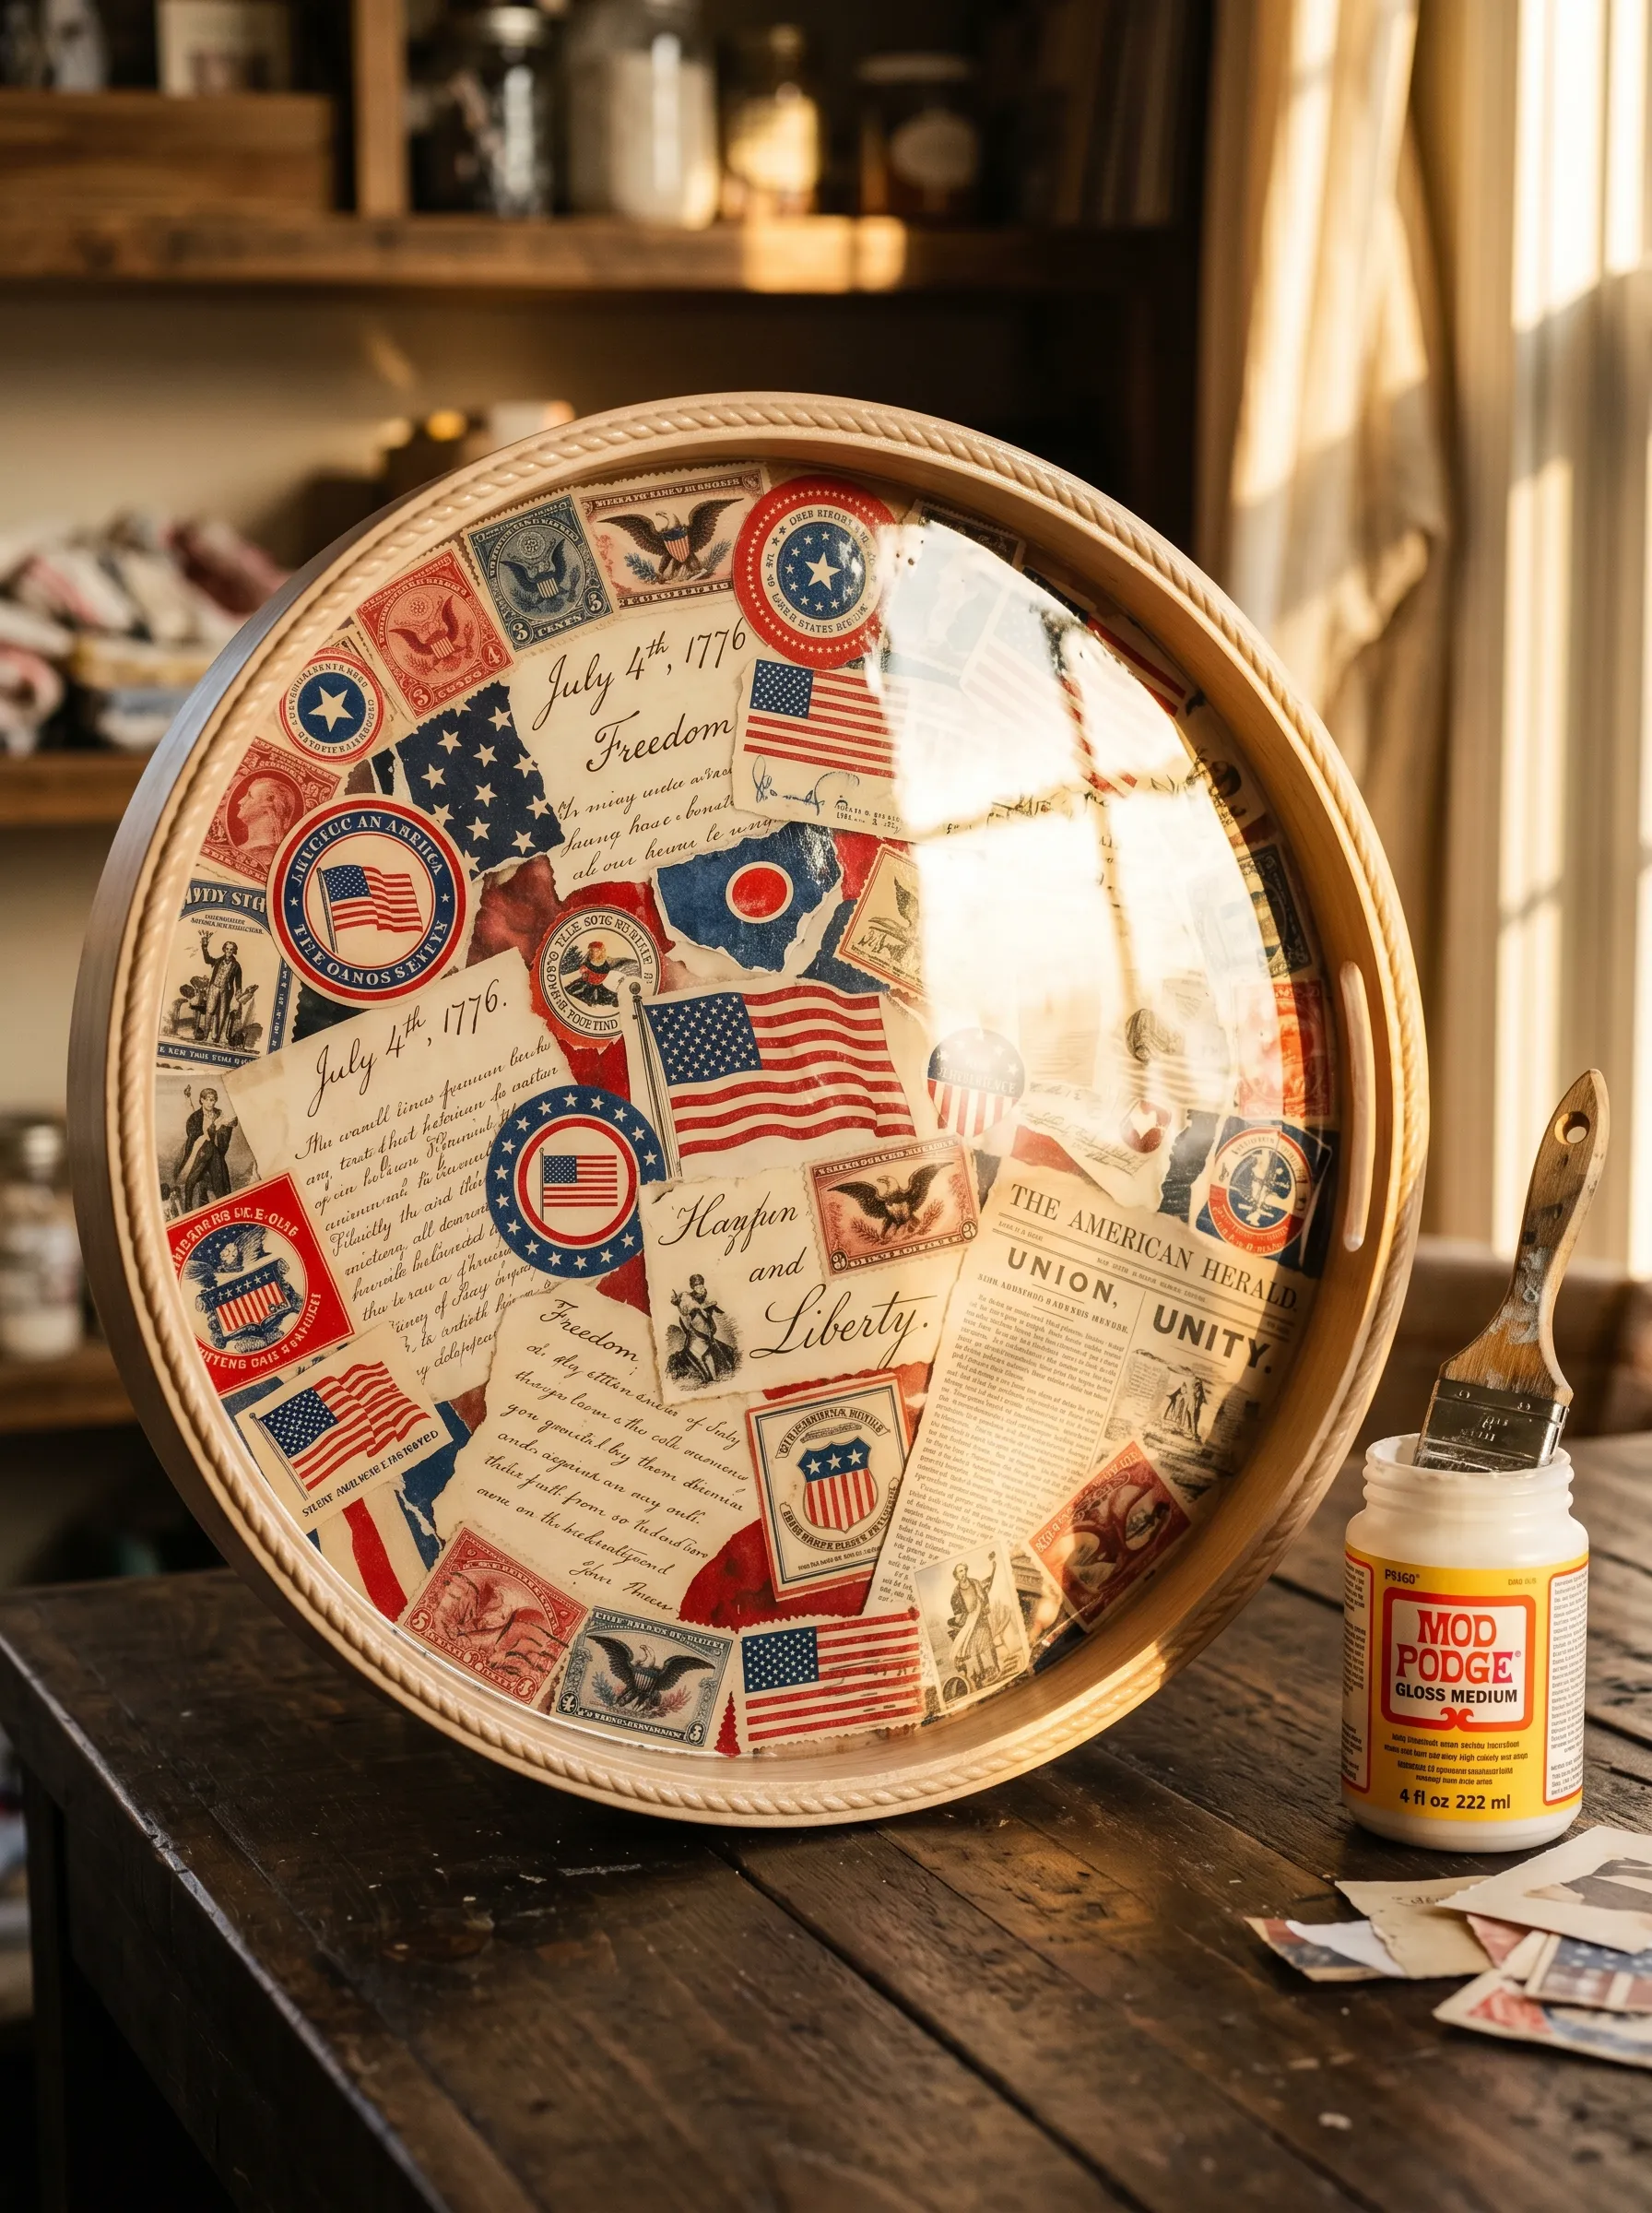
Find a round wooden tray with a smooth interior surface — unfinished wood works best, as does an old wood tray with the existing finish lightly sanded. The rope-edge tray shown adds texture to the rim that elevates the whole piece.
Gather ephemera for the collage: vintage-look postage stamps, reproduction newspaper clippings, handwritten letter fragments, flag images, patriotic seals, and script text pieces. Print these from free vintage clip art resources on regular printer paper, or cut from decorative paper packs. Tea-stain the paper pieces for two to three minutes in strong black tea, then dry completely — this unifies the look significantly.
Arrange all your pieces on the tray interior before you glue anything. Work from the edges inward, overlapping pieces by at least one-third. Apply Mod Podge to the tray surface in sections, press paper pieces down, then immediately brush Mod Podge over the top of each piece. Work out any air bubbles with your finger.
Once the entire surface is covered, apply two to three coats of Mod Podge gloss over the whole interior, letting each coat dry completely. The finished surface should have no visible paper edges. The gloss seal protects the surface and gives it the lacquered quality seen here.
The Pressed Flower American Flag Frame
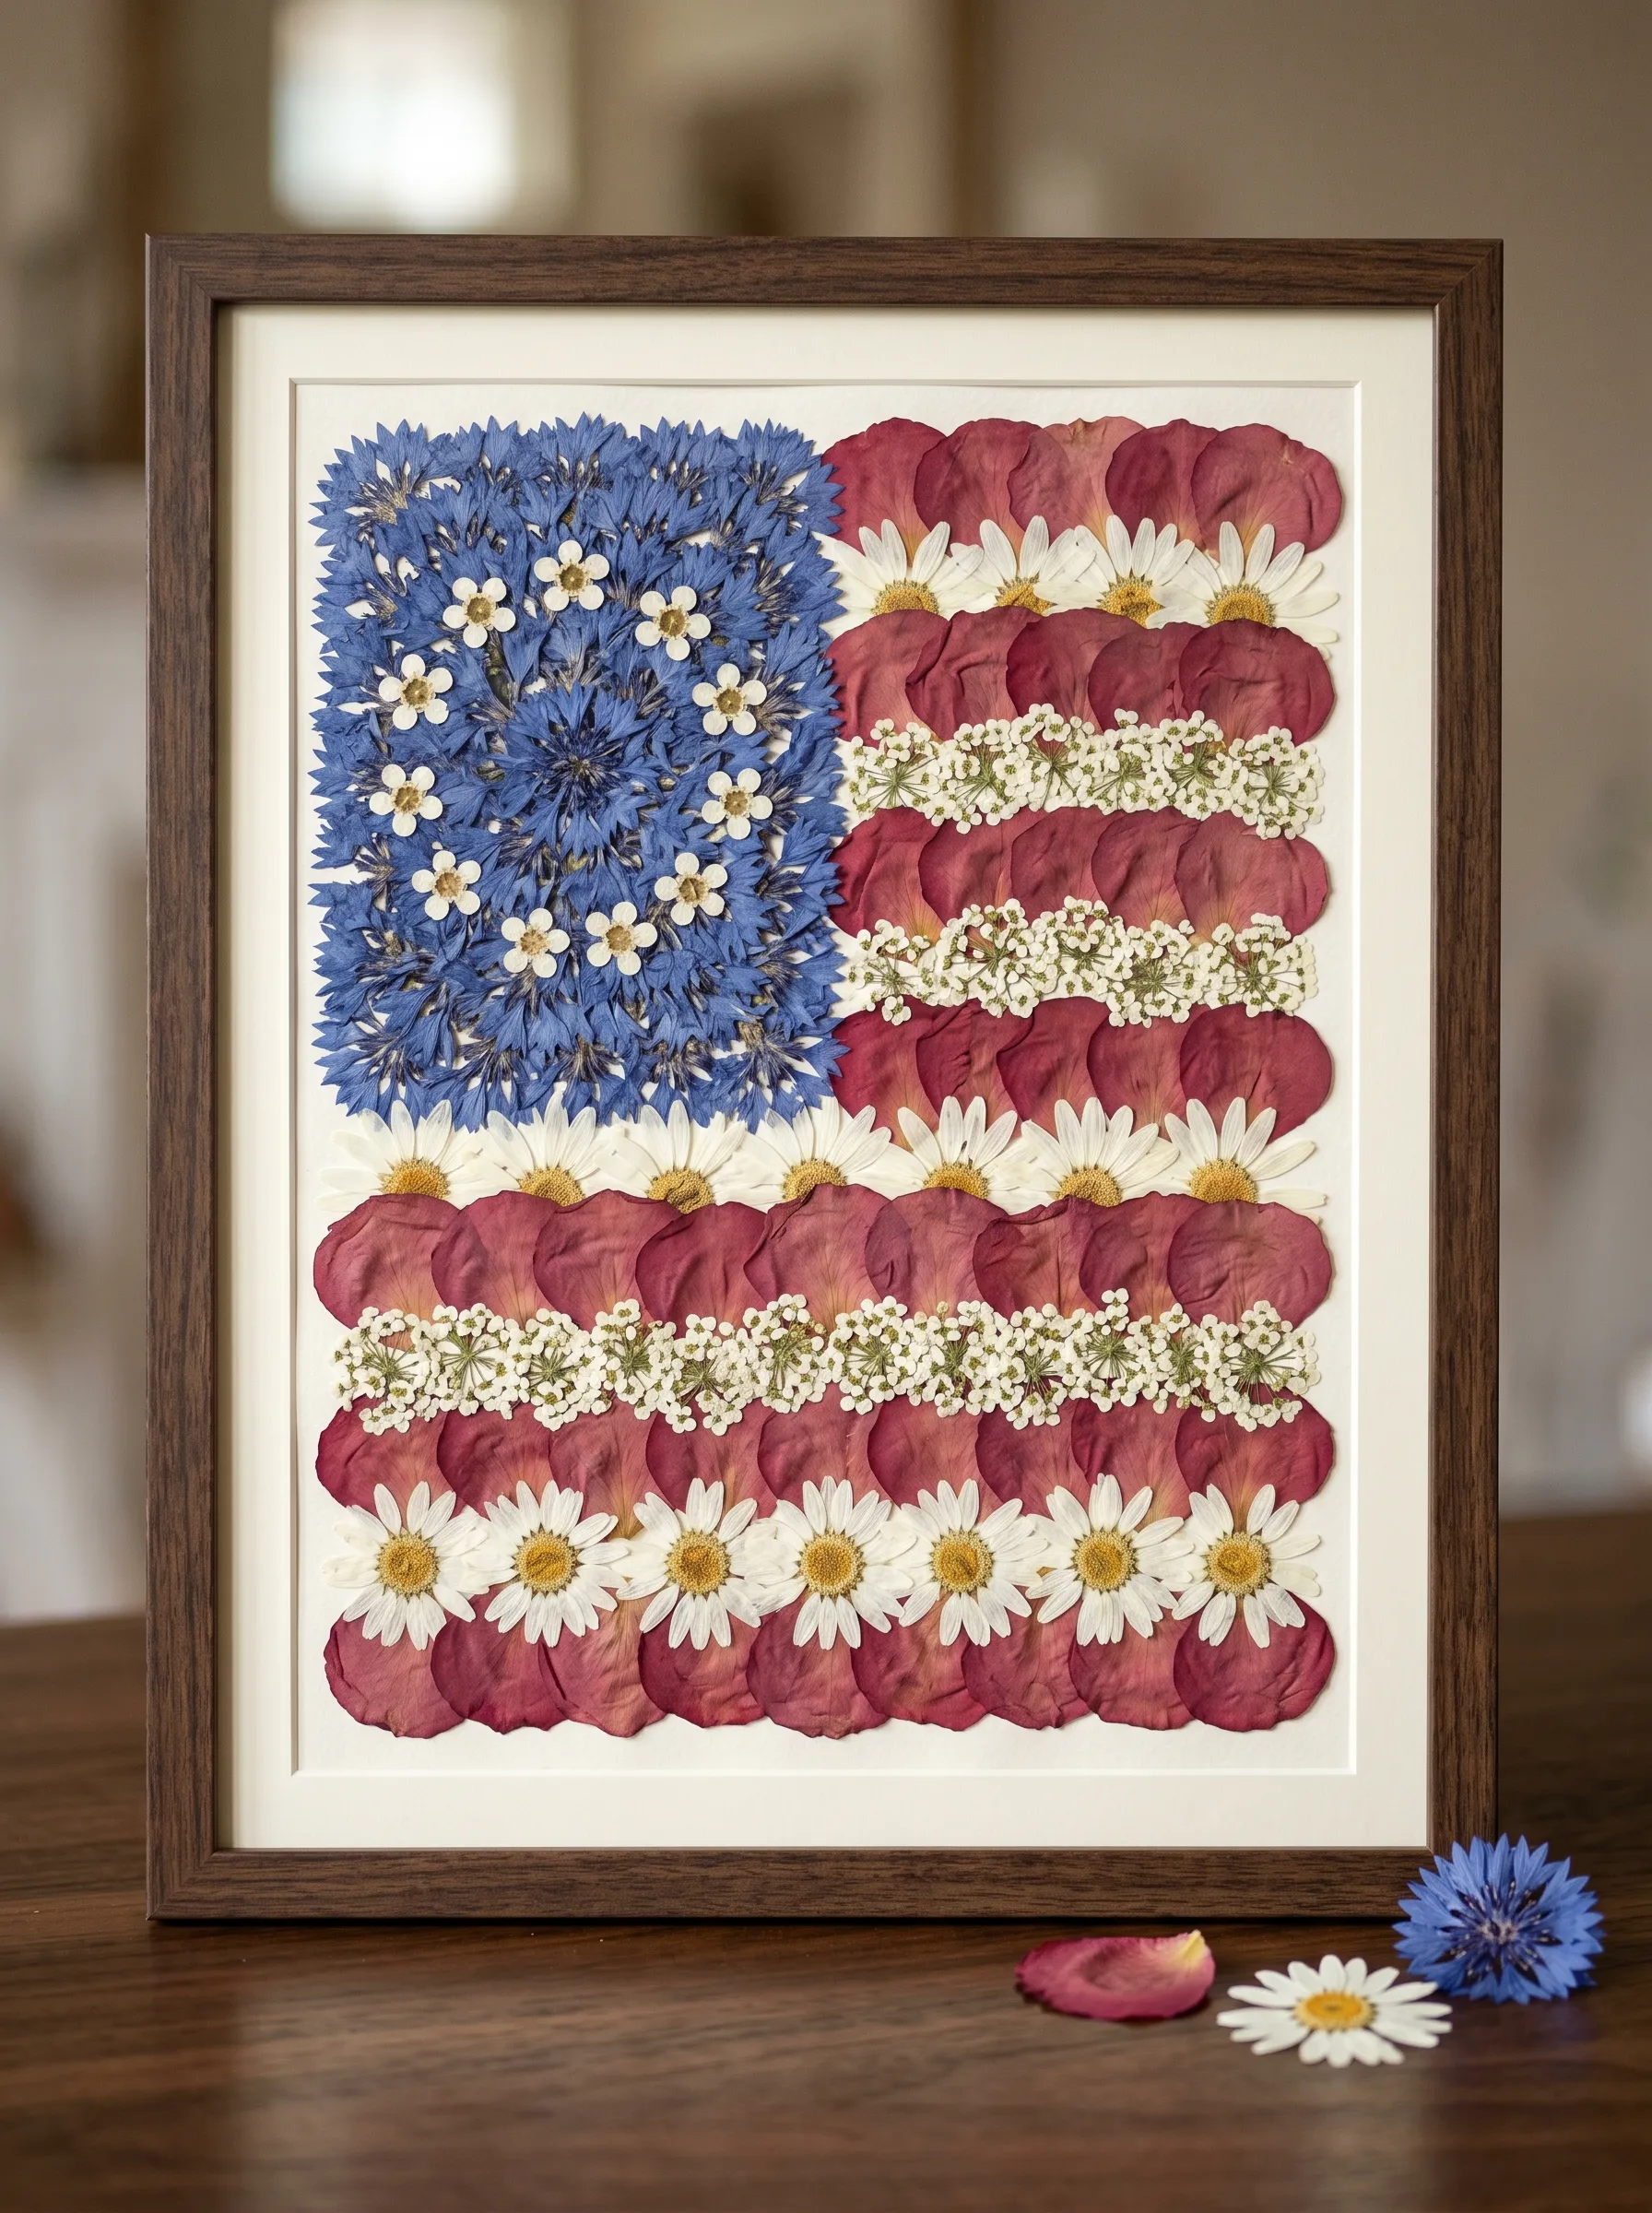
Begin this project three weeks before you need to display it. That is not optional. Flowers need two full weeks under significant weight to press flat and dry completely without browning.
Collect or purchase the following fresh flowers: blue cornflowers for the canton background, red rose petals for the red stripes, white daisies for the star layer, and queen anne’s lace or yarrow for the white stripe sections. Arrange them in a flower press or between sheets of plain newsprint inside a heavy book, with the book loaded with additional heavy books or weights on top. Replace the newsprint after the first three days to prevent mold.
Once fully pressed and dry, work on a rigid backing board cut to your desired frame size. Lay out the flag proportions first in pencil. Build the canton first by laying cornflowers face down in an overlapping layer to cover the field, then glue down carefully with craft glue applied to the stem ends only. Arrange pressed daisies for the star positions within the canton.
For the stripes, alternate rows of rose petals for red stripes and yarrow or queen anne’s lace for white stripes, overlapping each row slightly. Mount in a shadow box frame with a mat, not flush against the glass. The small gap between the flowers and the glass prevents condensation damage.
The Paper Fan and Garland Backdrop
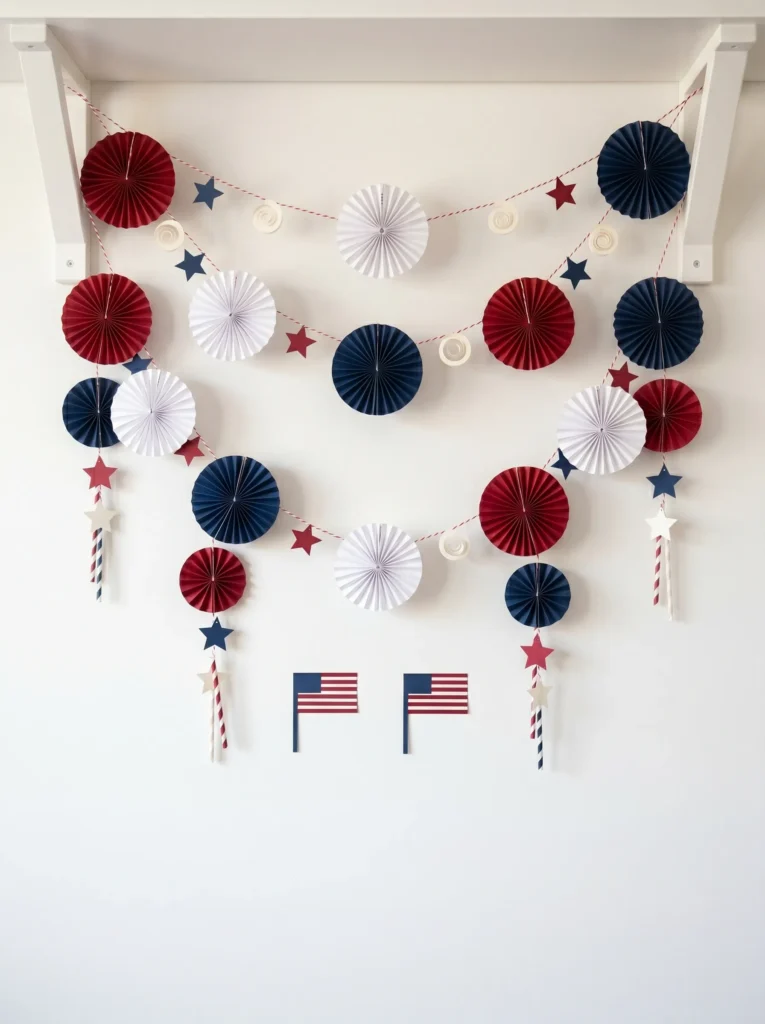
Make paper fans by accordion-folding sheets of twelve-by-twelve cardstock — use card weight paper, not copy paper, or the fans will go limp within days. Each fan requires one sheet folded in one-quarter inch accordion pleats, then pinched and stapled at the center. Open the two halves and glue them together to form a full circle. Make fans in three sizes: large (twelve-inch sheets, full circle), medium (cut sheets to eight inches before folding), and small (cut to five inches).
Create a star garland by cutting stars from cardstock in three sizes and threading through the center on red-and-white baker’s twine at irregular intervals. Add cream paper rosette spirals by cutting paper into a spiral and rolling from the outside in, releasing to form a spiral cone.
To hang the backdrop, attach two wooden shelf brackets to the wall at the same height and distance as the width of your display. Tie twine between them and hang the fans by hot-gluing a loop of thread to the back of each one before threading it onto the twine. Layer two to three rows of garland at different heights below the fans, swooping and pinning at the ends. Two small flag picks at the bottom center anchor the lowest point.
The Layered Mason Jar Candles
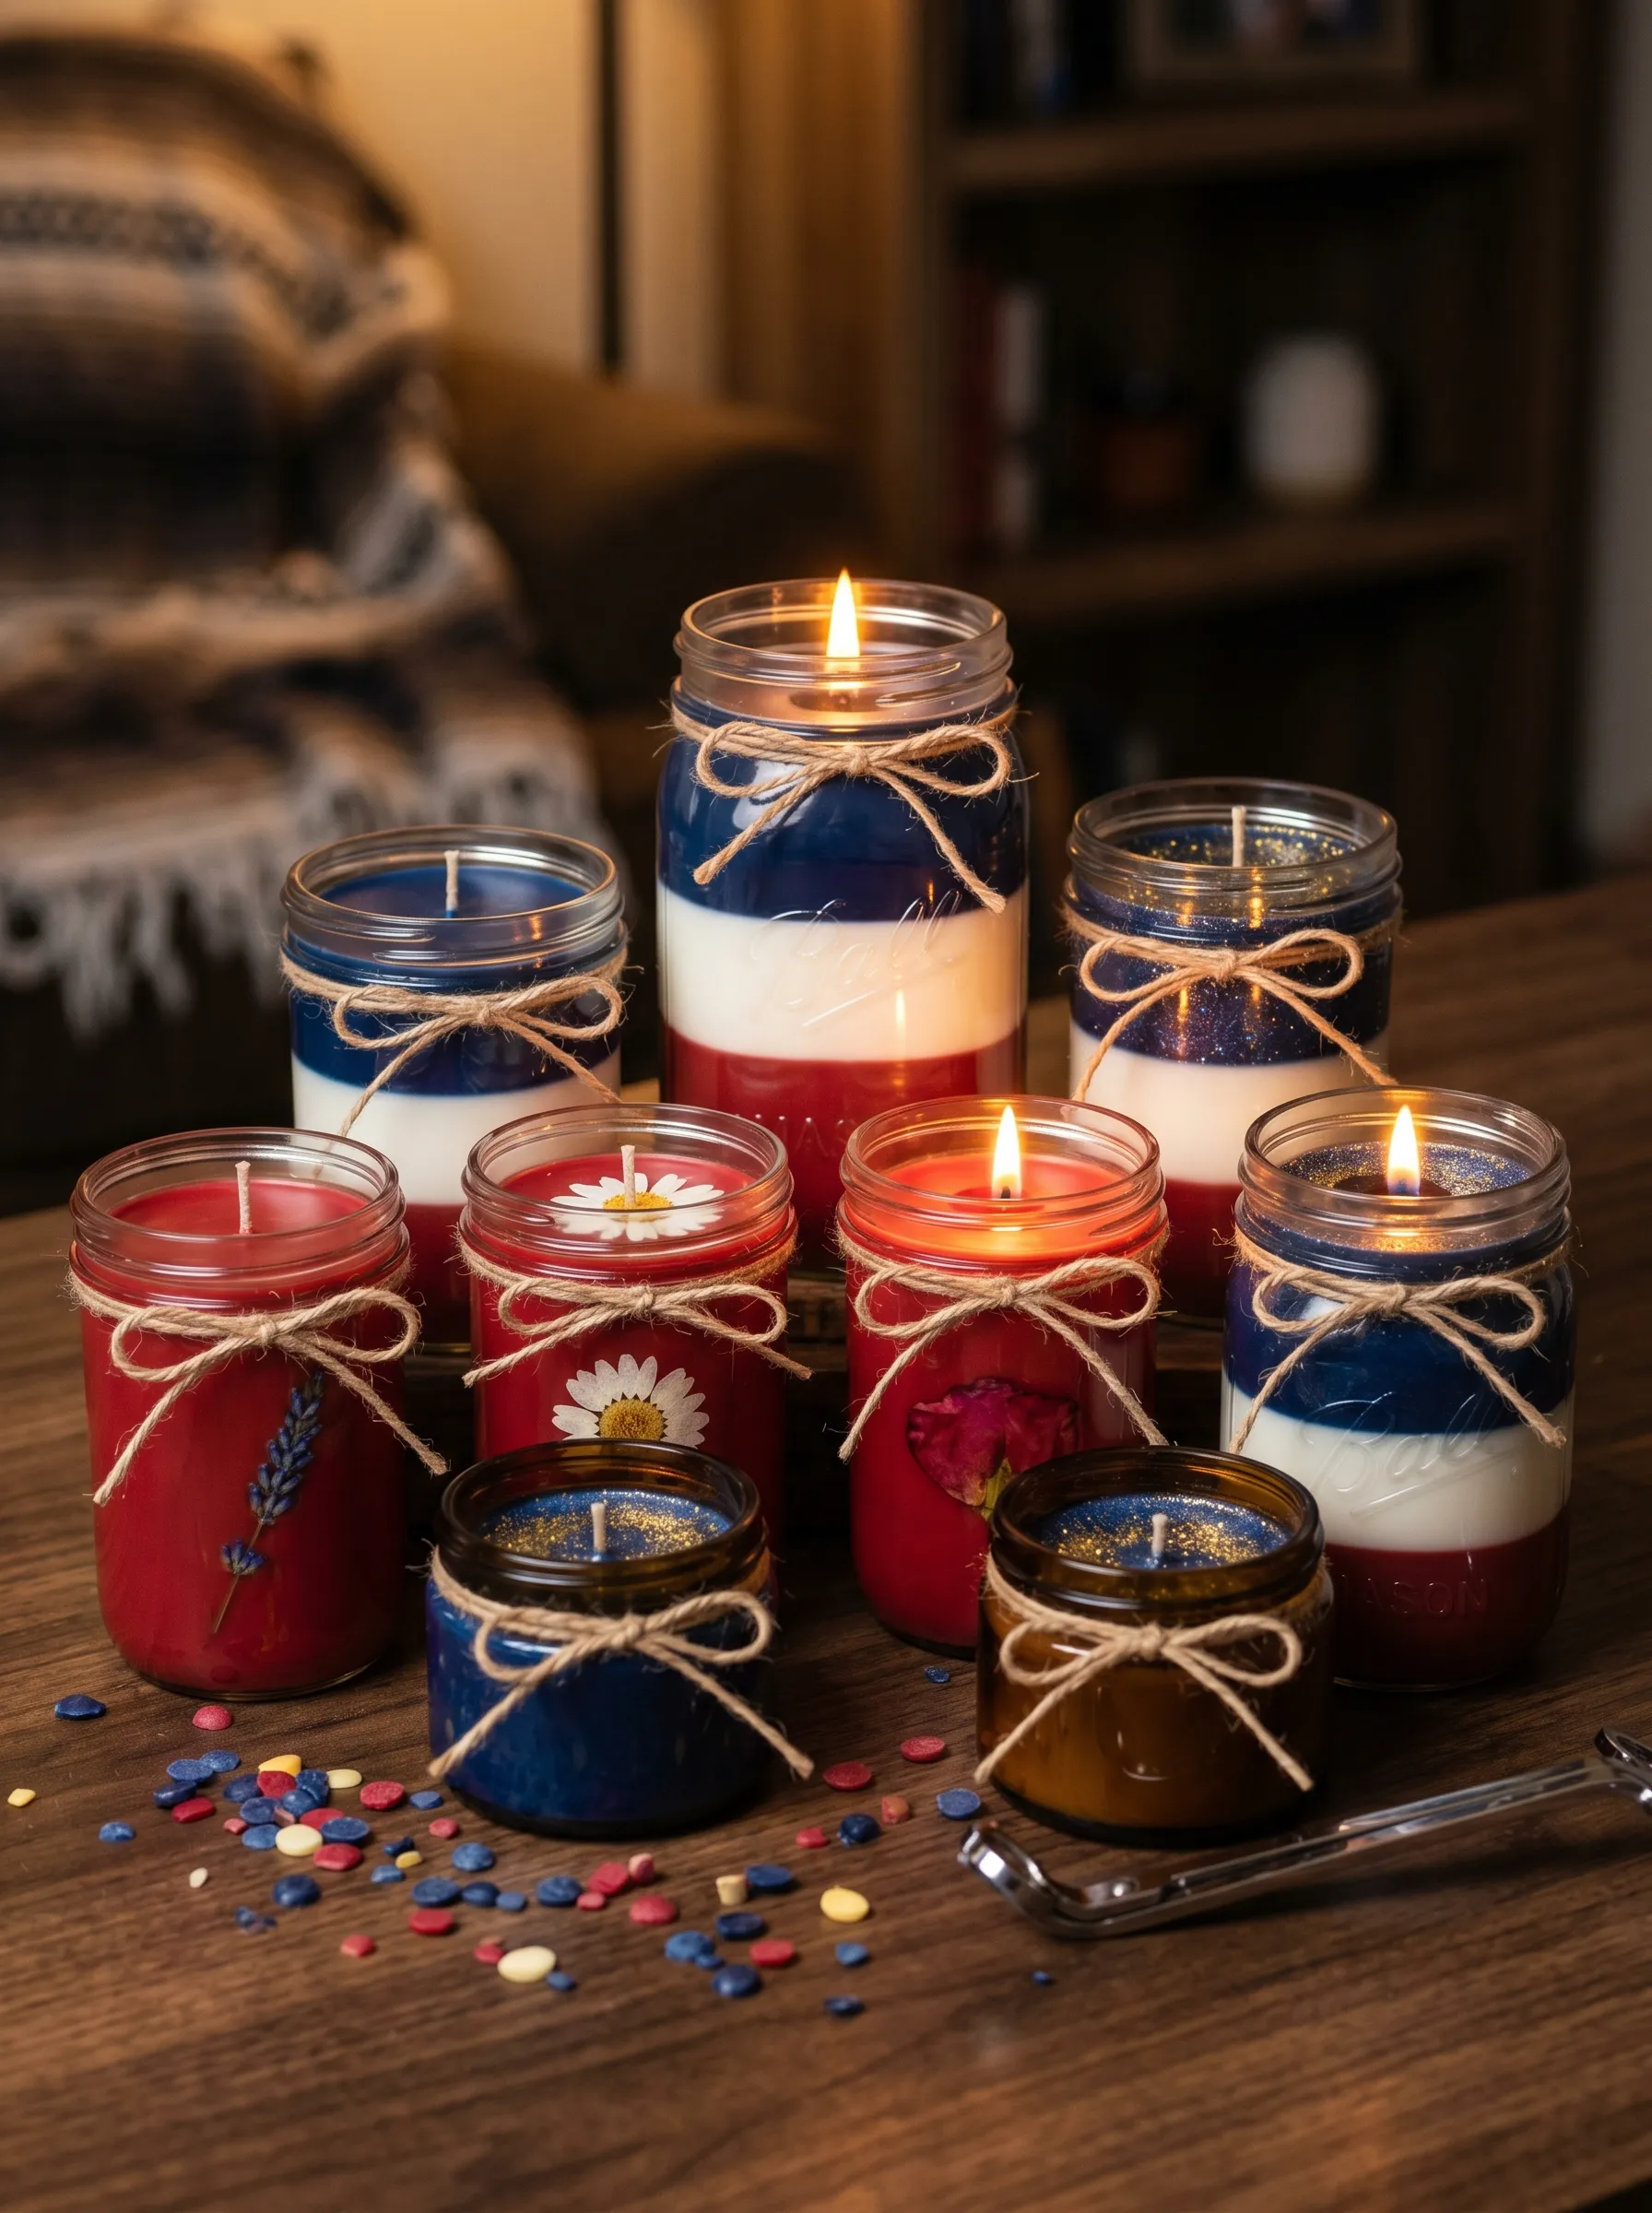
Use Ball-brand wide mouth mason jars in regular mouth for the smaller candles and wide mouth quart jars for the taller ones. Purchase soy wax flakes, cotton wicks, a pouring pitcher, and candle dye blocks in red and navy blue. Set up your work surface with newspaper down — wax cleanup is difficult.
Prepare each jar by taping the wick at the bottom center and resting the top of the wick over a pencil or skewer laid across the jar mouth to keep it centered. Melt wax in a double boiler to approximately 180 degrees. Pour a first layer in one color — deep navy, for example — to about one-third of the jar height. Let it set until firm but not completely cold (the surface should have lost its shine but still feel slightly warm to the touch). This partial cooling creates a better bond between layers without a visible seam crack.
Pour the second layer in white or cream — add no dye for natural off-white, or a small amount of ivory dye block. Let it set the same way. Pour the third layer in red. Each layer should be a distinct band.
For variation, embed a pressed flower or a dried botanical against the inside of the jar before pouring — press it flat against the glass with a skewer and pour carefully around it. Tie a natural jute bow around the neck of the finished candle. Trim the wick to one-quarter inch before lighting.
The Paper Origami and Star Mobile
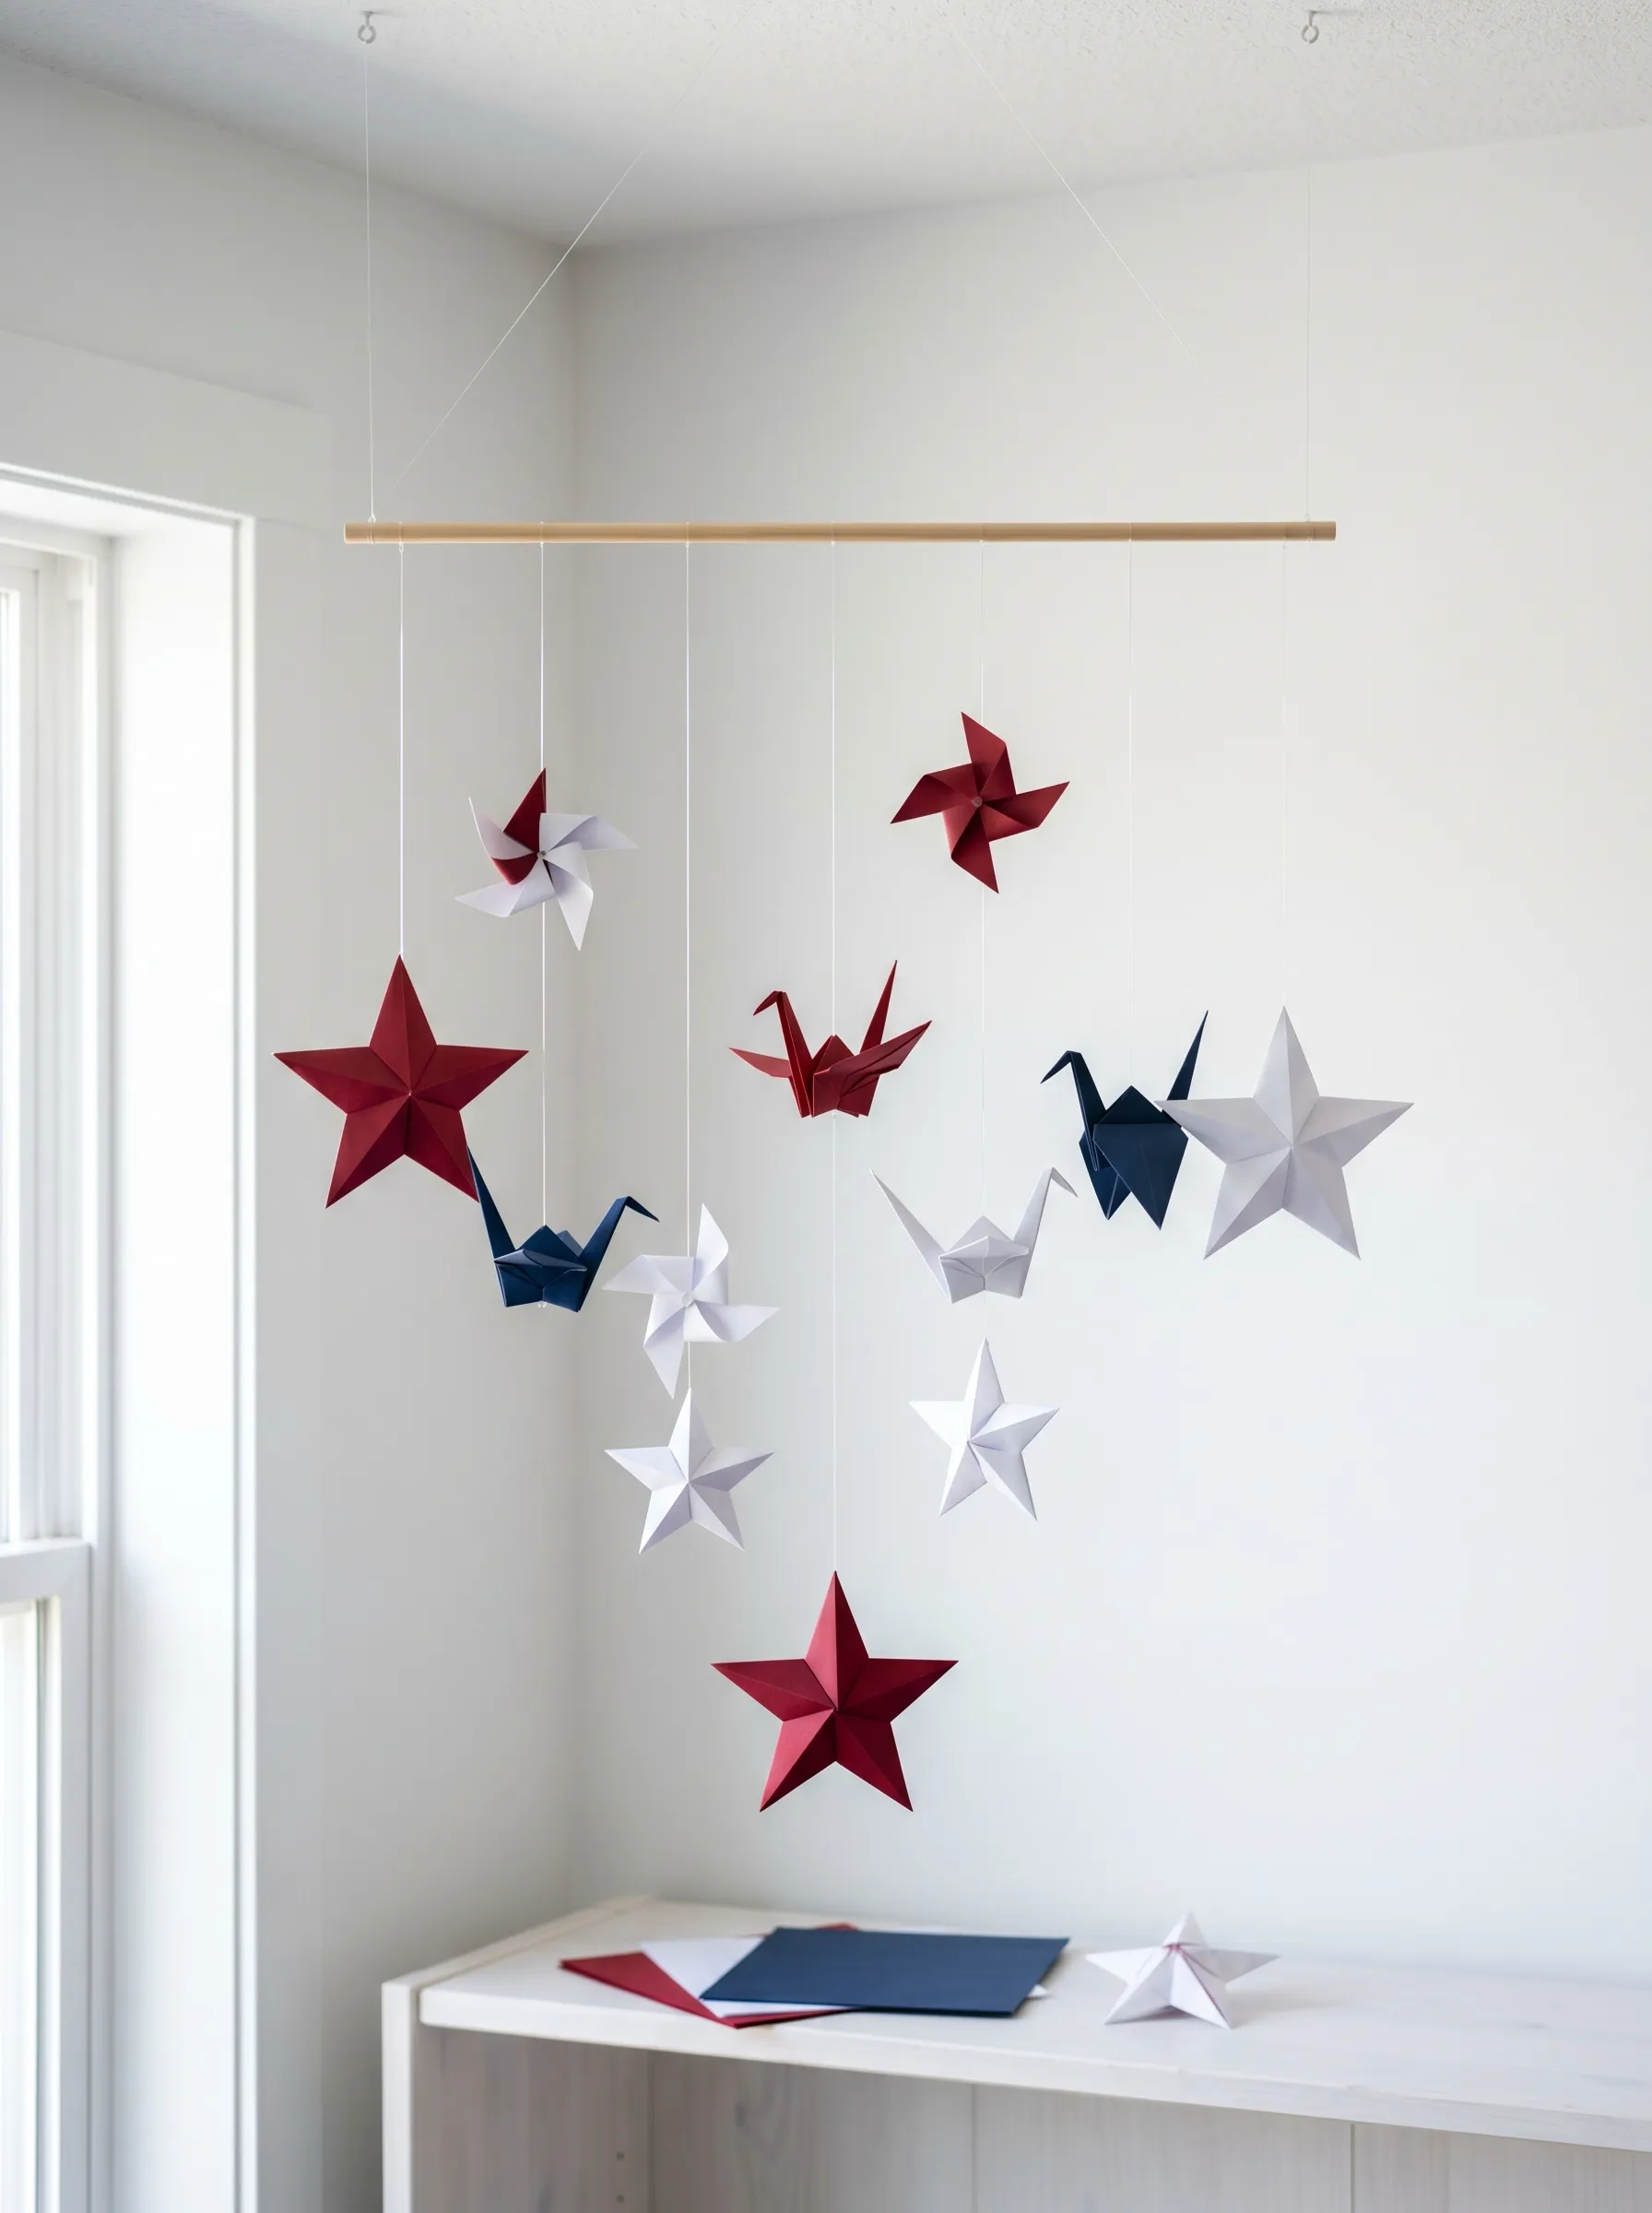
Cut paper squares in twelve-inch, nine-inch, and six-inch sizes from cardstock in deep red, navy, and white. For each star: fold the square in half diagonally twice to find the center, then use an eight-point star fold — there are clear tutorials for this fold widely available, and it produces a three-dimensional raised star with no glue required. For pinwheels: fold in half both ways, cut from each corner toward the center leaving one inch in the center, bring every other point to the center and glue down. For origami cranes: the standard crane fold works in any size.
Tie each finished piece to a length of clear nylon thread at varying lengths — stars on shorter threads, cranes on longer ones, pinwheels in the middle range. Attach all threads to a single wooden dowel rod at irregular intervals. The key to a balanced mobile is adjusting thread attachment points after all the pieces are hung — slide the threads left or right along the dowel until the whole thing hangs level.
Hang from the ceiling in a corner where air movement will cause gentle rotation.
The Layered Ribbon Wreath
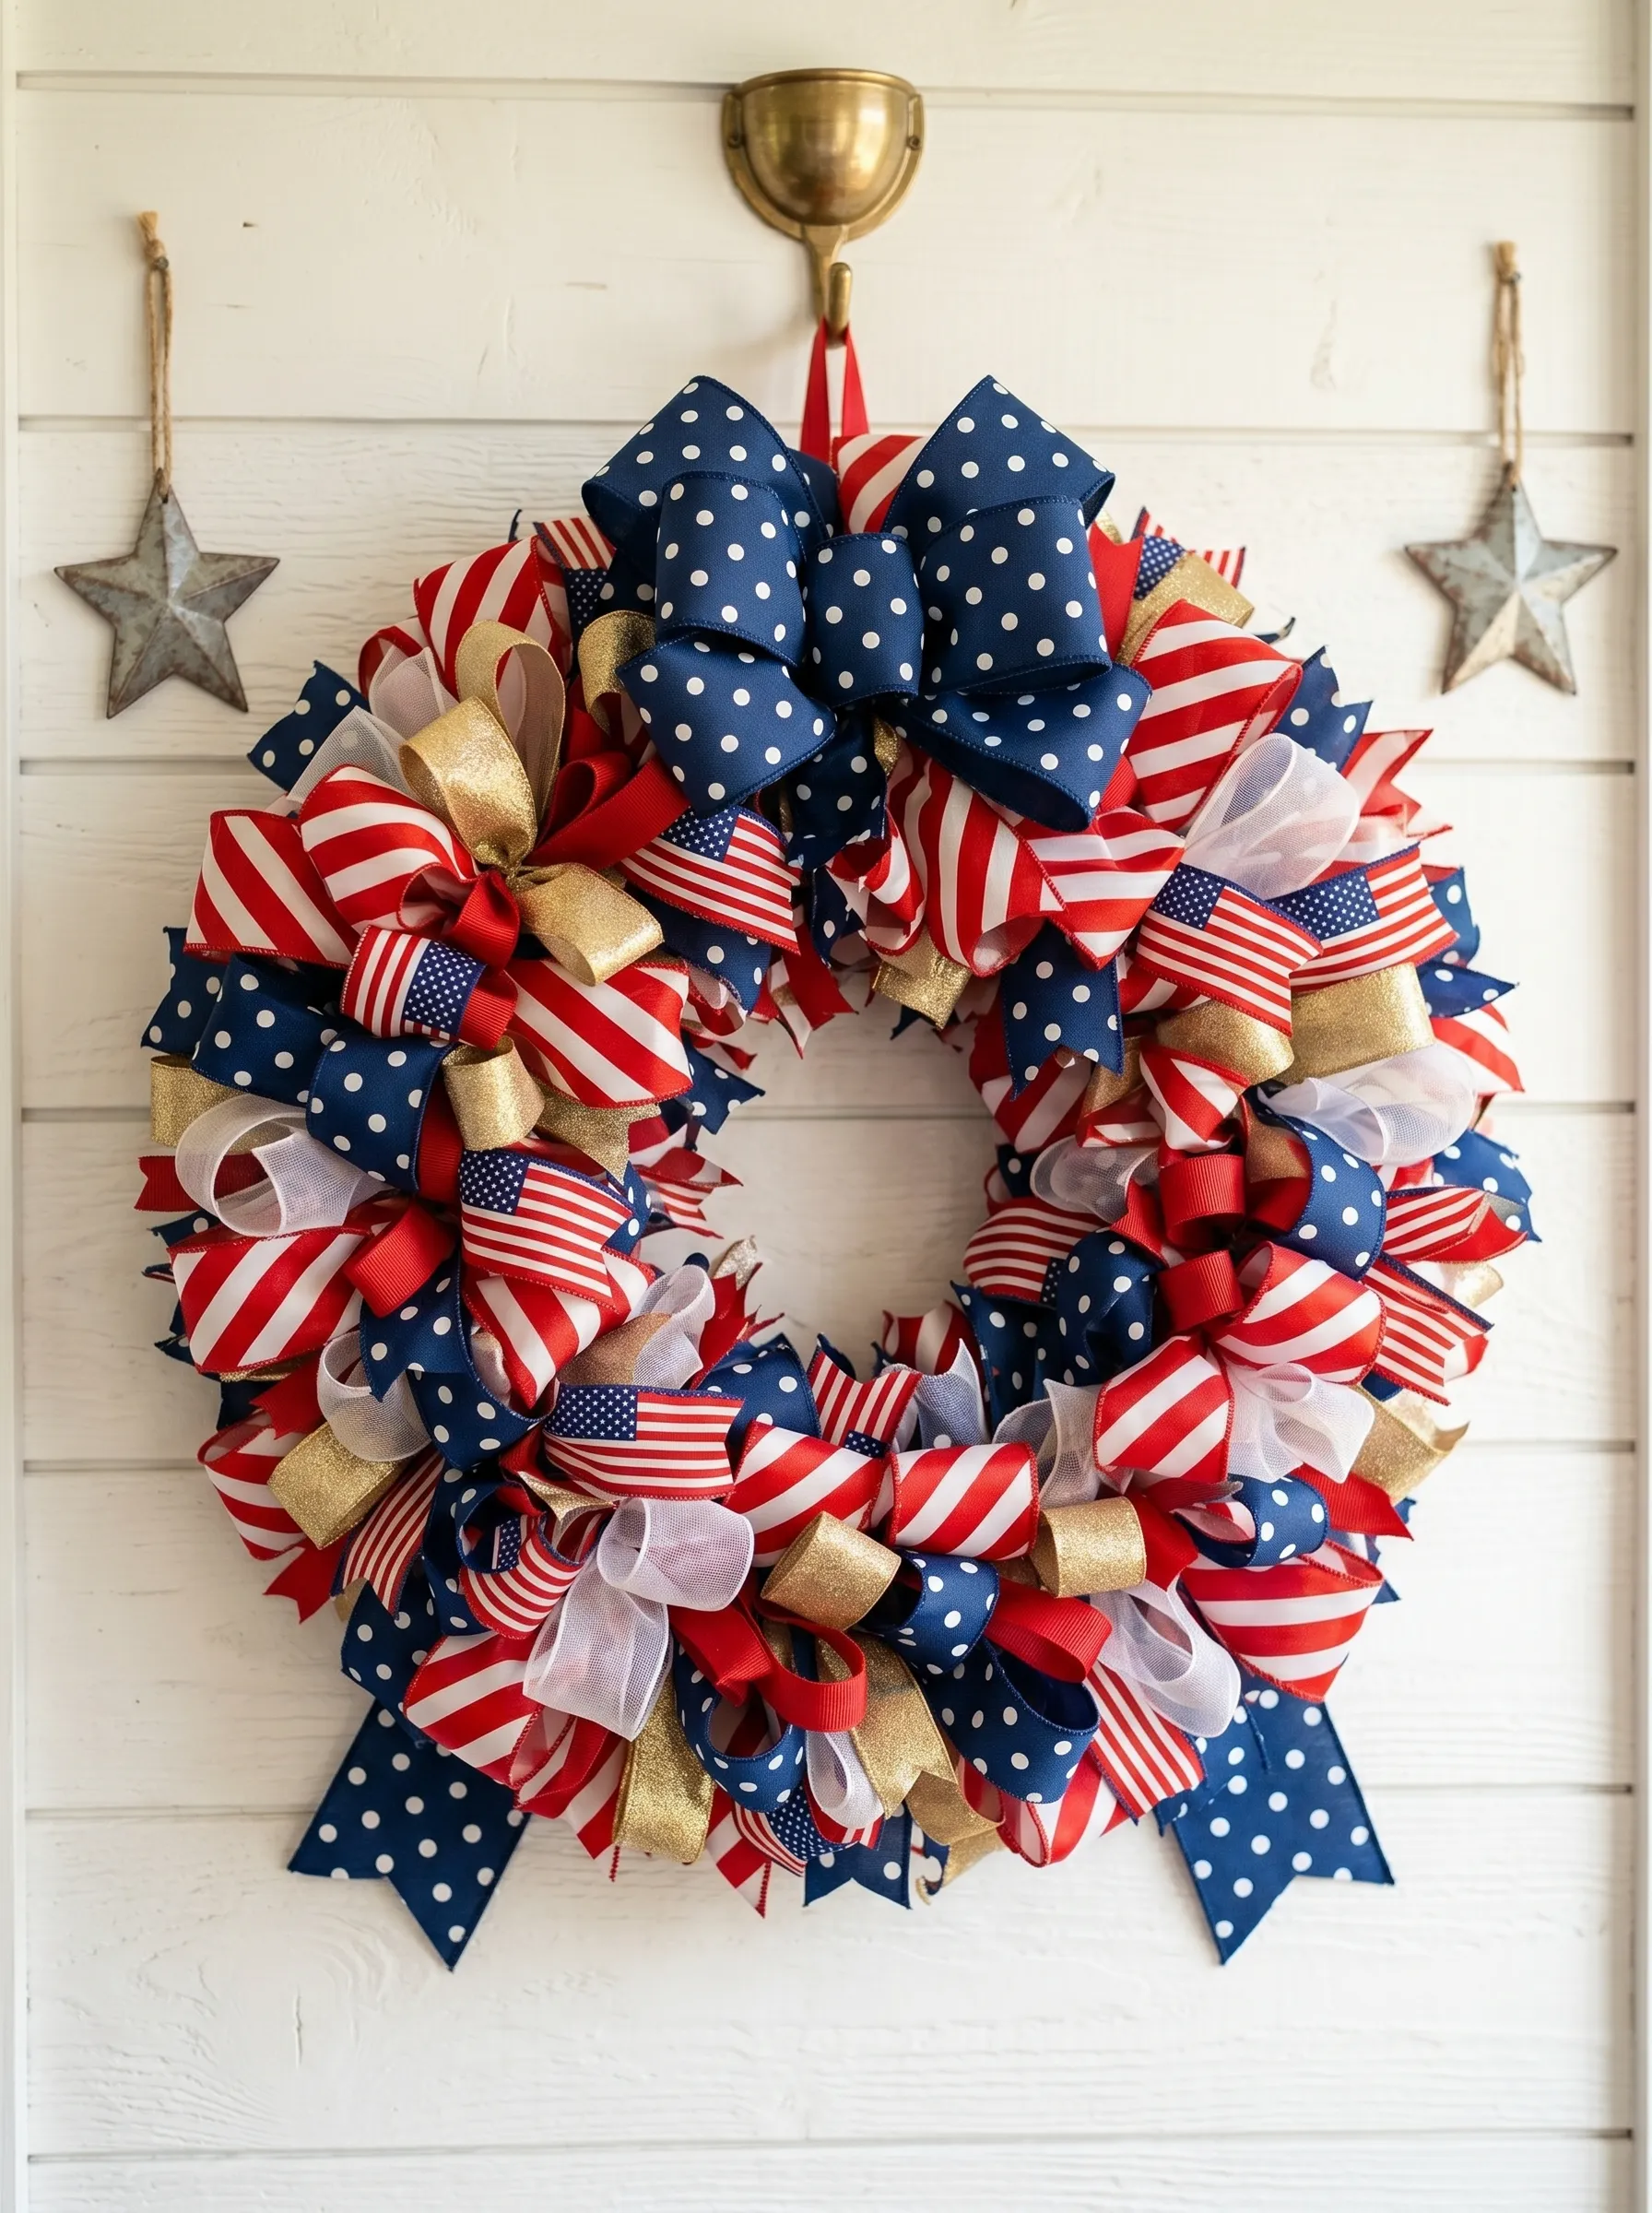
Start with a twelve-inch wire wreath frame, which is a simple double-loop of heavy wire. You will need a large quantity of ribbon in multiple widths and patterns — budget for fifteen to twenty spools. The combinations that work: striped ribbon, polka dot ribbon, flag-print ribbon, solid red grosgrain, solid navy satin, sheer white organza, and metallic gold wired ribbon.
Cut each ribbon into lengths of about ten to twelve inches. Fold each length in half and loop it through the wire frame with a lark’s head knot — pull both ends through the folded loop. Pack the loops tightly against each other so no wire shows. Alternate pattern types as you go to distribute the visual texture evenly around the ring.
For the finishing bow, use wired ribbon so it holds its shape. Make a six-loop bow by forming loops on each side of a center twist, with two long tails hanging below. Attach to the top of the wreath with a pipe cleaner twisted through the bow center and around the frame wire. Hang on a brass hook mounted on shiplap or a painted door.
The Painted Terracotta Patriotic Pots
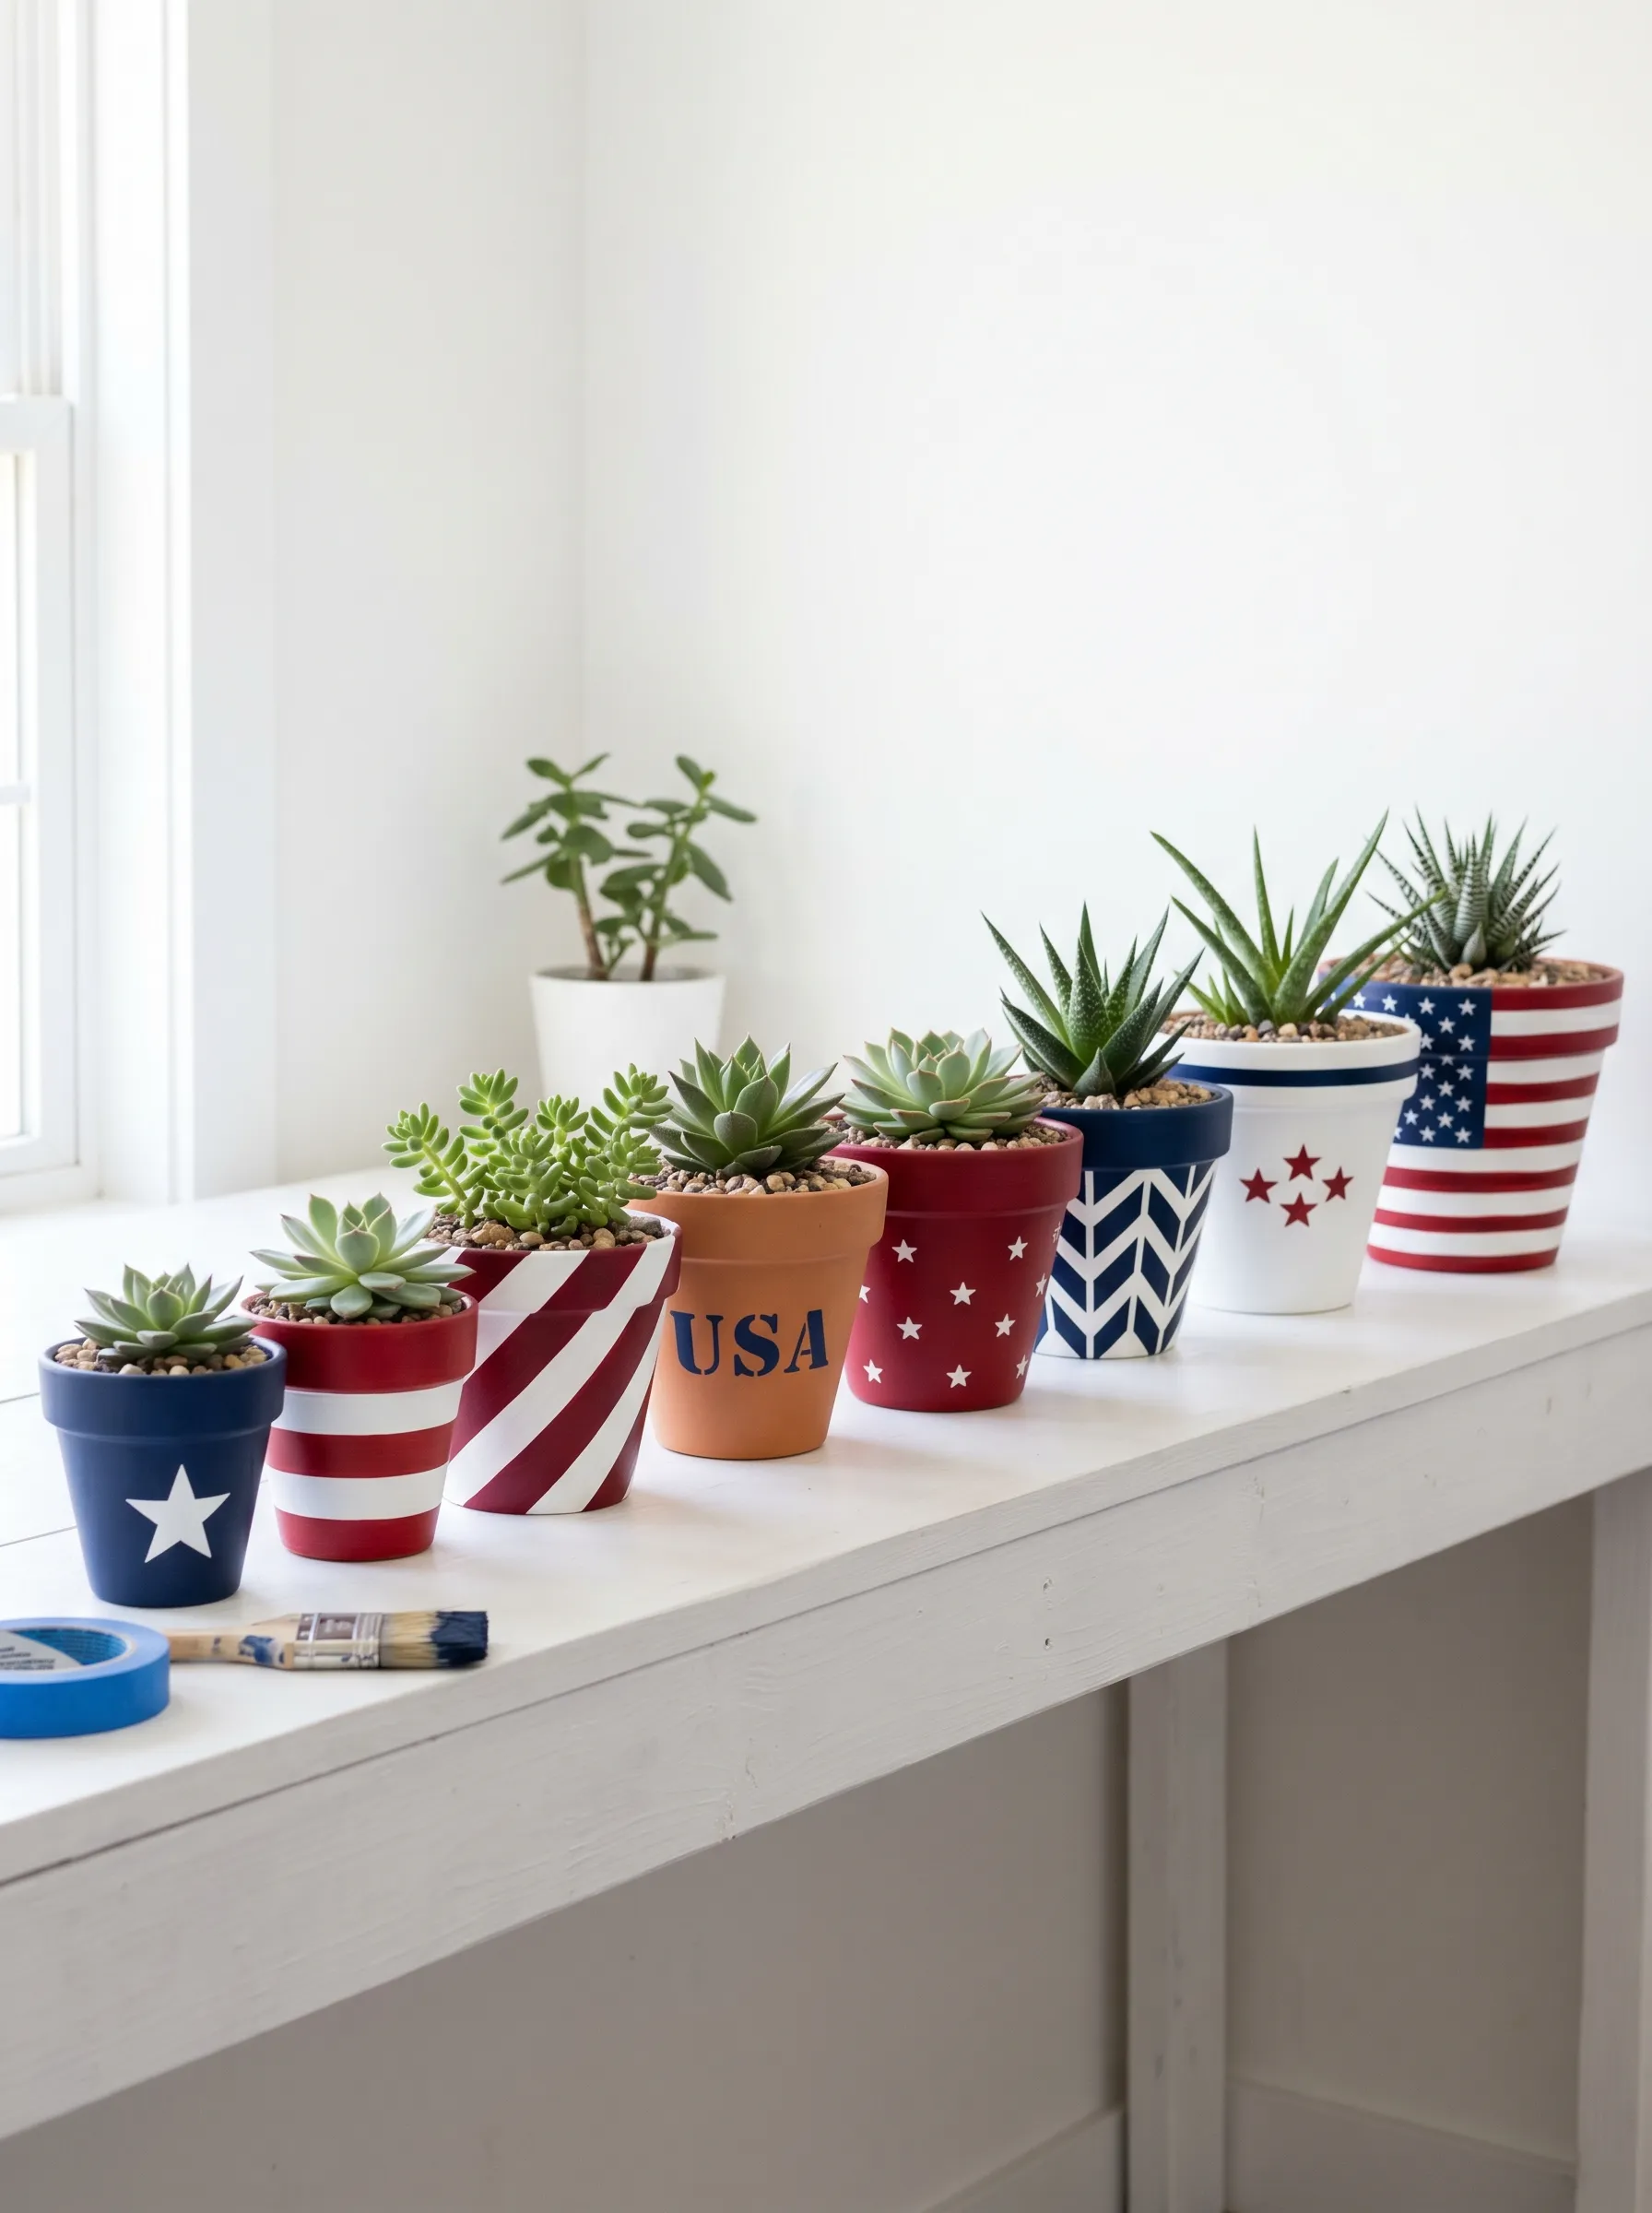
Start with clean, dry terracotta pots in a range of sizes from three inches to seven inches. Prime each pot with a coat of white spray primer and let dry fully — this step is not skippable, as unprimed terracotta absorbs paint unevenly and shows every brush stroke.
Base coat each pot in your primary color: full navy, full red, or full white using acrylic craft paint applied with a foam brush in even strokes. Two coats minimum. Let each coat dry completely before adding design work.
For stripes: apply painter’s tape in straight horizontal or diagonal lines. Press edges firmly. Paint the stripe color over the tape, let dry, and peel the tape before the paint is fully hardened — this prevents edge cracking. For stars: cut star stencils from adhesive contact paper and press onto the pot surface, then sponge or paint over them. For lettering: use a small script brush and practice the letters on paper before committing to the pot surface.
Seal every finished pot with matte or semi-gloss outdoor Mod Podge to protect against watering moisture. Plant succulents or small plants that won’t require heavy watering — the seal will hold up to occasional moisture but not daily soaking.
The Patriotic Painted Garden Rocks
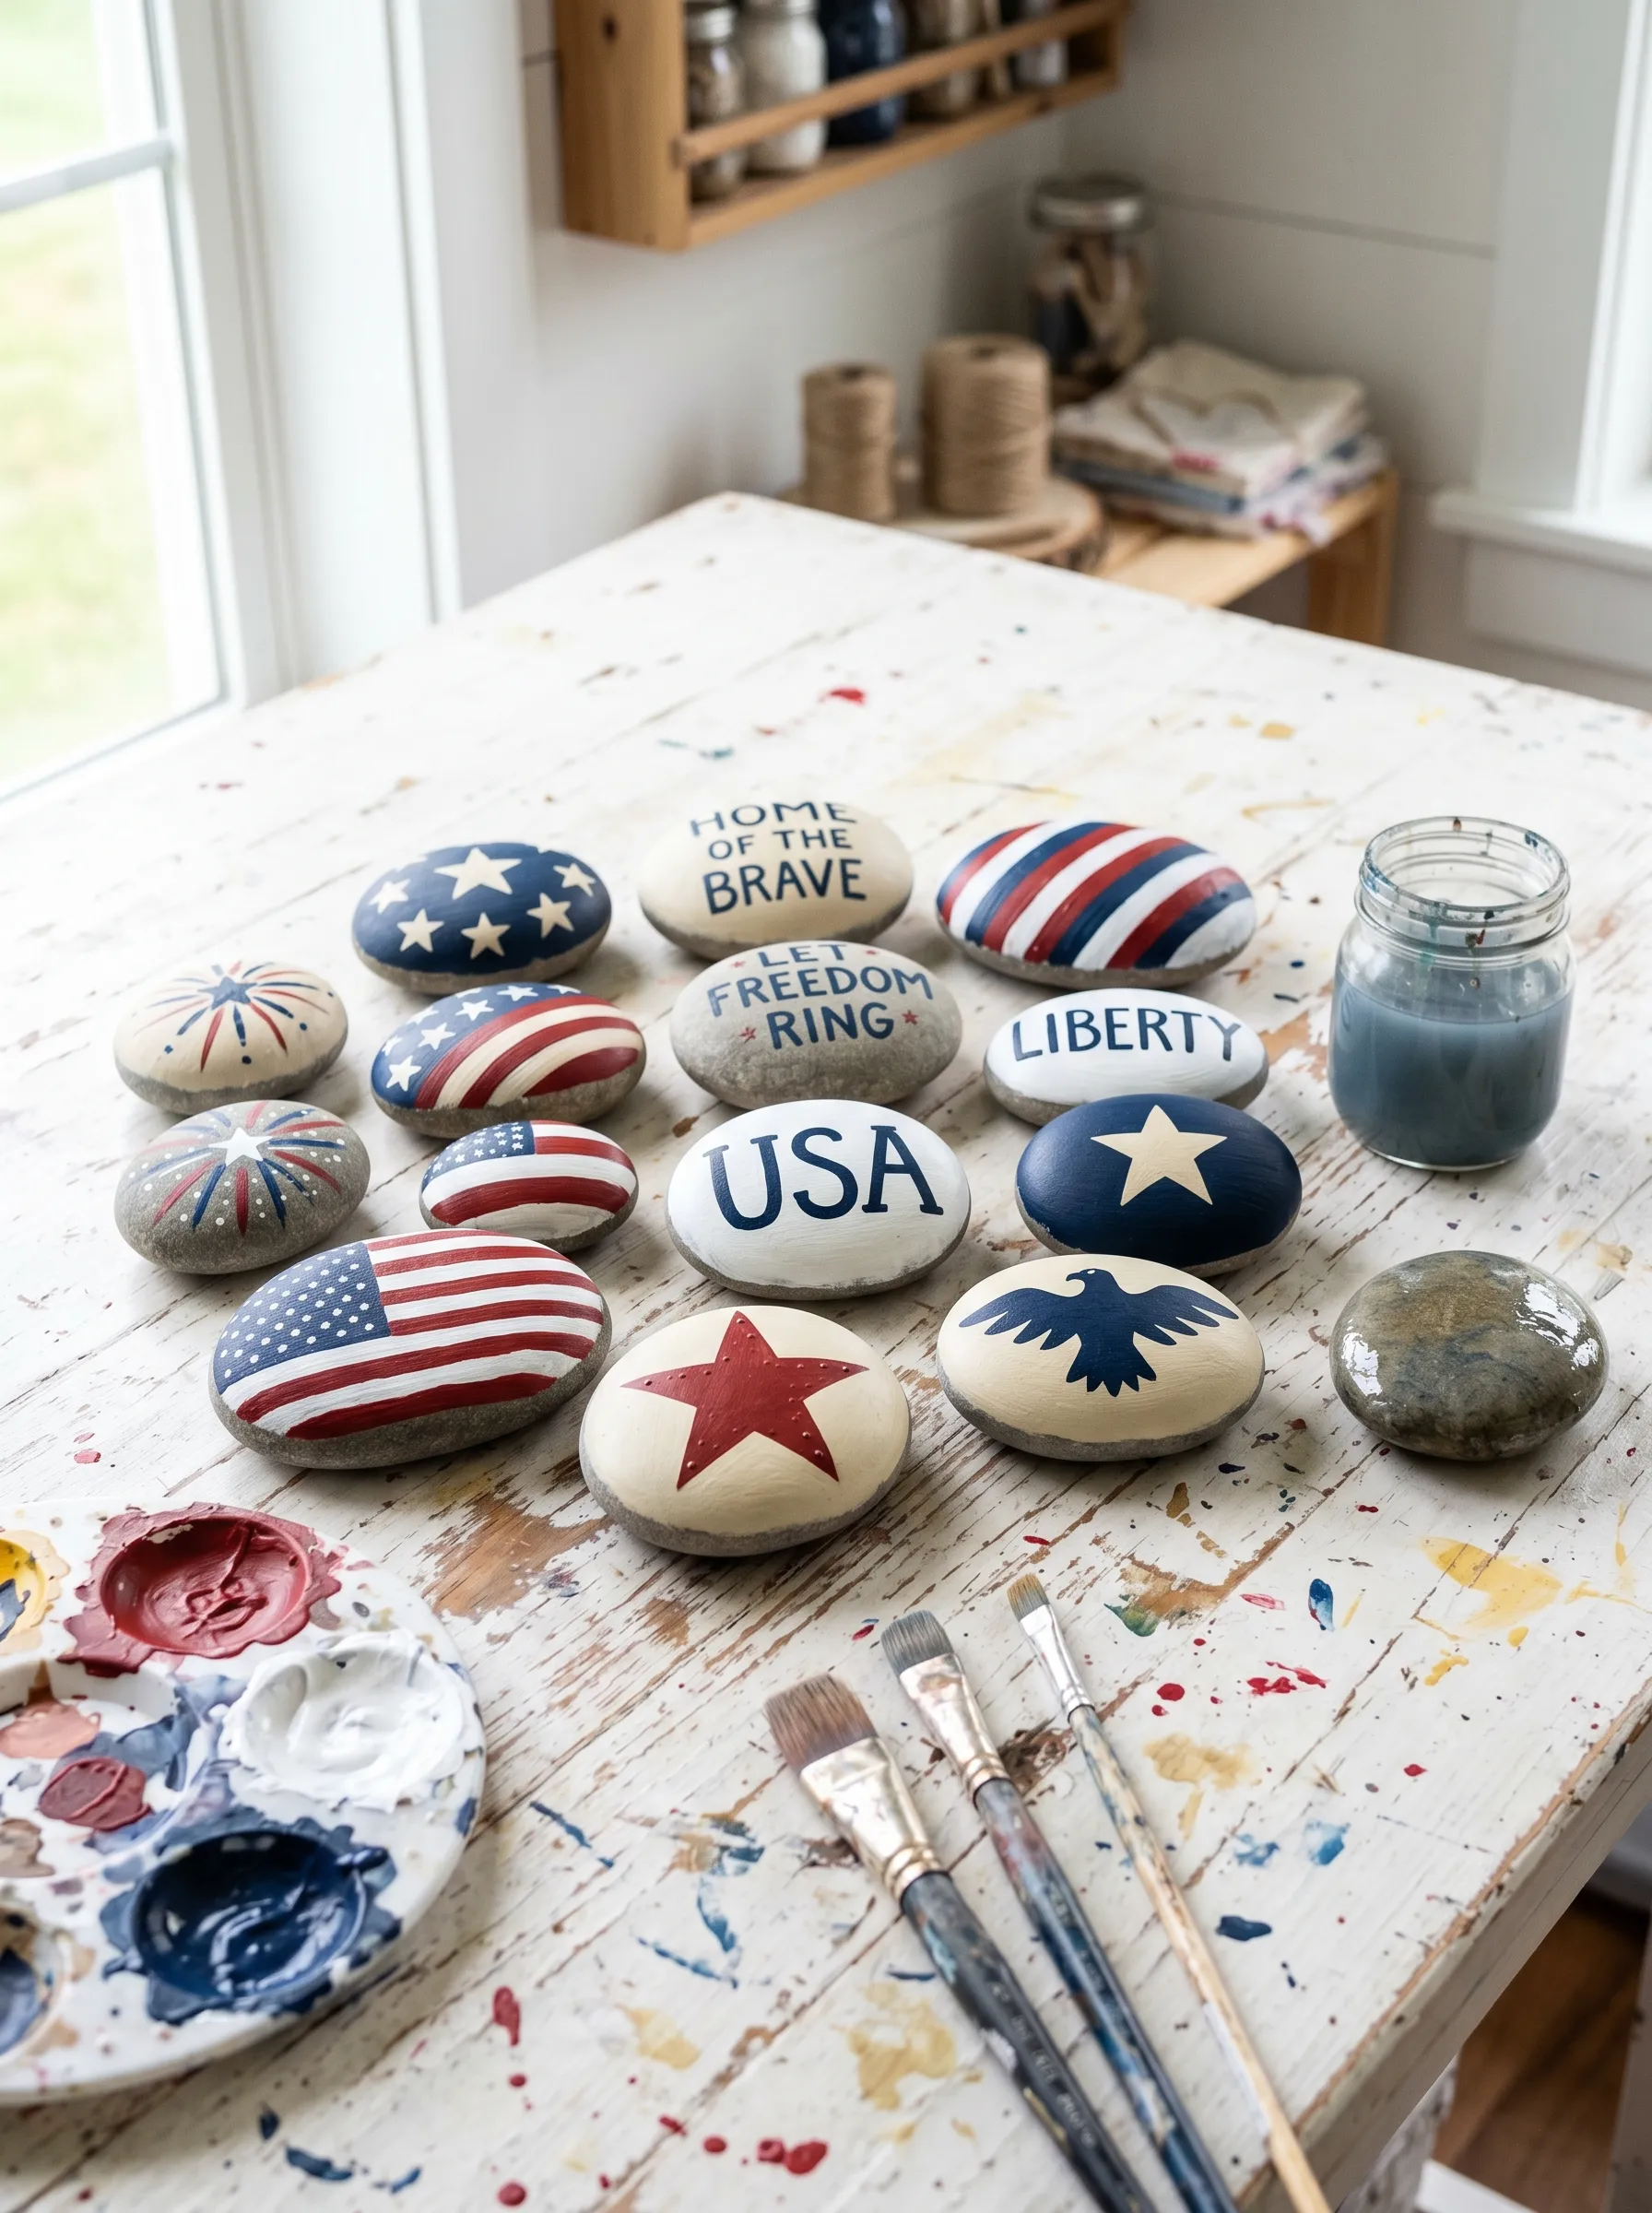
Collect smooth, flat river rocks or purchase landscape stones from a garden center. Flat surfaces take paint better than rounded ones. Wash rocks thoroughly and let dry completely.
Prime each rock with white spray primer — this is the single most important step. Without primer, acrylic paint sits on the surface rather than bonding to it and will chip within days.
For flag rocks: base coat in cream, then lay parallel strips of painter’s tape for the stripe sections. Paint red between alternating tapes. Remove tape, then use a fine liner brush to add the canton rectangle in navy, and paint or stamp white stars. For text rocks: base coat in cream or navy, letter in the contrasting color using a liner brush with thinned paint for smooth flow. For symbol rocks: trace a star or eagle template with a pencil first, then fill in with a flat brush.
Seal every rock with two coats of outdoor Mod Podge or clear acrylic sealer. Without sealing, painted rocks in garden conditions will fade or peel within one season. Display in clusters of five to eight — a single painted rock looks lost outdoors, while a collection looks intentional.
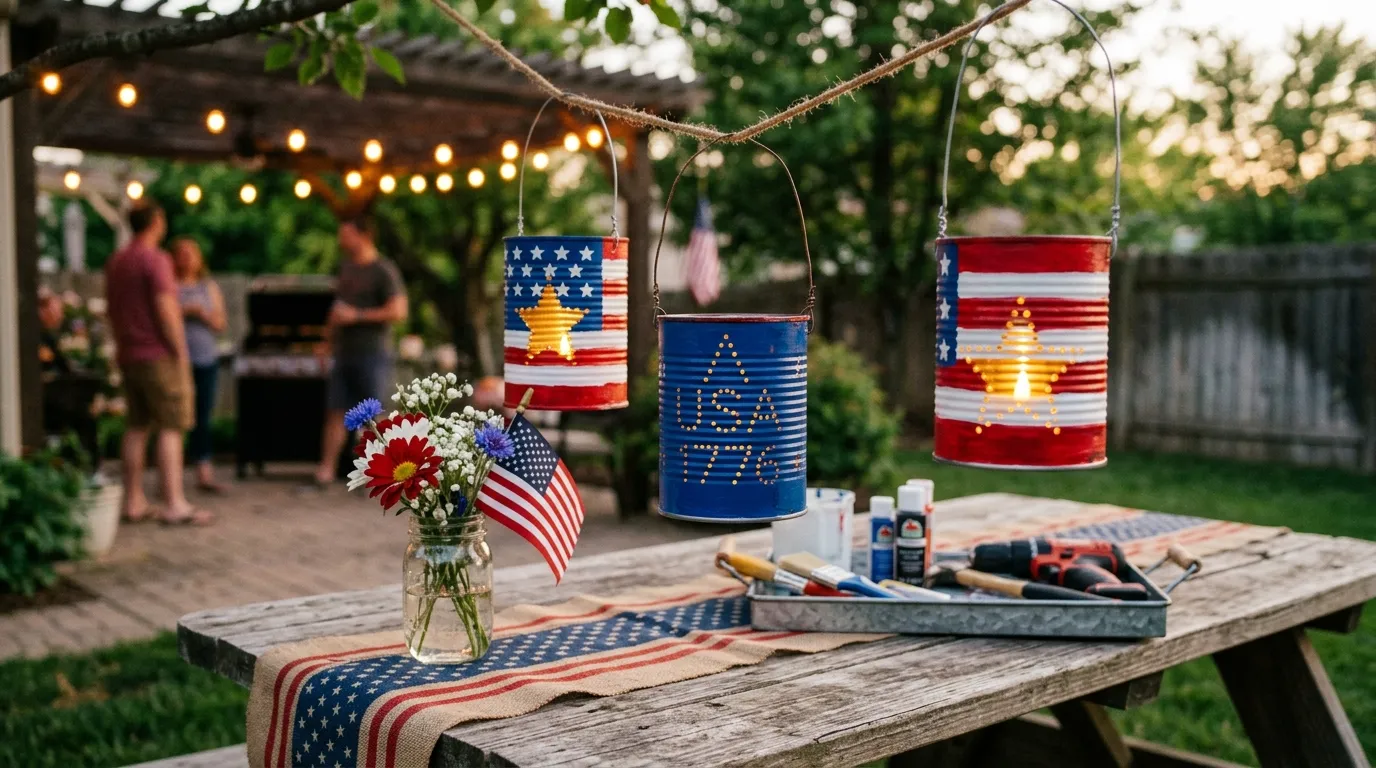
The Patriotic Paper Luminaria Bags
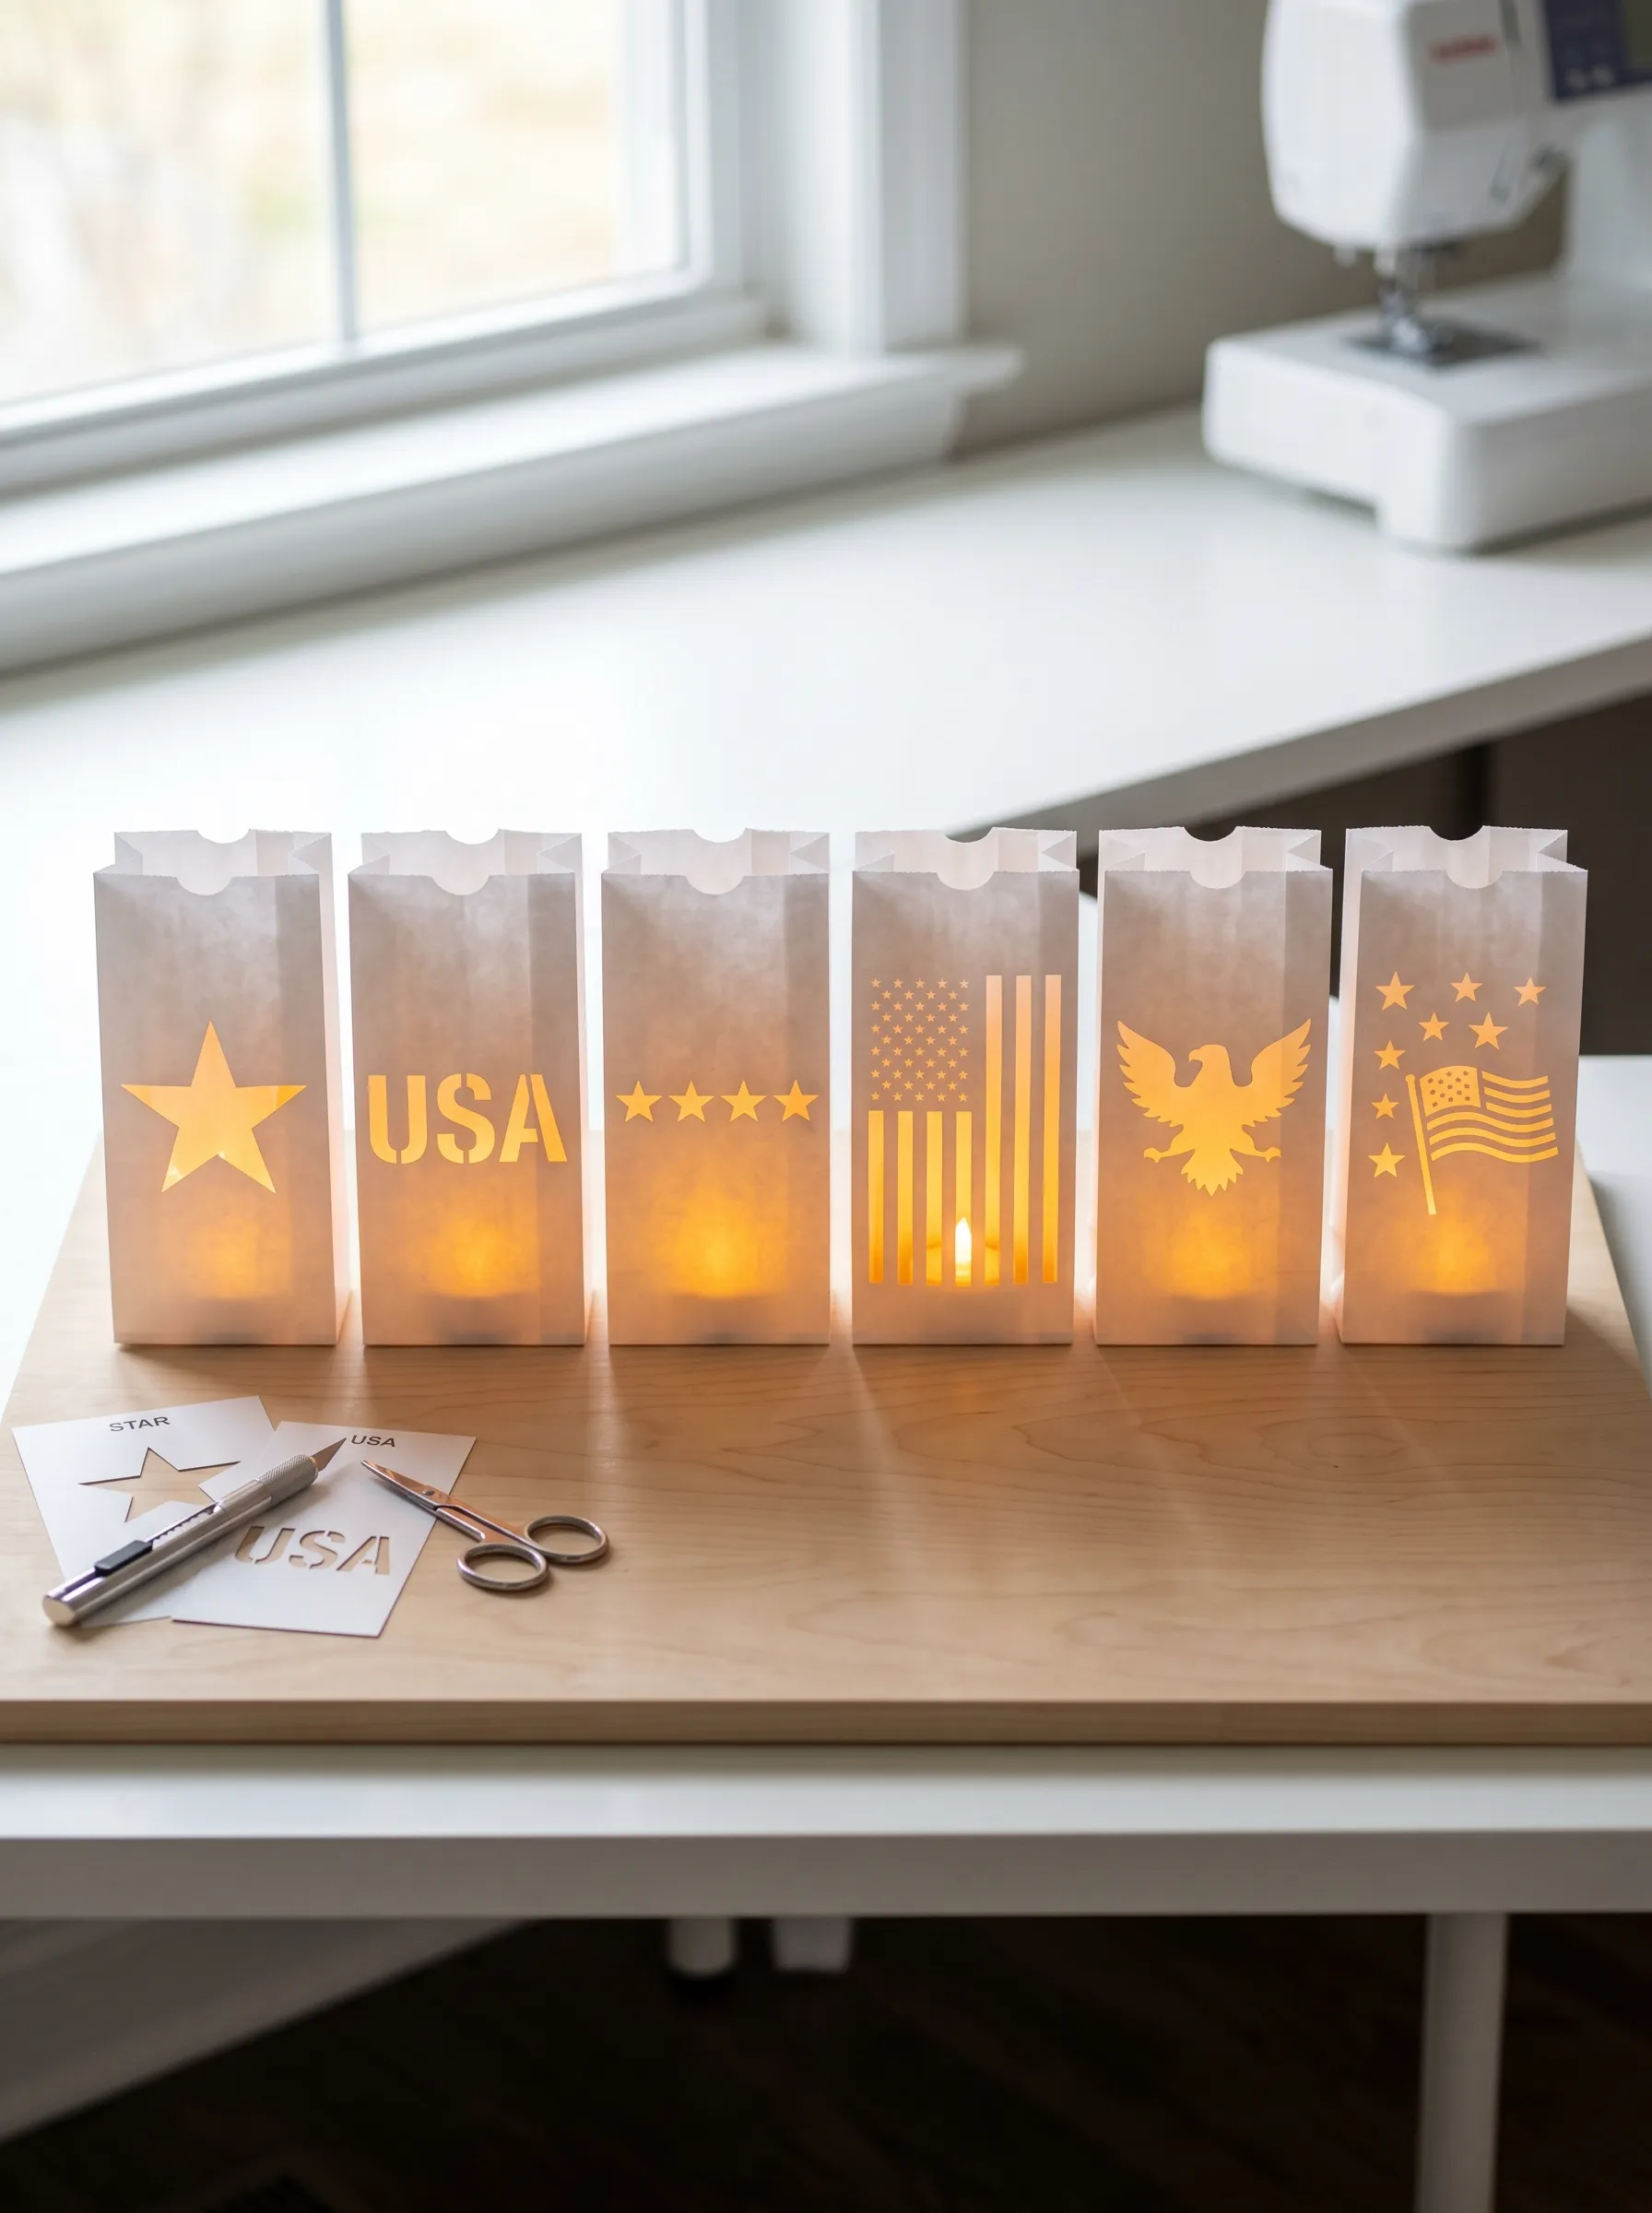
Purchase white paper lunch bags with a flat bottom that allows them to stand independently. Do not use any bags with handles or glossy surface — the candle glow will not transmit through anything other than plain paper.
Cut your designs with a craft knife or small scissors using a printed stencil taped to the front of each bag. Cut cleanly through a single layer only. Designs that work at this scale: a simple five-pointed star, bold block letters like “USA,” the flag silhouette in outline form, the eagle silhouette, and a simple firework burst of radiating lines from a center point.
Fill each finished bag with approximately one cup of play sand — the sand stabilizes the bag and prevents tipping. Press a battery-operated tea light candle into the sand at the center. Real flames in paper bags require constant supervision and fire awareness; battery tea lights produce the same glow effect with no risk.
Line these up in a row along a porch step edge, a pathway, a tabletop, or a mantel. The impact is entirely in the repetition — six in a row reads as decorating, one on a shelf reads as forgotten.
The Fringe Flag Banner Wall Hanging
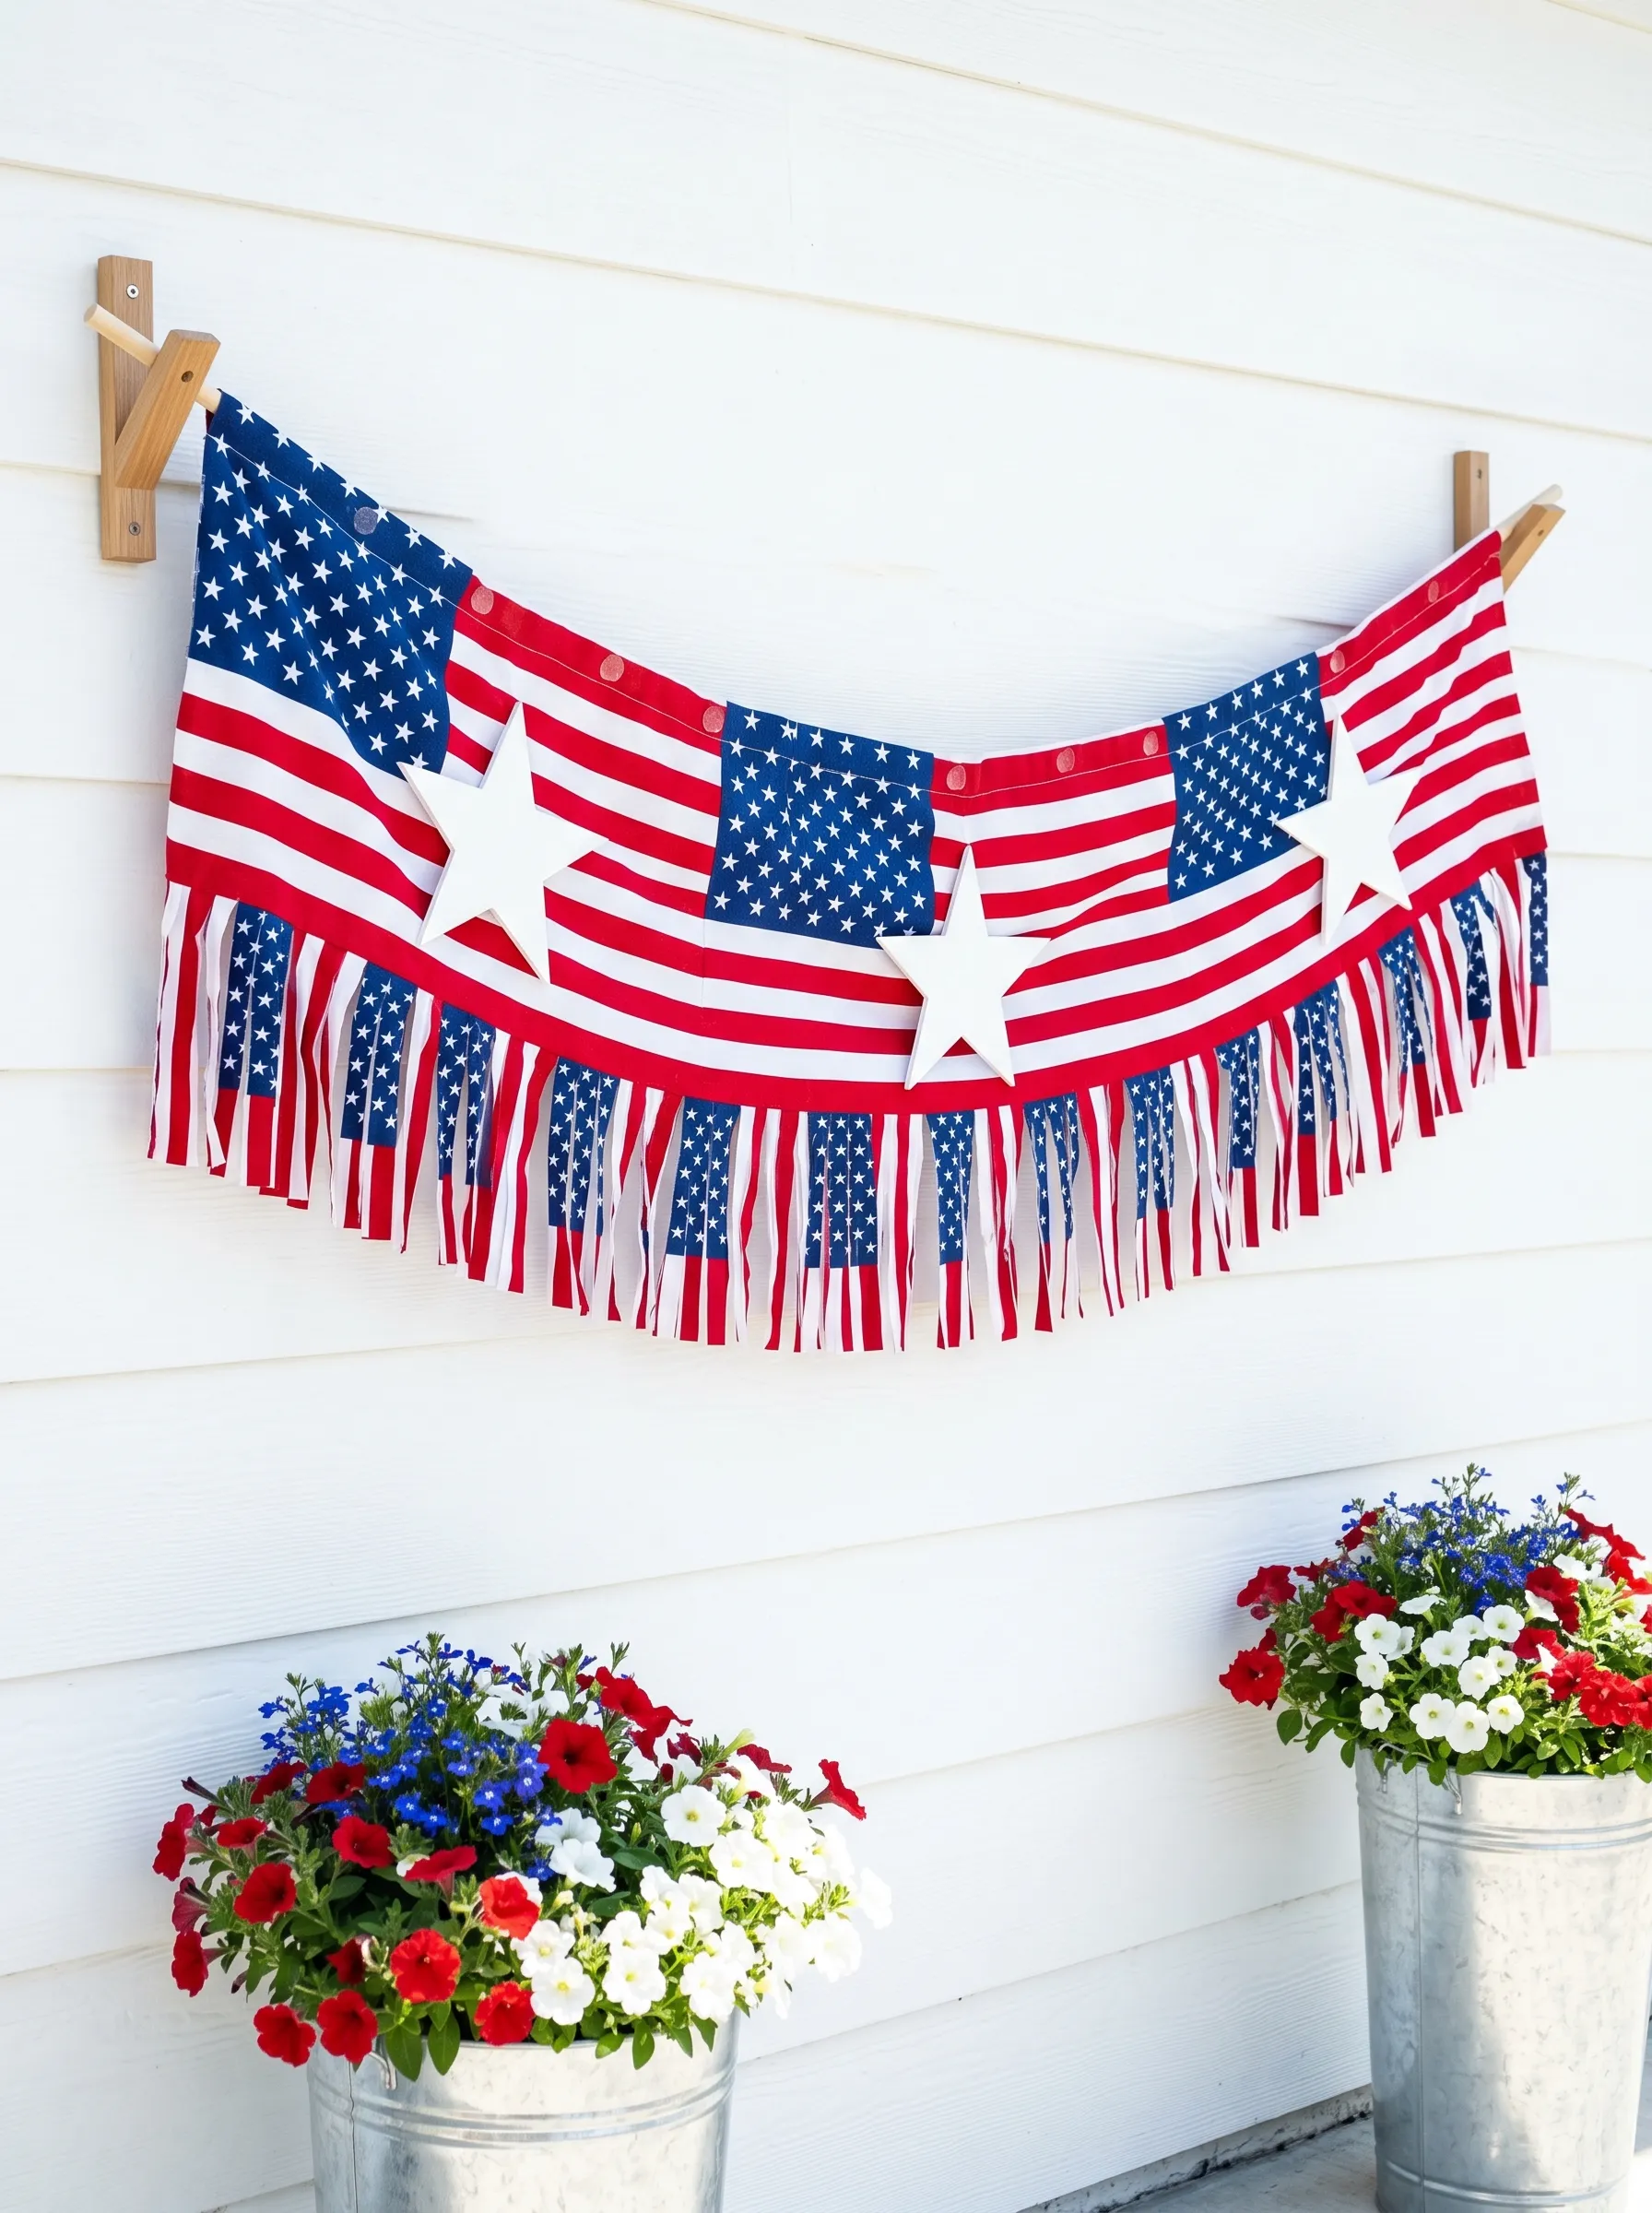
Purchase three to five full-size American flag bandanas or flag-print fabric panels in the same format. Lay them face-up in a row on a flat surface so they slightly overlap, then use a rotary cutter and cutting mat to cut the bottom three to four inches of all of them into one-inch strips vertically, all the way across — this is the fringe. Keep the top portion intact.
Fold the top edge of each panel over by one inch, then hot glue or sew the fold to create a channel. Thread a length of clear monofilament or clear elastic cord through all the channels in sequence to join them into one continuous banner. Attach cord ends to two wooden wall-mounted brackets — the simple L-bracket style in natural wood shown here works well.
Add three to five large wooden stars cut from one-quarter inch birch plywood and painted white, attached to the banner surface by hot glue at evenly spaced intervals. Install two galvanized metal buckets on the ground below the banner and fill with a mix of red, white, and blue petunias or geraniums planted together in each bucket. The combination of the banner above and the living color below creates a complete porch display.
The Patriotic Macramé Wall Hanging
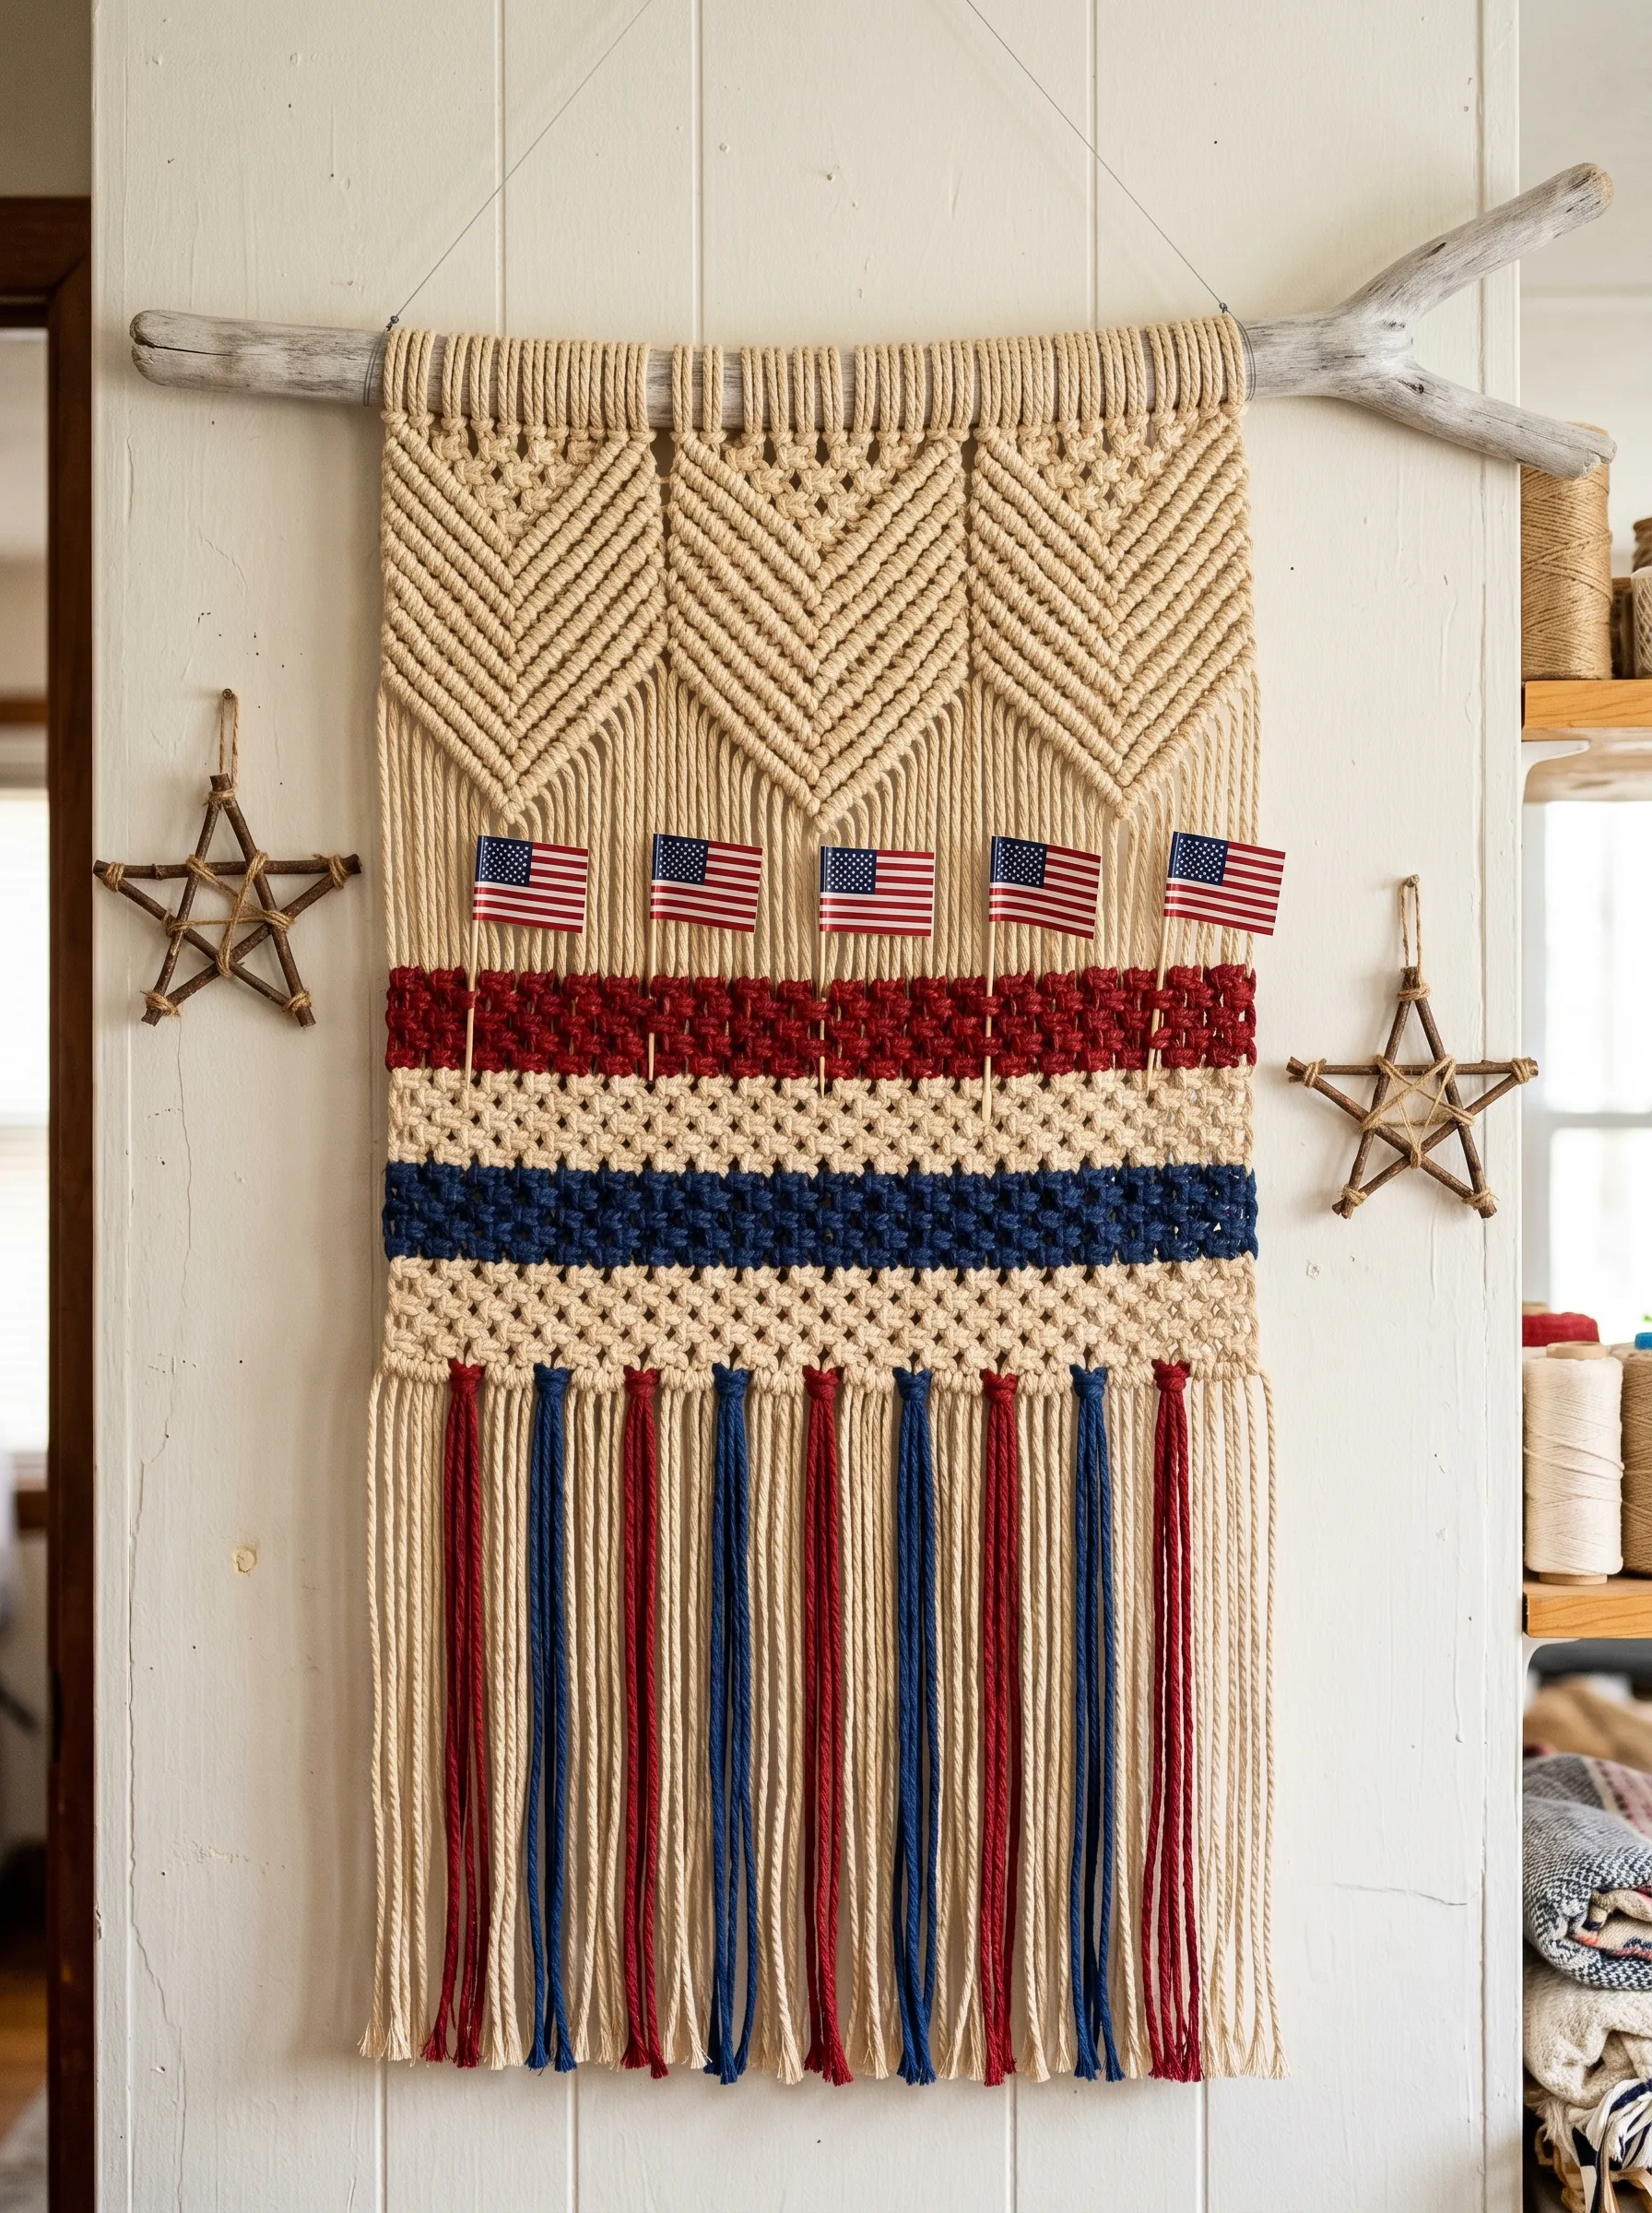
Source a driftwood branch or a length of thick dowel rod. The driftwood shown has natural imperfections and a weathered grey color that work well with natural macramé cord — it is worth finding a real piece rather than substituting. Look on beaches, in craft stores, or at floral supply shops.
Cut natural cotton macramé cord into lengths of two meters each — you will need approximately forty lengths for a medium-sized hanging. Fold each in half and attach to the driftwood using lark’s head knots, packing them side by side across the entire width of the branch.
Work a chevron pattern through the upper portion using diagonal half-hitch knots — this is one of the first patterns any beginner learns and tutorials are widely available. The chevrons create the inverted V shapes visible in the upper section of the hanging.
In the lower third, introduce colored cord sections: weave in horizontal rows of dark burgundy and navy cord using square knots. The specific pattern is rows of alternating square knots in the colored sections, with natural cord in the sections between. Thread small American flag picks through the knotting at the transition zone between the natural and colored sections.
Let the cord hang as fringe below the knotted section, trimming to an even length at the base. Add a few lengths of red and navy cord into the fringe by folding them around the existing strands and pulling through, so the fringe tapers from natural at the outer edges to colored stripes toward the center. Hang from two cup hooks.
The Whole Point of Making Something
Every project in this collection has one thing in common.
It required a decision. Not a purchase, not a delivery confirmation — an actual decision about color and material and shape. That’s what handmade means. It means you chose.
That’s what makes the difference between a home that feels decorated and a home that feels considered. Nobody needs to know how long it took. Nobody needs to know it was a Tuesday night with a glue gun and a half-drunk cup of coffee.
They just need to walk in and feel like someone lives here. Someone who actually thought about it.
That person is you. These are your tools.