
You bought a basil plant from the grocery store. It came in a plastic sleeve with a ribbon around it. You put it on the windowsill, watered it twice, and then watched it slowly collapse over two weeks like a plant with a personal problem.
That’s not gardening. That’s buying produce with extra steps.
An outdoor herb garden is a different animal entirely. Done right, it becomes the most functional square footage in your entire yard — something you actually use, something that earns its space, and something that looks like it belongs to someone who knows what they’re doing.
The problem is that most people approach it like a checklist. Pick some herbs. Put them in pots. Water them. Wonder why it looks terrible and grows poorly. The setup matters as much as the plants themselves. And that’s what nobody seems to want to talk about.
Container Choices Nobody Takes Seriously Enough
The vessel is not neutral. It dictates how your herbs grow, how the garden looks, and how much maintenance you’re signing yourself up for.
The Terracotta Problem
Terracotta is the default choice because it looks nice and people have always used it. Both of those things are true. What’s also true is that terracotta dries out fast — faster than most herbs can handle in summer heat.
If you love terracotta and you’re going to use it anyway, cluster the pots together. A group of terracotta pots holding heat and humidity between them performs significantly better than a single pot standing alone on a hot surface. The pots cool each other slightly, and the microclimate they create retains more moisture. A lone terracotta pot in full sun on a wooden deck is a dehydrating machine.
Group them in odd numbers. Three, five, or seven pots of varying heights read as intentional. Two or four read as accidental.
When the Container Becomes the Feature
Sometimes the container is doing more work than the plants. An old galvanised steel tub, a repurposed wine barrel, a cable drum turned planter — these are vessels that carry their own story before a single herb goes in.
The key is scale. Small quirky containers read as precious. A big, unexpected container reads as design. If you’re going the repurposed route, go large. A full-size galvanised trough can hold ten to twelve herbs comfortably, creates a strong visual presence, and looks entirely deliberate.
Drainage is the one non-negotiable. Whatever you use, it needs holes at the bottom, or you’re building a swamp. Drill them yourself if needed. Use a good-quality potting mix rather than garden soil — the latter compacts and kills drainage over time.
Height and Elevation
A herb garden at ground level looks like an afterthought. Even a modest elevation changes how it reads in the space.
Wooden legs on a galvanised trough. A repurposed cable spool standing on its edge to double as a table planter. A tiered ladder shelf against a wall. Height creates visibility, makes harvesting easier, and gives the garden a relationship with everything around it rather than just sitting flat on the earth.
Plant Placement Is Not About Aesthetics First
Most people arrange herbs by what looks good together. That’s the wrong starting point.
Light and Water Habits
Mediterranean herbs — rosemary, thyme, sage, lavender — want full sun and dry conditions. They hate wet feet. They handle drought without complaint.
Herbs like basil, mint, and parsley want more consistent moisture and do better with afternoon shade in hot climates. Planting these side by side in the same container is a compromise that neither group wins.
If you’re doing a mixed herb garden in a single bed or container, accept that you’ll need to manage the balance. Place the moisture-lovers toward the centre where the soil retains water longer, and the drought-tolerant ones at the edges where it drains fastest.
The Invasive Ones
Mint will take over. This is not an opinion. It is documented plant behaviour. Mint spreads by underground runners and it will colonise every inch of available soil, crowding out everything else within a season.
Plant mint in its own pot. If you’re doing a mixed raised bed or trough and you want mint in it, sink a buried container inside the bed — a plastic pot with the bottom cut off, its rim just below soil level — and plant the mint inside it. This contains the runners without restricting the plant above ground.
Lemon balm behaves similarly. Same solution.
Tall Plants and Sight Lines
Dill, fennel, and tarragon grow tall. If they go in front of shorter herbs, everything behind them disappears. Taller plants go at the back of beds or in the centre of round planters. This isn’t complicated, but it’s easy to ignore when you’re planting based on which six-pack was available at the nursery.
Outdoor Herb Garden Ideas
Stone Spiral Herb Tower
Build a spiral herb tower from dry-stacked natural stone — limestone or sandstone work best, as they’re flat-sided and stack without mortar. Begin with a base ring approximately 150cm in diameter. Build the stone walls up to about 30cm high, filling the interior with a mixture of coarse gravel and topsoil. Then begin the second tier, set slightly inward and rotated so the spiral begins, filling and building as you go. Continue to a height of 80–100cm, with the spiral pulling inward as it rises, the top tier reaching perhaps 60cm in diameter.
Plant based on drainage zone. The top of the tower drains most freely — rosemary, thyme, and lavender here in the driest conditions. The middle levels hold moderate moisture — sage, oregano, chamomile, and nasturtium. The base retains the most moisture — mint (contained), parsley, and chervil.
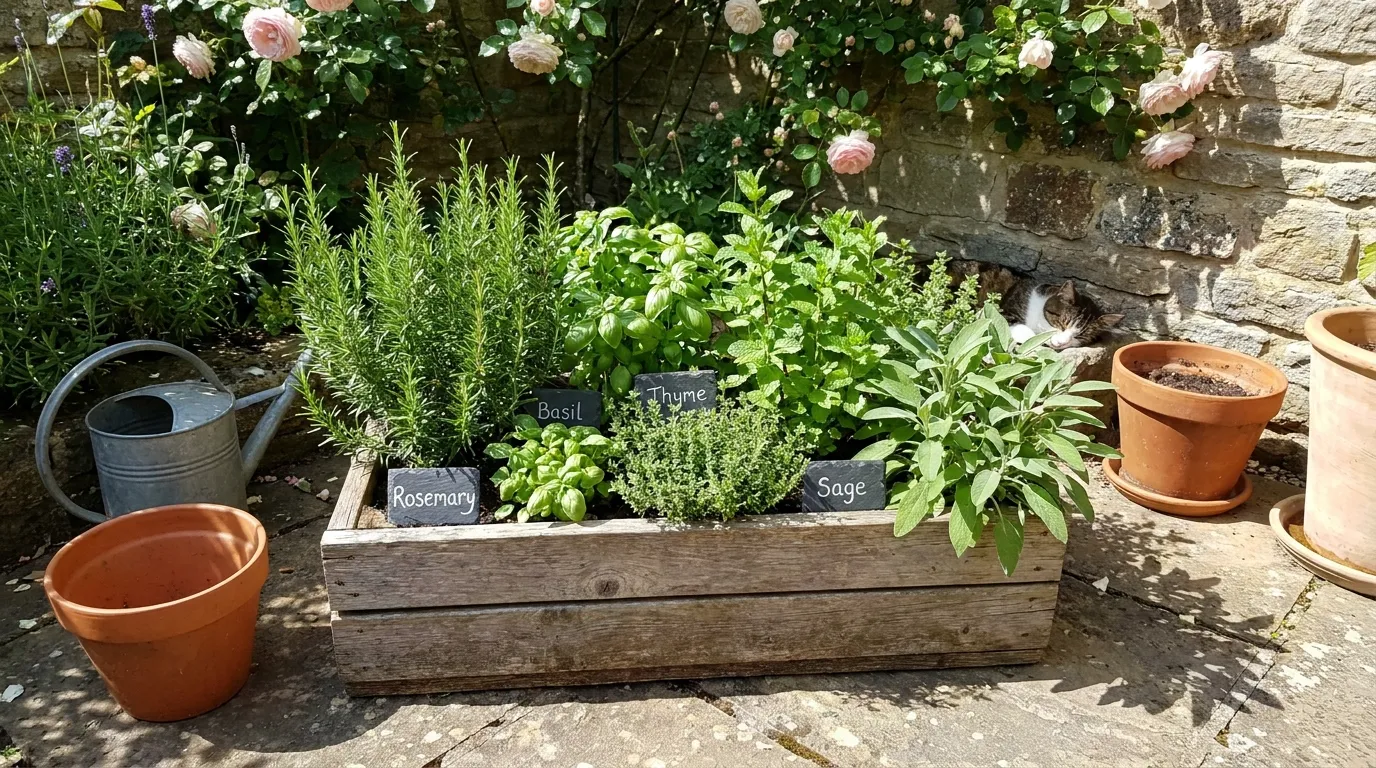
Label each plant on small chalkboard stakes or slate pieces cut and hand-lettered. This is not precious — the labels make the tower functional and readable as a garden, not just decorative.
Painted Pots in a Cedar Trough
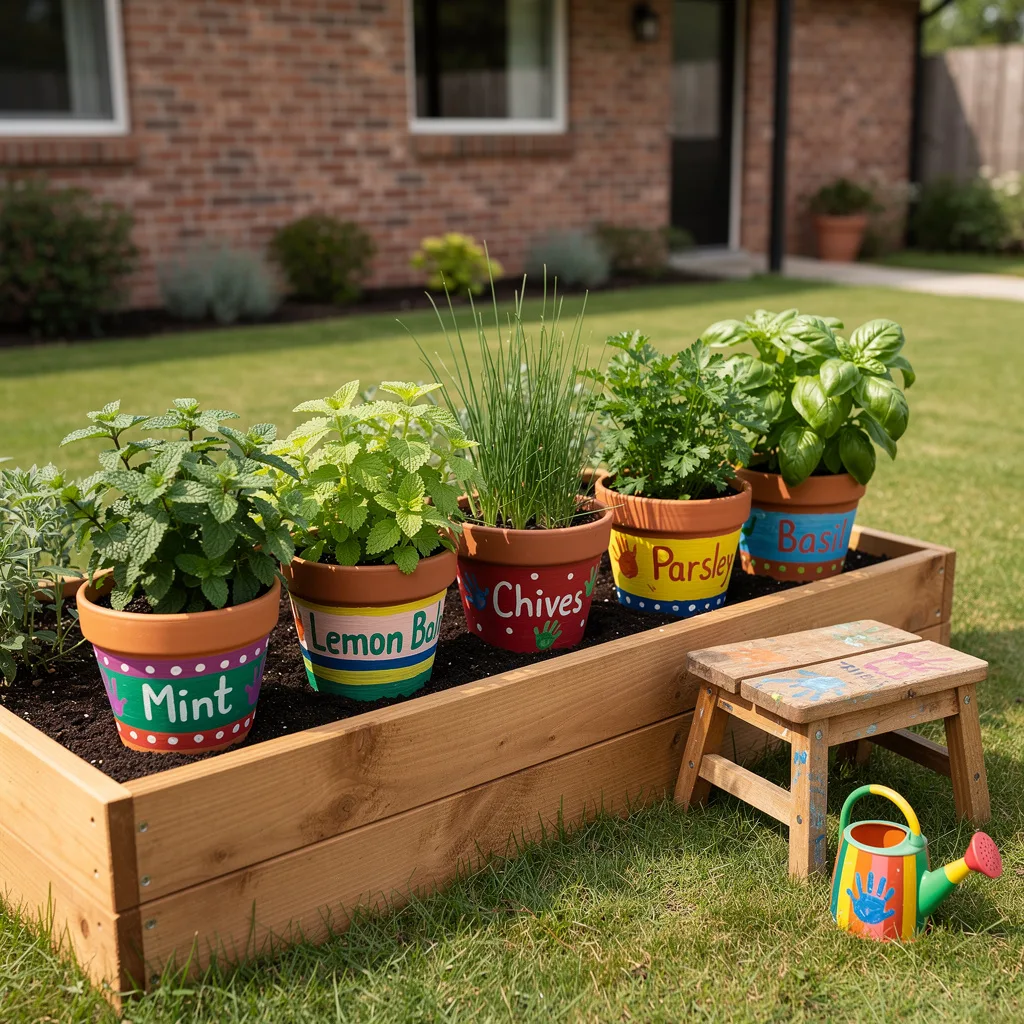
Build or buy a cedar raised bed approximately 60cm wide, 30cm deep, and as long as your space allows. Fill the base with 10cm of pea gravel for drainage, then a layer of landscape fabric, then potting mix. Instead of planting directly into the soil, sink individual terracotta pots into the bed, their rims sitting just above soil level. Paint each pot before planting.
Use outdoor acrylic or chalk paint in bold, primary colours — one colour per pot. Keep the design simple: a solid band of colour across the lower two-thirds of the pot, with the terracotta rim left exposed at the top, or cover the whole pot in one colour and letter the herb name in white paint. Use a wide, flat brush for the labels; hand-lettering doesn’t need to be perfect to look deliberate. Place a child-sized stool nearby. Plant herbs your household actually uses. Add a painted watering can in a complementary colour. This setup was made for small hands, but it’s genuinely useful for everyone.
Slatted Wall Herb Panel
Fix two vertical timber battens — 4x4cm minimum — to an exterior wall with masonry fixings, positioned 60cm apart and running floor to eave height. Between the battens, fix horizontal timber slats at 10–15cm intervals. Use hardwood for the slats — iroko, teak, or similar — stained dark to deepen the colour and protect it from weather. This creates a freestanding slatted panel against the wall.
Hang small timber or dark-painted trough planters from the horizontal slats using metal hooks, positioned at irregular intervals rather than in a grid. Put one on the left, the next slightly higher on the right, the next low on the left again. The staggered placement avoids the ordered look of a display unit.
Plant each trough with a single herb type. At the base of the panel, place two or three large terracotta pots with sprawling herbs — mint, lemon balm — that grow out and around the panel base, softening the transition to the ground.
Terracotta Cluster on Warm Timber

Gather a collection of terracotta pots in three or four different sizes — nothing identical, nothing matching. The smallest should be no smaller than six inches in diameter; anything below that dries out before you can rescue it. Fill each with a single herb variety rather than mixing: one pot of basil, one of rosemary, one each of sage and thyme, one for chives, one trailing pot of thyme or oregano with its stems falling over the rim.
Place the largest pot at the back left or back right, not centred. Arrange the remaining pots in a loose forward cluster, with the trailing pot at the very front edge. Set the group on a warm timber surface — a deck, a wooden step, or even a wide timber board if you’re on stone — and let the colour of the terracotta do its work against the wood grain. The combination of orange clay and warm timber is one of those pairings that doesn’t try hard and still looks completely right. Water the individual pots on slightly different schedules based on what’s in them. Basil drinks more than rosemary. Know your pots.
Italian Courtyard Pot Garden
Gather a serious collection of pots — not a coordinated set, but a genuine accumulation. Terracotta in every size. A few glazed pots in green or dark brown. A stone urn if you can find one. Stack smaller pots on upturned larger ones to create height variation. Allow some pots to sit on the ground, others on bricks, others on purpose-built timber platforms.
Plant freely and at different stages of maturity. A rosemary that’s three years old and fully woody alongside a freshly planted basil. Established sage next to young lavender. The point is accumulated, unplanned abundance — the look of a garden that has been growing for decades rather than assembled last spring.
Leave pots without saucers. Let the weathering happen. Lime deposits, green algae at the base of terracotta, the white bloom of mineral deposits on clay — all of this is the aesthetic. The worst thing you can do to this garden is keep it too clean.
Galvanised Trough on Timber Legs
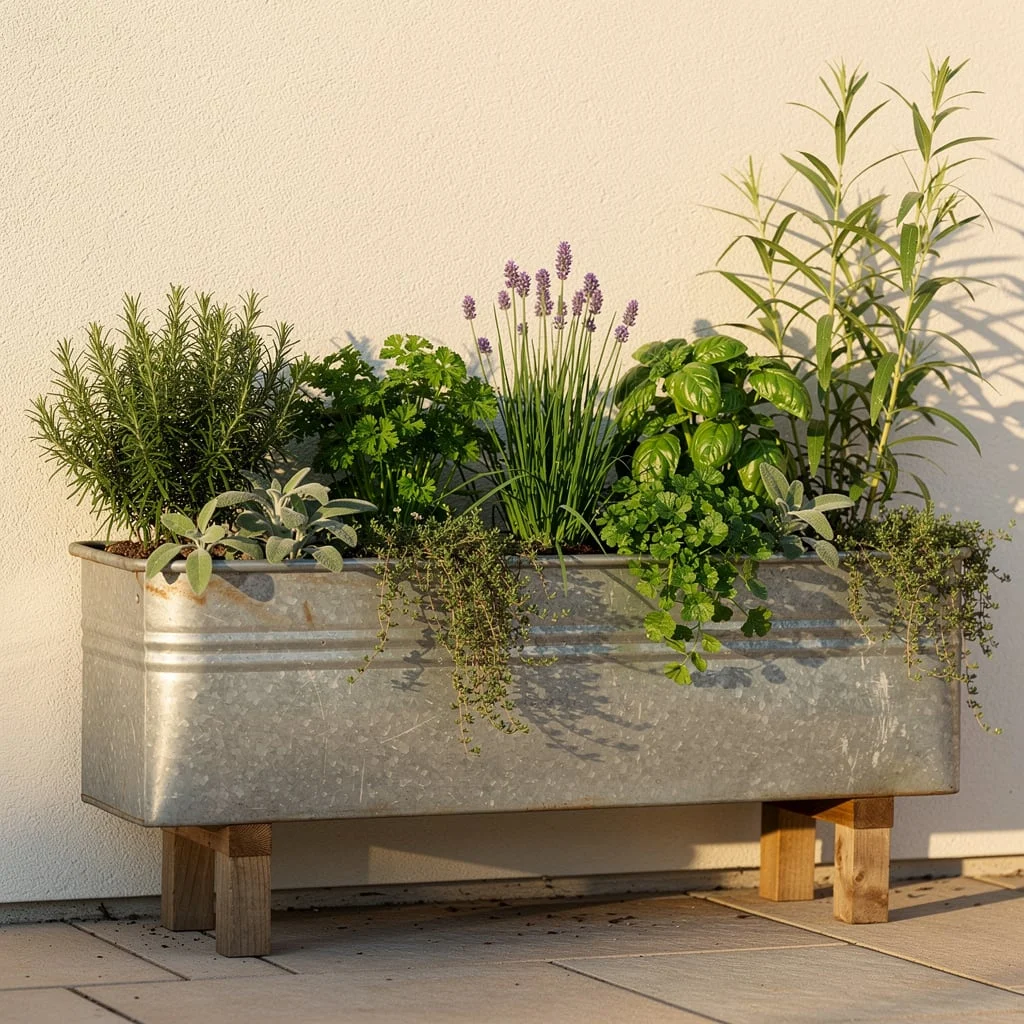
Source a galvanised steel stock tank or laundry trough — the larger the better, ideally around 90–120cm long. Drill drainage holes every 20cm along the base. Build or attach four simple wooden legs from 4×4 pine, cut to approximately 40–50cm tall, secured with timber screws through the existing bolt holes on the trough or with steel L-brackets. Sand the legs and finish with an outdoor oil or leave them raw to weather naturally. The planting arrangement should run from short to tall, left to right or front to back.
Trailing thyme and oregano at the front edges, mid-height basil and parsley in the middle, rosemary and sage at the rear, with lavender as the punctuation between sections. Let the trailing herbs spill down over the galvanised metal — the contrast between the silver steel and the soft green tendrils is the whole point of the exercise. Position against a plain rendered wall or flat fence where the structure of the trough reads cleanly without competition.
Tiered Metal Frame Planter
Use a powder-coated metal A-frame planter stand in black or dark bronze — the kind with four tiers of rectangular troughs that sit in the frame. The troughs themselves should be deep enough to grow substantial herbs, not the shallow window-box style that dries out in a morning.
Alternate the contents of adjacent troughs: herbs with flowers, herbs alone, herbs with flowers. On the herb-with-flower tiers, plant violas, pansies, or compact marigolds alongside thyme or basil. The colour of the flowers gives the planter a reason to exist as a patio feature rather than pure utility. Marigolds alongside basil are a classic combination that also works as companion planting — the marigolds repel aphids.
Situate the frame in a settled garden context — next to a timber bench, adjacent to a work table, somewhere with visual anchors around it. A black metal frame standing alone in the middle of an open patio looks like something waiting to be returned to the shop. Give it company.
Clawfoot Bath, Fully Committed
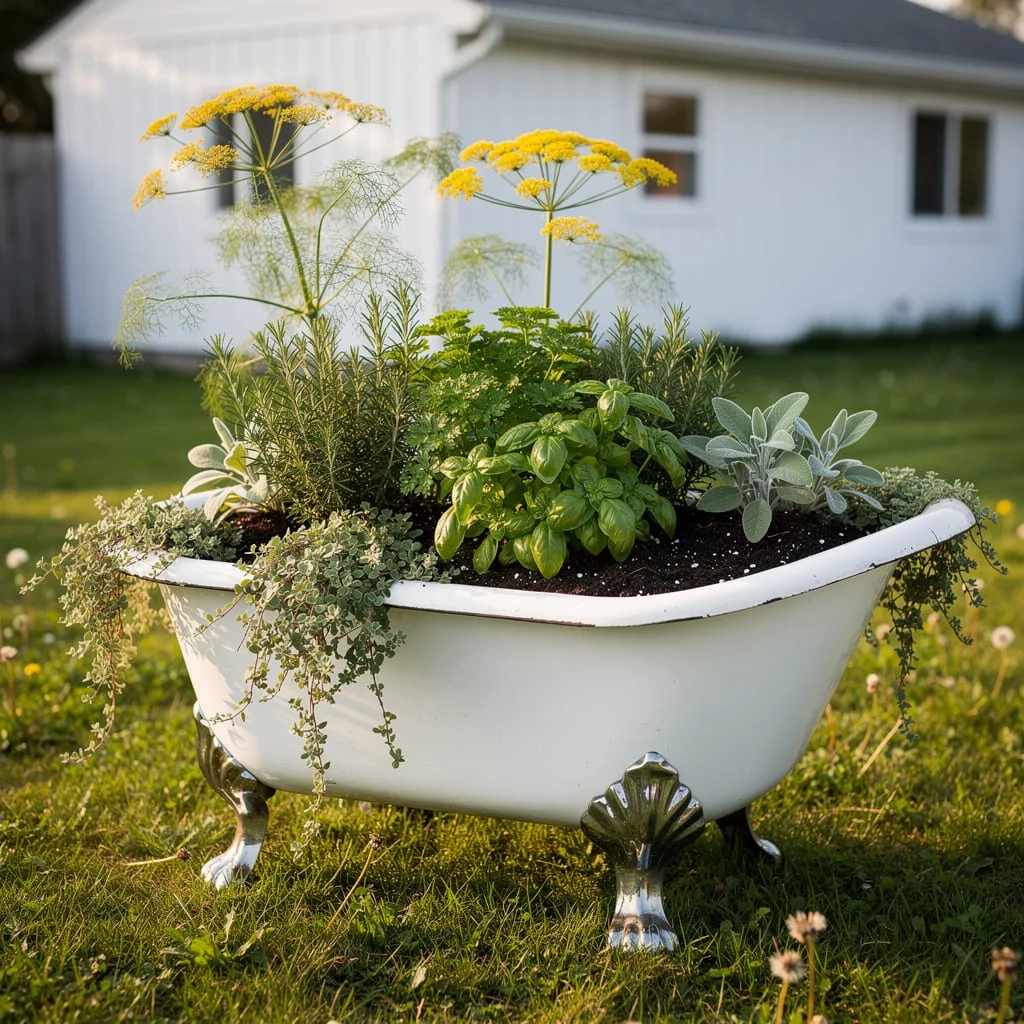
Find a salvage clawfoot bathtub — cast iron if you can manage it, pressed steel if you can’t. Drill 12–15 drainage holes across the base. This will feel violent. Do it anyway. Fill the base with a layer of broken terracotta pot shards or coarse gravel, then fill the tub with a mix of two-thirds potting mix and one-third coarse horticultural grit. Plant generously and at height.
This vessel earns drama. Rosemary at the back, growing tall. Basil in the centre, full and round. Sage to one side, grey-green and broad-leafed. Let dill or fennel tower above everything else at the back corners, their umbel flowers becoming part of the arrangement when they bloom. Choose a location where the tub stands slightly apart — on a lawn, away from walls, so the ornamental feet are visible from all sides. The bath doesn’t need context. It is the context. Place it in long grass or wildflower lawn to lean into the slightly eccentric quality of what you’re doing.
Cedar Raised Bed, Properly Scaled
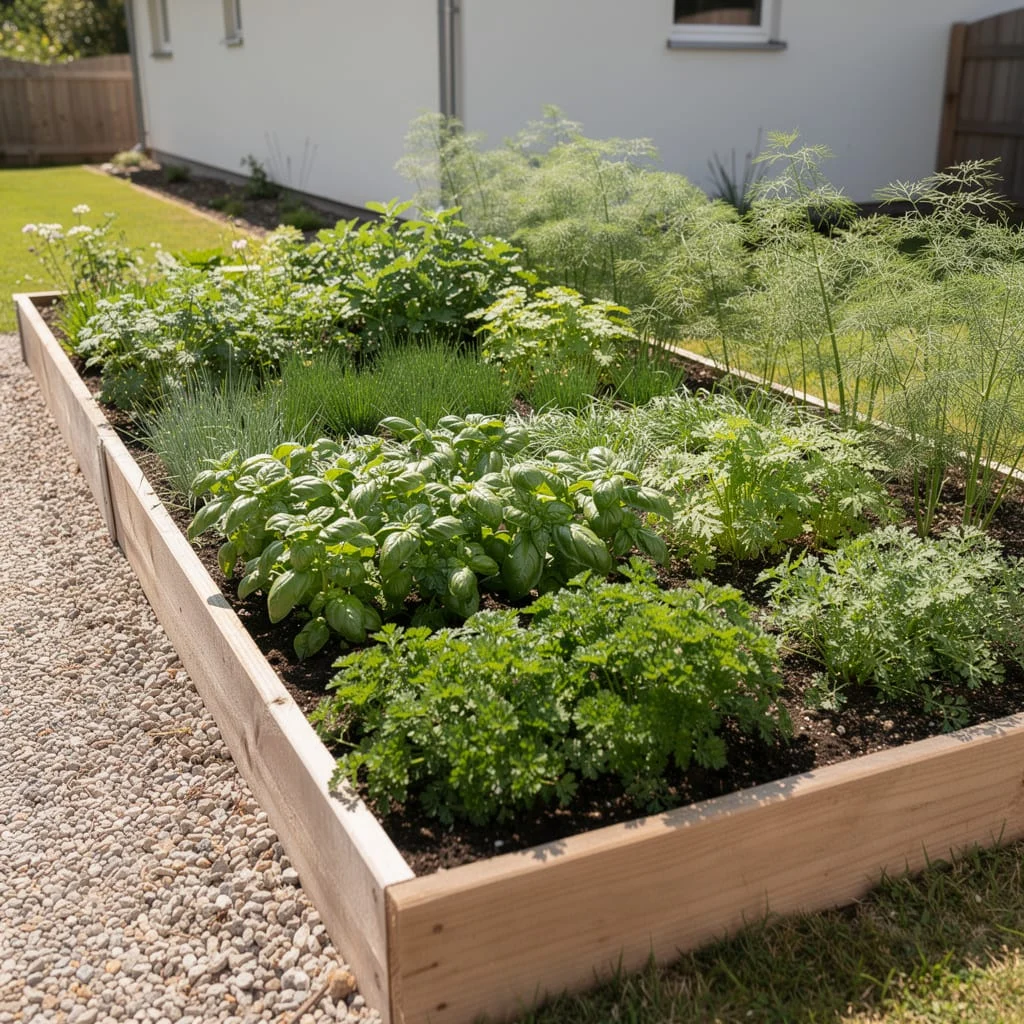
Build a raised bed from untreated cedar or Douglas fir boards — minimum 30cm deep, ideally 40–45cm for better root depth. Width should not exceed 120cm so you can reach the centre without stretching; length can be whatever your space accommodates. Fill with a mix of three parts quality potting compost, one part perlite for drainage, and one part garden compost if you have it.
Plant in loose zones rather than rigid rows — basil and parsley in one section, chives and coriander in another, then thyme, sage, and rosemary across the far end where they can spill over the edge of the bed. Place the bed alongside a gravel path rather than directly on grass. Lawn creeping into the bed edges is a constant maintenance problem. A 30–40cm gravel border around the perimeter resolves it cleanly, looks deliberate, and ties the bed into a more permanent landscape language.
Espalier Fig with Herb Underplanting
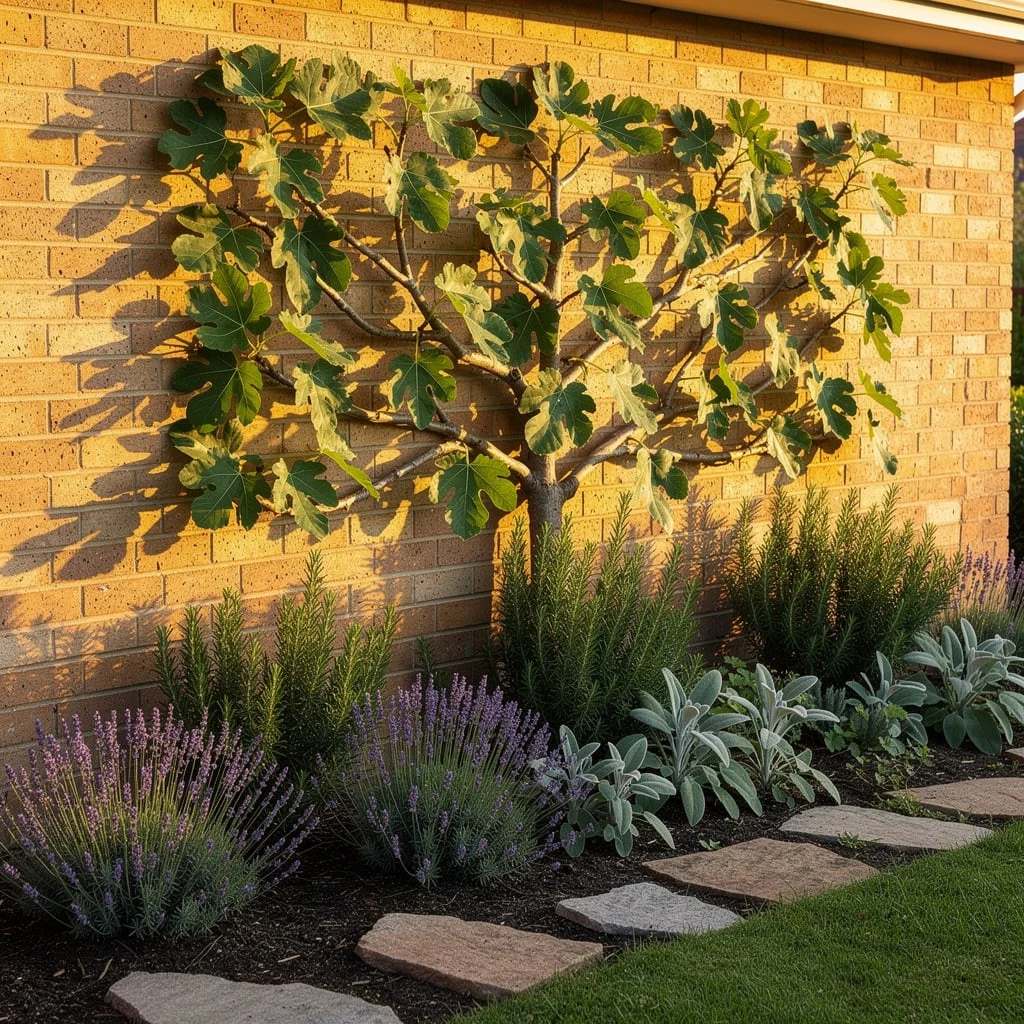
Train a fig tree flat against a sunny, south-facing wall using horizontal wires fixed at 40cm intervals into vine eyes. Choose a variety suited to wall training — Brown Turkey is reliable and widely available. Plant the fig at the base of the wall and begin training the main stems horizontally along the wires, removing any growth that pushes outward, away from the wall. Below the fig, at the base of the wall, plant a herb border in the exposed soil.
Work with the colour palette of the wall itself: against warm brick or sandstone, grey-green sage and silver-leafed lamb’s ear read beautifully. Add rosemary in upright columns between the sage, and low lavender at the very front edge as the border meets the path. The lavender flowers will echo through the season from pale purple to silver-grey seed heads without requiring replacement.
This combination works because the fig provides structure and overhead interest, the rosemary provides vertical rhythm below, and the lavender and sage provide soft carpet at ground level. Three distinct layers with one planting decision per layer.
Tiered Ladder Shelf, Wall-Leaning

Buy or build a three or four-tier A-frame ladder shelf in wood — teak, pine, or cedar all work, though cedar holds up best outdoors without treatment. The frame should lean against a wall or fence rather than stand fully freestanding; it’s more stable and looks less like garden centre display furniture. Assign one type of plant per shelf based on sunlight.
The top shelf receives the most light — rosemary and thyme here, the ones that want full sun and less water. The middle shelves for basil, chives, and parsley. The bottom shelf, which gets least light and holds moisture longer, for mint (in its own contained pot) and shade-tolerant herbs like Vietnamese coriander. Use only terracotta pots throughout. Mix weathered, age-stained ones with newer ones. The variation in age reads as collection rather than kit.
Pallet Herb Bed, Done Properly
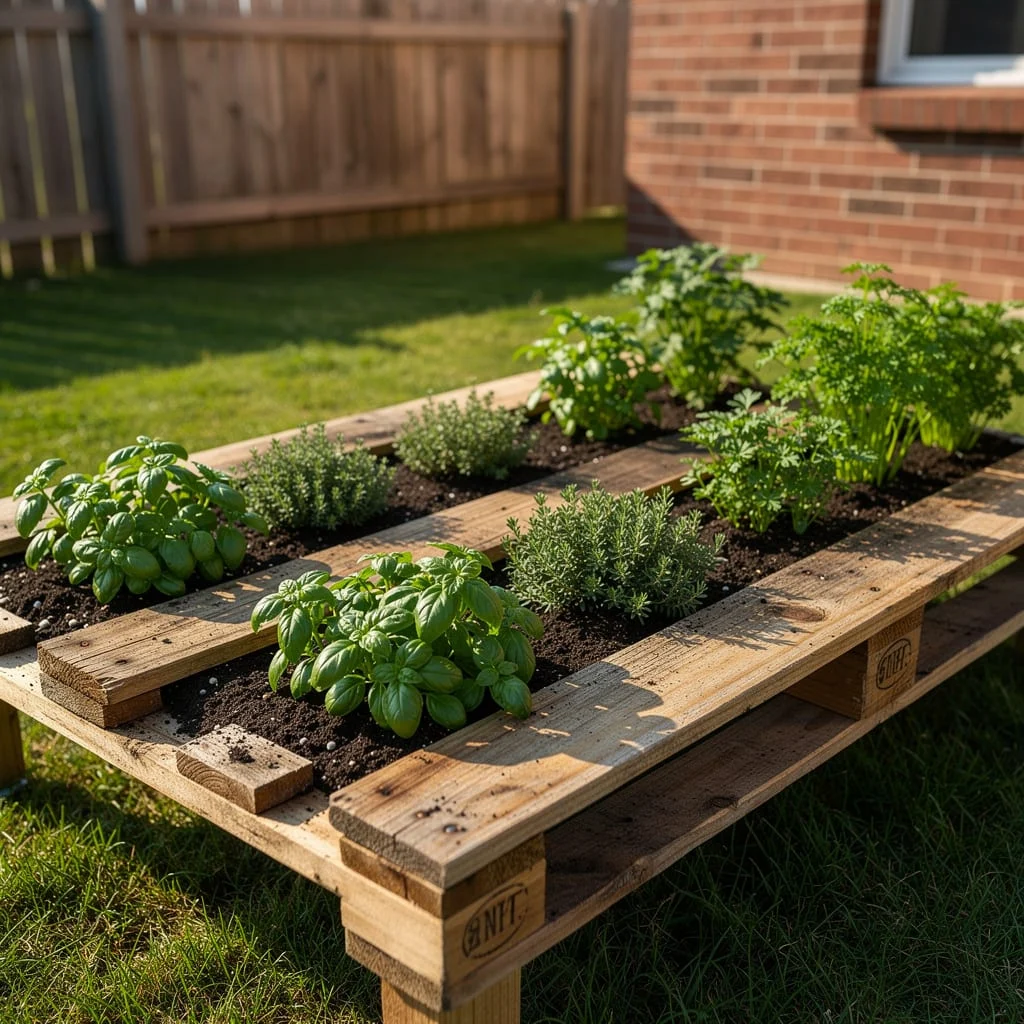
Source a heat-treated pallet — look for the HT stamp, which means it was heat-treated rather than chemically treated. Chemically treated pallets (marked MB for methyl bromide) should not be used for food growing. Sand the pallet all over to remove splinters, then seal it with an outdoor timber sealant. Elevate it on four corner blocks — bricks, timber offcuts, or metal feet — to lift it off the ground and allow air circulation underneath. Staple landscape fabric across the underside and up the inside edges to hold the soil. Fill each channel between the pallet slats with a loose potting mix. Plant one variety per channel, keeping plants that need the most water toward the centre of the pallet where soil depth is greatest, and the more drought-tolerant ones at the shallower edges. The gap between slats is the design feature here. Keep the planting even and full so that the green growth sits in each channel like a striped pattern when viewed from the side.
Herb Garden with Arch Entry

Set two upright 4×4 timber posts into the ground at a distance of 100–120cm apart, sunk 60cm into concrete footings for stability. Fix a curved or angled crosspiece between them at the top — either a pre-made arch kit or lengths of flexible timber bent and fixed with metal brackets. Train a fast-growing climbing herb up both uprights: thyme with its arching stems works, but oregano or a climbing nasturtium gives faster coverage and more visual drama. Behind the arch, plant a generous curved herb bed. Arrange by height and colour, not by habit alone. Lavender in mass plantings in the mid-ground — three, five, or seven plants of the same variety rather than one of each colour, which will look spotty. Catmint or Russian sage for silver-grey contrast. Basil and parsley at the front where they’re accessible without entering the bed. The arch is not decorative. It frames the view into the bed and gives the garden a clear entry point, a sense of destination.
Lit Herb Planter, After Dark
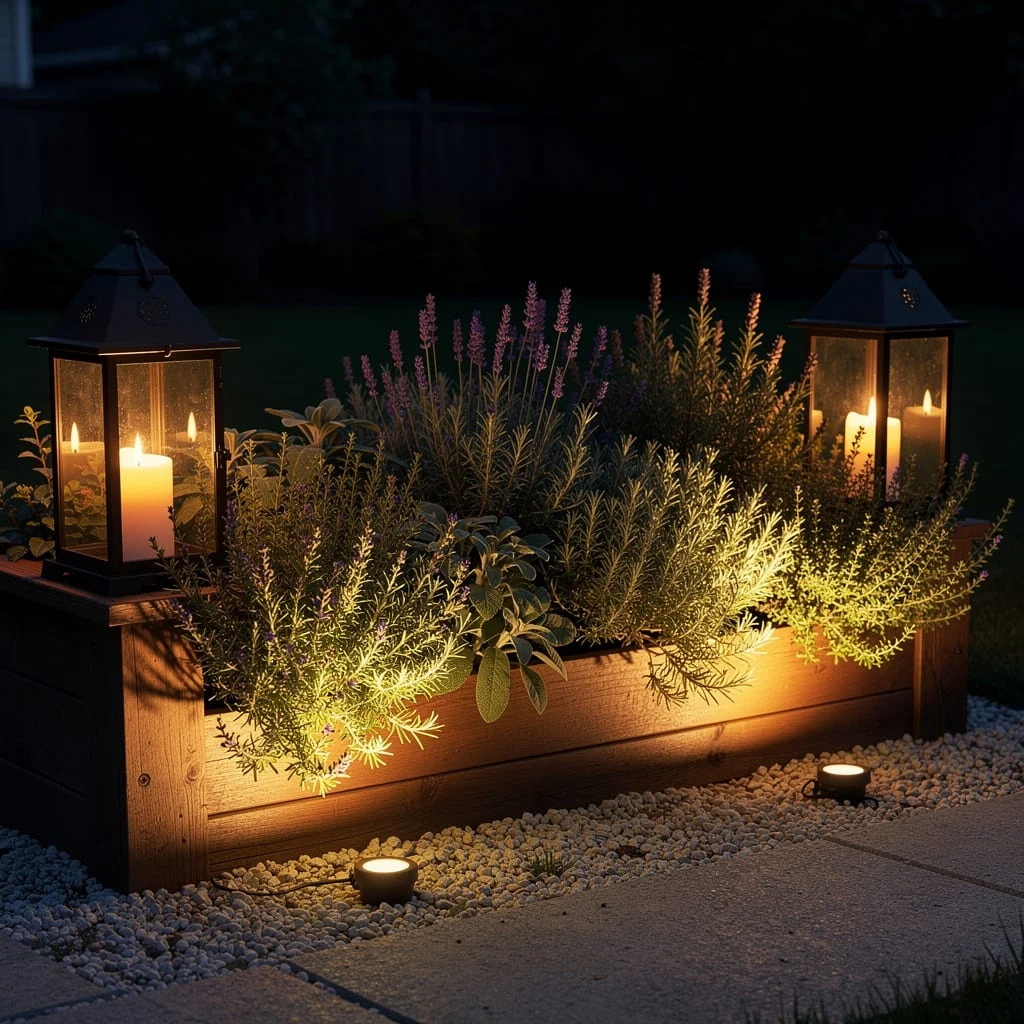
Build or buy a deep, wide timber planter box in cedar or hardwood — approximately 120cm long and 40cm tall. Stain it in a dark walnut or ebony finish, not a natural timber colour. The darkness of the box becomes the backdrop for the planting. Inside, grow only grey-green and silver-leafed herbs: lavender, rosemary, sage, and thyme. No bright-green herbs in this planter. The muted foliage colour is necessary for the lighting to work. At each end of the planter, fix a heavy black metal lantern directly onto the top rail of the box — the style with a peaked roof and glass panels, substantial in scale. Inside each lantern, place a pillar candle on a heatproof base. Around the base of the planter in the surrounding gravel, position two or three low flush ground lights angled upward at the herbs. In the evening, the ground lights cast upward through the lavender spikes and rosemary stems, the lanterns glow amber at each end, and the whole planting becomes something entirely different from what it is in daylight.
Cable Drum Table Planter
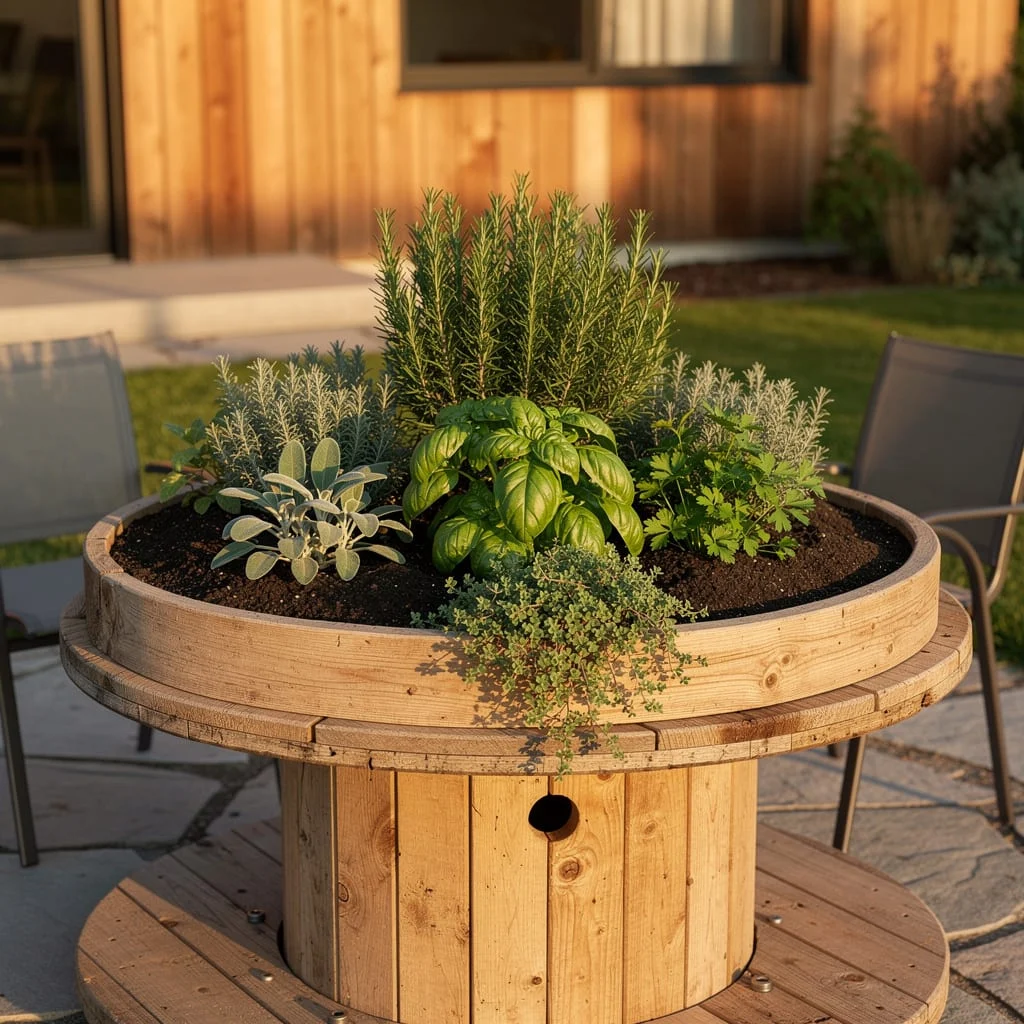
Source a large wooden cable drum from electrical suppliers or building salvage — the kind used for heavy-duty cable, which will be at least 80–100cm in diameter. Stand it upright on its flat disc face. The centre hole of the drum becomes the planting cavity. Line it with heavy-duty landscape fabric to hold the soil and cover the hole in the hollow drum cylinder below. Fill the planting cavity — which will be roughly 20–30cm deep and 40–50cm in diameter — with a well-draining potting mix. This is a full-sun position; place the drum where it receives at least six hours of direct light. Plant a mix of rosemary as the tall centrepiece, sage and basil around it, and trailing thyme at the outer edges to spill down over the drum face. The drum doubles as a table. Place chairs around it. The experience of sitting around a herb table — where you can reach out and pinch a leaf of basil or rosemary mid-conversation — is one of those garden decisions that sounds affected but turns out to be genuinely good.
Orchard Underplanting Herb Garden

Use the dappled shade beneath a mature fruit tree as the growing environment for a shade-tolerant herb garden. Lay irregular flagstone stepping stones in a loose path through the planting to allow access without compacting the soil around the roots. Plant in generous sweeps rather than individual specimens: mint across one section in its own buried container to contain the spread, lemon balm in another, chervil and Vietnamese coriander where the light is least. Allow the herbs to grow informally and into each other at the edges. The tree canopy above provides the structure; the herbs provide the ground-level texture. A stepping stone path through a herb garden planted beneath a fruit tree is a combination that takes almost no maintenance once established and rewards every visit with fragrance underfoot.
Final Thoughts
Every herb garden that works well has one thing in common with every herb garden that doesn’t: the same plants.
The herbs are not the variable. The approach is.
The best herb gardens are the ones where a decision was made about scale, structure, and vessel before a single plant was purchased. They’re the ones where the quirky container is genuinely big enough to matter. Where the planting reflects how the cook actually uses the kitchen, not an aspirational list of what sounds nice. Where the tall plants are in the back and the sprawling ones are allowed to sprawl.
You don’t need all seventeen of these ideas. You need one executed properly. A single galvanised trough on timber legs, planted well and positioned right, will do more for your outdoor space than fourteen small terracotta pots scattered without intention.
Start with structure. The rest follows.