
The grocery store herbs are a scam. Not the herbs themselves — basil is basil. The scam is the packaging. A plastic clamshell of wilted parsley for three dollars, used once, forgotten in the back of the fridge, discovered two weeks later as a cautionary tale. You buy it, you use a tablespoon, and the rest dies slowly under your watch.
Growing your own herbs costs less, tastes better, and takes up less space than you’ve been told it does. A kitchen windowsill, a fence panel, a corner of the patio — any of it works. The only thing stopping most people is the assumption that a herb garden requires a garden.
It doesn’t. It requires a container, some decent soil, and reasonable access to sunlight. Everything else is optional.
Location Is The Decision Nobody Makes First
Most herb gardens fail in the first month. The herbs arrive, get planted in whatever spot was convenient, and slowly decline into something scraggly and guilt-inducing. The location was never actually chosen — it was defaulted to.
Sun Hours Are Non-Negotiable
Most culinary herbs need six hours of direct sun per day. Not indirect light. Not a bright room. Direct sun. Basil, rosemary, thyme, sage, oregano, chives — all of them need that minimum to produce the oils that make them worth eating.
Before placing your herb garden anywhere, stand in that spot and count the actual hours of sun it receives on a typical summer day. A south or west-facing wall is almost always the right answer. A north-facing fence or a spot under a tree canopy is where herb gardens go to die quietly.
The kitchen windowsill exception: if your kitchen window faces south or west and receives genuine sun rather than bright ambient light, it works. If it faces north or is blocked by a roof overhang, the herbs will survive but not thrive.
Distance From The Kitchen
There’s a reason people don’t harvest herbs as often as they should. They have to go outside, find the scissors, locate the specific plant, and bring it back. Three minutes of friction is enough to make you reach for the dried stuff instead.
The closer the herb garden is to the door you use to enter the kitchen, the more you’ll actually use it. This is not a design principle. It’s a human behaviour pattern. Put the herbs somewhere inconvenient and you will use them inconveniently — which is to say, rarely.
Mint Goes Alone
Every herb garden list eventually mentions this, so here it is stated plainly. Mint spreads underground with the aggression of something that has a point to prove. Plant it in the ground near other herbs and within one season it will occupy everything in reach.
Mint belongs in its own container. Always. Even within a mixed herb bed or planter, give mint a buried pot within the larger bed — a plastic liner sunk into the soil — to contain its roots. Skip this and you will spend the following years removing mint from places you did not intend to have mint.
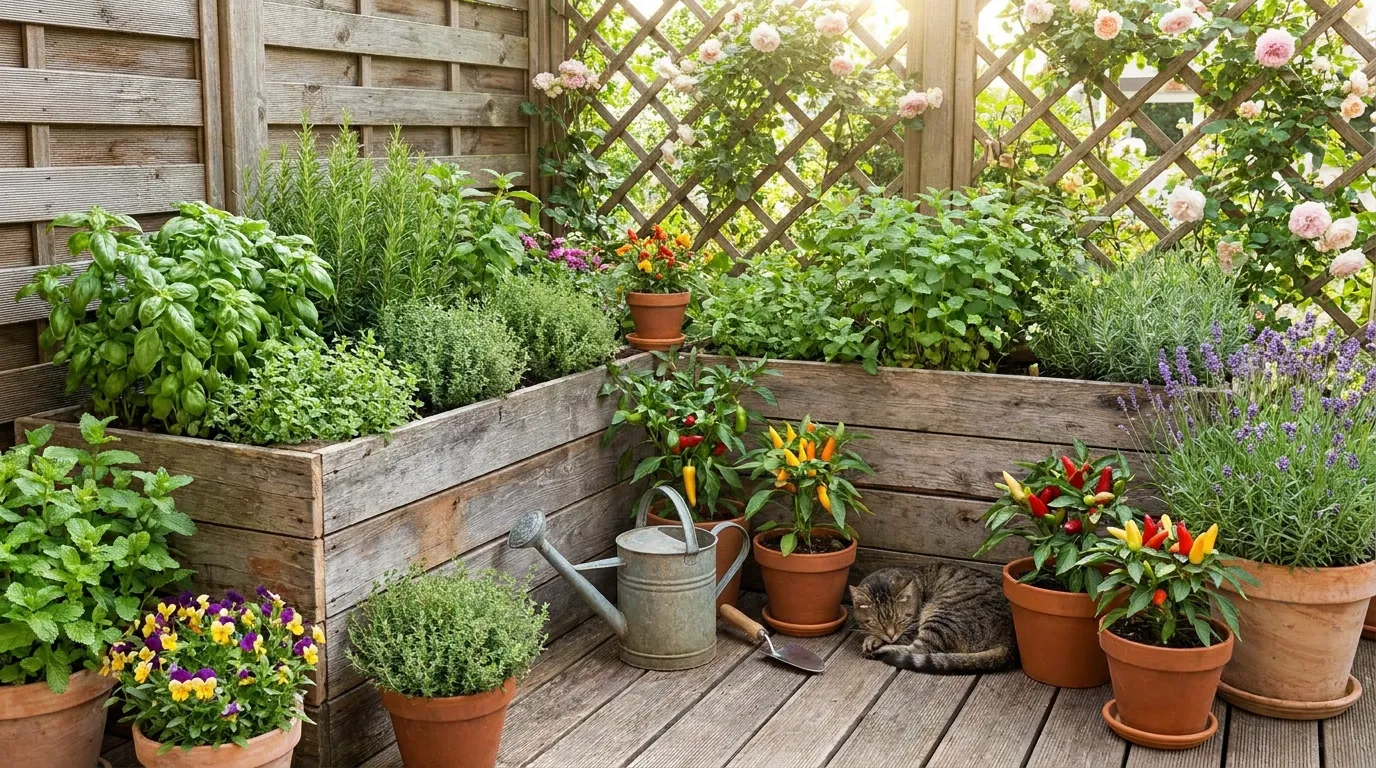
Containers Tell The Story Before The Plants Do
The vessel your herbs grow in is a design decision as much as a gardening one. Two herb gardens with identical plants can look completely different based solely on what they’re planted in.
Terracotta’s Particular Honesty
Terracotta pots age in a way that no other material quite replicates. The calcium deposits, the slight greening at the rim, the warm orange deepening with time — all of it reads as genuinely used rather than purchased last week. For herb gardens specifically, this aged quality suits the subject matter. You are growing something for cooking, not for show.
The practical limitation of terracotta is moisture retention. Unglazed terracotta is porous and dries out faster than ceramic or plastic. In hot weather, terracotta herb pots may need watering every day. This is fine if you’re attentive. It’s a problem if you travel regularly or tend toward inconsistency.
The Utility Of Found Containers
Galvanised metal tubs, vintage suitcases, old wooden crates, worn wheelbarrows — all of them make herb planters when properly lined and drained. The appeal is not novelty. It is that a found container carries a history that a new pot from a garden centre cannot replicate.
The practical requirements are the same regardless of the vessel: drainage holes at the base, a liner if the material would otherwise rot or corrode, and sufficient depth for root development. Most herbs need at least six to eight inches of soil depth. Shallow vessels grow shallow plants.
Matching Container To Architecture
A white rendered modern house wall calls for clean white cube wall planters. A warm brick wall reads best with terracotta or Corten steel. A timber fence takes hanging galvanised buckets or a stained pallet planter in a matching tone. A cottage garden suits vintage tubs, painted crates, and anything slightly imperfect.
The container doesn’t need to match the house exactly. It needs to not fight it.
Herb Garden Ideas
Vertical Stacking Tower
Purchase or build a tall stacking tower planter — the kind with individual planting pockets at each level — in a neutral material like stone-effect resin or natural fibre. Plant a different herb in each pocket, working from low-maintenance at the top to more water-demanding varieties at the base where soil moisture tends to concentrate. Parsley, thyme, oregano, chives, and basil across four to five levels gives a complete culinary herb collection in a single square foot of floor space. Keep this within arm’s reach of the kitchen door; the whole point of the vertical format is accessibility.
Four-Square Bed With Brick Edging
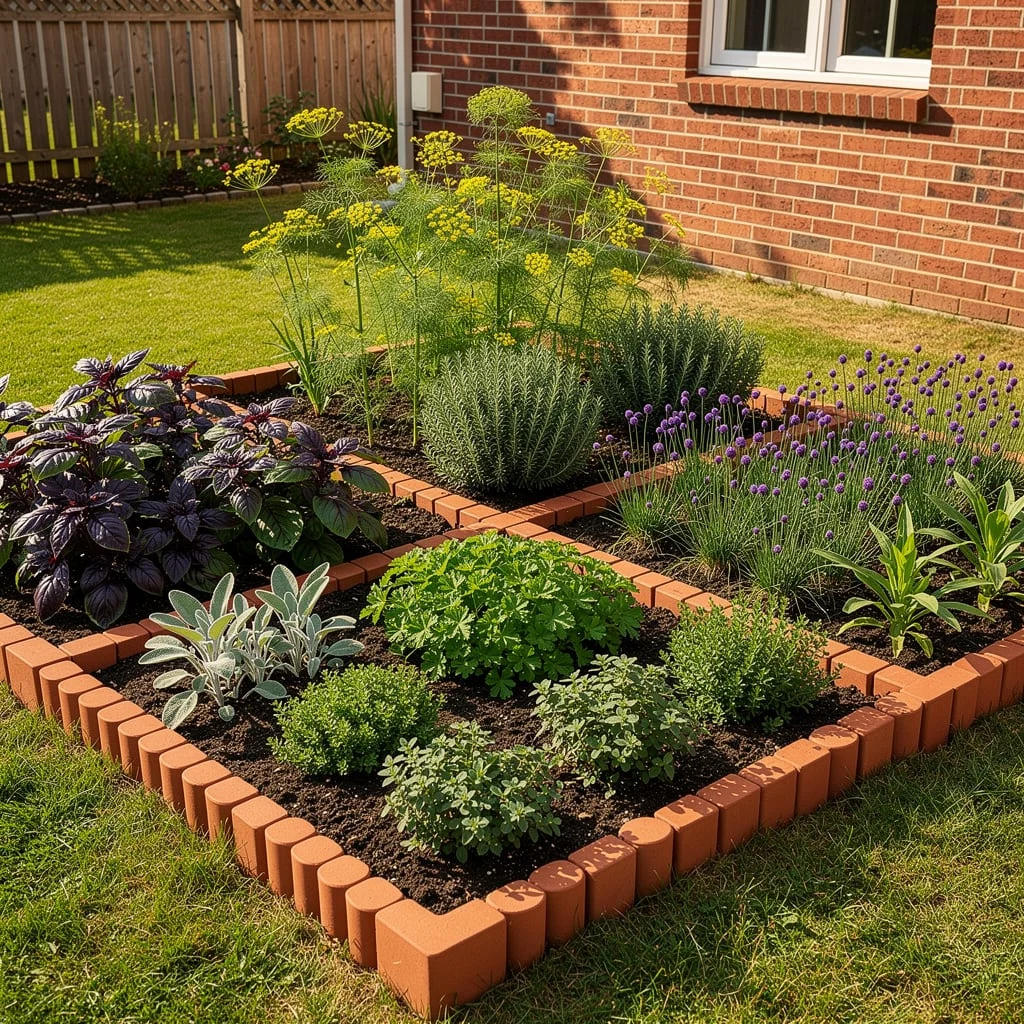
Lay brick edging in a square divided into four quadrants by a central cross of the same brick. Each quadrant is a different herb family or colour group: silver-leafed herbs in one, purple-leafed varieties in another, upright structural herbs in a third, and low-spreading varieties in the fourth. This is the traditional potager layout applied to herbs specifically. The division prevents aggressive spreaders from overtaking their neighbours, keeps harvesting tidy, and gives the bed a formal quality that suits gardens with strong geometric structure. The dill and allium flower heads that emerge in summer turn the functional bed into something ornamental.
Labelled Wooden Wall Boxes On A Deck Rail
Build or buy a series of narrow rectangular wooden boxes — roughly twelve inches long and five inches deep — in a uniform finish. Paint them in two tones: a dark background with cream or white painted labels directly on the front face. Plant each with a single herb and arrange them in a staggered grid pattern on a dark-painted wall or fence using standard shelf brackets. The labelled front face turns the herb display into something that reads as an installation rather than a collection of pots. Use this for a deck railing backdrop or a section of garden wall where herbs are the primary visual feature.
Dark Green Window Box
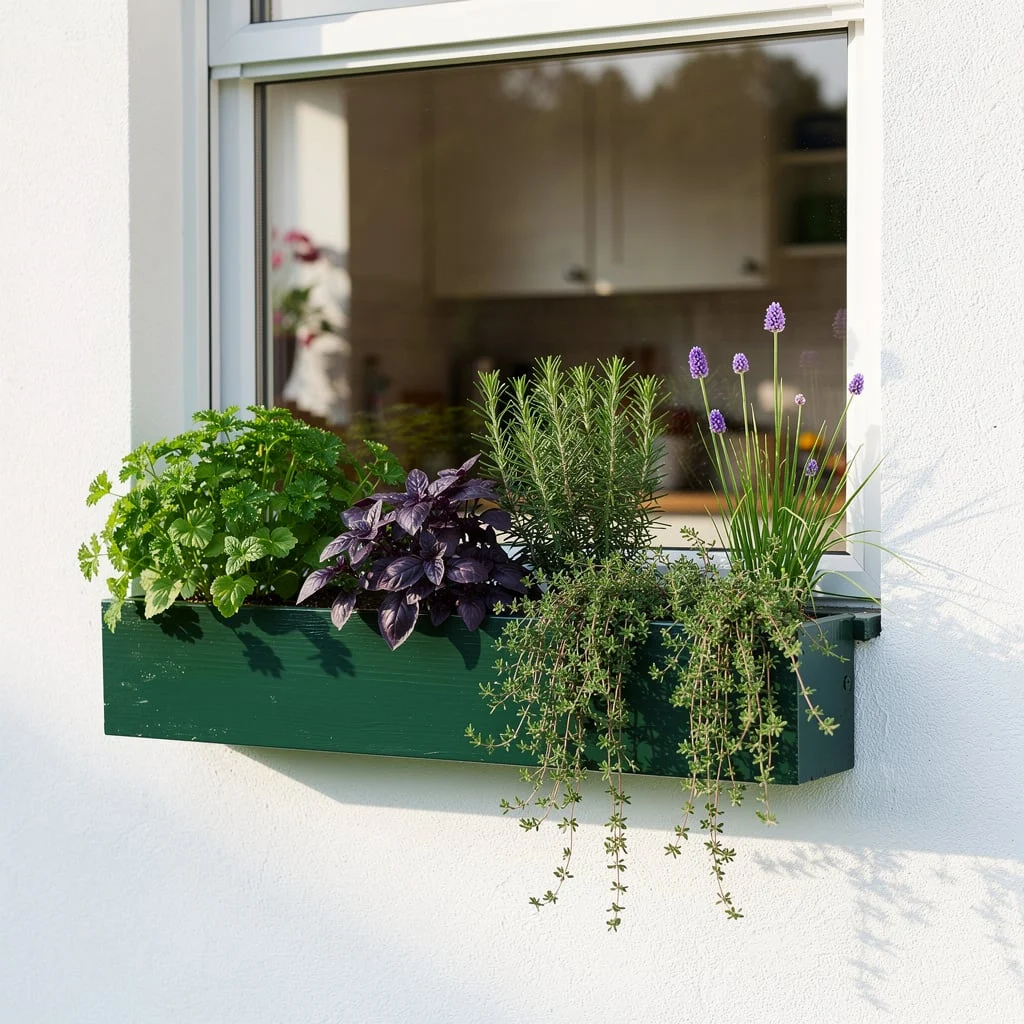
Mount a dark forest green painted wooden window box beneath a kitchen or dining room window, using standard exterior bracket hardware. Plant with a mix of contrasting textures: purple basil for the dark foliage, upright rosemary for structure, trailing thyme that will spill over the front edge, and chives with their purple flower heads for vertical interest. The dark green of the box against a white rendered or painted exterior wall creates a clean contrast. If the window is in the kitchen, the herbs are literally within arm’s reach when cooking.
Tiered Terracotta On A Wooden Rack
Use a weathered wooden three-tier plant stand — the kind with slotted shelves for drainage — and fill it exclusively with terracotta pots in standard sizes. Plant the tallest herbs at the top, medium at the middle, and trailing or compact varieties at the base. Label with pressed copper garden stakes rather than plastic labels. The uniformity of the terracotta across all tiers creates cohesion even when the plants themselves are varied. Set this up directly outside the kitchen door or on a deck corner where it receives maximum sun.
Kitchen Windowsill In White Ceramic
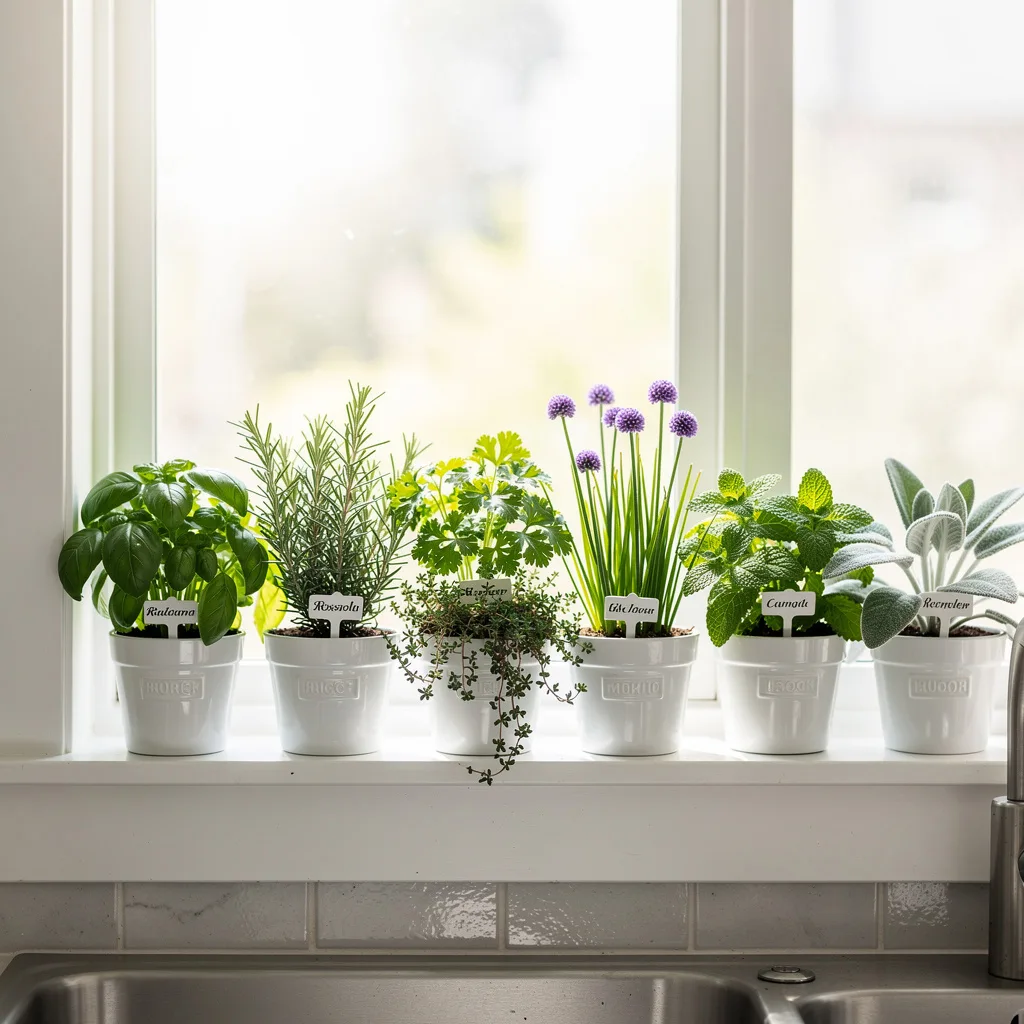
Line a sunny kitchen windowsill with identical white ceramic pots in a small standard profile — roughly four inches in diameter. Plant one herb per pot: basil, rosemary, flat-leaf parsley, chives, mint in its own contained pot, and sage. Label with small pressed metal or ceramic stake labels. The uniformity of the white ceramic against the window light and tile or painted sill creates a clean, deliberate display that reads as purposeful rather than accumulated. This works only on a genuinely sunny south or west-facing windowsill with at least five hours of direct light.
Fabric Pocket Wall System
Mount a multi-pocket fabric planter — the kind with diamond or square pockets in dark brown or charcoal felt — on a large section of fence or garden wall. Plant individual herbs in each pocket, filling the full height of the wall. Organise by variety type in columns: a full column of flat-leaf and curly parsley, a column of rosemary, a column of mint in individual pockets, a column of thyme varieties. The density of the planting is the design statement. When fully established, the wall reads as green rather than fabric, with dozens of different textures visible across the surface.
Long Cedar Raised Bed Against A Wall

Build or purchase a long shallow cedar raised bed — roughly six feet long, twelve inches wide, and eight inches deep — and position it directly against a brick or rendered wall where it will receive full afternoon sun. Plant in a single row, organising by height from tallest at the back to lowest at the front: rosemary and sage at the rear, basil and chives through the middle, thyme and creeping varieties at the front edge. Use individual copper or timber herb stakes to identify each plant. The cedar weathers attractively and the long format allows a comprehensive herb collection in an orderly display.
Pallet Planter On A Fence
Source a heat-treated wooden pallet — look for the HT stamp rather than MB, which indicates chemical treatment. Stain or paint the front face in a single colour: sage green, dark forest, charcoal, or a warm terracotta-adjacent brown. Attach landscape fabric to the back to form pockets between the pallet slats. Fill with potting mix and plant individual herbs in small galvanised or matte-finished metal pots, which are then set into the pallet pocket openings. Label each pot with a chalk marker directly on the pot surface or on a small slate label. Fix the whole assembly to a fence panel at eye height. The pallet stays; the individual pots can be swapped out as seasons change.
Corten Steel Long Planter
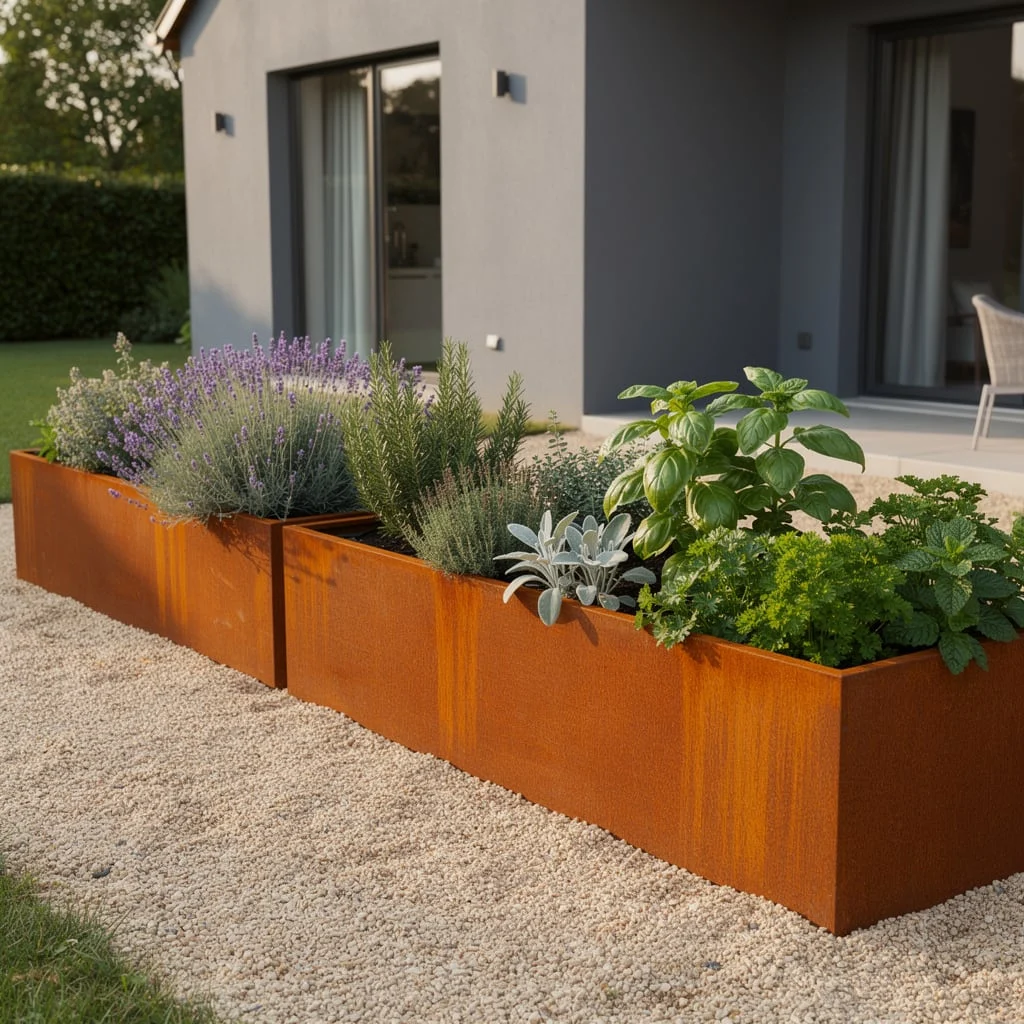
Position two Corten steel rectangular planters end to end along a gravel path or patio edge, forming an unbroken line of herbs at a raised height. The rust-orange patina of the weathering steel against the grey-green of rosemary, sage, and lavender is a specific colour combination that reads as contemporary without being sterile. Plant the left planter with flowering and aromatic herbs — lavender, rosemary, and sage — and the right planter with culinary workhorses — basil, parsley, and mint in a buried liner. The Corten will continue to develop its patina over the first two years before stabilising.
Painted Wooden Crates In Clusters
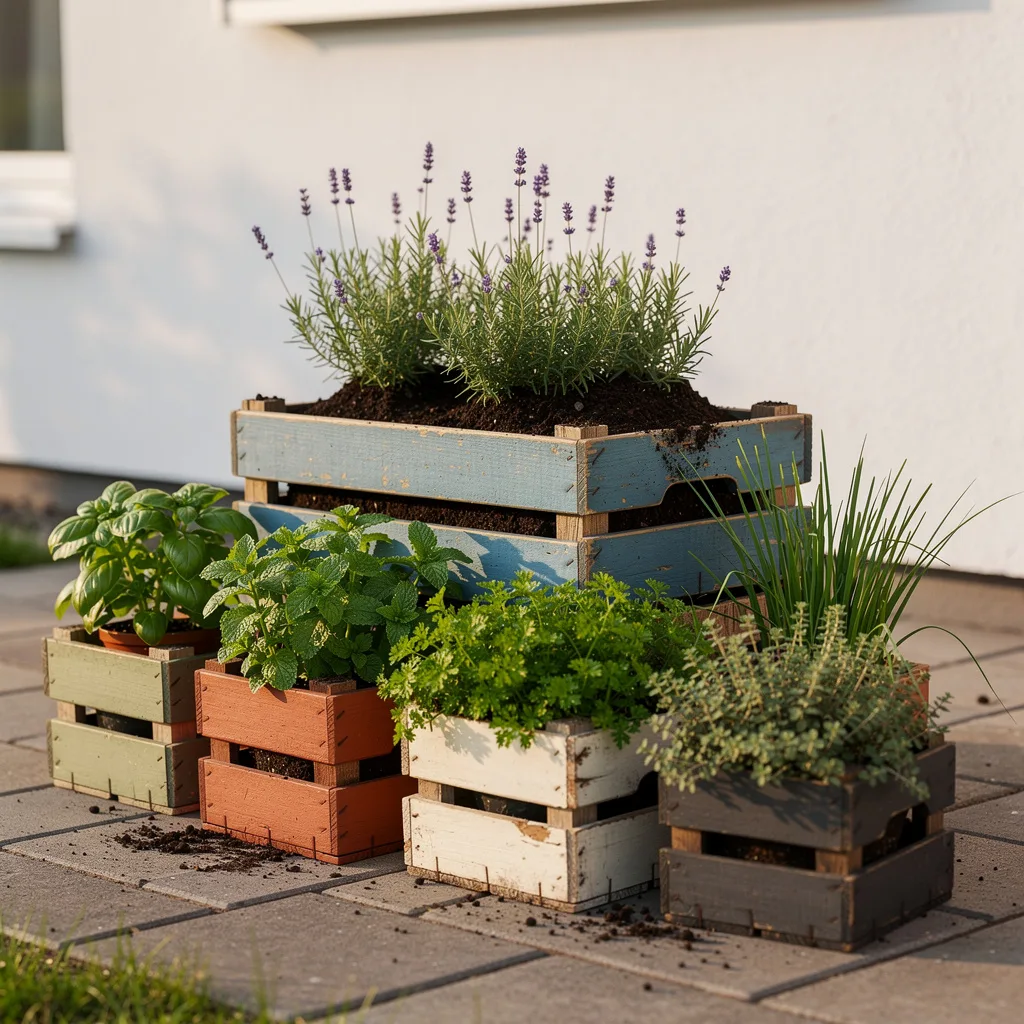
Find or purchase small wooden crates and paint each one in a different muted colour — dusty blue, sage, terracotta, soft grey. Line each with plastic before filling with potting mix. Plant one or two herbs per crate. Arrange in a loose cluster on a patio or balcony, varying the heights by placing some on bricks or wooden offcuts. The mix of colours gives the grouping a collected quality — as though the crates came from different places over time — while the uniform style of the containers prevents it from looking chaotic.
Vintage Suitcase Herb Planters
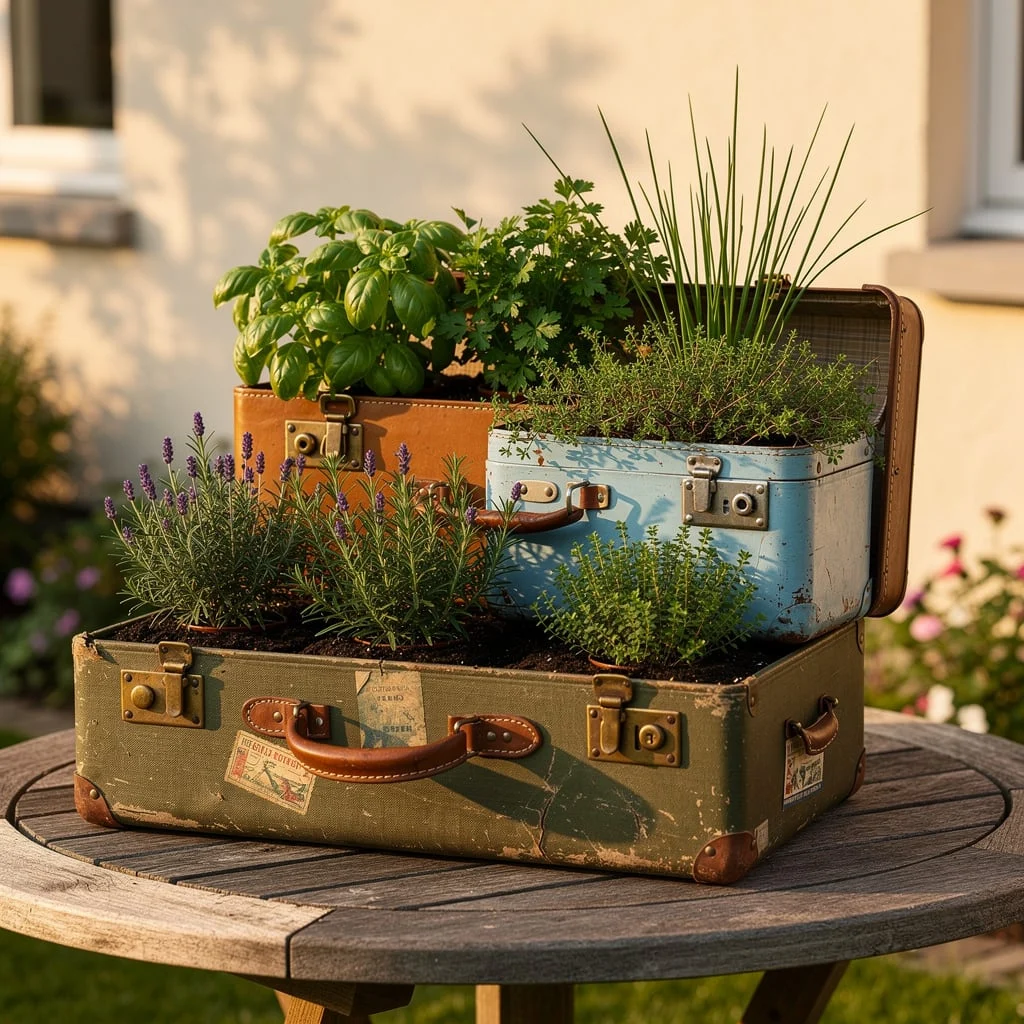
Source two or three vintage suitcases in different sizes from estate sales or thrift markets. Open them flat and line the interior with heavy-duty plastic sheeting before filling with potting mix. Drill drainage holes through the base of each before lining. Plant the largest suitcase with Mediterranean herbs that can handle the shallow depth — thyme, rosemary, and lavender. Fill the medium one with faster-growing culinary herbs — basil, parsley, and chives. The smallest holds a single specialty herb. Set them in a stacked or overlapping arrangement on an outdoor table or garden bench. The travel stickers and aged leather hardware are what this container does that no new pot can replicate.
Raised Bed With Bee Hotel

Build a single cedar raised bed and position a wooden bee hotel on a post directly alongside it. Plant the bed with pollinator-friendly herbs that serve double duty: lavender for the bees and the kitchen, chives whose purple flowers are edible and irresistible to pollinators, borage, and flowering thyme. The bee hotel becomes the garden’s second focal point alongside the planting. This is a herb garden that justifies its existence twice — once to you, once to the insects that make the rest of your garden productive.
Stacked Terracotta Tower
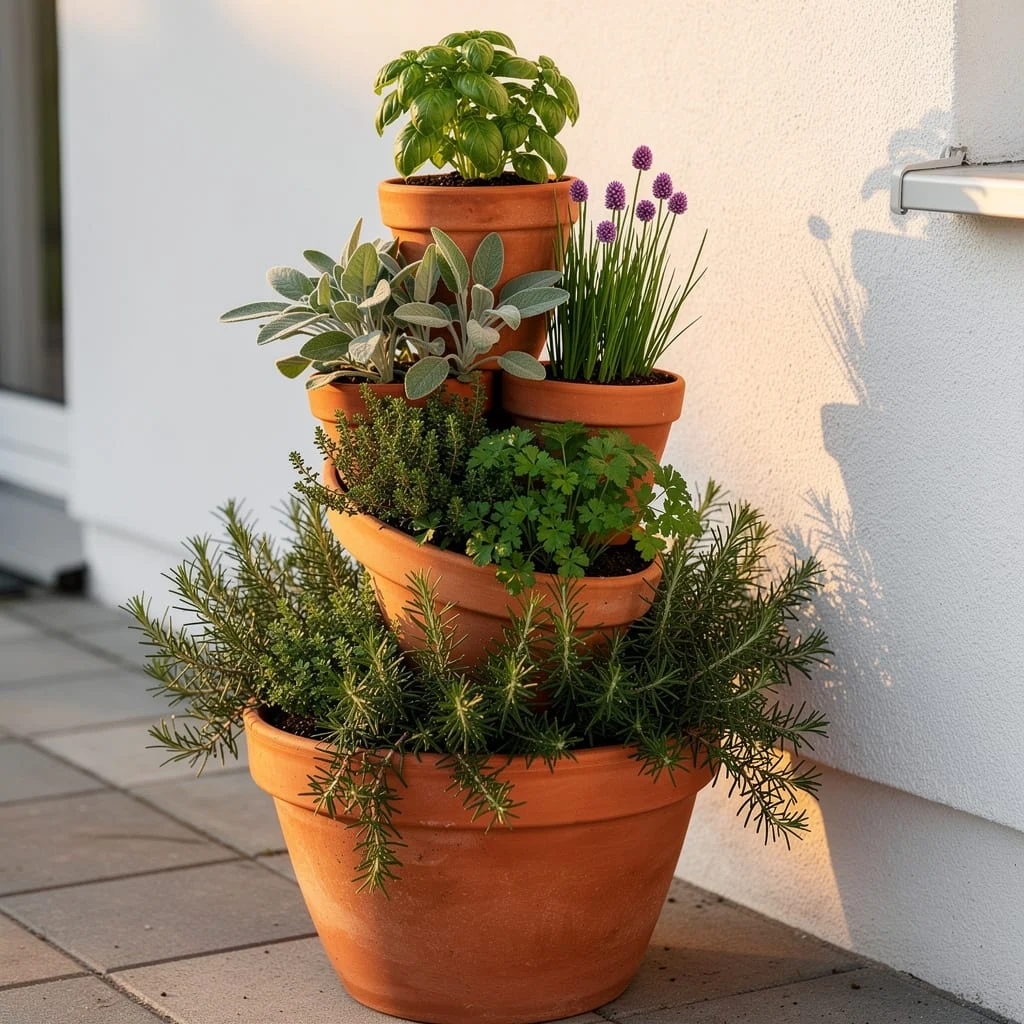
Stack terracotta pots in descending sizes — a large fourteen-inch pot at the base, a ten-inch pot on top, a six-inch pot on top of that — each offset slightly from centre so the arrangement twists gently upward. Drill a central stake through all three pots to stabilise if needed, or simply use the weight of potting mix to keep them in place. Plant rosemary and spreading thyme in the base pot so they trail down the sides. Parsley and chives in the middle. Basil at the top where it is warmest and receives the most direct light. The tower takes up one square foot of floor space and grows eight to ten herb plants.
Rustic Wheelbarrow Planter
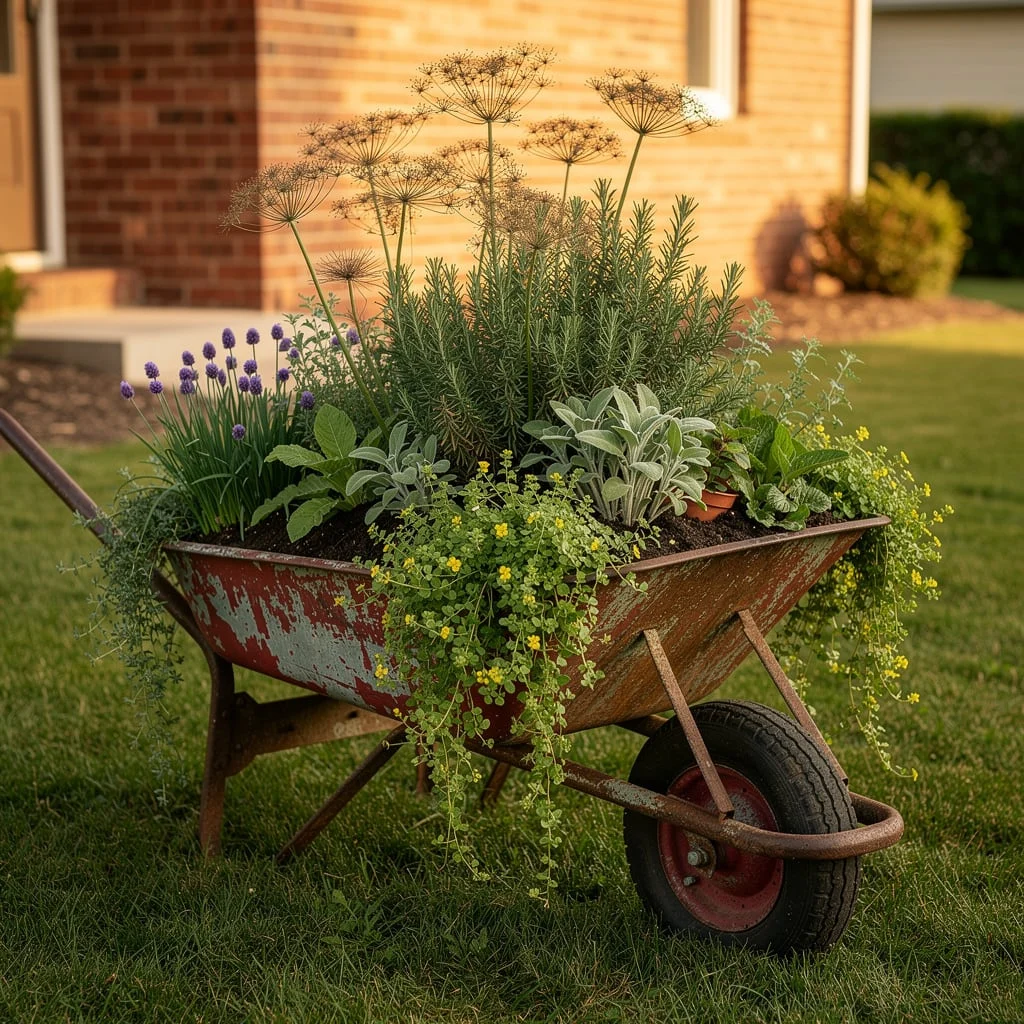
Take an old wheelbarrow — one with peeling paint and genuine wear — and fill it with a generous depth of potting mix. Plant a full mixed herb garden inside it: tall dill at the back, rosemary and sage through the middle, lavender and chives for the flowering interest, and trailing thyme at the front edge where it can spill over the barrow’s lip. Position it in the sunniest corner of the yard and leave it there permanently. The wheelbarrow’s wheels mean it is theoretically moveable, but once planted with an established herb collection it earns a permanent spot. The peeling paint is not a flaw.
Ladder Herb Display
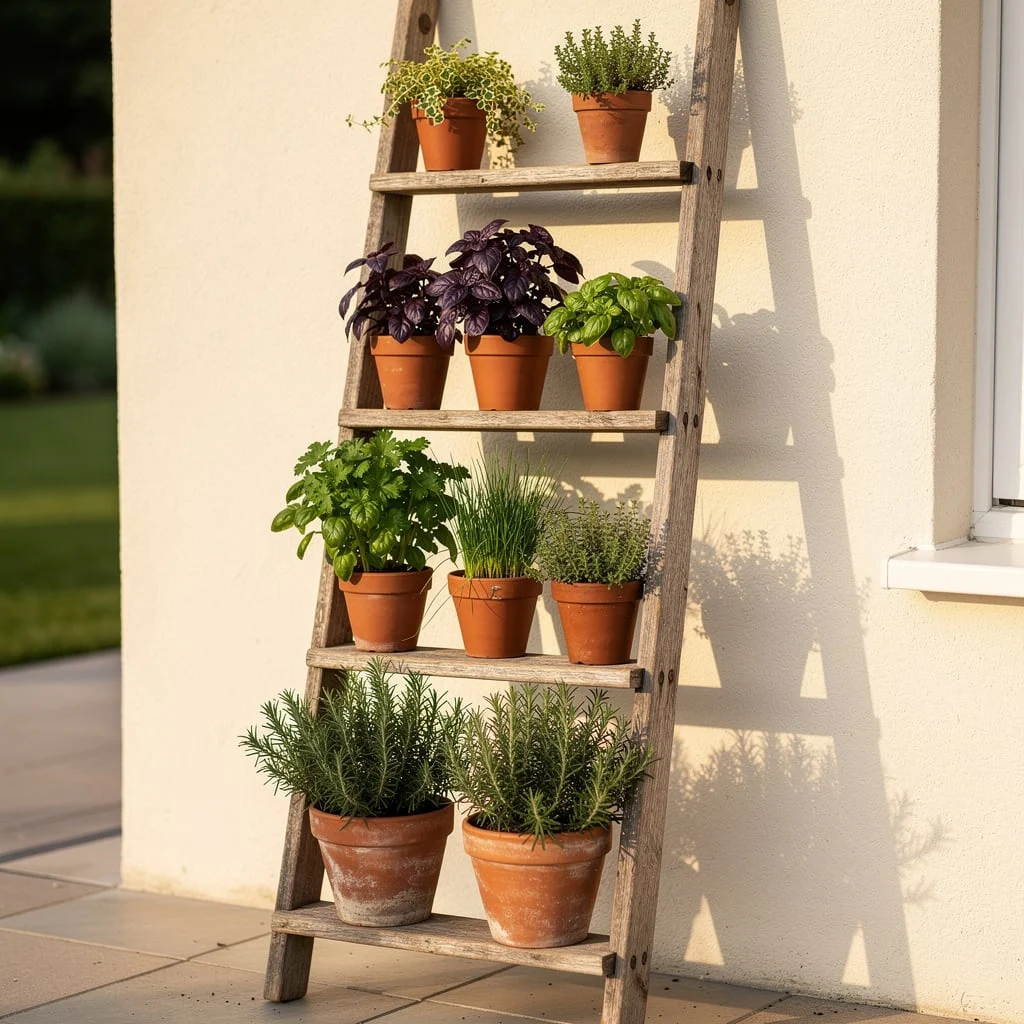
Lean an old wooden ladder — weathered, real, not decorative — against a wall. On each rung, rest terracotta pots in standard sizes. The lowest rung holds the largest pots with the most vigorous growers: rosemary at full width. The middle rungs hold medium pots of mixed varieties. The top rungs hold small pots of compact or newly planted herbs. You can swap pots out seasonally as varieties die back or go to seed. The ladder creates vertical display without requiring any construction, wall mounting, or permanent commitment. Weigh the base with a large pot if stability is a concern.
Black Wrought Iron Carousel Stand
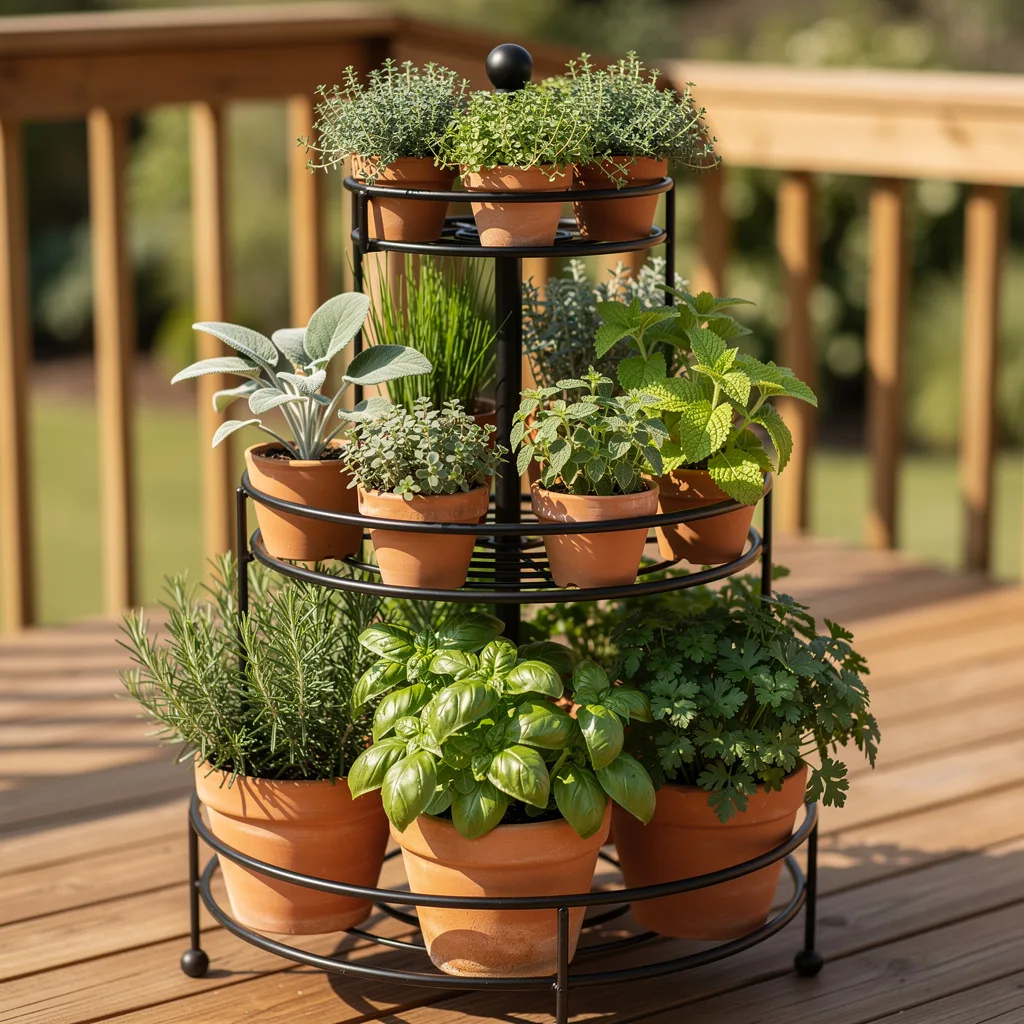
Place a circular tiered iron plant stand — the kind with three or four curved ring shelves at increasing heights — on a deck or patio surface that receives full sun. Fill each ring with terracotta pots, working from largest and most vigorous at the base up to smallest and most compact at the top. Use the stand exclusively for herbs, keeping the selection to what you cook with rather than an exhaustive collection. The black iron against the warm terracotta and green foliage is a combination that looks right in almost any outdoor setting from traditional cottage to modern deck.
Galvanised Tub With Seasonal Mix
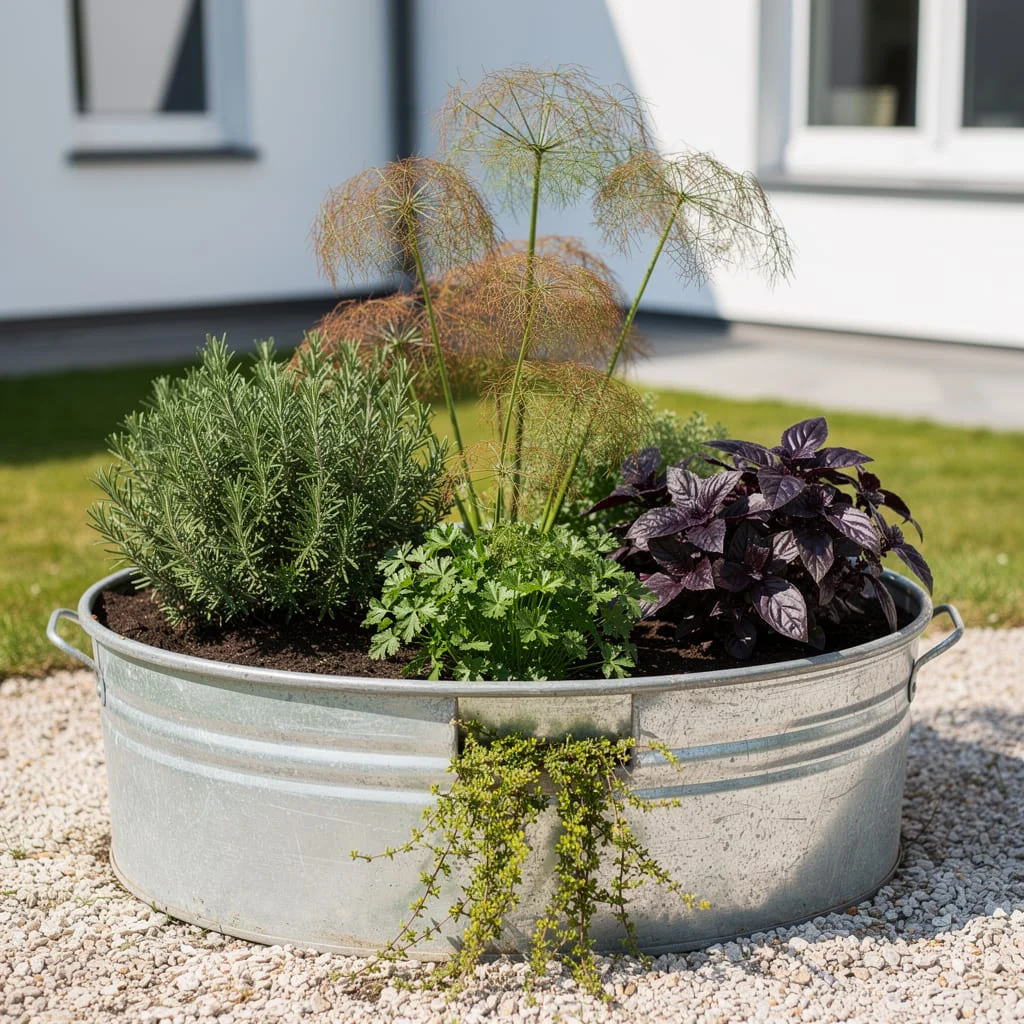
Use a large galvanised steel laundry tub — the oval utility kind with side handles — as a single-container herb garden. Drill drainage holes in the base. Fill with quality potting mix and plant a considered mix of herbs in sections: rosemary at the back as the permanent structural element, flat-leaf parsley and purple basil in the middle for contrast, and trailing thyme at the front edge. Allow the dill to go to seed in late summer for the dramatic umbrella flower heads that appear above everything else. The galvanised metal reads as utilitarian and honest in a way that suits herb growing specifically.
Minimalist White Wall Grid
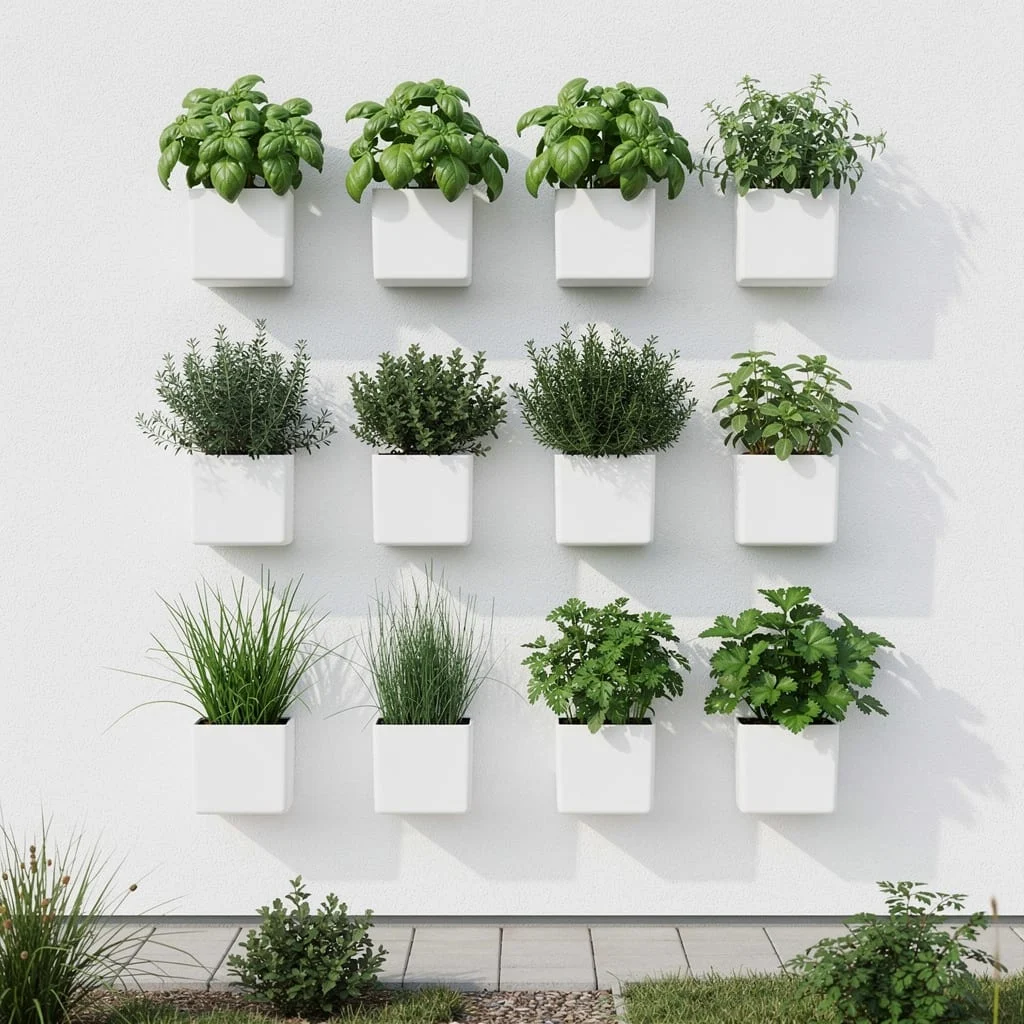
Mount a grid of identical small white ceramic or resin cube wall planters on a white rendered exterior wall, spaced evenly in a three-by-four or four-by-three arrangement. Plant one herb per pot in a consistent palette of green foliage — no flowering plants, no purple basil, just the greens: basil, thyme varieties, chives, parsley, coriander. The uniformity of the containers and the plant colour palette makes the grid read as a graphic element on the wall rather than a plant collection. This approach requires the most discipline: every pot identical, every plant healthy, the wall surface clean and uncluttered behind it.
Children’s Raised Bed With Painted Stones
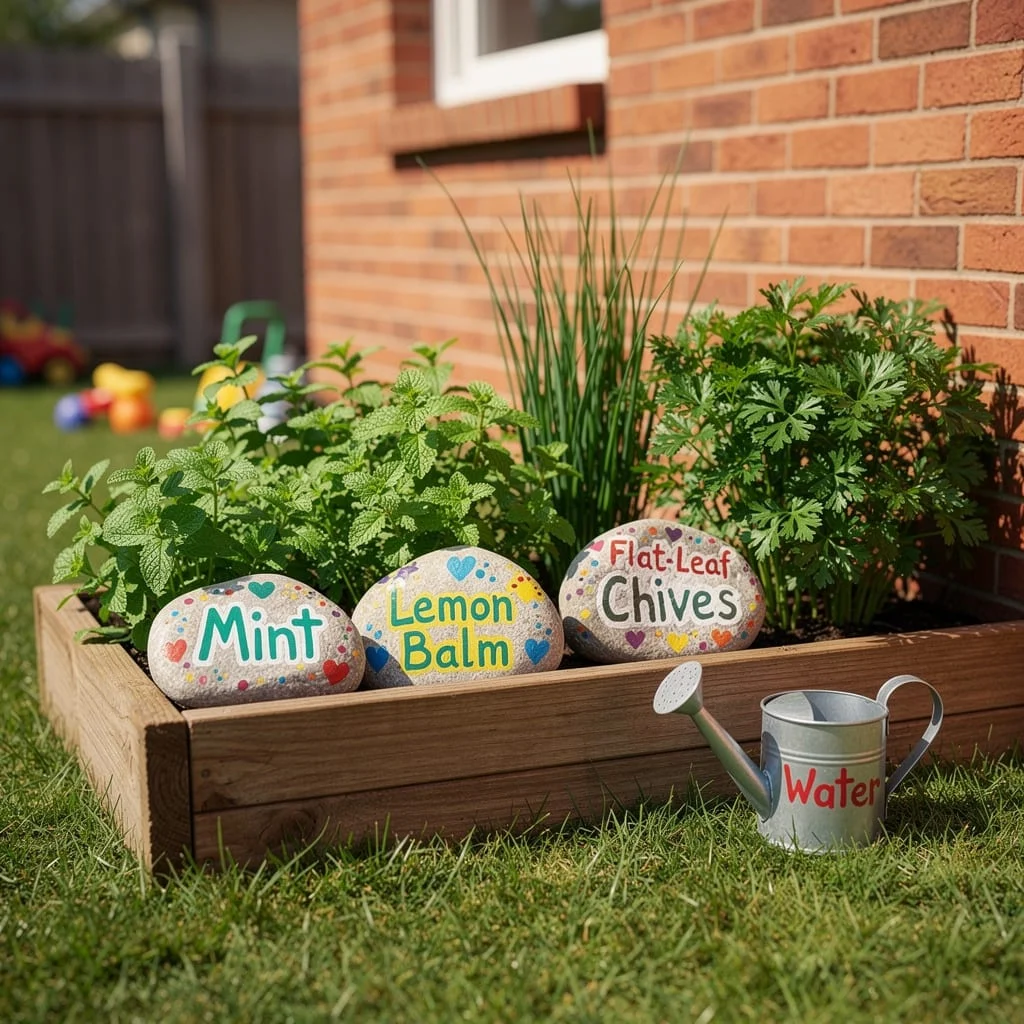
Build a low, accessible raised bed — no more than twelve inches off the ground — using dark-stained timber boards. Plant with herbs that are safe, sensory, and interesting to children: mint for the strong scent, lemon balm for the citrus smell when leaves are rubbed, chives for the edible flowers, and flat-leaf parsley as the most approachable of the culinary herbs. Paint large smooth river stones in bright colours and write each herb name on a stone as the label. Place a small galvanised watering can at the corner of the bed. The painted stones are reusable, won’t blow away, and give children ownership over the labelling process.
Final Thoughts
Every herb garden in this list is asking the same question: what is the smallest, most useful version of this I can actually maintain?
A tower of herbs beside the kitchen door that gets harvested three times a week is worth more than an elaborate raised bed garden that gets visited twice a month. The herbs that get used are the ones that are easy to reach, easy to identify, and easy to harvest without interrupting whatever you were doing in the kitchen.
Grow what you cook. Put it somewhere sunny. Keep it close to the door.
The rest is just choosing a container you like looking at.