
The front yard is the one part of your property everyone sees and almost nobody spends time in.
That changes the design brief entirely. You are not landscaping for enjoyment. You are landscaping for impression — the thirty-second read from the street, the first thing visitors see, the daily view you live with every time you pull into the driveway.
Simple front yard landscaping is not about doing less. It is about doing the right things, in the right proportion, without over-complicating a space that only needs to look good, not function as a destination.
Most people make it harder than it needs to be.
The Mulch Decision Nobody Treats as Seriously as They Should
Walk any suburban street and look at the foundation beds. The ones that look good almost always have fresh, dark mulch. The ones that look neglected almost always have old, faded, weed-infested mulch or bare soil.
Mulch is the single highest-return investment in front yard maintenance. Fresh dark shredded hardwood mulch makes everything planted in it look intentional. It suppresses weeds. It retains moisture. And it costs almost nothing relative to what it does for the overall appearance.
The Depth and Frequency People Get Wrong
Most people apply mulch too thinly and too infrequently. A one-inch layer looks good for about six weeks and then disappears into the soil.
Apply a minimum of three inches. Refresh annually in spring before the garden season begins. Pull weeds before mulching, not after. And keep the mulch slightly away from plant stems — mulch piled against a trunk or stem causes rot.
Dark brown or near-black dyed hardwood mulch makes plant colours pop and makes the bed edge look crisp. It reads as maintained even from the street, which is the whole point.
The Colour and Material Choice
Brown and dark brown mulch works with almost every house exterior and every plant palette. Red-dyed mulch is divisive — it suits brick houses and can look garish against siding. Black mulch is the most contemporary choice and works well with architectural planting schemes.
Avoid pine straw unless it genuinely suits your climate and aesthetic. It has a specific regional character that looks right in the Southeast and out of place almost everywhere else.
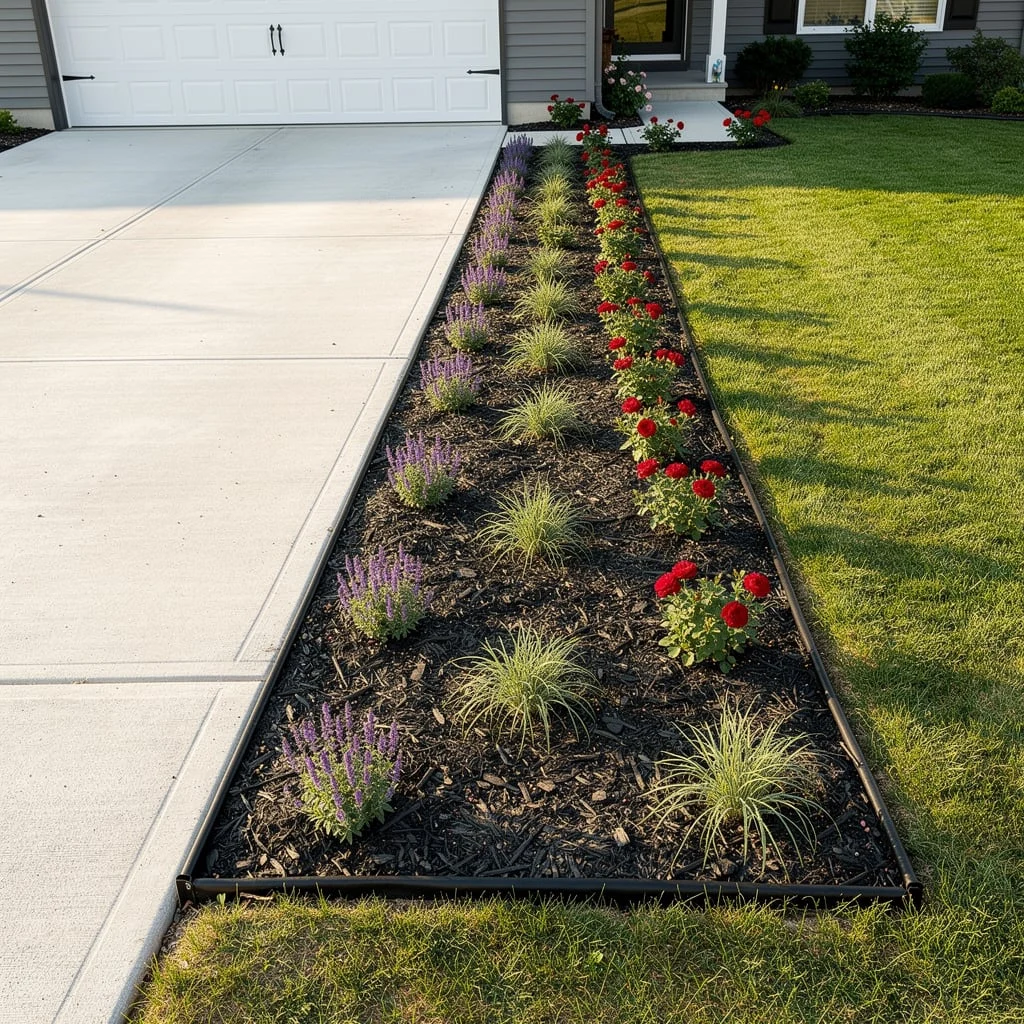
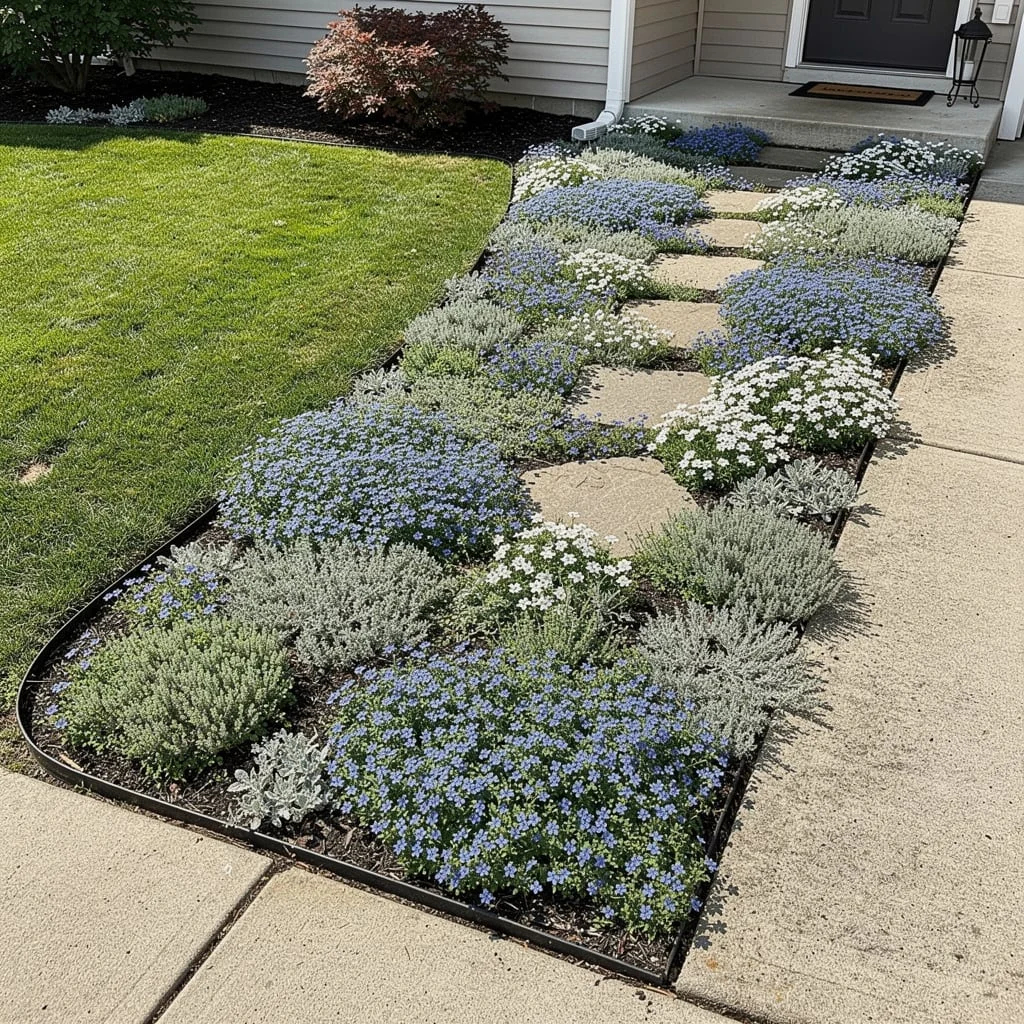
How a Curved Bed Edge Changes a Front Yard
Most front yard beds are the wrong shape. Not because of the plants in them or the mulch on them — because the edges are either perfectly straight and institutional, or irregular and accidental.
A smooth, deliberate curve is the shape that looks most intentional from the street.
The Tool That Does This Well
A garden hose laid on the ground is the oldest landscape design tool there is and still one of the best. Lay the hose in the curve you want, walk to the street and look at it, adjust until it looks right from that angle specifically — not from above, not from the front door.
Cut the edge along the hose line with a flat spade or a half-moon edger. Install black steel landscape edging along the cut to hold the curve permanently.
Re-edge once a year in spring. The edge is doing forty percent of the visual work that makes a simple bed look professional. Keep it sharp.
The Curve Logic
Curves should be broad and sweeping, not tight and busy. A bed with a single generous curve — widest nearest the house, tapering toward the street — reads as designed. A bed with multiple tight wiggles reads as indecisive.
One or two curves per bed, maximum. If in doubt, make the curve simple
Simple Front Yard Landscaping Ideas
The All-White Gravel Fire Pit Patio with Olive Tree
The contemporary backyard logic applied to the front: white marble pebbles as the ground surface, a round concrete fire bowl, white Adirondack chairs, a multi-stemmed olive tree for canopy and character.
This works because every element is the same colour family. White gravel, white fire bowl, white chairs — the monochrome palette reads as a deliberate design decision rather than an accumulation of purchases.
The olive tree is the one element that earns its place on form alone. Multi-stemmed, silver-leafed, ancient-looking even when young. Plant it off-centre, never symmetrically placed. Let it grow informally without clipping.
The transition from the white gravel area to an adjacent patio in warm terracotta tone is the detail that prevents the white from reading as sterile. Warm and cool surfaces meeting at a clear edge creates visual interest without adding complexity.
The Spiral Herb Garden with River Rock Dividers
The rock-divided spiral herb garden is a functional and decorative installation simultaneously. The river stone dividers create a spiral path through the planting, giving each section a distinct microclimate — slightly elevated sections drain faster and suit Mediterranean herbs; lower sections retain more moisture for leafier varieties.
Plant in the sections according to light and water needs. Lavender, thyme, and rosemary in the higher drier positions. Mint, chives, and parsley lower and with more moisture. Use dark shredded bark mulch within each section to define the zones against the river stone dividers.
The outer perimeter of the spiral bed uses larger river stones as a defined border against the surrounding patio or path material. The scale transition from large perimeter stones to smaller interior dividers gives the installation visual depth.
The Japanese Garden with Pebble Ground Plane, Cloud Pine, and Lantern
A contained Japanese-inspired garden is one of the most achievable high-impact front yard interventions for a small or awkward space — a corner, a side yard, an entry nook.
The ground surface is grey or blue-grey smooth pebbles, raked if you have the patience, laid flat and clean if you don’t. Stepping stones move through the space — irregular natural stone set flush or slightly proud of the pebble surface.
The cloud-pruned pine is the centrepiece. It takes years to develop genuinely, but a young multi-branched Japanese black pine can be started and will become more interesting every year. Place it off-centre. A stone lantern on one side, low enough that it doesn’t compete with the tree. A bamboo water feature that trickles is the optional element that makes the space genuinely restful.
Keep the planting spare. Two or three other elements maximum — a bird’s nest fern, a low bamboo grass, a flowering shrub for seasonal colour. The negative space in a Japanese garden is deliberate. Resist the urge to fill it.
The Symmetrical Hydrangea Foundation Planting
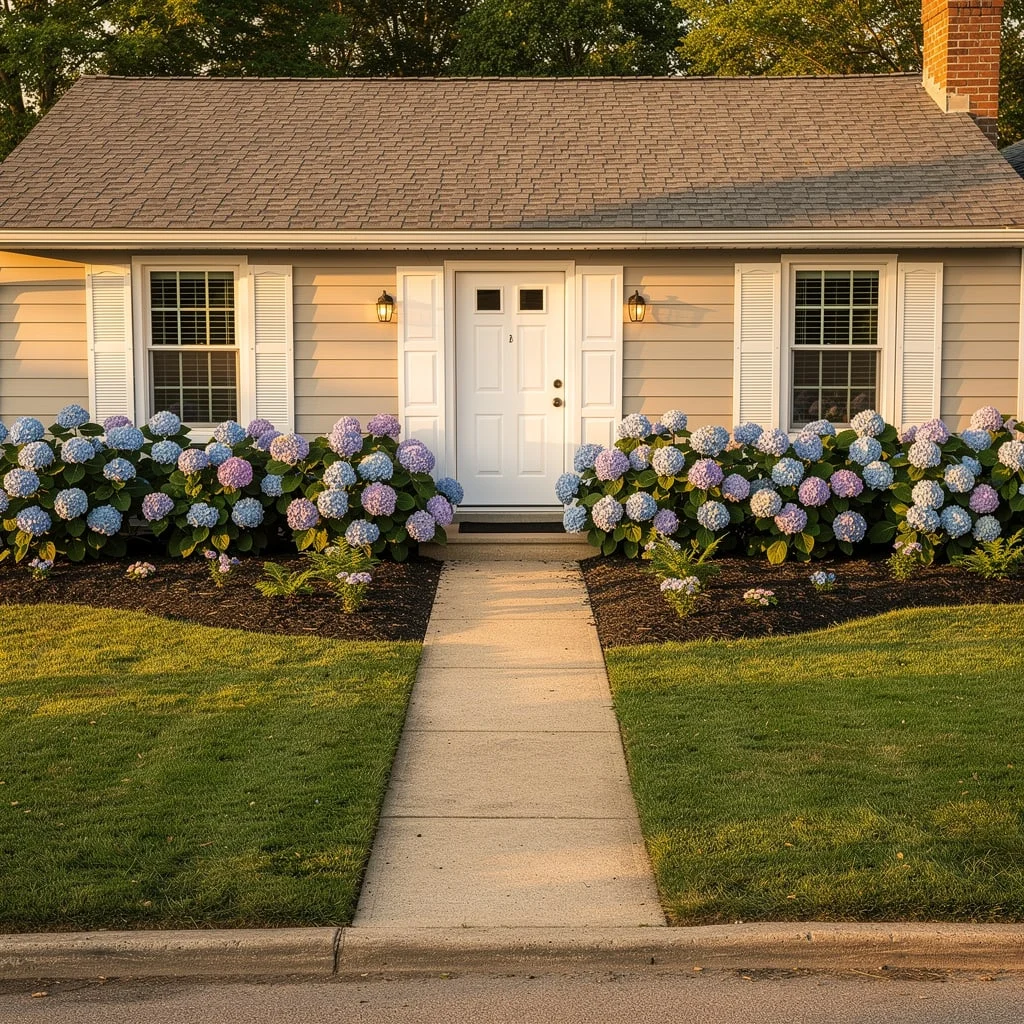
Two matching beds, one either side of the front path, each planted with a continuous row of mophead hydrangeas in blue-purple tones.
That’s the whole scheme. It works because it commits to its own simplicity.
The beds are mulched in dark brown shredded bark. The edges are clean and straight, paralleling the path on each side. The hydrangeas are the same variety, the same age, spaced equally.
The symmetry is the design. Break it — with different varieties, uneven spacing, additional plants — and the scheme loses its clarity without gaining anything.
Water hydrangeas deeply and infrequently rather than shallowly and often. Feed in spring with a balanced fertiliser. Cut back in late winter to about one foot above ground. The new growth flowers on old wood in mophead types, so check your variety before hard pruning.
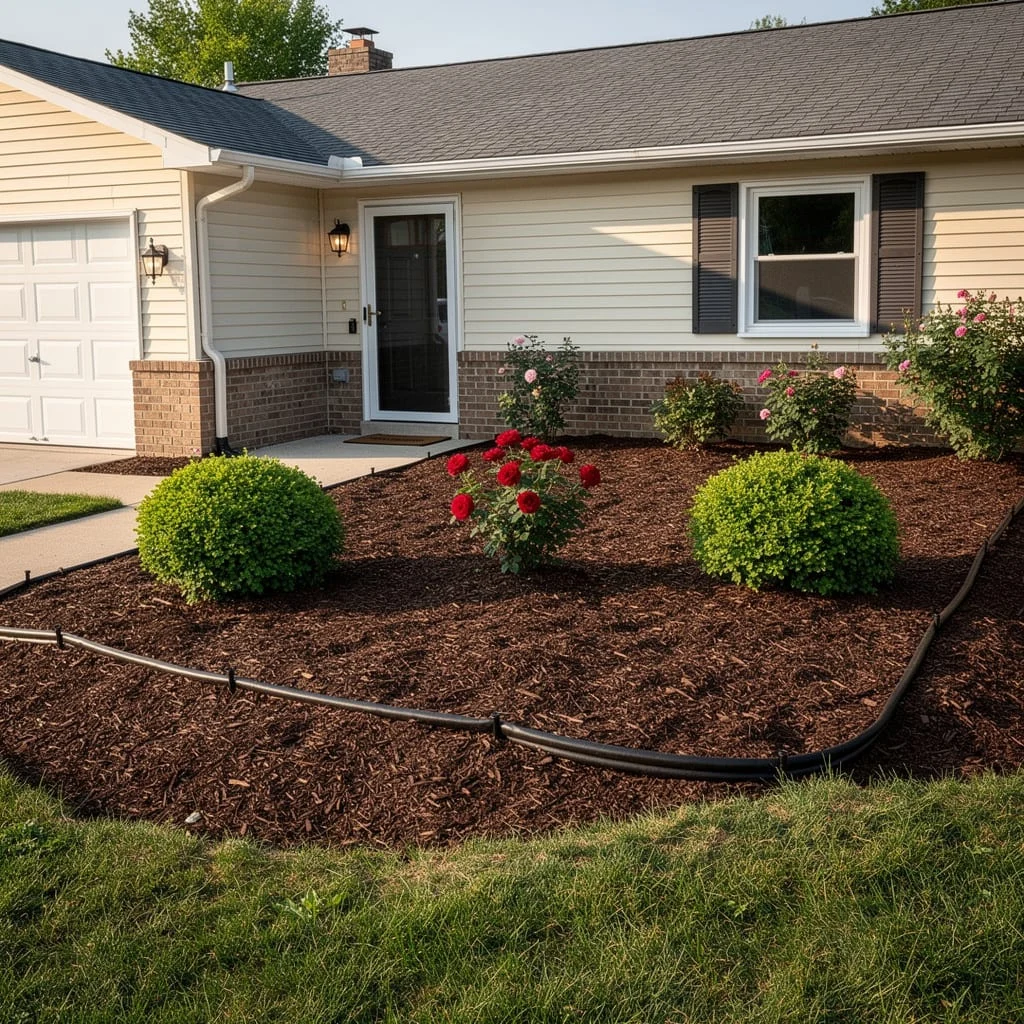
The Dark Mulch Curved Bed with Mixed Shrubs and Clean Edging
The foundation for this scheme is the edging and the mulch. Get those right and the planting can be relatively simple.
Install black steel landscape edging in a broad curve from the driveway to the front corner of the house, creating a generous planting bed along the foundation and beside the drive. Fill to three inches with dark shredded hardwood mulch.
Plant into the bed with globe-form boxwoods at regular intervals for structure, mixed with seasonal shrubs that provide colour in rotation — knock-out roses for summer, mums for autumn. Keep one space near the mailbox for a trailing or mounding plant that softens the boundary between the bed and the driveway.
The key is restraint. Three plant species maximum in a bed of this type. Repetition of the globe boxwood is the unifying thread.
The Ornamental Grass Statement with Layered Perennials
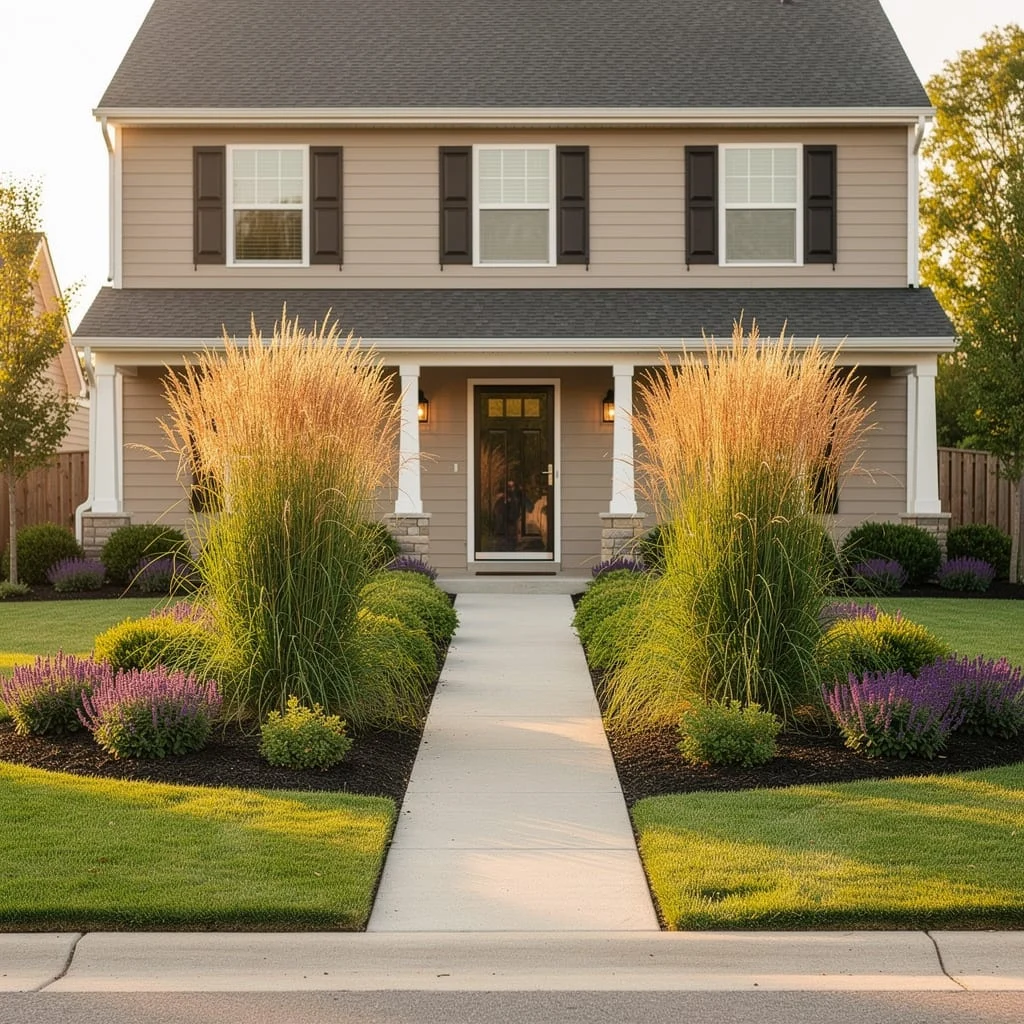
Tall ornamental grasses as the centrepiece — two clumps of Karl Foerster or similar upright grass, placed symmetrically either side of the front path — flanked by lower plantings of Russian sage, catmint, or salvia.
The grasses do something critical for a front yard: they move. In late afternoon light, the amber seed heads catch the sun. In autumn they hold their structure when everything else has died back.
The salvia or catmint below them provides the colour layer — purple-blue tones that complement the warm amber and green of the grass. Use a dark bark mulch in the beds and install clean steel edging at the lawn boundary.
Cut the grasses back hard in late winter — to about eight inches above ground — before new growth begins. This keeps them compact and fresh rather than dead-centred and thatchy.
The Driveway Strip Planting with Alternating Texture
The narrow strip between driveway and lawn is underused in most front yards. It is visible from the street, easy to mow around if planted well, and contributes materially to the reading of the whole front yard.
Plant alternating drifts of two species: ornamental grass in a fine-textured low-growing variety and a flowering perennial with a contrasting form — catmint, lavender, or salvia. The plants alternate in groups of three — three grass, three flowering, three grass — down the length of the strip.
Use black steel edging on both the driveway side and the lawn side to keep the strip defined. Mulch between plants with dark bark.
The repetition pattern does the design work. The strip reads as intentional from the street because the rhythm is clear — you can see the plan.
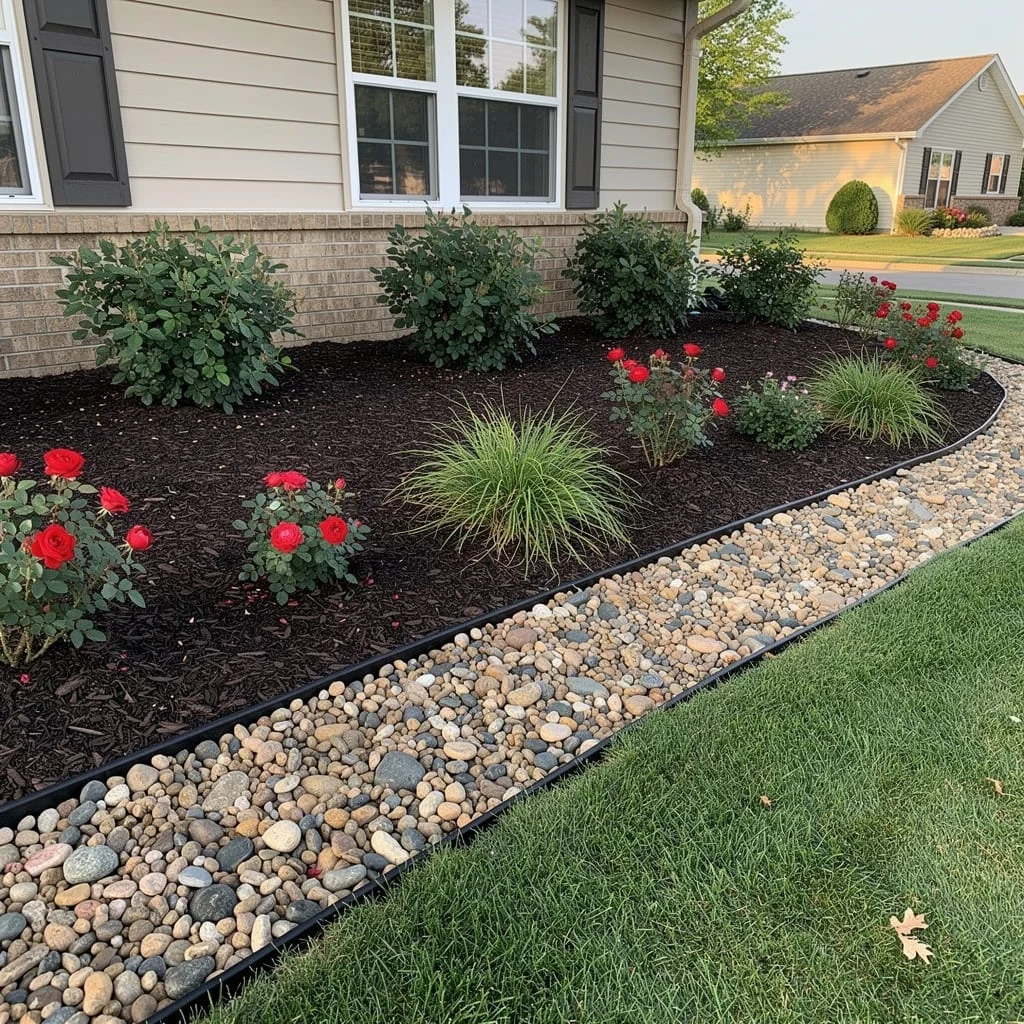
The Curved Bed with Globe Boxwood, Red Roses, and River Rock Border
The mulched foundation bed with a river rock collar — a continuous line of smooth rounded stones forming the outer edge of the bed — is a refinement on the standard mulched bed.
The river rock border sits in a shallow trench at the bed’s outer edge, just below lawn grade. Install black steel edging behind the rock to prevent the mulch from migrating into the stone. The stones create a transitional material between the mulch surface and the lawn, making the edge more decorative and more defined simultaneously.
Plant with globe-form boxwoods for structure, red shrub roses for colour, and one or two ornamental grass clumps for texture contrast. Keep all plants in the dark mulched area. The river rock is purely border — nothing plants into it.
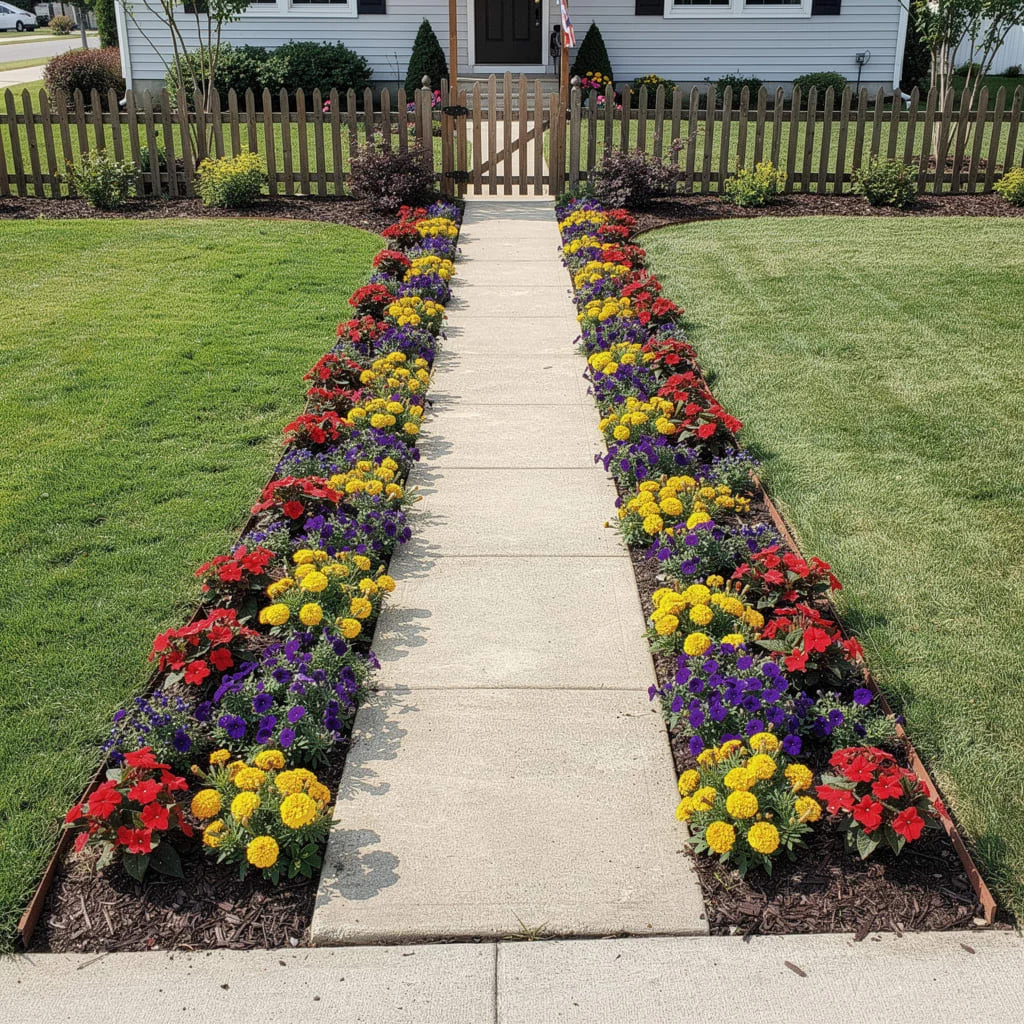
The Annual Colour Path Border
The strip either side of the front path planted densely with summer annuals — marigolds in yellow and orange, impatiens in red and purple, petunias in any combination — is the most labour-intensive approach in this list and the most immediately rewarding.
The key is density. Plants should touch each other when they reach full size. Gaps in the annual bed look like missing teeth. Buy more plants than you think you need. Space them at the label spacing or slightly closer.
Dead-head weekly. Feed fortnightly with a liquid flowering fertiliser. Replace exhausted plants mid-season with fresh transplants if you can.
This is a high-maintenance approach but it is also entirely accessible — no permanent decisions, fully replaced each year, low skill threshold. If you want your front yard to look extraordinary for a specific event, this is how you achieve it in a single weekend.
The Flagstone Path Through Lawn with Low Perennial Border
The natural flagstone path set directly into the lawn — no surrounding gravel, no edged bed, just stone flush with the grass — is the simplest possible path installation and one of the most effective.
Use large irregular flagstones, not small stepping pads. The stones should be heavy enough to stay in place and large enough to land on comfortably without looking down. Bury them so their upper face is level with the lawn surface. The mower passes over them.
Along the foundation of the house, create a simple matching border on each side of the door — two identical planting groups of ornamental grass and salvia. Mulch the beds dark. The simplicity of the planting groups on each side of the door frames the entry without overwhelming a small house.
The Silver and Blue Low-Maintenance Ground Cover Border
The border planted entirely with low ground-hugging perennials — blue lobularia or ageratum, silver-leafed artemisia or stachys, white low-growing daisies — is a low-maintenance approach that covers ground effectively and looks soft and considered from the street.
These plants are chosen to stay low, spread without aggressive invasiveness, and require minimal maintenance beyond an annual cutback. Set flat stepping stones through the border at intervals for occasional access without compacting the plants.
The steel edging at the border boundary is the key maintenance detail. These plants will spread. The edging keeps them from colonising the lawn or the path. Reinstall edging after any frost heaving.
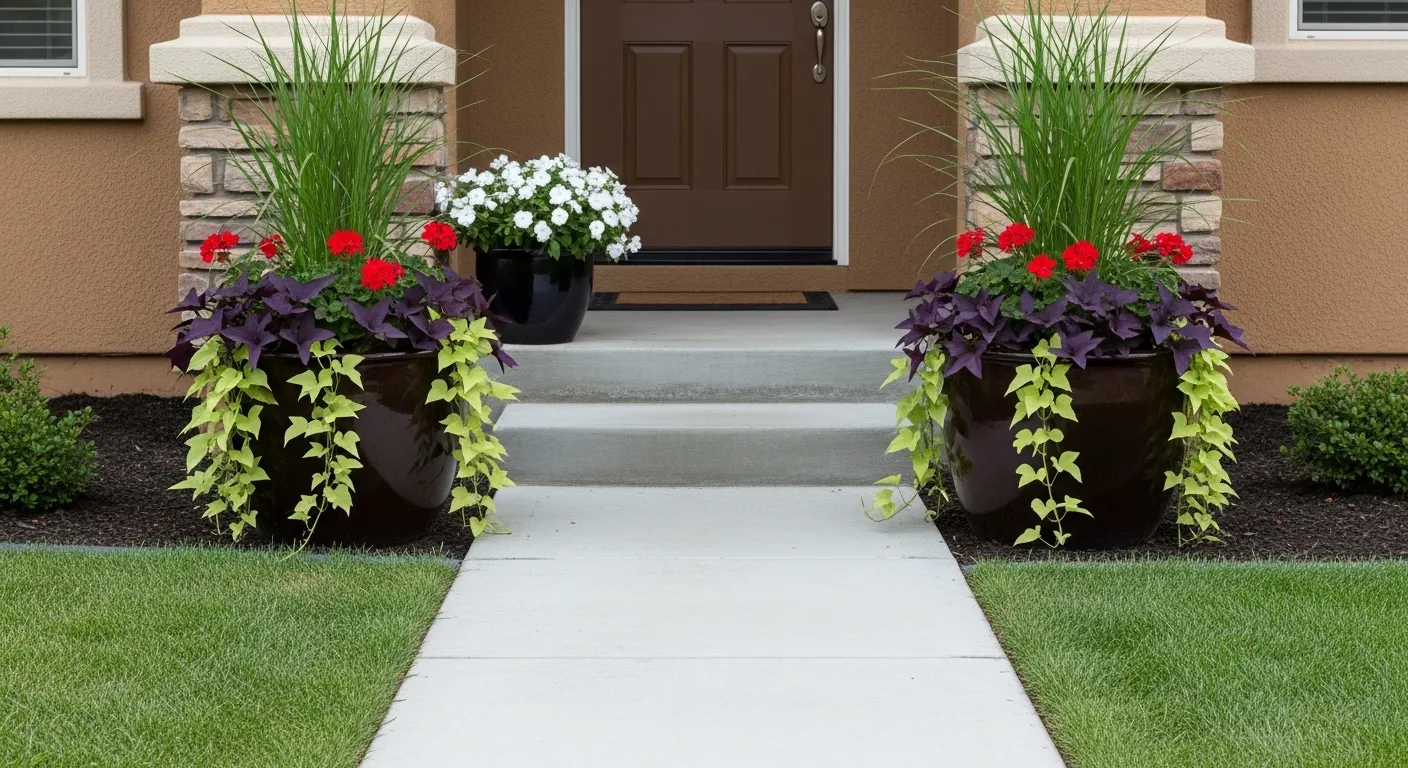
The Terracotta Pot Grouping at the Entry
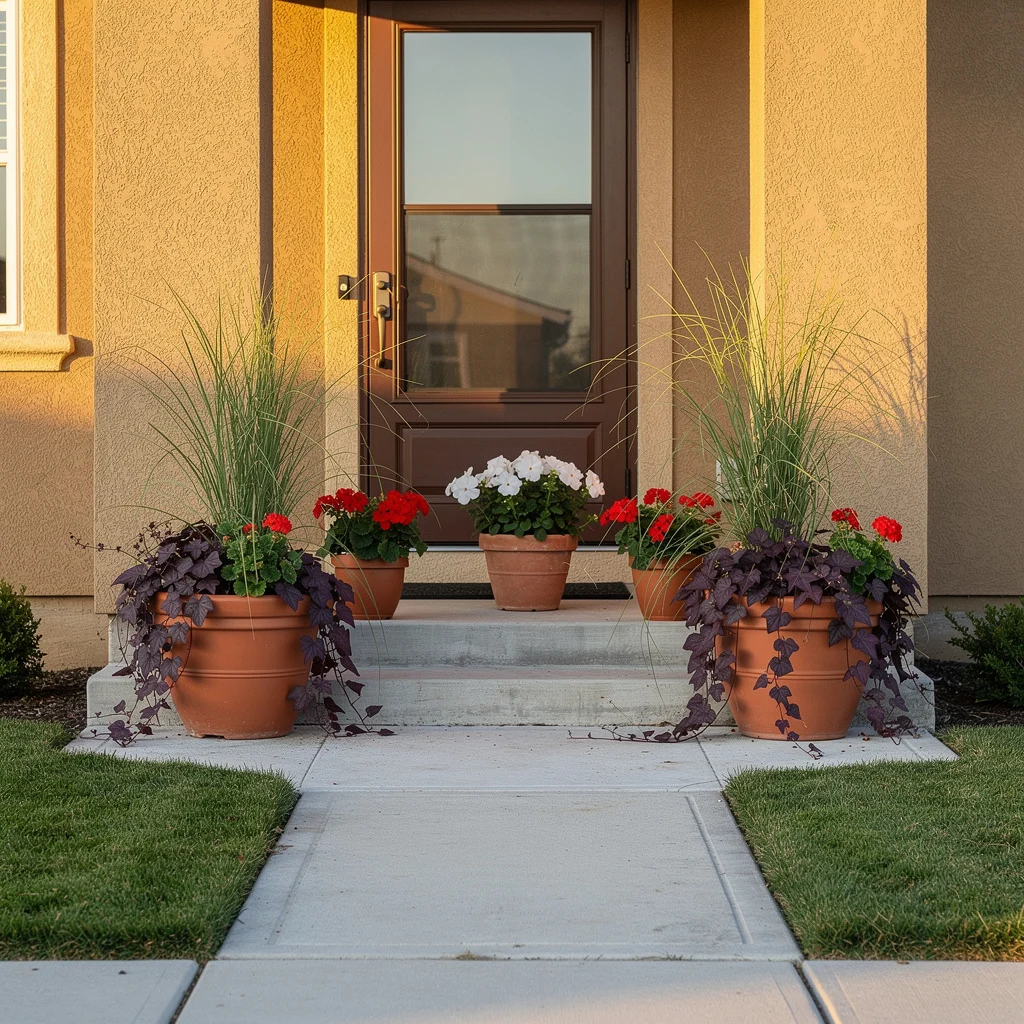
No bed, no lawn renovation, no structural change: just three terracotta pots at the front door.
The formula for an entry pot grouping that looks designed: two larger pots flanking the steps and one smaller pot between them, or two large on the lower step and one medium on the threshold above. Never fewer than three. Never in a straight line.
Plant each pot with the thriller-filler-spiller principle: one tall architectural element (ornamental grass, cordyline, or canna), one mounding flowering element (geranium, petunia, or zinnia), and one trailing element (sweet potato vine, bacopa, or ivy). Use the same trailing plant in all pots for cohesion. Vary the thriller for individuality.
This is the approach for a rented property, a low-budget renovation, or a homeowner not ready to commit to permanent planting. Done well with quality pots and the right plant combinations, it creates a front entry that reads as considered and welcoming from the street.
The Globe Shrub Row with Mum Accents

The row of globe-clipped boxwoods or euonymus along the foundation line — all the same species, all clipped to the same size — with a seasonal front-row accent of chrysanthemums in autumn.
This is one of the most reliably attractive and lowest-maintenance front yard schemes available. Once the boxwoods reach the desired size — typically three to four years after planting — the annual maintenance is two or three clippings to maintain the globe form, and a spring feeding.
The mums along the front of the bed are planted fresh in autumn, either in the ground or left in nursery containers sunk into the mulch surface. They bloom for four to six weeks and then get cut back or replaced. The boxwoods hold the scheme through every other season.
Clip all globes to exactly the same size and height. The consistency is everything. One undersized or oversized globe breaks the rhythm.
The Stepping Stone Path Through Lawn with Paired Foundation Planting
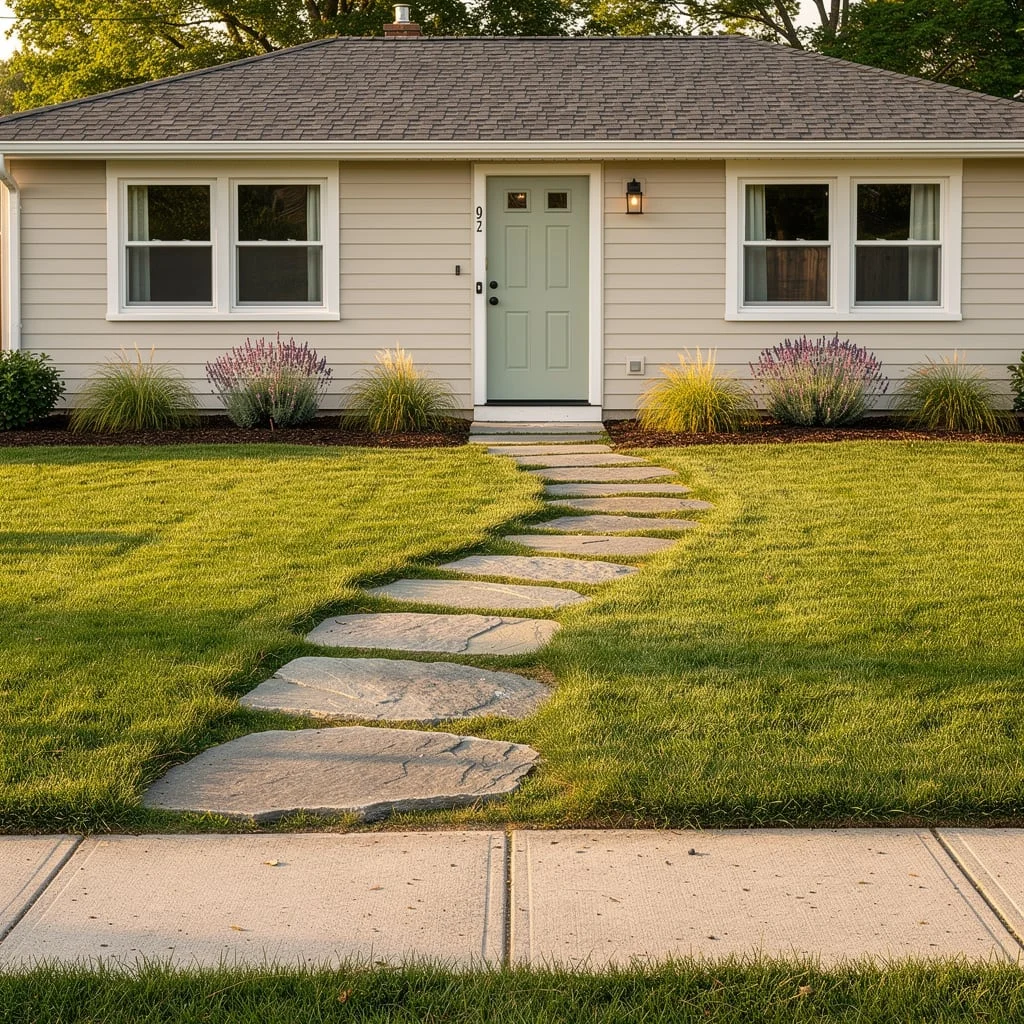
Flat irregular flagstones laid in a gentle curve through a well-maintained lawn, with paired planting groups either side of the front door — ornamental grass clumps flanked by salvia in purple.
The lawn must be healthy for this to work. A lawn with brown patches, bare spots, or uneven growth undermines the whole scheme. If the lawn needs work, address it before adding the path.
The stepping stones are the design event. They add personality and destination to a front yard that would otherwise be a flat expanse of grass. The slight curve is important — a dead-straight stepping stone path through a lawn looks functional. A curved one looks chosen.
The Cottage Front Yard with White Picket Gate and Mixed Border
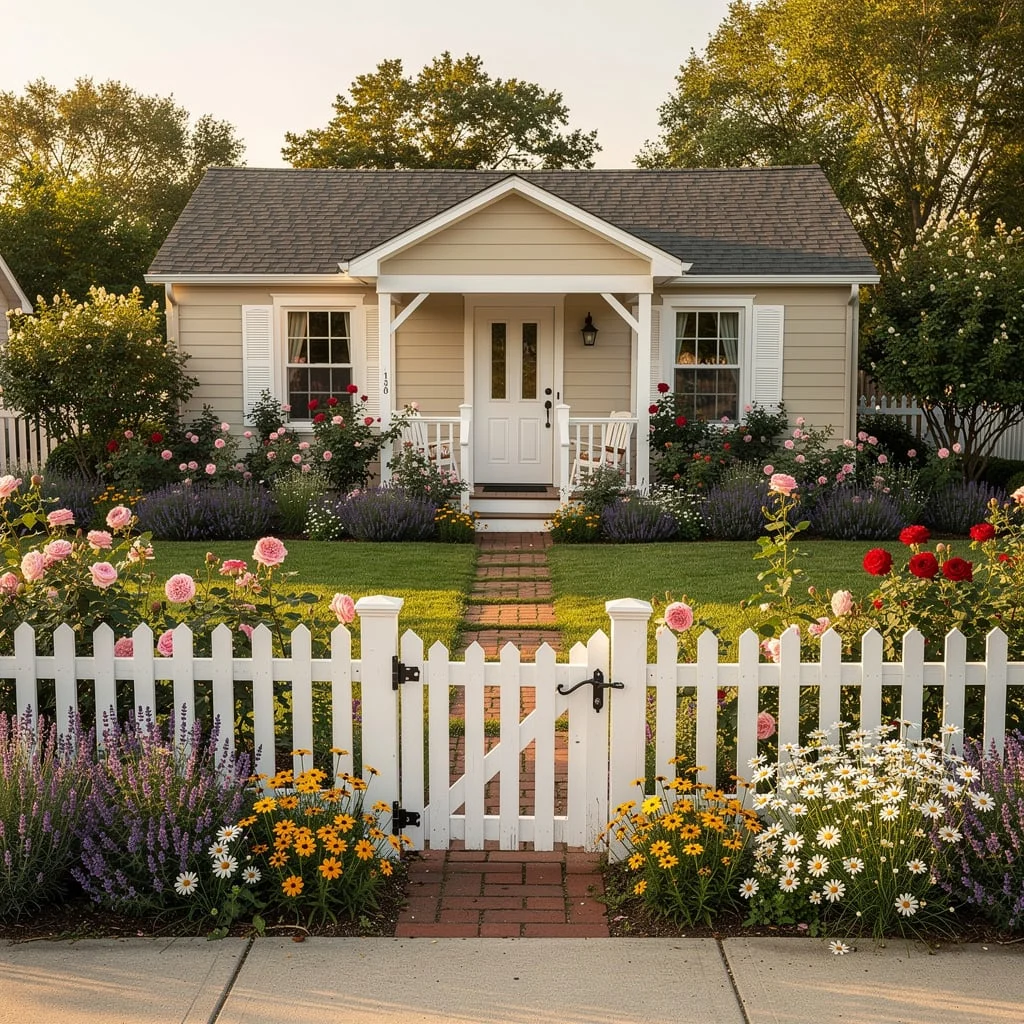
This is the scheme that requires the most plant knowledge and delivers the most personality.
A white picket fence with a gate at the path entrance. A brick or flagstone path from gate to front door. Foundation borders along the front of the house on each side, planted with a mix of roses in pink and red, lavender in purple-grey, daisies in white and yellow, and any other summer perennials or annuals that suit the palette.
The border should be full. Gaps are the enemy. Fill with annuals between perennials in the first few years while the permanent plants establish and spread. The roses are the most important element — choose repeat-flowering compact shrub varieties that will bloom from late spring until frost and stay within the depth of the border.
The white fence is the frame. Keep it freshly painted. A grey or dirty white fence undermines everything planted in front of it.
The Truth About Simple Front Yard Landscaping
None of these schemes require remarkable skill.
They require making a decision and completing it properly. The curved bed that looks good from the street is one that has a smooth curve, deep mulch, clean edging, and plants placed at the right height hierarchy. None of those things is technically difficult. All of them require follow-through.
The front yards that look neglected are almost never the result of wrong choices. They are the result of half-finished choices — the mulch applied too thinly, the edging not installed, the plants chosen well but placed without height logic.
Start small. Do one bed properly. Then the next.
Your street will notice.