
You have a kitchen. You have walls. You’re using almost none of them. Instead, you have upper cabinets that swallow everything whole, a counter covered in things that should be somewhere else, and a vague feeling that your kitchen could be more functional if you just had more space. You don’t need more space. You need better walls.
Open shelving isn’t a trend that came and went. It’s a decision about how you want to live in your kitchen. It says something will always be within reach, that the things you own are worth looking at, and that you trust yourself to keep things tidy enough. That last part is where most people falter. Not the aesthetics. The accountability.
The problem isn’t that open shelving is hard to do well. It’s that most people approach it like a storage problem when it’s actually a design problem. They load up a shelf with whatever they own and call it done. The shelf looks like a garage sale. They put doors back on and swear off the whole concept.
This post is about doing it differently. About choosing the right shelf system for your kitchen, styling it in a way that earns its visibility, and making decisions before anything goes on the wall.
Kitchen Shelving Ideas
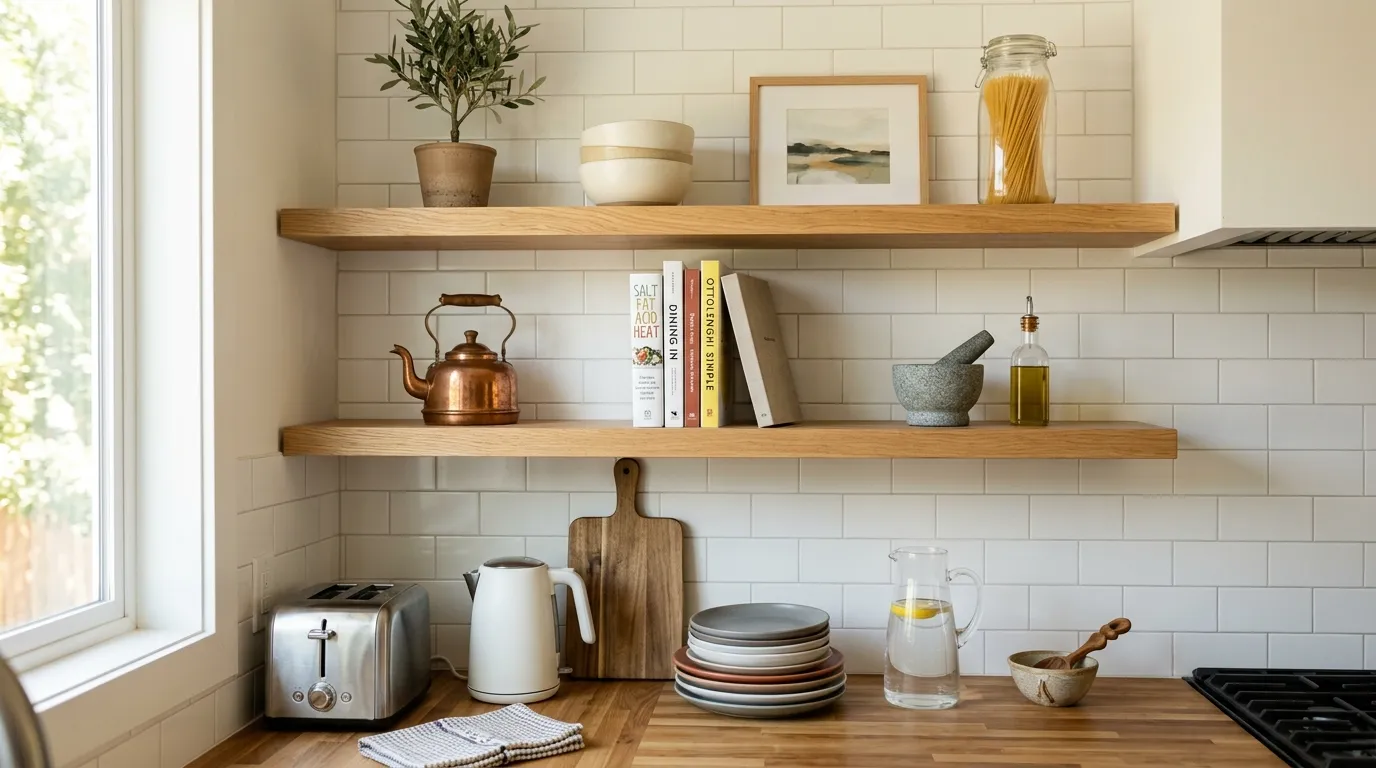
The Scandinavian Oak and Black Steel Three-Tier That Gets the Basics Exactly Right
Source solid oak boards at a minimum thickness of four centimetres — thinner and they will visibly flex under load. Cut to the width of your chosen wall section, leaving at least ten centimetres of wall visible on each side. The ends can be left square or given a very gentle chamfer on the top edge; anything more decorative starts to look fussy against the clean black bracket hardware.
Choose heavy-duty black powder-coated angle brackets — the L-shaped variety with a diagonal brace underneath. The diagonal brace is structural and should be visible; it contributes to the industrial quality that balances the warmth of the oak. Space brackets no more than sixty centimetres apart for loaded shelves.
On the top shelf, place a single substantial item at one end — a black cast iron pot, a large ceramic pitcher, something with real visual weight. Leave the rest of the surface clear or nearly so. This establishes scale without crowding the uppermost tier.
On the middle shelf, hang a horizontal row of small S-hooks through a thin brass or black rod threaded through two hooks below the shelf front. From these hang ceramic mugs. Underneath the same shelf, arrange three glass jars with gold lids in a loose grouping beside a small white ceramic vase. The hanging mugs add vertical rhythm below the shelf line without taking up surface area.
The lowest shelf carries the most practical weight: stacked white bowls, a potted trailing plant, and a pair of cookbooks stood upright. Put the plant between the bowls and the books so the green breaks what would otherwise be a flat line.
The Ceiling-Suspended Walnut and Brass Rod System That Changes the Room
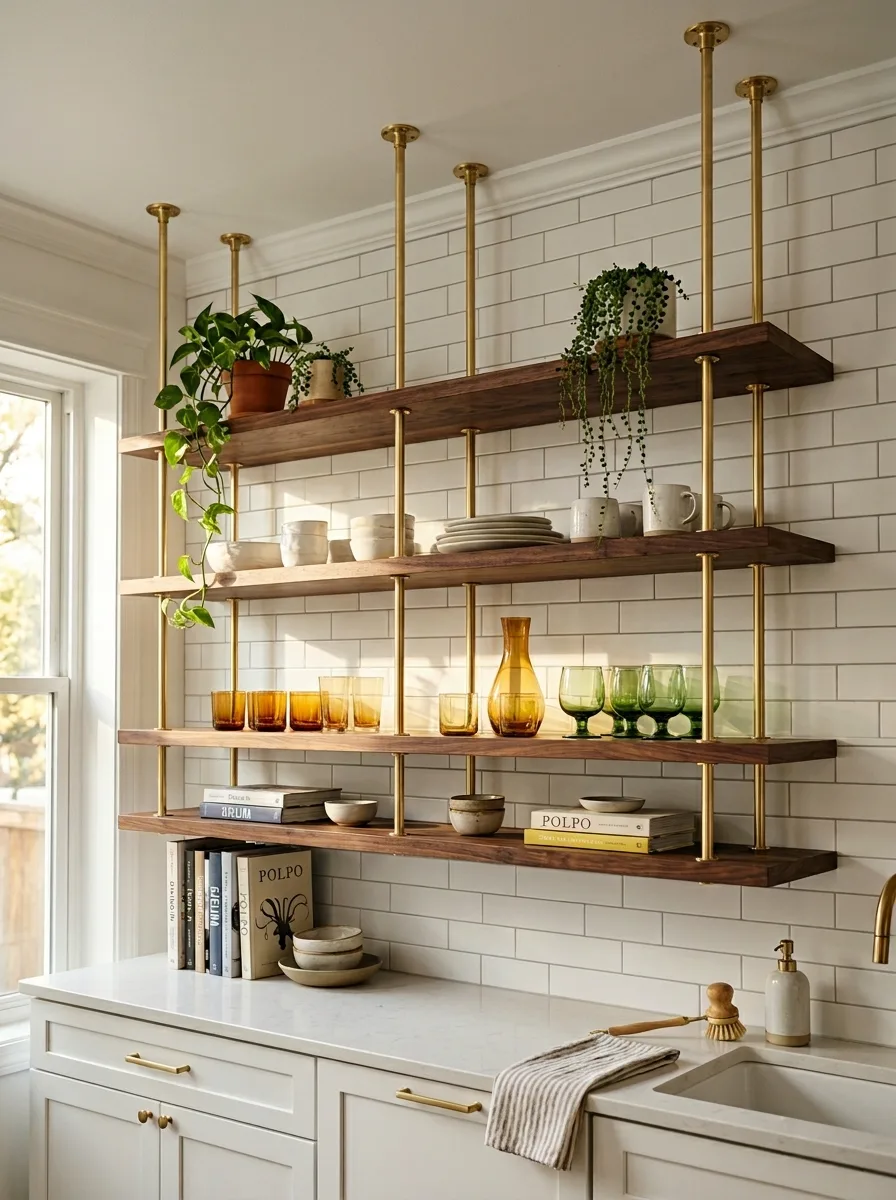
This installation hangs from the ceiling rather than mounting to the wall, which means it can sit in front of a backsplash without interfering with it. The visual effect is dramatic — shelves that appear to float on vertical brass rods, hanging above the workspace.
Source threaded brass rod in a diameter of at least twelve millimetres. Cut the rods to your ceiling height minus the clearance you want above the top shelf. At the ceiling, fix brass ceiling flanges drilled into joists — not drywall. Thread the rod through the flange and fix with a locking nut above and below the flange plate. At each shelf position, drill holes through the walnut board slightly larger than the rod diameter, slide the board onto the rod, and lock into position with a nut above and below the board.
Use dark-stained walnut for the shelves — the depth of colour against white tile backsplash is the whole visual argument. Finish with a matte oil rather than lacquer, so the grain stays tactile.
Style by material group: one shelf for ceramics and pottery, one for coloured glassware, one for books and smaller utilitarian items. The amber and green glassware against the tile, lit by natural window light, becomes genuinely beautiful. It stops being storage and starts being composition.
The Backlit Glass Shelf System with Chrome Brackets That Doubles as Display Lighting
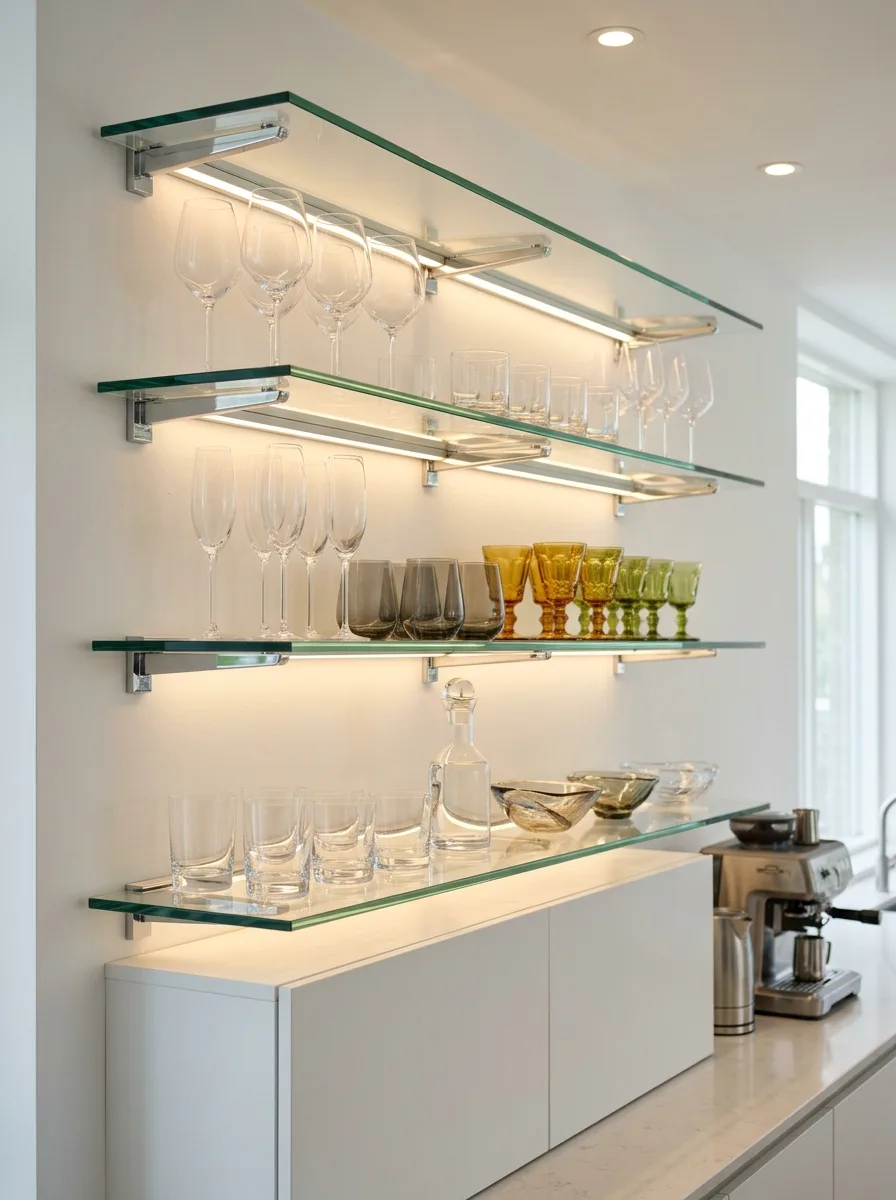
This installation requires an electrician for the under-shelf LED channel work but is otherwise straightforward. Order tempered glass shelves in twelve-millimetre thickness, sized to your wall width. Mount chrome satin bracket hardware — the kind that grips the glass edge on both sides rather than supporting from below — into studs at uniform intervals.
The lighting is everything here. Run an LED strip channel along the back edge of each shelf, recessed into a slim aluminium channel glued to the glass with silicone. The light washes down the wall and forward under the shelf, illuminating whatever is displayed below. Use a warm white LED strip, not cool white — cool white makes glassware look clinical.
On the top shelf, stand wine glasses upright in rows. The backlighting through the crystal creates a glow that does not require any further styling. On the middle shelf, alternate flute and tumbler forms — the variation in silhouette gives the row life. On the lower shelves, introduce colour through vintage pressed glass goblets and amber tumblers. The coloured glass, lit from above, becomes the focal point of the entire wall.
The Full-Height Marble Floating Shelf Stack with Brass Keystone Brackets
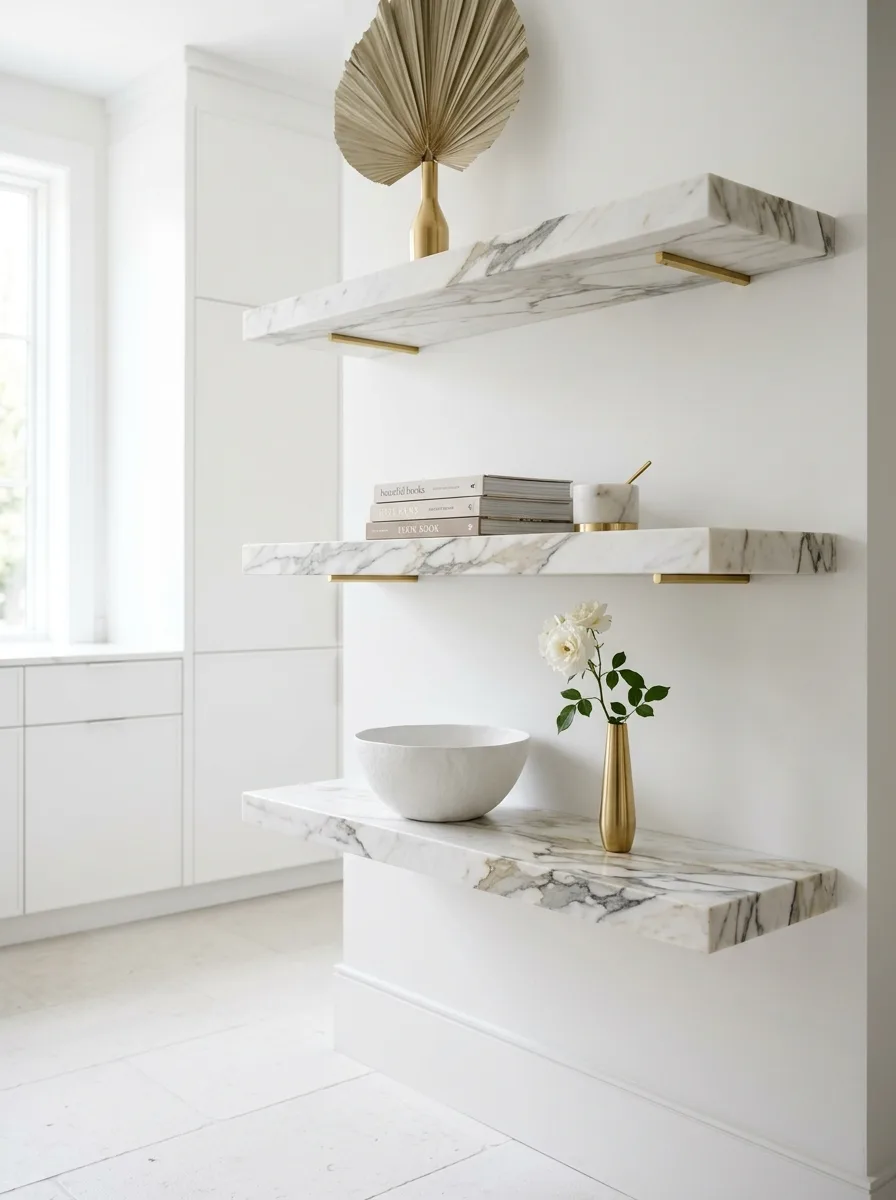
Marble shelves are heavy and expensive and completely worth it if your kitchen has the bone structure to support them. This works best in a kitchen that is already leaning white and minimal — the marble becomes the texture in a space that is otherwise very clean.
Order honed Calacatta or Arabescato marble in forty-millimetre slab depth. Thicker is better — it gives the shelf a presence that thinner profiles cannot achieve, and it reads as more architecturally serious. The veining should be bookmatched if you’re doing two shelves — opposing marble slabs cut from the same block, mirrored, so the veining pattern echoes across both surfaces.
Mount with concealed brass keystone brackets embedded in the wall before the shelves are placed. These are engineered specifically for heavy stone shelves and carry the load through the bracket body rather than through anchor bolts. The result is a shelf with no visible hardware — just a marble slab that projects from the wall as if it grew there.
Style with extreme restraint. A single brass bud vase and two white roses on the lowest shelf. A stack of three coffee table books and a small marble mortar on the middle shelf. On the top shelf, nothing but a tall dried palm fan in a brass vessel. The emptiness is the point.
The Terracotta-Backed Niche Shelf That Treats the Wall Like a Feature
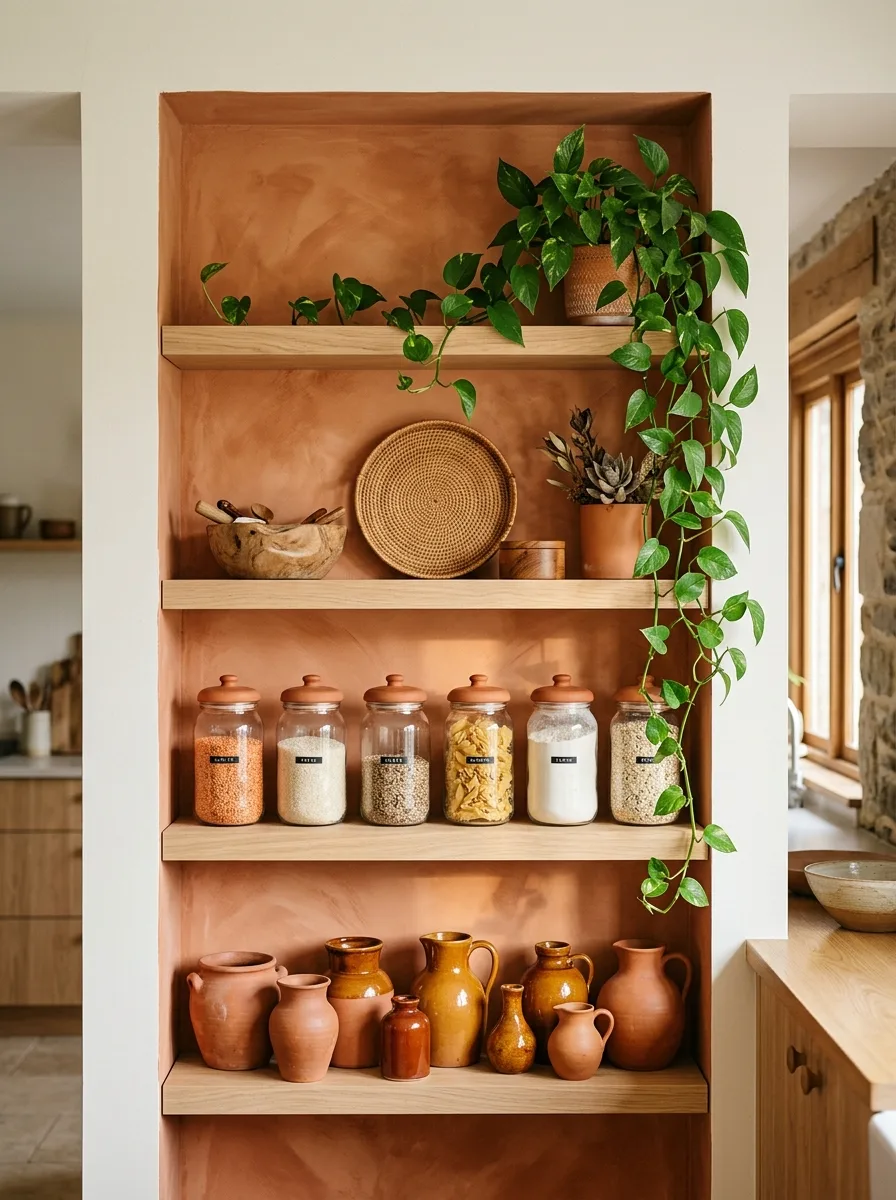
Rather than mounting shelves to an existing wall, this approach involves building or reclaiming a niche — a recessed opening in a non-structural wall — and painting the interior back and sides in a deep terracotta or clay plaster finish.
The terracotta interior is the defining decision. It turns the shelf opening into a warm, architectural frame that gives every object placed inside it a kind of gallery quality. Natural oak shelf boards sit in the niche, visible on only three faces — the front and two ends — which makes them read as cleaner and more deliberate than a wall-mounted bracket shelf.
On the uppermost shelf, place one trailing pothos in a woven basket pot. Let the vines spill over the shelf edge and run down toward the shelf below — this trailing plant is not decorative trim, it is a structural element of the entire composition. On the middle shelf, line six or seven identical glass jars with terracotta-toned ceramic lids in a horizontal row. The uniformity against the warm background reads as satisfying rather than sterile. On the lowest shelf, arrange a collection of terracotta and amber glazed pottery pitchers and vessels in graduated sizes. The ceramics and the painted niche wall have matching warmth, which makes the whole thing feel cohesive without feeling matchy.
The Corner Oak Floating Stack That Makes Use of a Wall No One Touches
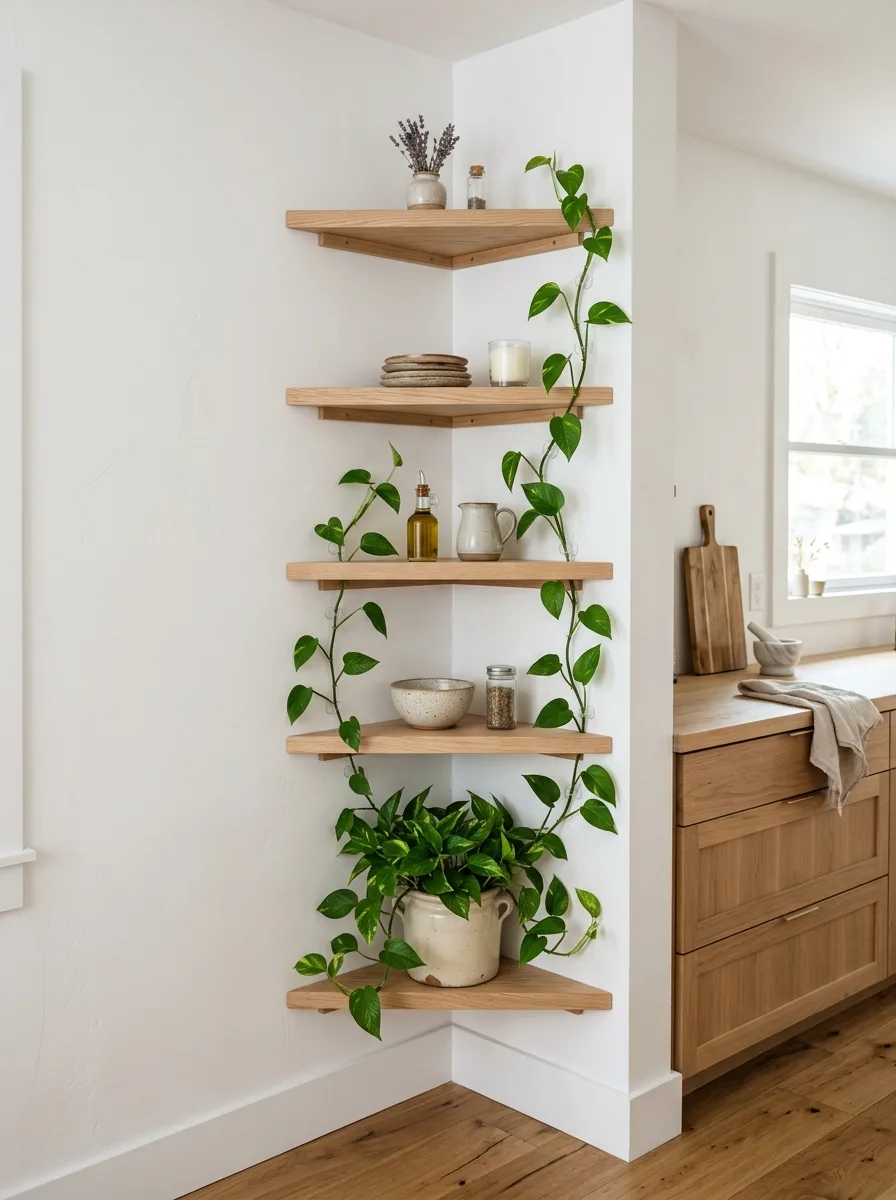
Install four or five oak floating shelves spanning both walls of a corner, mitre-cutting each shelf at forty-five degrees at the inner corner so the two halves meet cleanly. This creates continuous shelf surfaces around the corner without a gap or an awkward overlap.
The corner shelves work because they exploit the one area of most kitchens that has the most available wall surface and the fewest competing demands. No window, no switch plate, no vent — just two clean walls meeting at a right angle.
Mount a single large pothos in a ceramic crock pot on the lowest shelf. Thread a long length of jute cord loosely along the wall surface above, fixing it with small brass tacks every thirty centimetres or so, to give the plant’s growing vines a structure to follow. Over a few months the plant will colonise the wall between shelves, turning the utilitarian corner into something alive.
Keep the objects on each shelf minimal: a bottle of olive oil, a small ceramic jug, a candle, a spice jar. The trailing plant is the dominant element. Everything else is supporting cast.
The Live Edge Oak Board on Plaster Wall with Herb Garden Integration
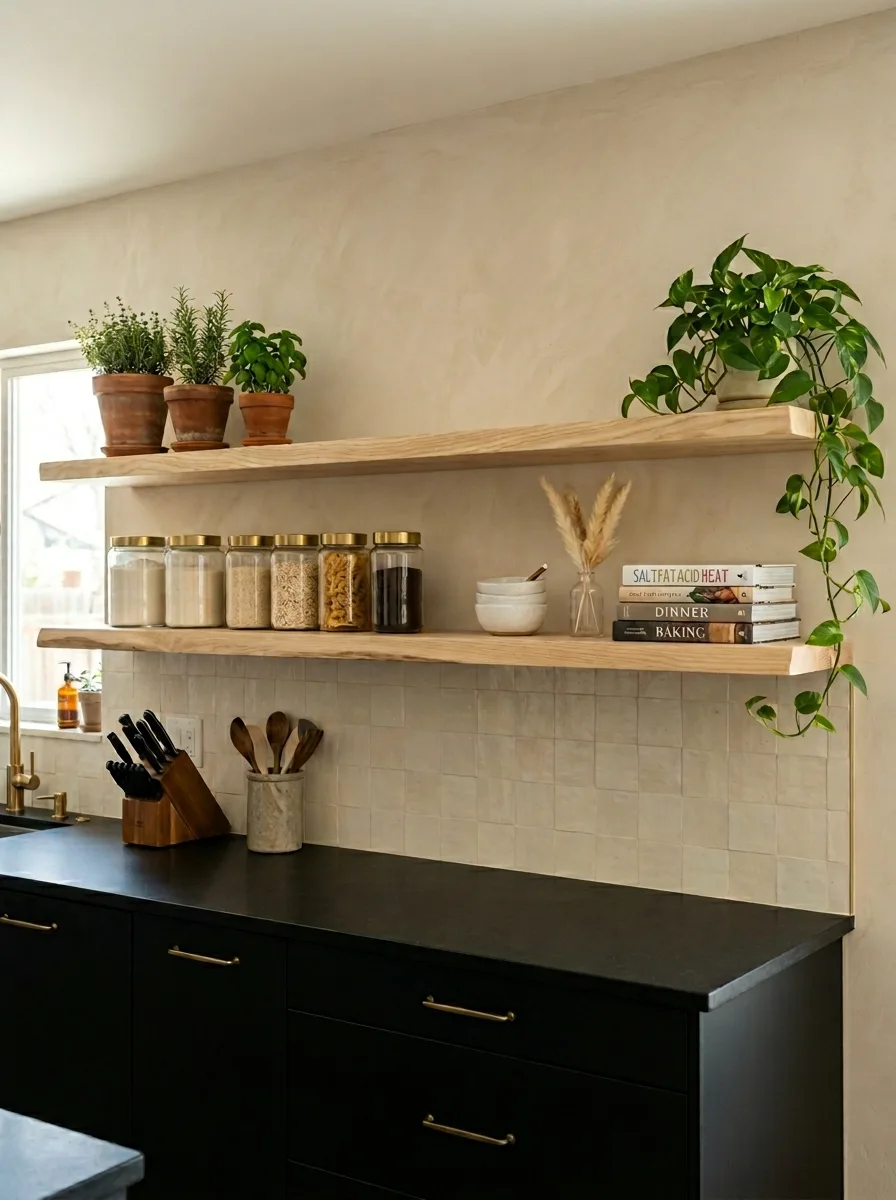
Source two live edge oak boards — wide enough to be functional, with one natural bark edge each — and apply a clear matte oil finish that preserves the colour and grain without adding any sheen. The natural bark edge should face forward, visible from the room. The sawn edge goes against the wall.
Mount with simple floating shelf hardware embedded in the wall — no visible bracket. The shelf appears to project from the plastered wall without support, which suits the organic character of the live edge material.
On the upper shelf, plant a line of terracotta pots with growing kitchen herbs: rosemary, thyme, basil. Position them so they’re silhouetted against the window if the wall backs one. Herbs on a kitchen shelf are functional, but they also read as domestic and alive in a way that no decorative object can replicate.
On the lower shelf, arrange a row of glass jars with brass lids — the same jars as a set — and fill them with dry goods. The brass lid on the live-edge shelf plays into the same material warmth. Add a stack of three cookbooks on one end and a trailing plant on the other, so the shelf has anchoring visual weight at both ends.
The Arched Plaster Niche with Integrated LED That Elevates Everyday Ceramics
These arched niches are architectural decisions. They belong in a house that already has some character — a kitchen with thick plaster walls, or one that’s willing to commit to a Mediterranean or Moroccan-adjacent aesthetic. In the wrong context they look like a theme park.
In the right kitchen, they are extraordinary.
Build three stacked arch-form niches in a non-structural wall, each approximately sixty centimetres wide and forty centimetres tall. The arch should be a true half-circle. Finish the interior with smooth white plaster and run a continuous LED strip along the inner curve of each arch, recessed into a narrow channel so the strip itself is invisible and only the glow is visible.
The warm LED wash against the white plaster turns each niche into a miniature illuminated alcove. In the top niche, place a single terracotta urn with a succulent. In the middle niche, arrange amber goblets and a glass carafe alongside a spray of olive leaves in a clear vase. In the lowest niche, stack dark green plates and a matching set of terracotta bowls. The colour palette — amber, terracotta, forest green — plays off the warm light perfectly.
The Ceiling-Hung Oak Pot Rack with Brass Chain That Turns Cookware Into Display
A pot rack only works if your cookware is worth displaying. That means cast iron, stainless steel, carbon steel, or quality enamelled pieces. If you have a mixed collection of non-matching aluminium pans, a pot rack will announce that fact to every visitor. Edit the collection first.
Build the pot rack from an oak frame — a simple rectangular structure made from four pieces of solid oak joined at the corners with brass corner plates. The frame should be large enough to hold a practical number of pots without crowding — roughly sixty by ninety centimetres is workable for most kitchens.
Suspend from four brass chains at the corners, hanging from brass ceiling roses drilled into the ceiling joists. The chain length determines the height — aim for the base of the rack to clear standing head height by at least twenty centimetres.
Fix a row of brass S-hooks along both long edges of the frame’s lower edge. From these hang cast iron pans graduated by size. Intersperse with bundles of drying herbs tied with jute twine — lavender, thyme, rosemary. The herbs will dry in place and contribute fragrance as well as texture.
The upper surface of the rack frame can function as an additional shelf: a flat oak plane for a few items that benefit from proximity to the hob — chopping boards, a ceramic pitcher, a small bowl.
The Dark Forest Green Open Dresser That Makes White Ceramics Look Expensive
The defining move here is colour. Paint the inside of a floor-to-ceiling open dresser unit — back panel, side panels, shelf undersides, all of it — in a deep forest green. The exterior and cabinet face remain the surrounding kitchen colour.
The green interior does one thing: it makes everything placed against it read as more considered. White ceramics against forest green have a quality they absolutely do not have against white or natural wood. The contrast is high enough that each object has real presence.
Fill the upper shelves sparingly with white pieces: a tall vase, a pair of taper candles and their holders, a white pitcher. Allow a trailing ivy to grow from one shelf down across the lower ones — the bright green of the ivy against the dark green background is the detail that keeps the arrangement from looking too formal.
On the lower shelves, store what is actually used daily: stacked plates on a wooden plate rack, bowls by size, drinking glasses grouped by type. The functional storage reads as beautiful because the colour doing the work in the background.
The Cream Shelf with Colour-Coordinated Storage Jars and Green Bracket Detailing
The green brackets here are the design decision. Not black, not natural steel, not brass — painted green, chosen specifically to echo the terracotta herb pots and introduce a complementary colour note against the white-painted shelf boards.
Source plain timber shelf boards and paint them in a warm off-white, not stark white. The warmth stops the display from feeling clinical. Fit the green painted brackets — standard L-bracket profiles are fine, painted to match with a satin finish for durability.
On the top shelf, set a large cascading pothos at one end and a row of cookbooks standing upright at the other. Keep the space between them clear enough to see the books.
On the middle shelf, arrange a complete set of ceramic canisters with bamboo lids, each one labelled with a single word in a consistent handwritten font. Behind and beside these, place clip-top glass jars filled with dry goods, each with a small handwritten paper tag. The labelling is not decorative — it is the organisation system, made visible.
On the lower shelf, stack stoneware bowls at one end, keep a small herb garden of terracotta pots at the other, and fold a linen tea towel between them as a textural element.
The Scattered Single-Bracket Mini Shelf Installation That Covers an Entire Wall
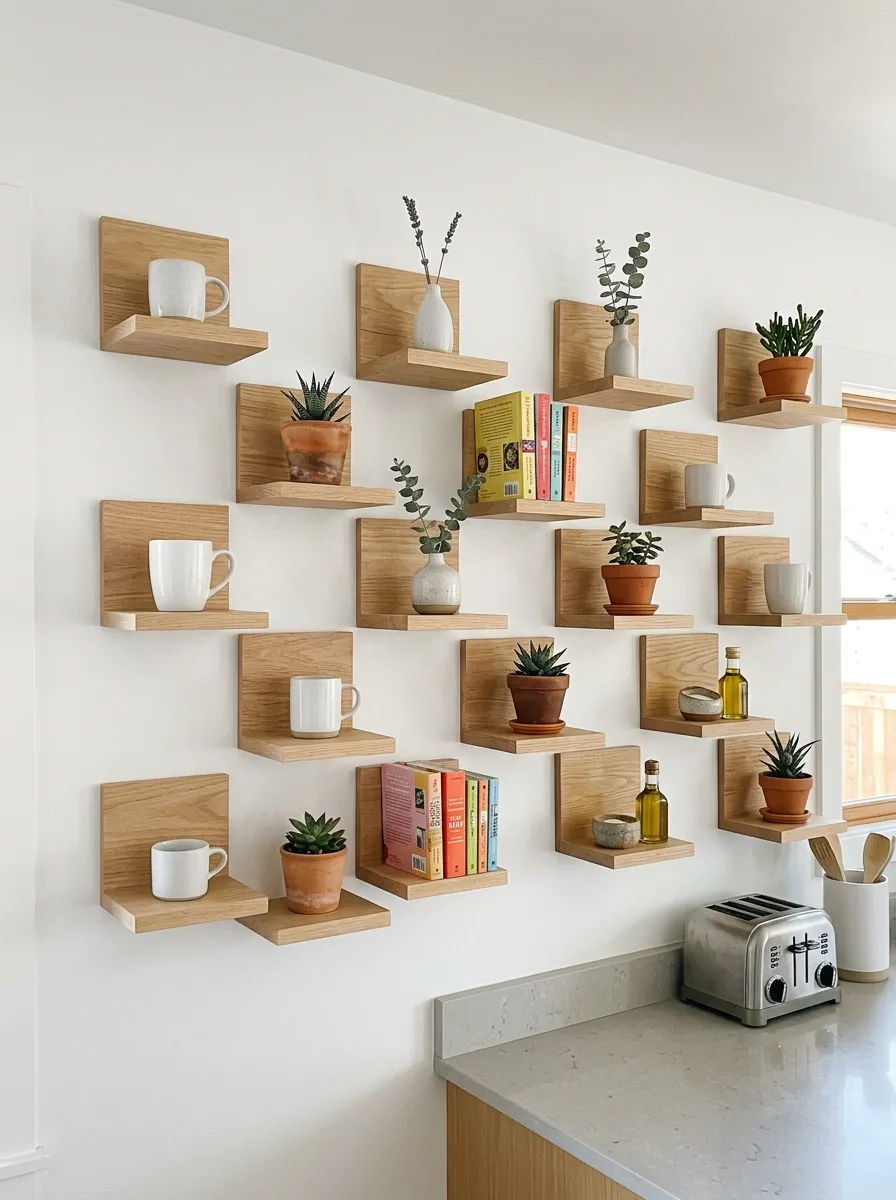
This is not a conventional shelf arrangement. It’s a wall covered in a grid of small individual shelves — each one a narrow square back panel with a shallow projecting ledge — distributed across the wall surface in a loose, asymmetric pattern.
Install each shelf unit with two screws through the back panel into the wall. The key is the layout. Spend significant time planning the placement before drilling anything. The arrangement needs to feel like it was scattered freely while actually being carefully considered — enough overlap in height that the eye reads it as a composition rather than a random grouping, but no perfect rows or columns that would make it look regimented.
Each mini shelf holds a single item: a white mug, a small succulent in a terracotta pot, a slim bud vase, a short stack of colourful paperbacks. The limitation of the shelf size forces editorial rigour. Every object has its own stage.
The Kitchen Pegboard That Actually Has a System
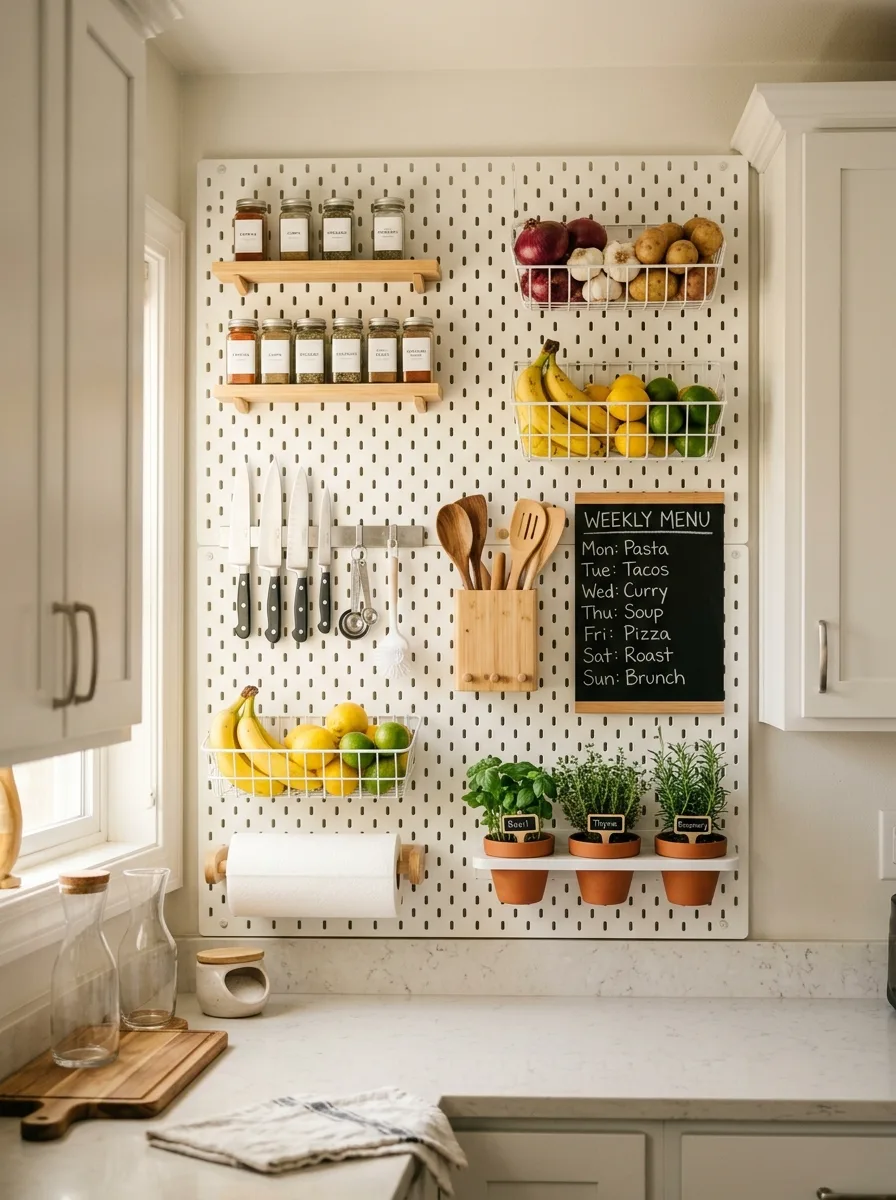
The pegboard only works when it’s been designed, not just filled. The failure mode of kitchen pegboards is that everything gets hung on it and rearranged every week because nothing has a defined home. The successful pegboard has zones.
Mount a large pegboard — a full sheet of four by eight feet if the wall allows — with a two-centimetre standoff from the wall surface to allow the pegs to grip from behind. Paint the pegboard in a neutral off-white before mounting. Paint or stain the wooden shelf accessories in a contrasting natural tone.
Establish zones before adding any accessories. The spice zone goes on one shelf section, the knife zone on a magnetic strip, the produce zone in wire baskets, the herb zone on a separate shelf at the bottom. Each zone gets its accessories installed in a configuration that won’t be moved. The chalkboard panel becomes the menu board — not optional decoration, but the functional planning surface that makes the whole system work as a kitchen management tool, not just a storage wall.
The paper towel roll has its own holder at the base. Everything has a designated position. That’s what makes it look considered rather than chaotic.
The Zen Floating Oak Ledge with Three Objects
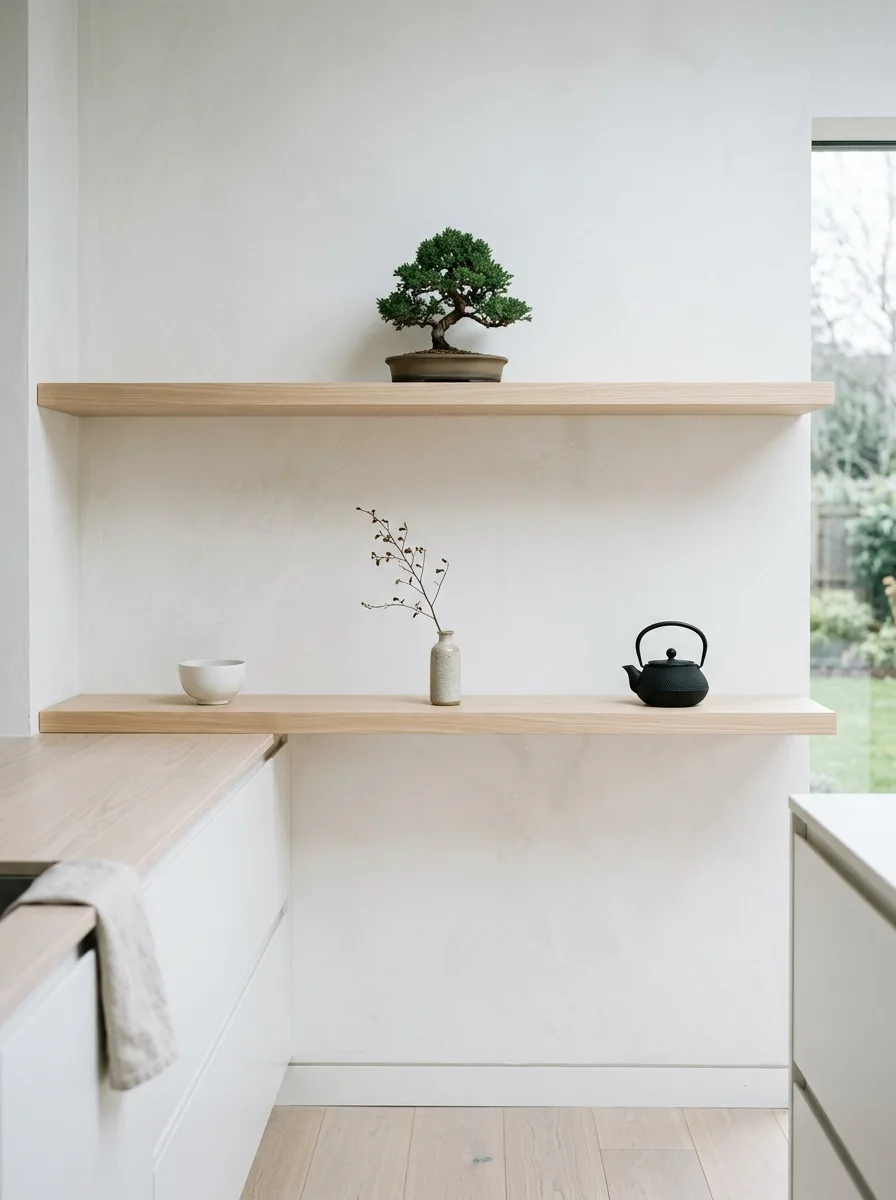
Two shelves. Three objects per shelf, maximum. This is a discipline disguised as a style.
Choose pale oak boards in a satin oil finish — nothing with visible knots or strong grain variation. The point here is quietness. Mount floating with completely concealed hardware in a wall niche or simply against a very clean plastered wall.
On the upper shelf, one bonsai tree in its proper ceramic training pot. Nothing else. The bonsai occupies the entire visual argument.
On the lower shelf, three objects: a small white ceramic bowl on the left, a ceramic bud vase with a single dried branch in the centre, a cast iron tetsubin teapot on the right. The objects are separated by enough empty shelf surface that each reads independently.
The success of this installation depends on the negative space. The shelf is eighty to ninety percent empty. The emptiness is what makes the three objects significant.
The Pull-Out Spice Drawer System Hidden Inside a Tall Cabinet

The best kitchen shelf is sometimes the one you can’t see until you open the door. This installation converts the interior of a single tall cabinet into a tiered pull-out spice organisation system.
Install three oak-fronted drawer boxes on full-extension ball-bearing slides inside the cabinet interior — one above the other, staggered in height so each drawer clears the one below when extended. Each drawer is shallow: roughly eight to ten centimetres deep, which is the right depth for a single row of standard spice jars standing upright.
Fill each drawer with matching glass spice jars in a consistent height and diameter. Apply identical labels — printed or handwritten — to each jar front in the same style, aligned to the same position on each jar. The uniformity is functional: when you want cumin, you scan text, not jar shapes.
The drawer boxes should be angled slightly — two to three degrees — toward the front of the cabinet, which means each jar is visible at a glance from the front rather than only from directly above.
The Under-Stair Kitchen Shelf and Wine Storage Built-In
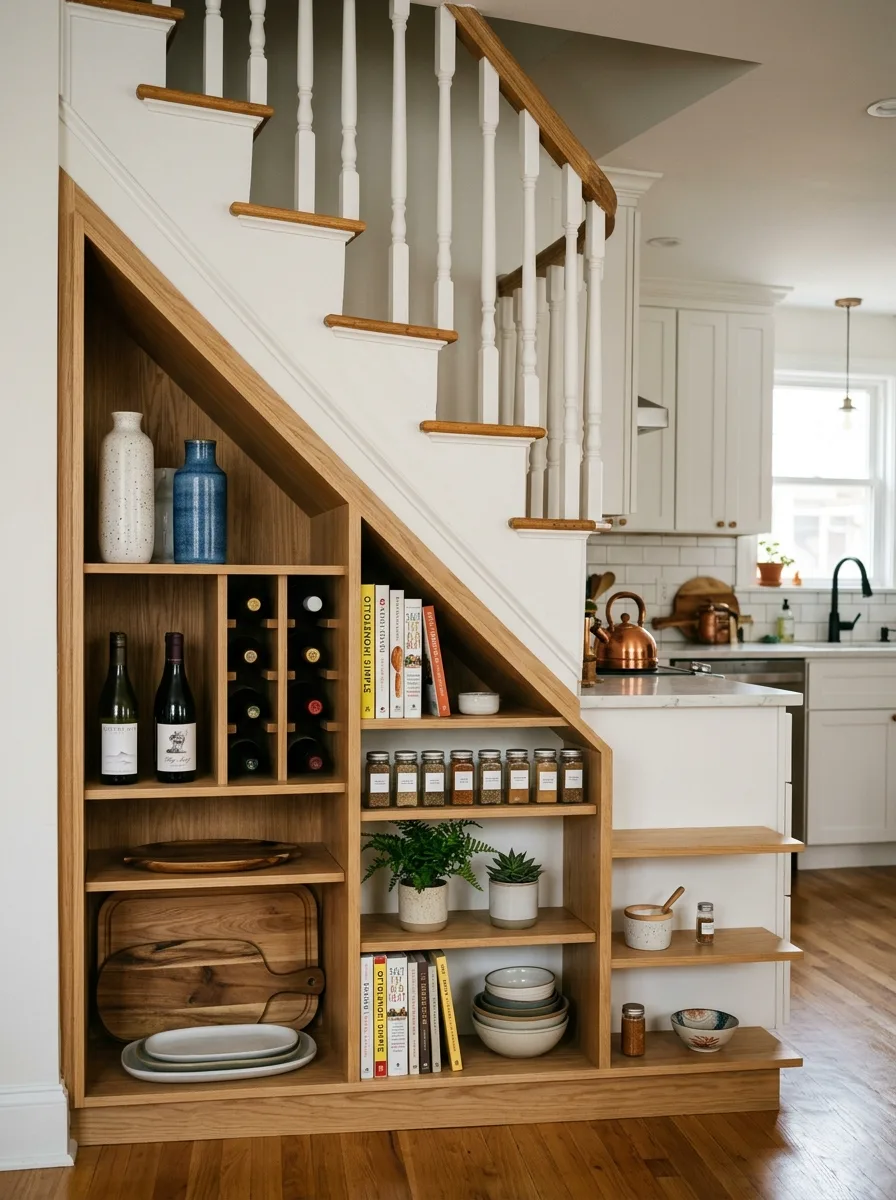
The space under stairs adjacent to or within a kitchen is the most underutilised volume in most homes. The triangular footprint is awkward enough that most people ignore it. That’s exactly why it works — because no one else is using it.
Build a floor-to-ceiling shelving unit that follows the stair soffit angle. Divide it into zones by function: the deepest section, with the most headroom, handles tall items — wine bottles in individual cells, large vases, serving platters. The middle section, accessible at a comfortable reaching height, carries everyday use items: spice jars on a shallow shelf, a plant, stacked bowls. The stepped section at the far end, where the stair meets floor level, becomes a cascading display of items that decrease in scale with the available height.
Use the same timber finish as your kitchen cabinetry so the under-stair unit reads as part of the kitchen rather than an afterthought addition.
The Colour-Blocked Floating Shelf Stack Where the Shelf Is the Style
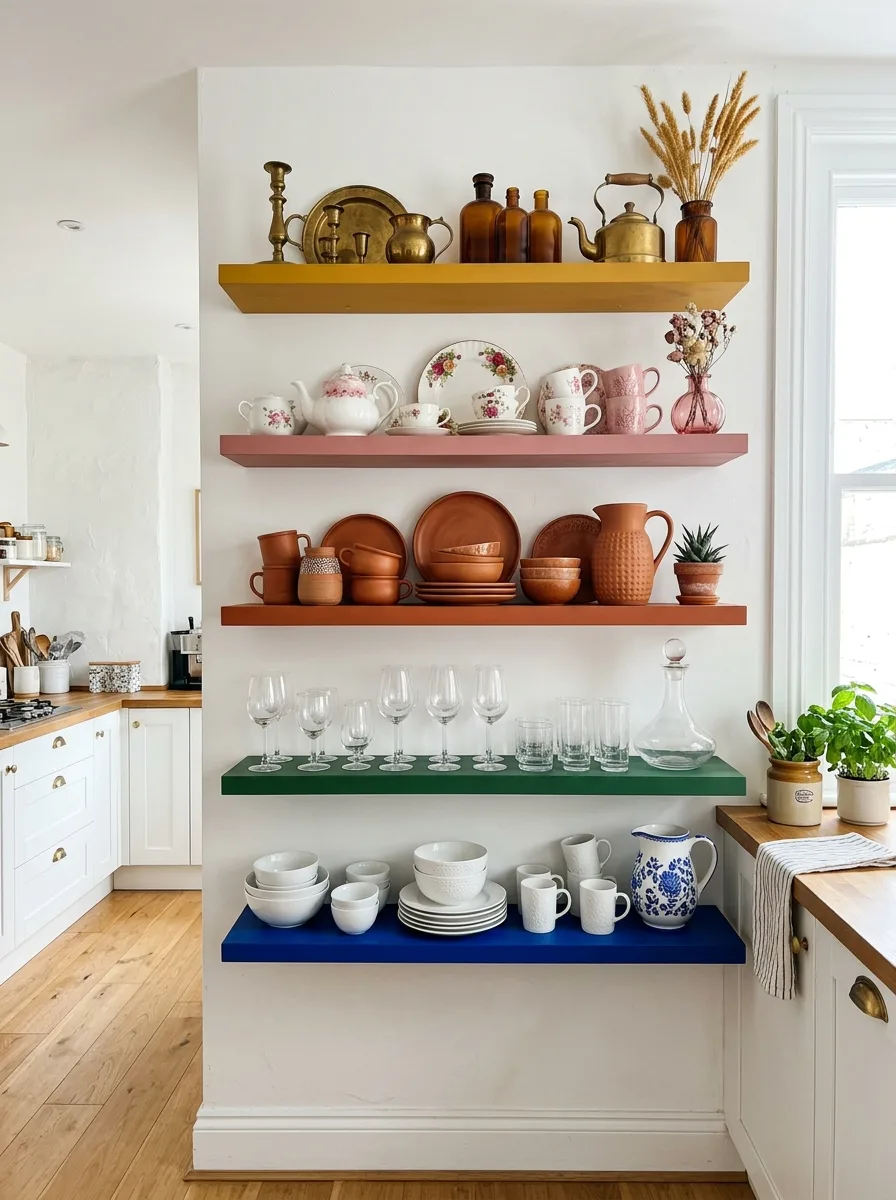
Paint each shelf a different colour: ochre yellow at the top, dusty pink below, terracotta below that, deep green below that, cobalt blue at the bottom. Mount all five on a single white wall using concealed floating brackets, evenly spaced.
The shelves become the visual argument. What sits on them should be grouped by material type and kept relatively consistent per shelf — brass objects on the yellow shelf, floral and pink ceramics on the pink shelf, terracotta pieces on the terracotta shelf, clear glassware on the green shelf, blue and white porcelain on the blue shelf. The colour of each shelf becomes the organising principle.
This is not a subtle look. It’s a commitment. The wall behind should be white with nothing else on it. The shelves are enough.
The Walnut Live-Edge Shelf on Raw Stone with Epoxy River Inlay

This installation belongs in a kitchen that already has character — rough stone walls, raw natural materials, a willingness to embrace something handmade. The shelves are not purchased. They are made.
Source walnut slabs with one or two live bark edges per board. Sand the face to a two-twenty grit, then fill any cracks, voids, or knot holes with a deep cobalt or teal epoxy resin. Pour the resin in stages, allowing each pour to cure before adding the next, until the voids are slightly overfilled. Sand flush once fully cured. The coloured resin running through the natural walnut grain is the defining detail — it reads as dramatic against the rough dark stone wall behind.
Mount the shelves with minimal hardware — small pin supports drilled into the stone with a masonry bit, or recessed hidden brackets. The stone wall provides the backdrop and the character.
Style with objects that match the material intensity: hand-thrown ceramic mugs, a speckled stoneware bowl, a wooden mortar and pestle, terracotta plates. Nothing mass-produced. Nothing that looks like it came in a set.
The Stainless Shelf on Stone Wall Outdoor Kitchen Station with Full Herb Garden
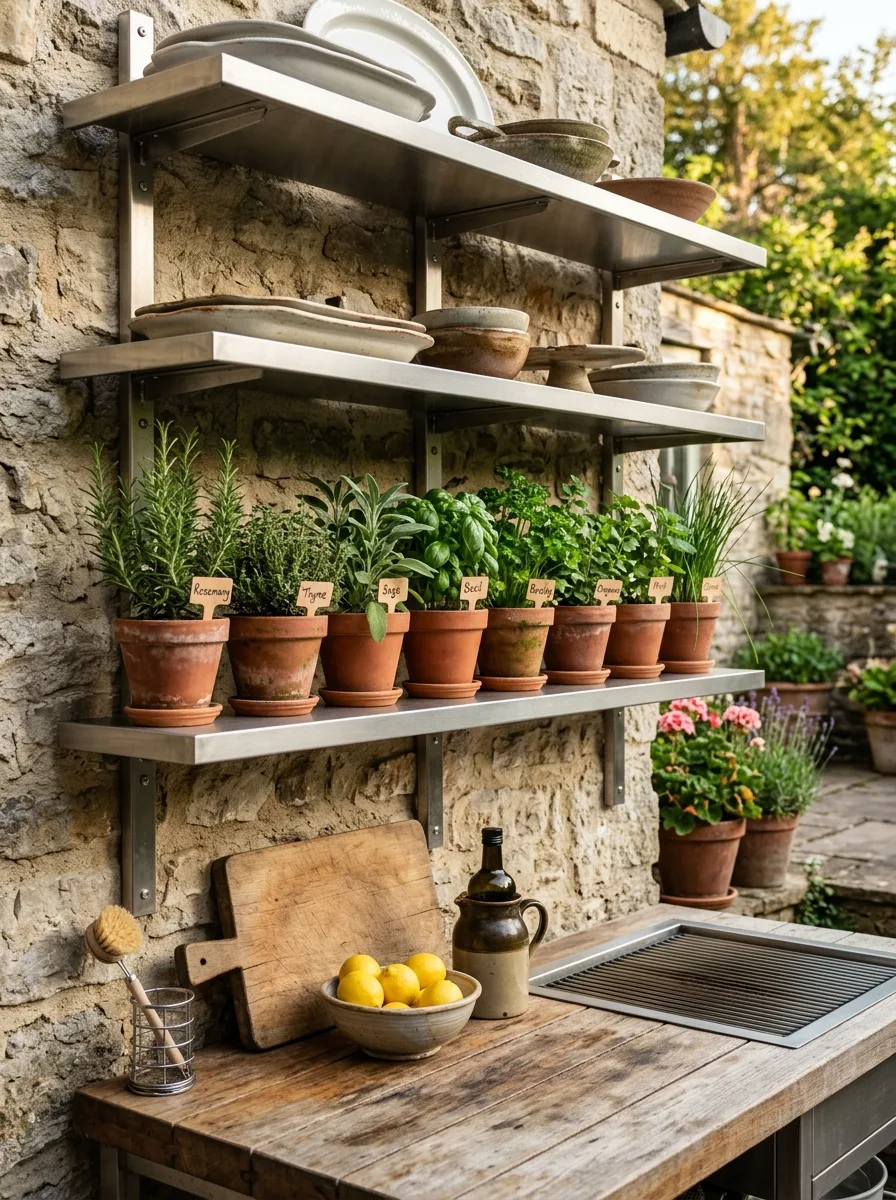
Outdoor kitchen shelving needs to earn its keep against weather, heat, and the kind of practical demands that indoor shelves don’t face. Stainless steel is the right material. No finish required, no maintenance needed, no concern about moisture.
Mount brushed stainless steel restaurant-grade shelving brackets into a stone or rendered exterior wall. Use commercial-grade shelf boards in the same material — the kind with a raised lip at the back to prevent things rolling off. Space two shelves: the upper one higher, for serving items and larger pieces; the middle one at a comfortable reaching height for active use during cooking.
Dedicate the middle shelf entirely to herbs in individual terracotta pots. Label each pot with a handwritten terracotta or wooden stake: rosemary, thyme, sage, basil, parsley, chives, oregano. Plant them in matching pot sizes, saucer underneath each one.
The rows of herbs at eye level, outside against stone, in matching clay pots with hand-lettered names, is one of the most genuinely useful and visually satisfying things a kitchen — indoor or outdoor — can have.
The Oak Shelf with Wicker Basket and Cookbook System That’s Actually a Pantry
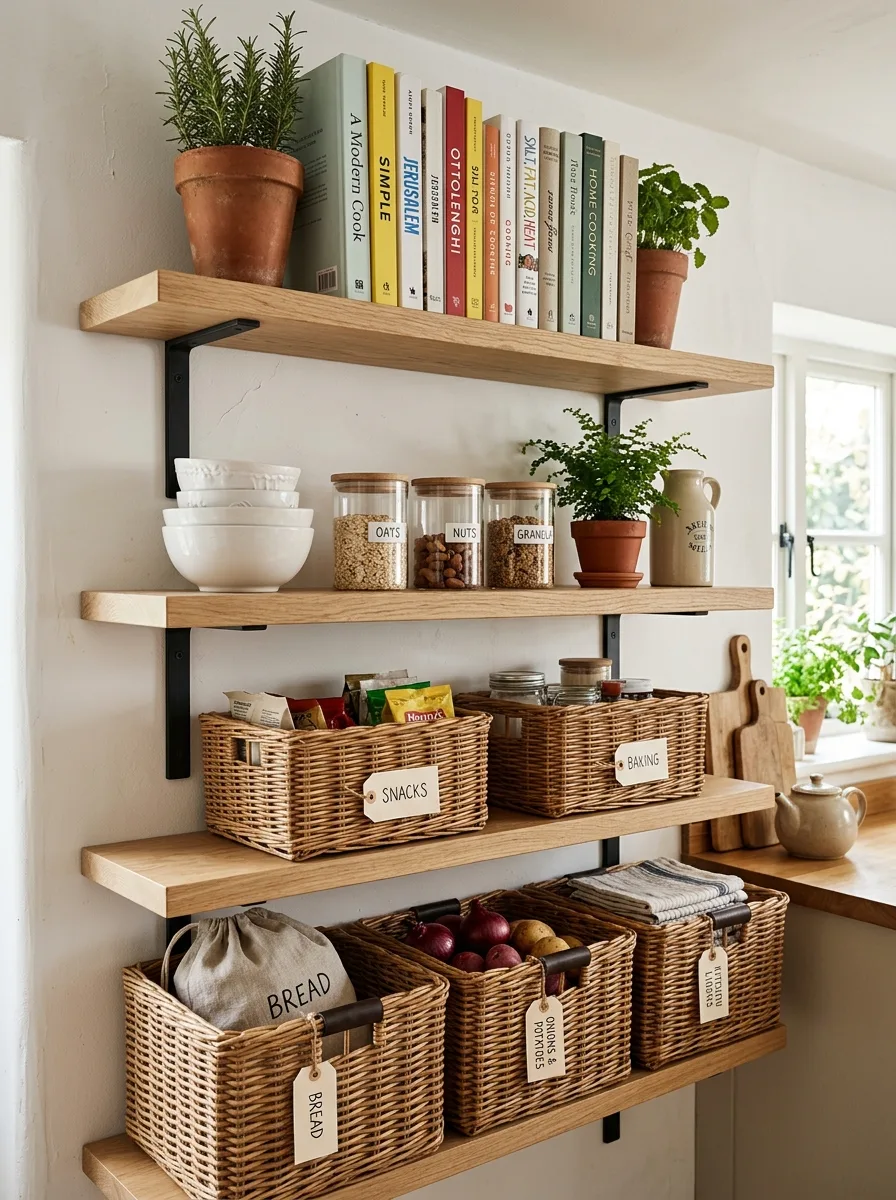
This is an open pantry disguised as a shelf arrangement. Three shelves, each with a dedicated purpose, and the entire system functions as a replacement for a cabinet pantry.
The bottom shelf holds a row of labelled wicker baskets in matching sizes: one for bread, one for root vegetables, one for onions and potatoes, one for kitchen linens. The baskets have paper hang tags and rattan handles. Nothing inside the baskets is visible. The basket is the organisation.
The middle shelf mixes open storage — glass jars with bamboo lids for oats, nuts, granola, labelled clearly — with a potted plant and a small ceramic vessel. The labels aren’t precious. They’re practical. They’re there so you can read them from across the kitchen.
The top shelf is the cookbooks. Stand them upright, spines out, grouped by cuisine or use. Add a herb plant or two between groups. The cookbooks are simultaneously reference and display.
Final Thoughts
The kitchens in this collection are different in almost every way — materials, scale, aesthetic, price point. Some are minimal enough to be austere. Some are busy enough to need a confident hand to pull off. Some look like they were designed. Some look like they grew.
But they share something. Every one of them made a decision about what the kitchen was for and let the shelving reflect that decision. The walnut and brass system says this kitchen takes itself seriously. The terracotta niche says this is a kitchen for cooking Mediterranean food slowly. The Zen floating ledge says this kitchen is a form of meditation. The wicker basket pantry shelf says six people live here and lunch needs to happen efficiently.
Your shelving doesn’t have to announce a personality that isn’t yours. But it does have to announce something. A shelf that’s just there — just holding things, just filling wall space, just existing without commitment — is worse than no shelf at all.
Make a decision. Then make the shelf that holds it.