

The pool is in. It cost a significant amount of money. And now it sits in the garden looking like a hole filled with expensive water, surrounded by whatever happened to be growing there before.
This is more common than it should be. People plan the pool meticulously — the shape, the finish, the filtration system, the tile line — and then run completely out of ideas the moment it comes to the landscaping.
The pool is not the design. The pool is the anchor. Everything around it is the design.
Get the surroundings wrong and the water looks like a construction feature that hasn’t been finished yet. Get them right and the whole space — the pool, the paving, the planting, the fencing — reads as a single place with a point of view.
That’s what these ideas are about. Not plants to put near water. Places to build around a pool.
Why Pool Landscaping So Often Looks Like It Was Done Last
Pool landscaping fails in a specific, identifiable way. It looks added on. Like someone built the pool, looked around, thought “we need some plants,” and bought whatever was available.
The Pool Gets a Budget. The Surroundings Get the Change.
This is the root problem. Pool construction budgets are set. Landscaping budgets are what’s left over.
The result is a beautifully engineered swimming pool sitting in a space that received a third of the thought and a tenth of the investment. No wonder it looks incomplete.
The surroundings are not a finishing touch. They determine the experience of the space. The pool itself is underwater — literally. What you see from inside the house, from a sun lounger, from the kitchen window, is the landscape around the pool. That is what you are actually designing.
Everything Gets Planted Too Close and Too Small
The instinct is to fill in. To make the space feel established immediately. So everything gets planted at the closest available spacing, in the smallest size that fits the remaining budget.
Three years later the beds are overcrowded. Plants are competing, some are dying, everything is a maintenance problem. The proportions that were planned no longer exist.
Plants that look good near pools need room. A Strelitzia planted correctly at 1.2 metres from the pool edge becomes a drama. Planted at 300mm, it becomes a hazard and a problem.
Buy fewer plants. Buy them larger. Plant them at the correct spacing for their mature size. This is the single piece of advice that separates good pool landscaping from expensive pool landscaping that looks bad.
The Fence Line Gets Ignored Until It’s Too Late
Pool fencing is mandatory in most jurisdictions. It’s also one of the most significant visual elements in any pool space.
Most people treat the fence as a legal requirement and nothing else. They install the cheapest compliant fence, put it as close to the pool as possible to preserve lawn space, and consider the job done.
The fence is a design element. Its material, its height, its relationship to the planted beds and the paving — all of these affect the reading of the whole space. A dark colorbond fence with tropical planting in front of it is a completely different experience to a black aluminium pool fence with white flowering jasmine climbing it.
Decide what the fence is doing in the landscape before it goes in.
The Relationship Between Water and What Grows Near It
Every successful pool landscape has resolved the relationship between the water surface and the living material around it. This relationship is not automatic. It requires decisions.
Reflection Is a Design Tool
The water surface reflects what is above and beside it. At certain times of day — early morning, late afternoon — the reflection in a pool can be more beautiful than the planting it mirrors.
This is not an accident in well-designed pool landscapes. The decision about what to plant, and where, accounts for what will reflect in the water. Tall grass plumes catching late afternoon light. A white rendered wall with bougainvillea cascading over the top. A stone feature wall with copper spouts at the waterline.
All of these were positioned in relation to where their reflection would fall, and in what light.
The Pool Coping Is the Frame of the Painting
The coping — the material that edges the pool — is the frame between the water and everything beyond it. It carries more visual weight than it gets credit for.
Warm travertine coping makes the water read as Mediterranean. Grey bluestone coping makes the same water read as contemporary and restrained. Timber pool decking instead of coping removes the hard line entirely and makes the pool feel embedded in a warm, natural surface.
Choose the coping in relation to the landscape concept, not just the pool finish.
Still Water Needs Visual Counterpoint
A flat, still pool surface is beautiful and static. Without something moving in the landscape around it, the space can feel slightly lifeless.
Ornamental grasses that move in the breeze. A water feature that introduces sound and surface movement. Climbing roses that change through the season.
The pool is permanent and unchanging. The landscape around it should provide the movement and seasonal shift that the water cannot.
Pool Landscaping Ideas Worth Diving Into
The Tropical Pool Border with Bird of Paradise
Begin with the fence. A dark colorbond fence — charcoal or monument — in a vertical profile creates the backdrop that makes everything planted in front of it read at maximum contrast. The dark surface absorbs light rather than reflecting it, which means the green and yellow of tropical plants stands forward with intensity.
Prepare a planting bed between the fence and the pool coping at 800mm to 1.2 metres wide. Improve the soil significantly — tropical plants are heavy feeders. Apply dark bark mulch at 100mm depth.
Plant Strelitzia nicolai — white bird of paradise — as the dominant structural species. Space plants at 1.5 metres apart, positioned at irregular intervals rather than in a row. These are large plants at maturity. Give them room now and the spacing will feel right in three years. At the front of the bed, closest to the coping, plant compact Aeonium rosettes and low succulent groundcover — the contrast between the upright tropical foliage and the flat succulent geometry is the detail that makes this look designed.
Keep the pool coping and the paving around it clean, uncluttered, and in a material that reads differently to the dark fence — pale concrete aggregate, travertine, or a light-toned porcelain. The contrast between the dark fence and the pale paving, with the tropical planting between them, is the whole composition.
The Pool Terrace with a Row of Olive Standards in Terracotta Pots
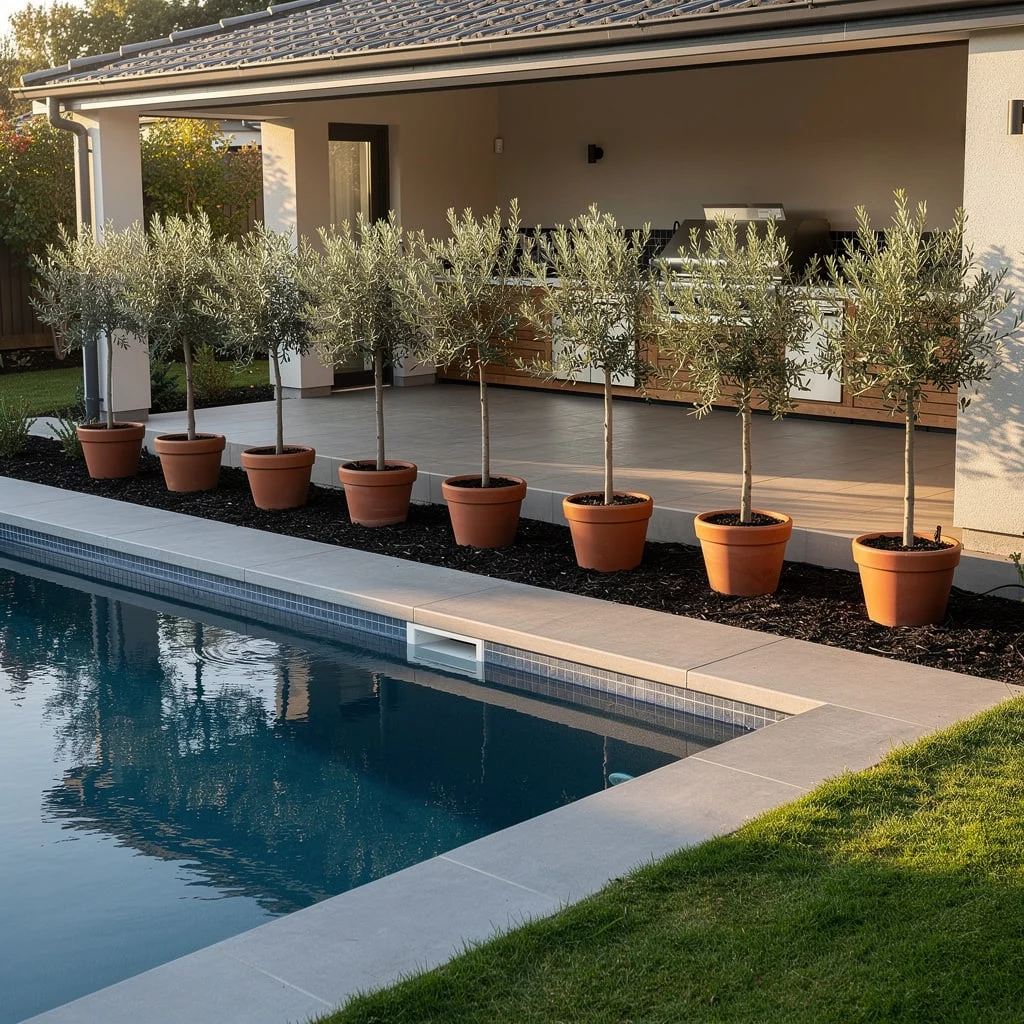
Buy the terracotta pots first and in the largest size your budget allows — 450mm to 500mm diameter at minimum. Source them in a consistent shape, ideally from a single supplier, so the proportions are identical across the row. Consistency of pot form matters as much as consistency of the plant.
Plant each pot with a standard olive tree — a clear single stem at 800 to 1000mm with a rounded head that has been trained into a ball. The ball head is the important thing. An open-grown, multi-directional olive head reads as untidy against a formal pool edge. A clipped ball head reads as classical and resolved.
Space the pots at equal intervals along the pool edge, between the pool coping and the outdoor kitchen or wall behind. Equal spacing, equal heights, equal pot form. The discipline is everything.
Fill the pots with a loam-based compost mixed with perlite. Olive trees are drought-tolerant but will perform better in a pot with consistent moisture. Water weekly in hot weather.
The dark bark mulch on the soil surface of each pot reads against the terracotta in a clean contrast that keeps the eye moving between the individual trees rather than resting on the mulch.
The Formal Spa Garden with Clipped Box Hedging
The elevated spa is a structural element. Build it with the same stone facing as the surrounding terrace — a sandstone or limestone block wall at 600mm height, with coping to match the main pool surround. Stairs in the same material on one side only, positioned to one end of the spa rather than central.
Surround the spa with formal square hedging in Buxus sempervirens, clipped to a consistent 500mm height. The hedges should read as architectural partitions — not plantings, but walls. They frame the spa from three sides, leaving the fourth open to the main pool and garden view.
Place outdoor lanterns at consistent spacing along the hedge lines — on posts or on the coping ledge. Warm-toned brass or antique bronze finish, consistent across every fixture. The repetition of the lantern at regular intervals is as important as the hedge itself.
Plant the wider garden beyond the hedge zone with white flowering shrubs, roses, and structured evergreens. At night, with the lanterns lit and the water surface reflecting their light, this space looks like it belongs in a different era — entirely intentional.
The Lawn-Set Pool with Lavender Borders All Four Sides
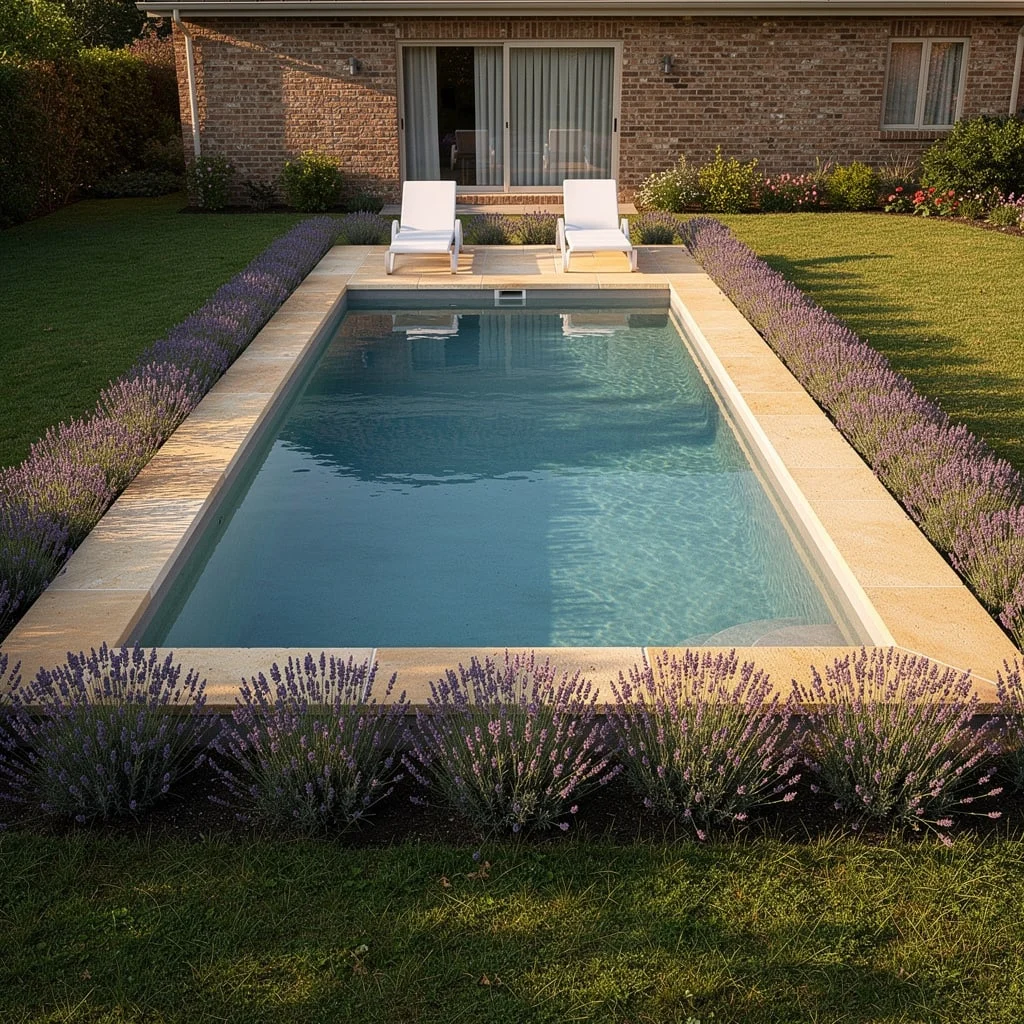
The lavender border works because it is a single species decision applied with absolute consistency. No other planting. No structural shrubs. No mixed species border.
Install sandstone or pale limestone coping around the pool perimeter. Between the coping edge and the lawn, excavate a bed 400 to 500mm wide on all four sides — this is the lavender bed. Improve the soil with grit for drainage; lavender will not tolerate heavy, wet soil.
Plant English lavender — Hidcote or Munstead for their compact form — at 300mm centres across the full perimeter bed. Plant them the same season so they develop at the same rate and look consistent.
The bed fills in within one growing season to a continuous purple-grey mass that frames the pool on all four sides. In bloom, the colour against the pale coping and the blue water is extraordinary. Between blooms, the silver-grey foliage is the frame.
Clip the lavender back by one third immediately after flowering each year. This keeps it compact and ensures continued flowering rather than woody leggy growth.
Place two white sun loungers on the pool terrace, facing the wider garden. No other furniture. No umbrella. The simplicity of the composition is the point.
The Geometric Pool Behind a Horizontal Timber and White Render Fence with Autumn Trees
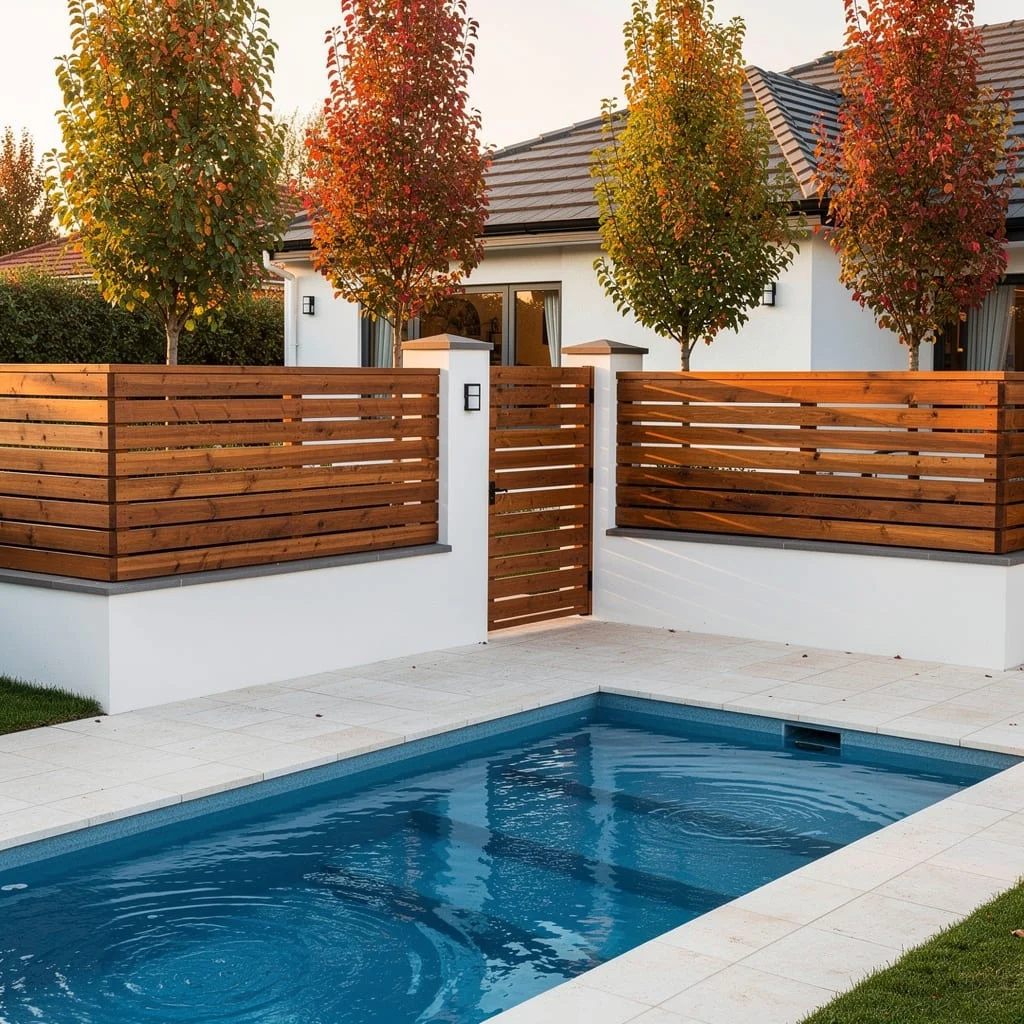
The fence is the most important element in this space. A rendered white masonry base wall at 600mm height, with horizontal timber slats in cedar or hardwood above it to the required fence height, creates a fence that reads as architecture rather than barrier.
Cap the masonry base with a dark capping stone. Install the horizontal slats at even spacing with gaps of 20 to 25mm — enough to suggest privacy without fully enclosing. Stain the timber in a warm reddish-brown oil finish.
Plant one matching deciduous tree at each corner of the fence line, positioned symmetrically. Ornamental pears, amelanchier, or crepe myrtles — choose a species with good autumn colour. These trees provide the seasonal change that the fence and pool cannot.
Pave the pool surround in large-format white or cream porcelain tiles. The pool shell should be finished in a deep blue — cobalt or French blue — so the water reads as saturated and vivid against the white surround.
The visual logic of this space is deliberate contrast at every scale: the warm timber of the fence against the cold white render; the deep blue pool against the pale paving; the fiery autumn canopy against the controlled geometry below.
The Courtyard Pool with a Wall Waterfall
The waterfall feature is the focal point, so install it first and position everything else in relation to it. A blade waterfall or curtain waterfall recessed into a stone or rendered feature wall delivers water at the pool’s edge with maximum visual impact and minimum mechanical complexity. The wall behind it needs to be substantial — faced in natural stone mosaic, rendered in white or cream — substantial enough to anchor the water feature visually.
Place a rattan hanging egg chair to one side of the pool area, positioned so it sits at an angle to the waterfall rather than directly opposite. The asymmetry makes the space feel lived-in rather than staged.
Pack the planted beds with tropical foliage: Monstera deliciosa, Heliconia, Philodendron selloum, and elephant ears in varied leaf sizes. The principle is density and variety of leaf scale rather than a single species. Large leaves next to split leaves next to broad leaves — the visual complexity creates the sense of a lush interior garden.
Set warm-toned wall lights at low height in the feature wall. At night, with the water falling lit from above and the wall sconces throwing amber light across the stone face, the whole space reads as something considerably more expensive than it is.
The Dark Pool with White Gravel, Silver-Leaf Native Planting, and a Charcoal Fence
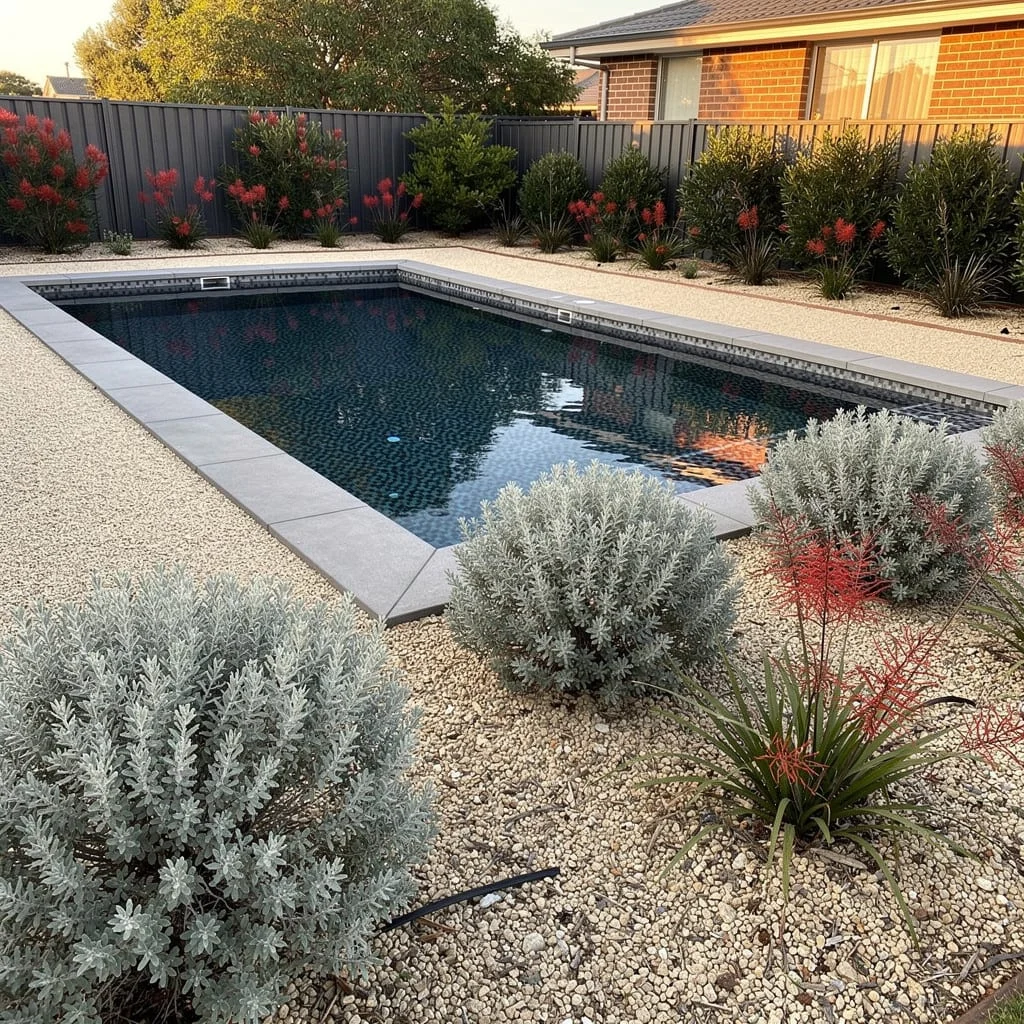
Choose a near-black pool finish — dark graphite or charcoal mosaic tile — and commit to it. A dark pool is not for everyone. It reads as dramatic and contemporary. It also makes the pool feel warmer to swim in and shows less algae bloom.
Pair it with a charcoal colorbond fence in a full-height vertical profile. The fence and the pool are now the same tone family. Everything planted between them needs to work against that dark register.
Use white or cream pea gravel as the entire ground plane around the pool. This is a no-lawn pool space. The pale gravel against the dark fence is the primary contrast on which the whole design rests.
Plant Westringia (coastal rosemary) and Leucophyta (cushion bush) as the primary species — both silver-grey, both native, both extremely low-maintenance. Add red Grevillea for colour punctuation. The silver-red-green palette against the white gravel and dark fence is the native garden colour story, restated in a pool setting.
Keep the planting asymmetric and irregular. This is not a formal composition. It is an informal, textural one. The precision comes from the fence line and the pool coping, not from the planting.
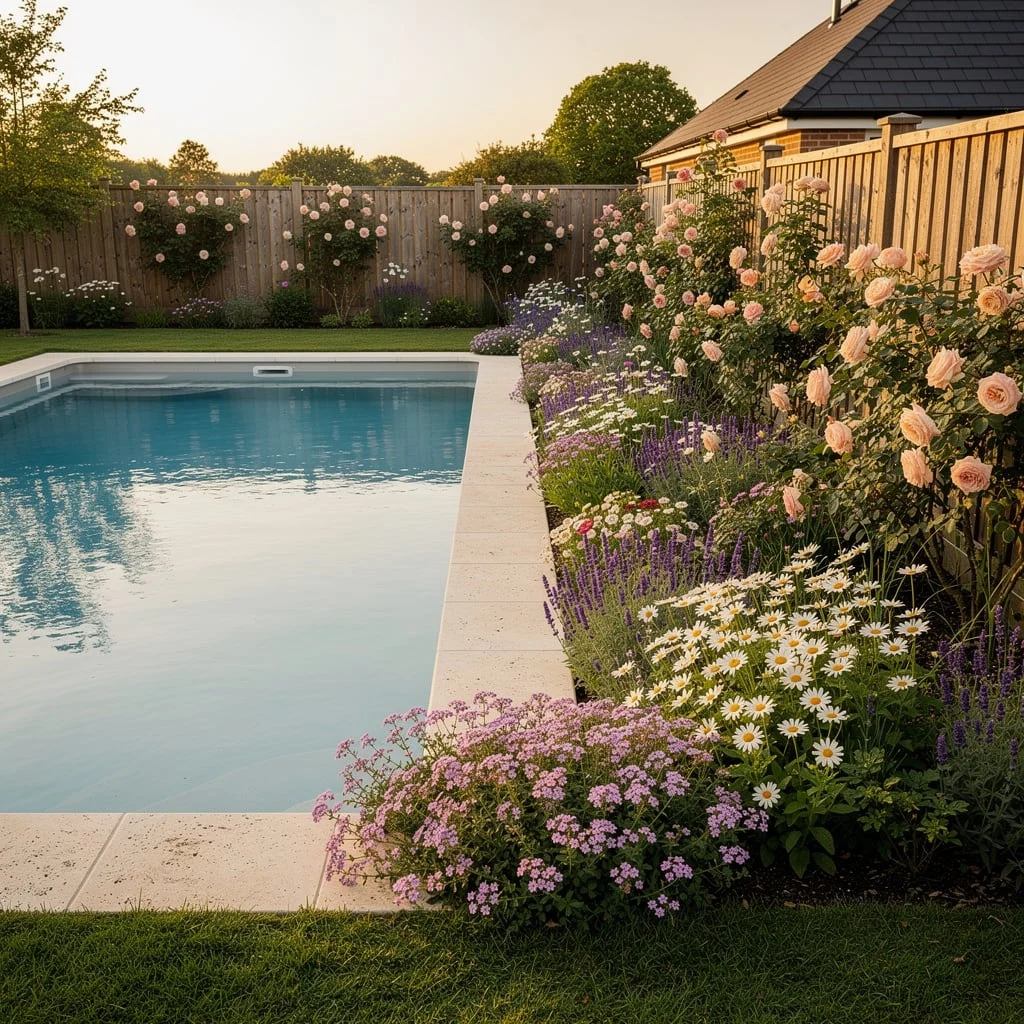
The Cottage Pool Border with Roses, Lavender, Daisies, and Climbing Fence Roses
Cottage-style pool planting requires more maintenance than any other pool landscape approach. It also provides more pleasure for anyone who loves the look of an abundant, informal English border.
The border along the pool fence should run the full length of the fence. It needs to be at least 1.2 metres deep to accommodate the layering of plant heights. Prepare the soil with generous amounts of compost and a slow-release fertiliser.
Plant in layers from back to front: climbing roses trained on the fence at the back — choose a coral or blush pink variety, ‘Compassion’ or ‘New Dawn’ are reliable — as the tallest layer. In front of them, lavender and upright salvia for the mid layer. At the front edge, spilling toward the pool coping, Shasta daisies and verbena.
Keep the colour palette pink, white, and purple-blue. Do not introduce yellow or orange. The palette restraint is what makes a cottage border read as designed rather than planted randomly.
White limestone or travertine coping works best with this scheme. Coloured stone fights with the flower palette. Keep everything below the coping pale and simple.
The border provides the romance; the pool provides the geometry. Both need to be allowed to do their own job.
The Dark Pool with Travertine Paving, Karl Foerster Grasses, and a Grey Fence as Screen
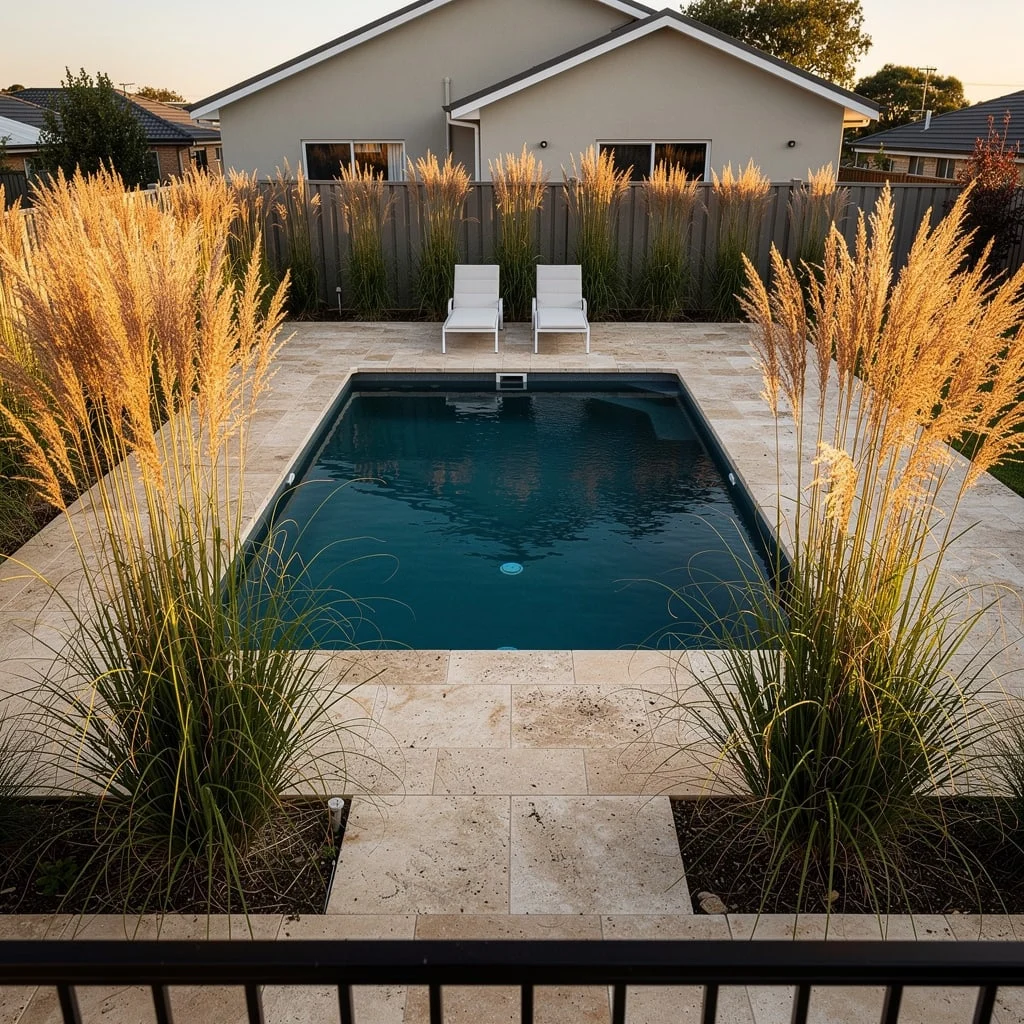
This is the ornamental grass pool landscape. It requires confidence because from certain angles — particularly in winter before the grass seed heads develop — it can look bare.
In full autumn growth, with the Karl Foerster plumed and golden in low light, reflecting in a dark pool surface, this space is extraordinary.
Install travertine paving in a French pattern — three or four tile sizes mixed in a traditional quarry bond — across the entire pool surround. The warm, creamy tone of travertine against a dark pool finish creates a warm-cool contrast that makes both materials look better.
Plant Karl Foerster ornamental grasses in the border beds at the pool ends and fence line. Use groups of three to five at each planting position rather than individual specimens. Plant in a consistent species rhythm across the perimeter — no mixing with other species. The power of this look is in the repetition.
Position white sun loungers at the far end of the pool. These loungers are the horizontal, bleached-linen element that completes the palette.
The fence or wall behind the grass should be neutral — grey, taupe, or a weathered timber. It exists to make the grass readable. Nothing behind this border should compete with the golden September light caught in those plumes.
The Jasmine-Covered Pool Fence That Solves Privacy and Beauty Simultaneously
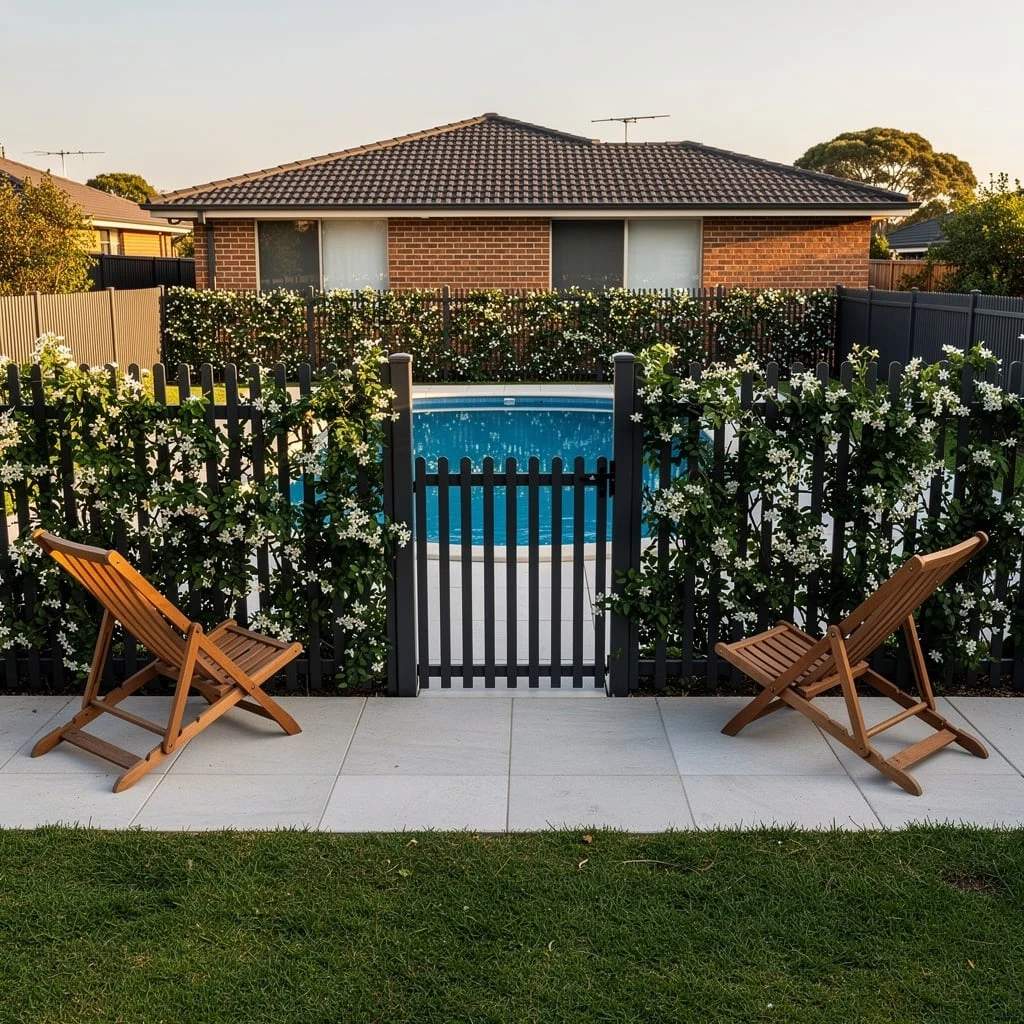
A black aluminium pool fence is legally compliant, affordable, and aesthetically challenging. Cover it in jasmine and it becomes something entirely different.
Plant star jasmine — Trachelospermum jasminoides — at the base of the fence at 600mm intervals. In the first season, tie the growth onto the fence uprights loosely as it reaches upward. Within two to three growing seasons, jasmine will cover the fence completely.
The white flowers appear in late spring and summer and release a fragrance that carries across the entire pool area. The dark green glossy foliage provides year-round coverage. The white flowers against the black fence, with the blue pool behind it, creates one of the most cost-effective dramatic statements available to any pool garden.
Clip the jasmine once a year after flowering to keep it within the fence face. Left untrimmed it billows outward and eventually becomes unmanageable. Annual clipping at the fence face keeps it flat and controlled.
Place two timber deck chairs, low to the ground, outside the fence on the lawn side facing the gate. This framing — chairs facing the gate, fence covered in green and white flowering vine, pool glimpsed beyond — turns the functional pool barrier into a garden feature.
The Minimalist Pool with Clipped Hedging Walls and Grey Stone Paving
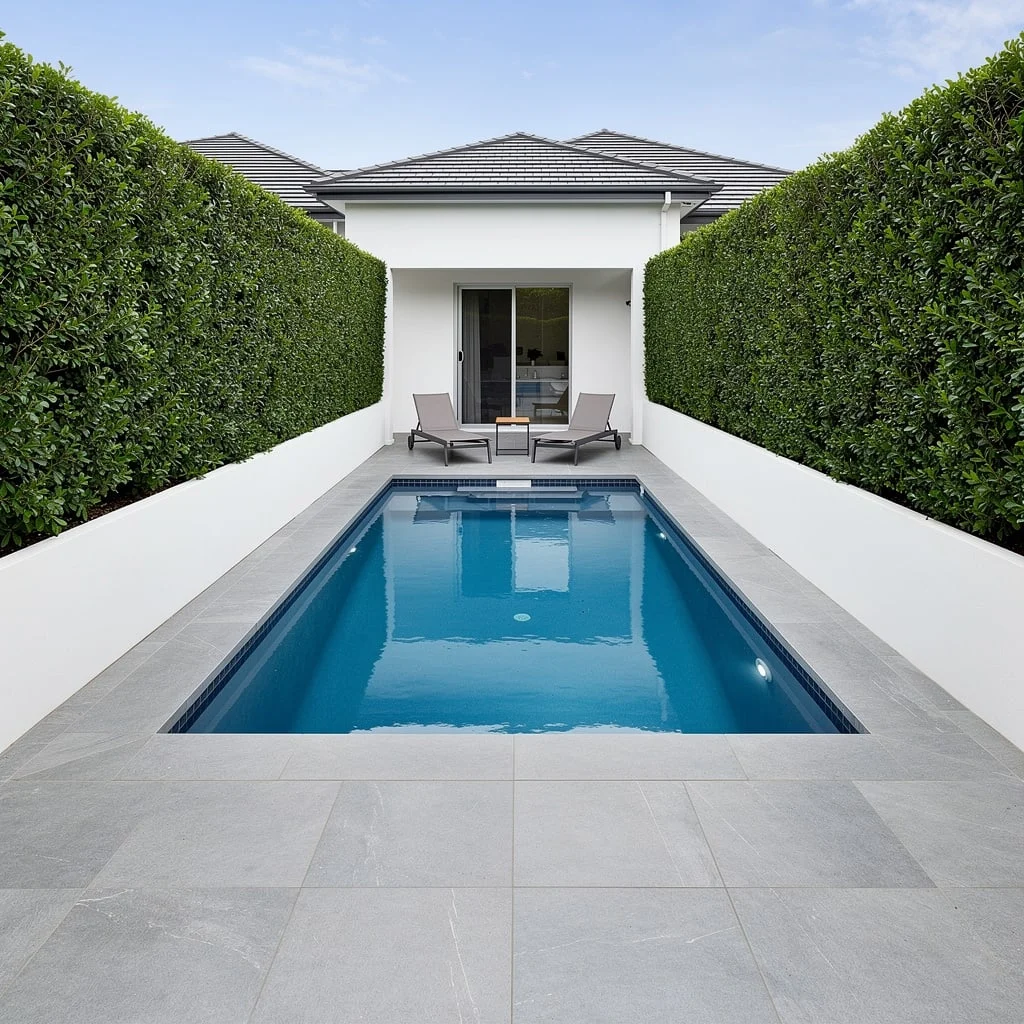
Remove everything from consideration except three elements: water, stone, and hedge. This landscape design has no flowers, no ornamental planting, no colour beyond the blue of the pool.
Grow the hedges to a full height of 2 to 2.5 metres on both sides of the pool — Lilly Pilly, Photinia, or a large-leaved ficus all work. Clip them flat on the face, flat on the top. The faces of the hedges must be perfectly vertical — not tapering toward the top, but precisely square-shouldered. This requires regular clipping and a set of guidelines or a string line to achieve consistently.
Render and paint the end walls of the pool space white. Two white walls, two green hedge walls. The pool runs along the axis created by these walls.
Pave in large-format grey stone — 600 x 600mm minimum, ideally 900mm. The grey paving against the white walls and green hedges is the entire material palette. It is complete and needs nothing added to it.
Add two minimal sun loungers in a dark grey or charcoal fabric. Their form should be as low and flat as possible. No umbrellas. No cushions in bright colours. The restraint of this space is its strength. Every addition would diminish it.
The Dark Pool with a Stacked Stone Feature Wall, Copper Spouts, and Terracotta Topiary
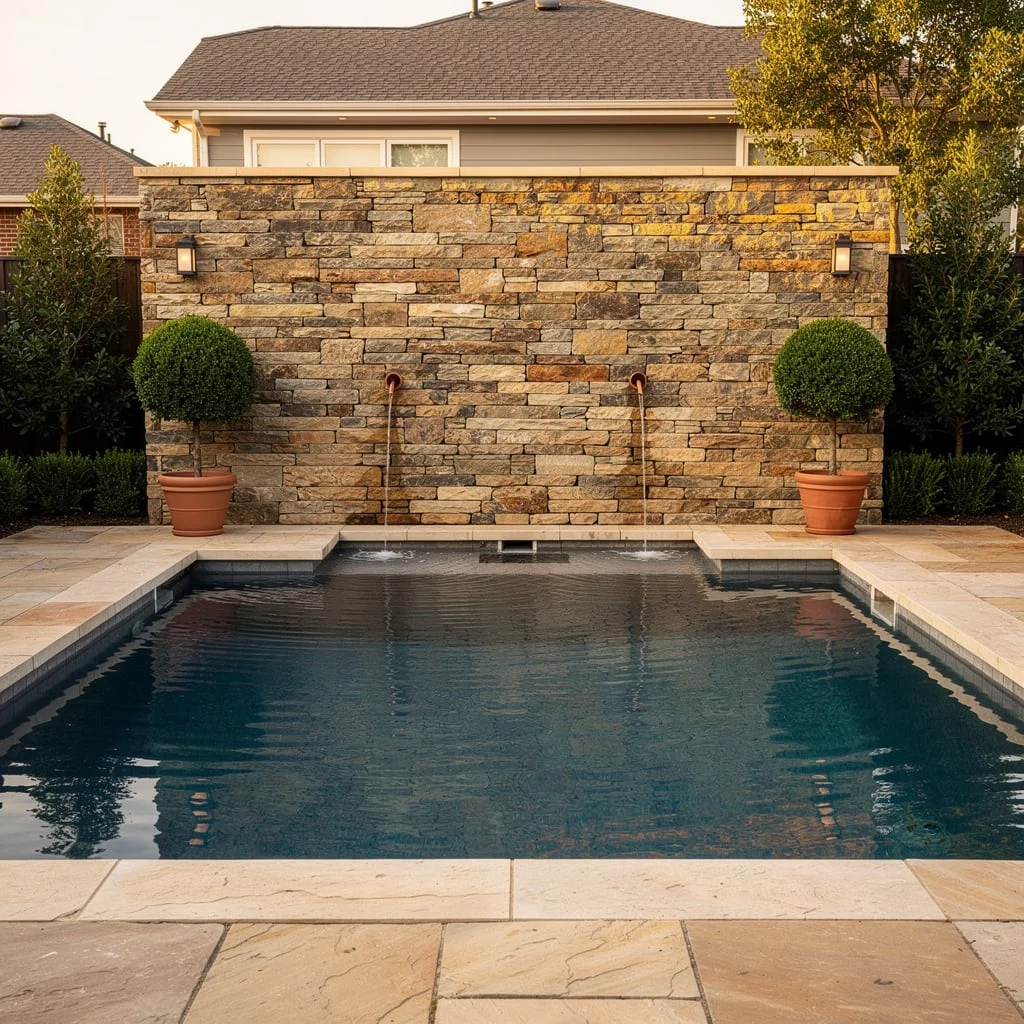
The feature wall is the budget decision this whole space hangs on. Stone-faced walls — whether in natural stacked stone, veneer stone, or reconstituted stone product — are expensive and worth it when they are the primary visual element of a pool space.
Build the wall full-width across the pool end to a height of 1.8 to 2.2 metres. Use a golden-brown multicolour sandstone or a warm fieldstone in irregular horizontal courses. The wall face texture should be rough rather than smooth — it catches and holds light differently at different times of day.
Install two copper wall spouts at an equal height through the stone face, directed into the pool. Copper spouts patinate over time — they start bright and warm and gradually develop a blue-green patina that looks beautiful against warm-toned stone.
Install wall lanterns on either side of the spout zone, in a bronze or black iron finish. The light from these lanterns at dusk throws shadows across the stone texture and illuminates the falling water from each spout.
Place two large terracotta pots flanking the wall — one at each end — each planted with a box topiary standard (clear stem, clipped ball head). These are the vertical frame of the wall composition. They ground it and give it scale.
Pave in a warm sandstone that echoes the tone of the wall. Keep the pool finish dark — charcoal or deep grey — so the water surface reads as reflective and atmospheric rather than bright.
The Agapanthus Pool Border Against a Dark Fence That Requires Almost No Maintenance
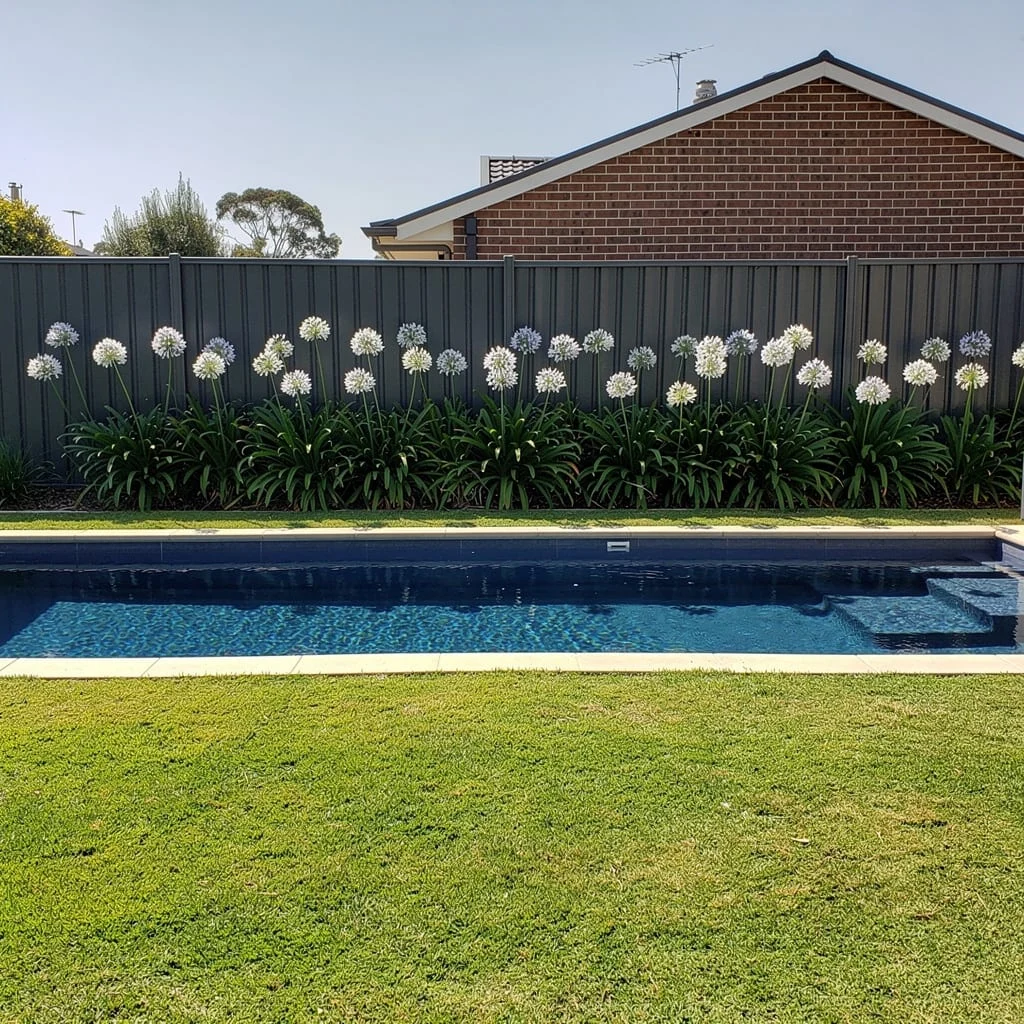
Agapanthus africanus planted in a dense continuous mass is one of the easiest and most effective pool border strategies available. It is drought-tolerant once established. It survives pool splashing and reflected heat. It flowers reliably in summer — exactly the season when the pool is in use. And a mass of white agapanthus flower heads against a dark charcoal fence is genuinely beautiful.
Clear the bed, improve the soil with compost, and plant white agapanthus — ‘White Ice’ or Agapanthus praecox in white — at 400mm centres in a double or triple row along the full fence length. The density is important. A sparse planting of agapanthus looks scattered. A dense planting reads as a considered border.
No mulch needed under agapanthus planted at this density — the foliage itself covers the soil surface within one growing season.
Maintain by dividing congested clumps every three to four years and removing spent flower stems after flowering. That is the complete maintenance programme.
The pool coping and lawn surface do the rest of the design work. This border requires one good season to look established and another to look excellent.
The Raised Planter Bed with Concrete Block Wall, Agapanthus, and Box Spheres at Poolside
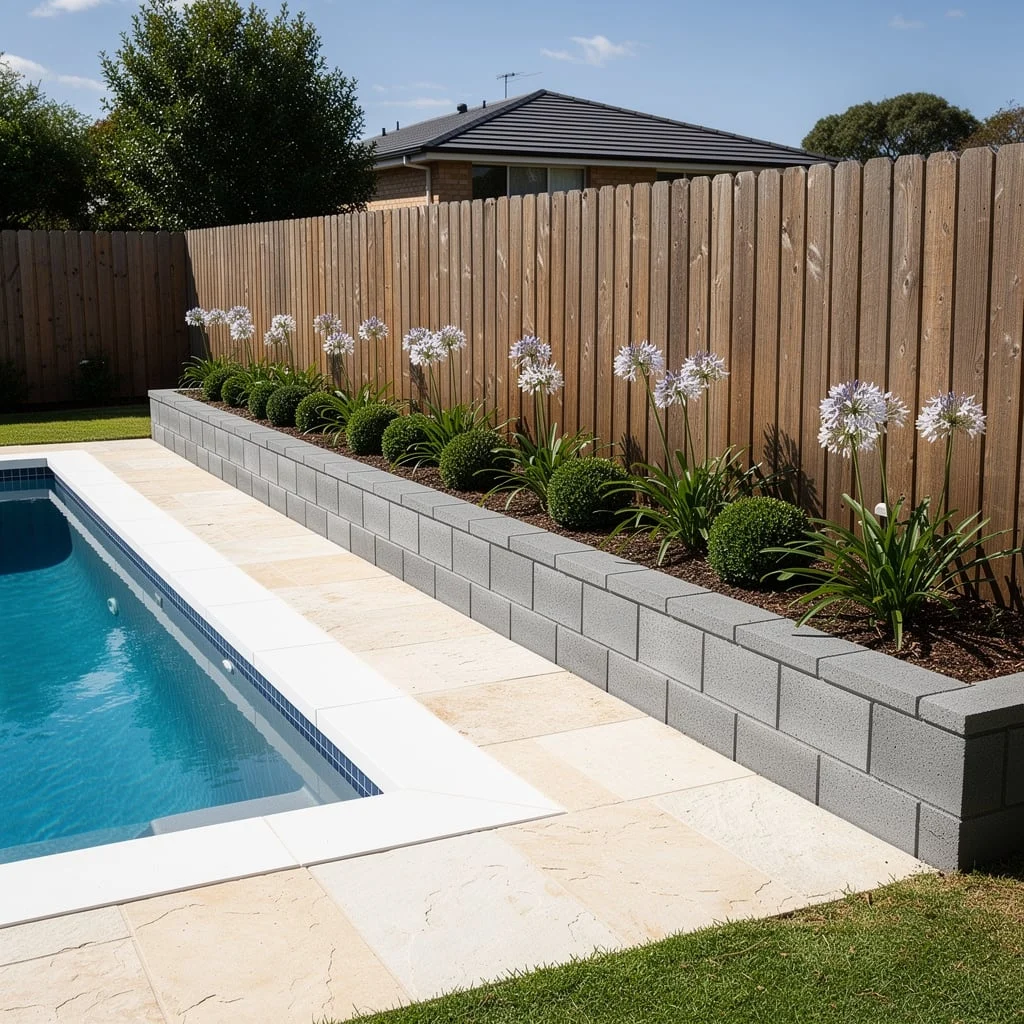
Build the retaining wall from concrete blocks rather than stone — the block wall costs a fraction of the price, and when capped with a matching coping stone to the pool surround, reads as a resolved structural element rather than a cheap substitute.
Use a grey concrete masonry block, two courses high, capped with a bull-nosed coping in the same material as the pool edge. The combination creates a raised bed at approximately 400mm height above the pool terrace, which sits at the fence line and gives the planting a visual platform.
Fill the raised bed with improved soil mix and plant alternating agapanthus — for the vertical and seasonal flower interest — and compact box spheres for the year-round structure. The agapanthus grows up through and between the spheres. The combination of the structured ball form and the strap-like agapanthus foliage reads as both formal and lush simultaneously.
Apply dark bark mulch between plants. The dark mulch against the grey block face is a clean, graphic transition between the two elements.
A timber fence directly behind the raised bed provides a warm natural backdrop. The combination of the cool grey block wall, the warm timber fence, the dark mulch, and the blue agapanthus flower is exactly four well-chosen tones that work together.
The White Flowering Jasmine Pergola as the Pool Seating Canopy
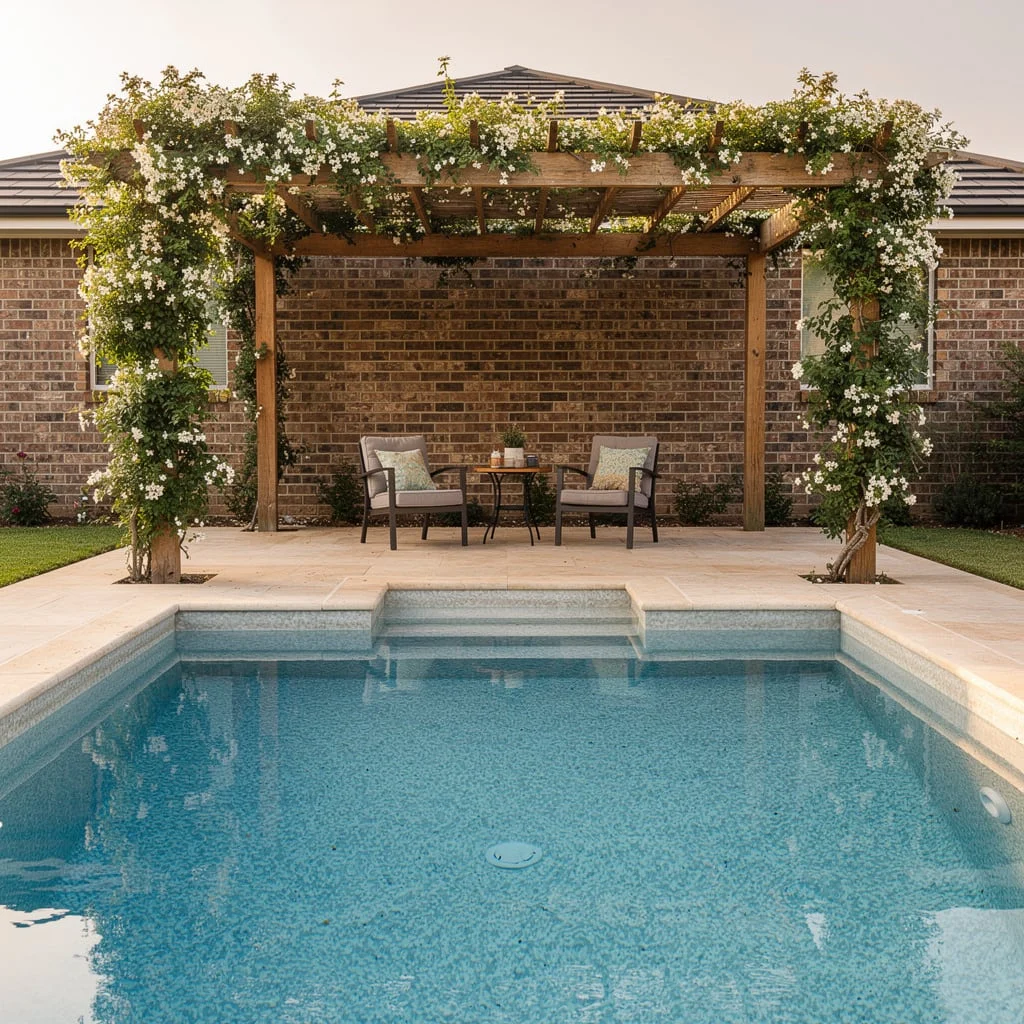
Build the pergola at the pool end — not beside the pool, but at one end, as the destination the pool leads to. Four posts set into the pool terrace paving, heavy enough in section to read as structural — 150 x 150mm minimum in cedar or treated pine. Cross beams at 2.4 metres height. Longitudinal beams at 600mm spacing.
Plant one climbing rose or jasmine at the base of each post. In the first season, tie growth vertically up each post. In the second season, begin training growth horizontally across the beams. Within three seasons, the pergola is canopied in white flowering growth.
Choose a white flowering climber — ‘Iceberg’ climbing rose, star jasmine, or white wisteria. The white flowers against the warm timber read as classical and resolved. Coloured climbing roses introduce a colour decision that competes with the pool water. White is neutral and amplifies everything around it.
Place two low armchairs under the pergola — dark iron frames, neutral cushions — with a small table between them. Position them slightly off-centre so one chair has a direct sightline across the pool water.
At dusk, with the pool lit from below and the jasmine or rose canopy above, this is the most used spot in the garden. It is also the simplest structure. The planting does all of the work.
The Tropical Pool Deck with Timber Decking, Bamboo Screen, and Bird of Paradise Planting
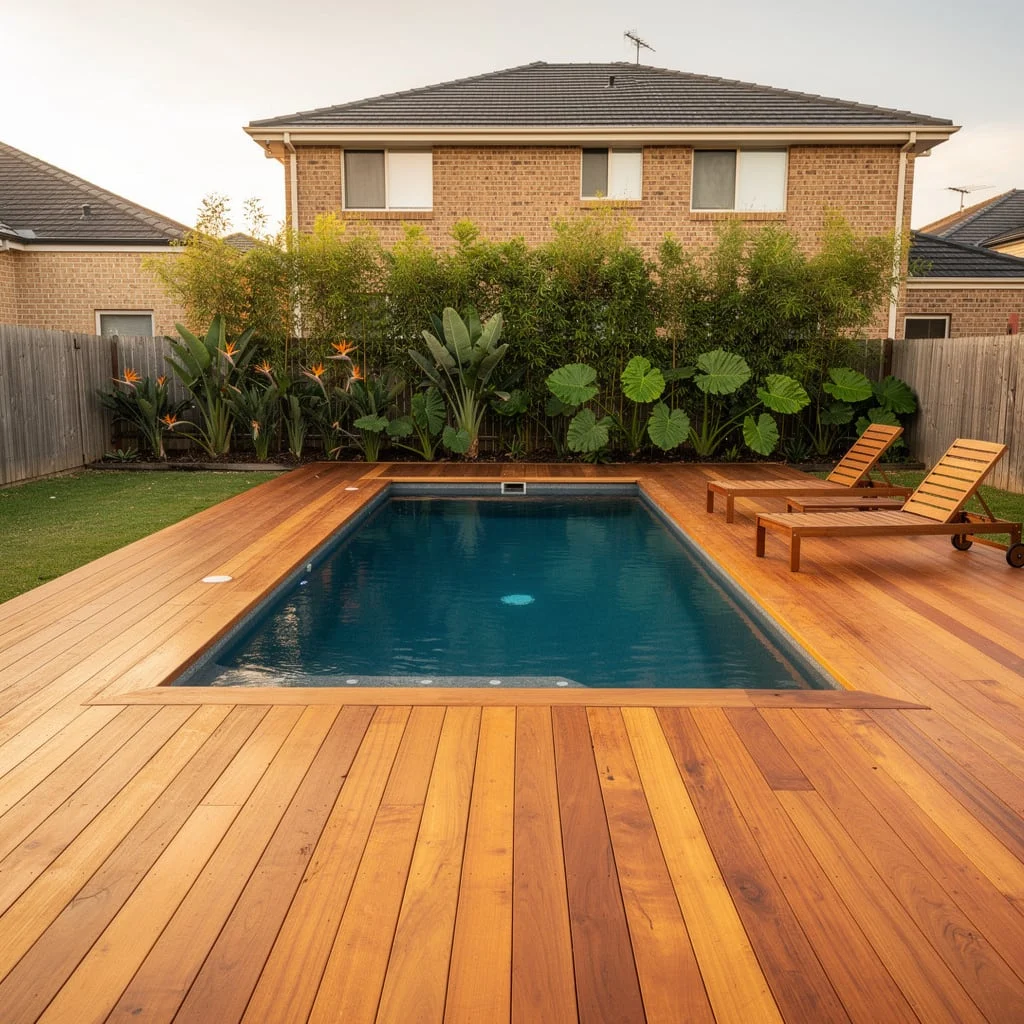
Run the timber decking around the pool in a hardwood or quality composite — ipe, spotted gum, or a deep brown composite. The deck boards should run perpendicular to the pool long axis, leading the eye from the pool edge toward the garden.
At the back of the space, behind the deck, plant a dense clumping bamboo screen — Fargesia robusta or Bambusa textilis in a root barrier trench — to provide the green privacy wall. At 3 to 4 metres in height at maturity, clumping bamboo provides a screen that no fence can match for density, texture, and movement.
In front of the bamboo, plant a mixed tropical border in the bed between the bamboo screen and the deck edge: Bird of Paradise for the flower, Alocasia for the large-leaf drama, and Heliconia for tropical colour.
Keep the deck furniture simple — two teak sun loungers, no cushion patterns, no umbrella. The tropical planting border provides the visual complexity. The furniture and the deck surface need to be simple and recede.
The warm reddish-brown of hardwood decking against the intense green of the tropical border and the deep blue-black of the pool is the tonal composition this space rests on. Any one of those tones changed significantly — grey composite, light green planting, pale blue pool — and the whole thing is a different, lesser space.
The Curved Pool Bed with Red Roses, Lavender, Box Spheres, and a Travertine Coping Edge
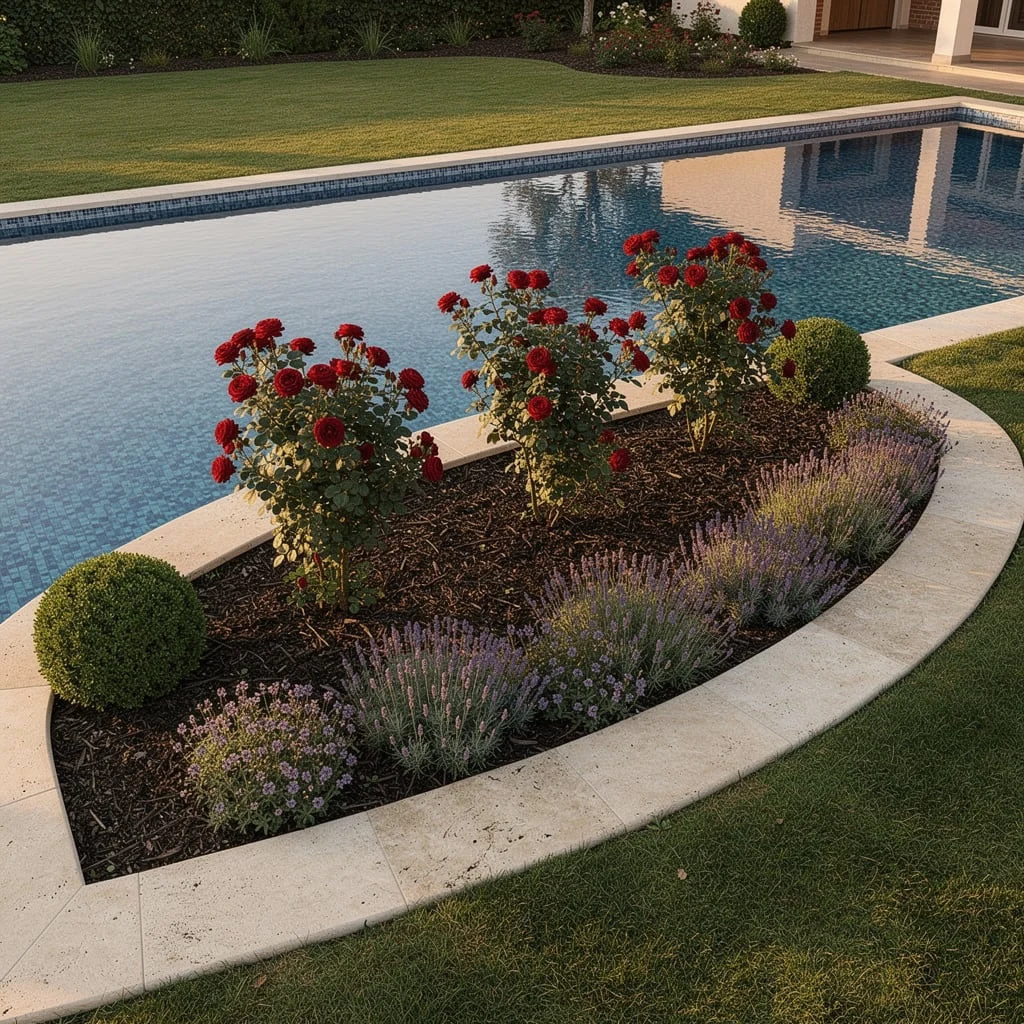
The curve of the pool coping creates the curve of the planting bed. The bed does not fight or ignore this curve. It follows it exactly, framed by the travertine coping on the pool side and by a simple mown lawn edge on the garden side.
Prepare the bed, add compost, and plant in a clear three-tier composition. Two clipped box spheres — one at each end of the curve — as the structural anchor points. In the middle of the bed, three red shrub roses spaced 600 to 800mm apart — standard-form roses on clear stems read better at pool-side scale than bush form. Between the roses and the box spheres, English lavender and low-growing thyme as the ground layer.
The palette is deliberate and controlled: deep red, purple-blue, and dark green against the pale travertine coping and the blue pool. The bed provides the single instance of colour in an otherwise paved and water-dominant space.
Dark bark mulch across the bed surface, pulled back from each plant. The dark mulch ties into the dark pool finish and makes the planting read with maximum contrast against the pale coping.
Maintain by clipping the box spheres twice yearly, pruning the roses in late winter to outward-facing buds, and trimming lavender after its first bloom. The thyme needs almost no attention.
The White Rendered Pool Wall with Bougainvillea Cascading Over the Top
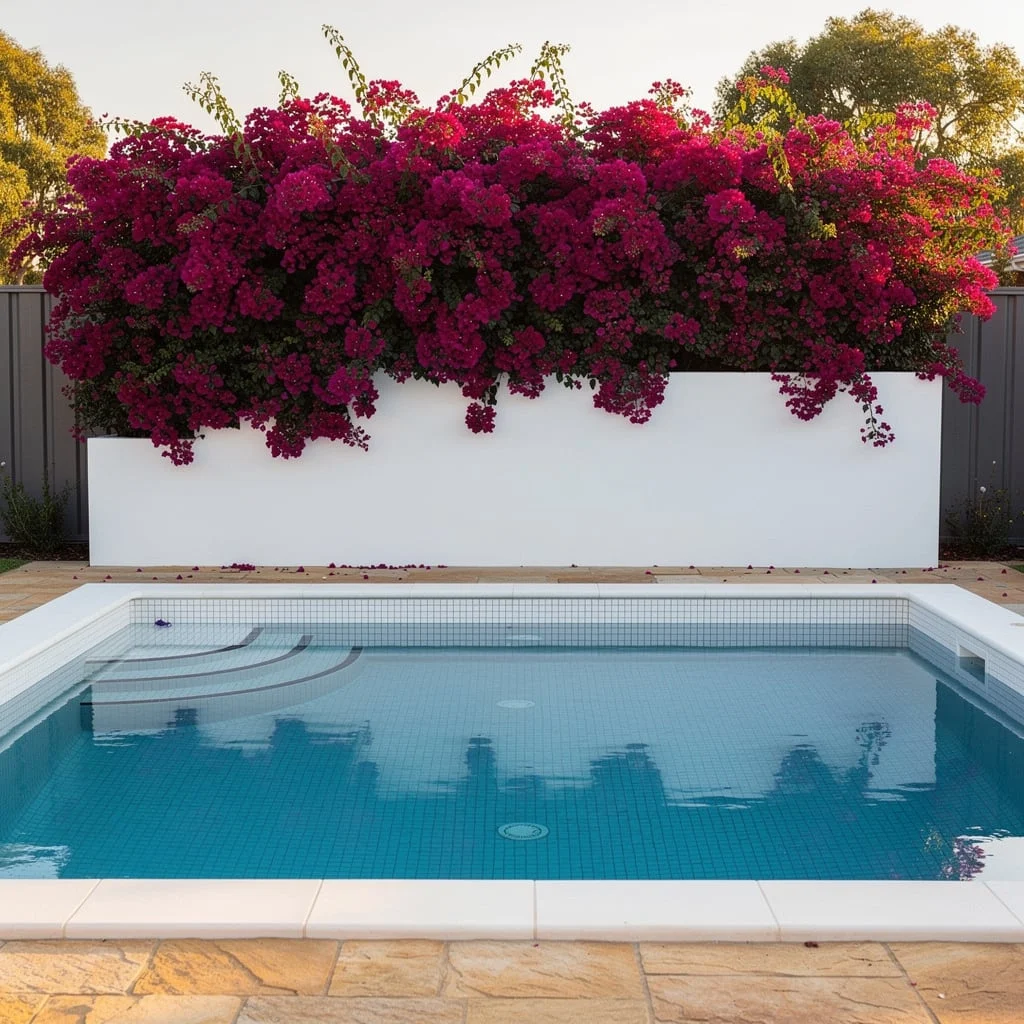
This is the most dramatic and the most specific landscape idea in this collection. It works because of one fundamental contrast: the harsh, graphic white wall and the voluminous, intensely coloured bougainvillea tumbling over it.
Build the wall in rendered masonry at a height that allows the bougainvillea, when established, to cascade significantly over the top face — roughly 1.8 to 2 metres high. Render it in white. Use an exterior acrylic render that can be repainted as needed.
Plant bougainvillea — in deep magenta or hot pink, not orange or yellow — at the back of the wall where the root system can establish in open ground. Train the stems over the wall top using ties fixed to the render or to small eye hooks mortared into the coping. In the first two years the growth is manageable. By year three to four, the bougainvillea will require a significant hard prune after flowering to prevent it from becoming structural.
The pool itself should be finished in white or near-white mosaic tile — the pool tile and the wall finish in the same near-white palette means the whole composition reads as white below, then cascading magenta above. Sandstone or travertine paving in a warm honey tone around the pool.
Bougainvillea near a pool means bougainvillea bracts in the pool. This is non-negotiable. If fallen bracts in the pool water is unacceptable, choose a different planting scheme. If it is acceptable — and the sight of magenta bracts drifting on turquoise water is genuinely beautiful — plant the bougainvillea and watch this become the most photographed corner of your property.
Why the Best Pool Gardens Look Like They Were Always There
They made a commitment before anything was planted. A commitment to a material, a tone, a level of formality, a planting character.
Every idea in this collection made one strong decision and built everything else around it. The tropical gardens committed to scale and leaf drama. The formal gardens committed to clipped structure. The native gardens committed to texture and restraint. The romantic gardens committed to abundance and colour.
None of them committed to everything. That is the discipline that is hardest to maintain.
A pool is a significant investment in the capacity for pleasure. The landscape around it is the investment in the experience of that pleasure. You don’t just want a pool that functions. You want a space that makes you feel something when you walk out to it in the morning, when you sit beside it at the end of the day, when you see it from inside the house on a dark evening lit from below.
That feeling doesn’t come from the water. The water is the same in every pool. It comes from everything around it.
Get that right. The rest takes care of itself.